|

And type the desired value in it. You can continue with the
cells on the left and right to complete a record:

Before selecting a record, you must display the table in Datasheet
View:
- To select a record, click the desired row header
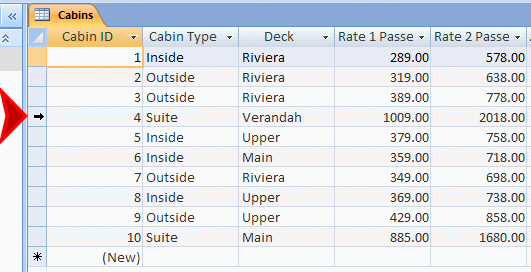

- To select more than one record, click and hold your mouse
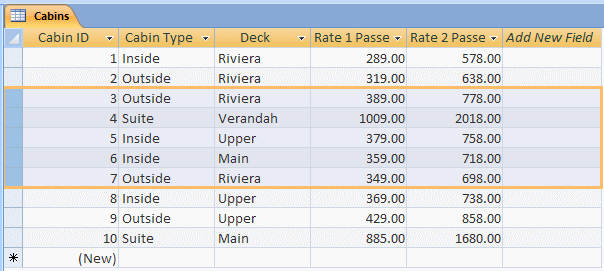
on one of them, then drag to cover the other desired row or rows. When all desired rows
are highlighted, release the mouse. Another technique used to select more than one row
consists of clicking one row that will be at one end, pressing and holding Shift, and then
clicking the row that will be at the other end
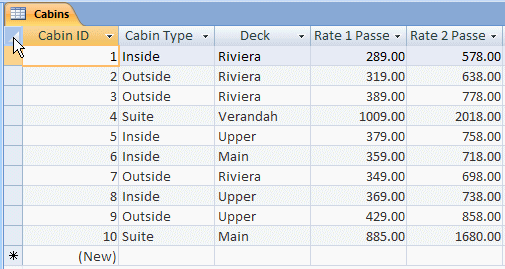
- To select all records of a table, you can press Ctrl +
A or you can click the button at the intersection of the column headers
and the row headers

|
If a record is not needed anymore or has become irrelevant in
a table, you can delete it. To do this:
- You can click a row header and press Delete
- You can right-click a row header and click Delete Record

You would receive a warning message.
|
|
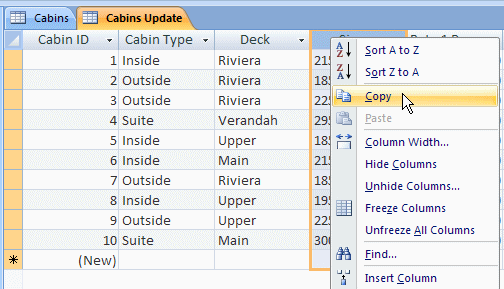
You copy records from one table and you paste them in another
table. To copy the values under a column, right-click its column header and
click Copy:
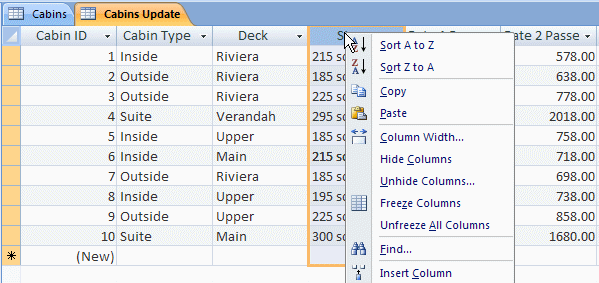
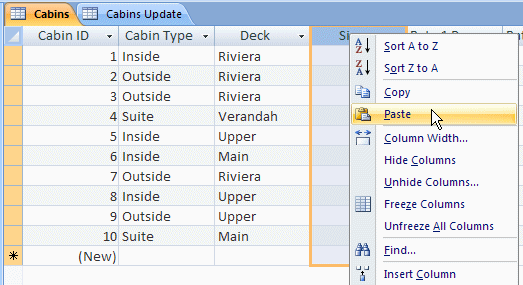
To paste, right-click the target column in the same table or
another table and click Paste:
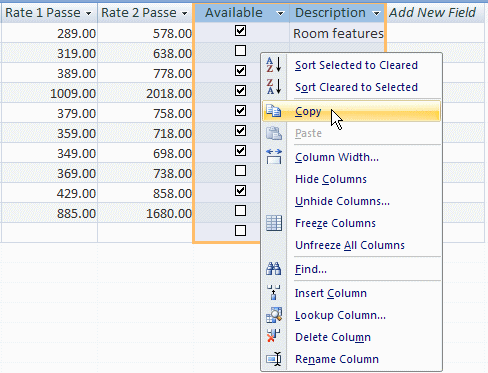
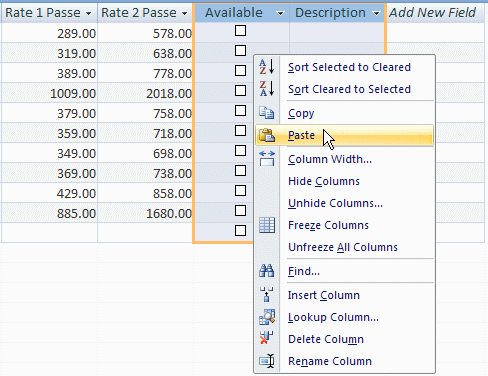
In the same way, you can copy the values of more than one
column and paste them where needed
Besides, or instead of, the table, you can create records on
a form, which is in fact more convenient. To create a record, open the form in
Form View. You can navigate to a new record or click the New Record button  .
Then click each box and add the desired value. .
Then click each box and add the desired value.
|
Finding and Replacing Data |
|
Editing a value consists of changing it. This can be done on
the table or the form (or on a query as we will learn in Lesson
20). To do
this, first locate the value in the field. If you are working on a table, you
can click the value and use the keys (left, right, Home, End, Backspace, or the
Space Bar) to edit the value. If you are working on a form, you can click the
label next to a field. This would completely select the corresponding value in
the control. You can then press F2 to position the caret in the control and edit
its value. Alternatively, you can click the control's field and edit the value.
|
 Practical Learning: Editing Data Practical Learning: Editing Data
|
|
- From the resources that accompany these lessons, open the Ceil Inn5
database
- In the Navigation Pane, double-click Customers: Table to open it
- In record number 2, click the empty box under Emergency Name
- Type Albert Lomey and press Enter
- Close the table
- In the Navigation Pane, under Customers: Table, double-click Customer to
open the form
- Click the Next Record button once
 to navigate to the second record
- Click the Emergency Name label and type 301-412-5055
- Close the form
|
Sometimes there will be some regular problems in your database. For example during data
entry, some information could be missing, mistyped, or entered in the wrong
field. These problems would be easy to locate on a small table or form. If the
database grows, values could become difficult to locate. Fortunately, Microsoft
Access provides many tools you can use to find values and take actions.
To assist you with finding a value in a table or a form, the
Home tab of the Ribbon is equipped with a section named Find:
|
 |

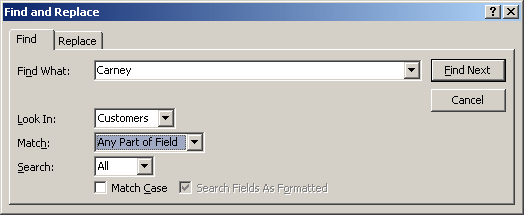
To start looking for a value, you can click the Find button  or you can press Ctrl + F. This would open the Find and Replace dialog box with
the Find tab selected:

The Find and Replace dialog box is modeless, meaning you can
access the table or form in the background while the dialog box is present.
To specify the value to look for, type it in the Find
What combo box. If you had previously used the dialog box, the Find What combo
box keeps track of the previous searches and stores them in the control. This
would allow you to perform a search on a value previously used.
The Look In
combo box allows you to select the column where the value should be located. By
default, when the Find and Replace dialog box displays, it selects the column or
field that had focus and puts its name in the Look In combo box. You can look
into that column but, if you want to search the whole table, select its name in
the Look In combo box.
The Match combo
box allows you to specify how close the match should be. The options are Any
Part of Field, Whole Field (the default), and Start of Field.
The Search combo
box allows you to specify the direction to follow. The options are Up, Down, and
All (the default).
After specifying the options, you can click Find Next. After
using the Find and Replace dialog box, to dismiss it, you can click Cancel or
press Esc.
|
 Practical Learning: Editing Data Practical Learning: Editing Data
|
|
- The Ceil Inn5 database should still be opened.
In the Navigation Pane, double-click Customers: Table to open it
- In the Find section of the Ribbon, click the Find button

- In the Find What combo box, type Carney
- In the Look In combo box, select Customers
- In the Match combo box, select Any Part of Field
- Click Find Next
- Click Find Next again. Notice that a second result is found
- In the second result, while the Find and Replace dialog box is still
opened, on the table, click the found Carney and press Tab three times to
get to its Emergency Phone
- Press F2 to position the caret in the cell and edit it to display
990-326-5144
- In the Find and Replace dialog box, replace Carney with Beckins
- Click Find Next.
Notice that the Phone # of that record is incomplete
- Click the right side of the incomplete telephone number and type 1440 to
make it 410-944-1440
- Click the Find and Replace dialog box
We have seen that you can use the Find and Replace dialog
box to simply locate a value. Instead of just finding it, you may want to
replace the found value with an alternate. To assist you with this, you can use
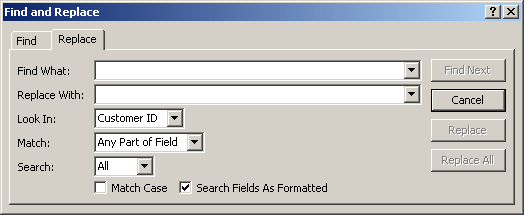
the Replace section of the dialog box. To get it, in the Find section of the
Ribbon, you can click the Replace button  or you can press Ctrl + H. This would open the Find and Replace dialog box with
the Replace tab selected:
You can also open the Find and Replace dialog box as we did
for finding, then click the Replace tab.
The Replace section of the dialog box provides the same
options at the Find counterpart with the addition of the Replace With combo box,
the Replace and the Replace All buttons. After specifying what to look for in
the Find What combo box, the Replace With combo box allows you to specify the
value to replace the Find What with.
|
 Practical Learning: Editing Data Practical Learning: Editing Data
|
|
- The Ceil Inn5 database should still be opened.
In the Navigation Pane, double-click Customers: Table to open it
- In the Find section of the Ribbon, click the Replace button

- In the Find What combo box, type ratner
- In the Replace With combo box, type Rattner
- In the Look In combo box, select Customers
- In the Match combo box, select Any Part of Field
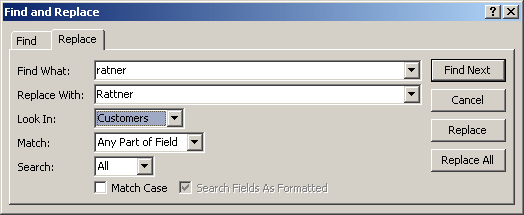
- Click Find Next
- Once the value is found, click Replace
- Close the Find and Replace dialog box and close the table
- In the Navigation Pane, under Customers: Table, double-click the Customers
form
- Press Ctrl + H to display the Replace dialog box
- In the Find What combo box, replace the string with Annie and press
Tab
- In the Replace With combo box, type Annette
- Make sure the Look In combo box displays Customers and make sure the Match
combo box is set to Any Part of Field.
Click Find Next
- Once a match is found, click Replace All
- Click the right side of the incomplete telephone number and type 1440 to
make it 410-944-1440
- Close the Find and Replace dialog box and close the form
|
Introduction to Record Printing |
|
The primary function of the table is to provide a
means of storing and arranging information of a database. Nevertheless, you can print data of a table, especially if
for example you are in a hurry and do not have access to another object. You can print data on a table whether the table is opened or not.
To print a closed table, locate it in the Navigation
Pane and click it to select it, then click the Office Button, position the
mouse on Print and select one of the three options. In the same way, if
the table is opened in Datasheet View, click its tab to give it focus,
then click the Office Button -> Print and select to print or to
preview.
The Print menu of the Office Button presents three
options:
- If you click Print, the Print dialog box would be presented to you. It
allows you to specify the printer you want to use. Most of the time, the
Name combo box will present the default printer; otherwise, you can select
one:

After specifying the printer, if you are ready to print, you can click OK.
To customize the printing job, you can click Properties. A dialog box, whose
contents depend on the selected printer, would come up. Among the various
options you would have is that of specifying the orientation of the paper
(Portrait or Landscape). Again, remember that different printers provide
different features. Here is an example of the Properties of a printer that
would allow you to print on both sides of the paper:
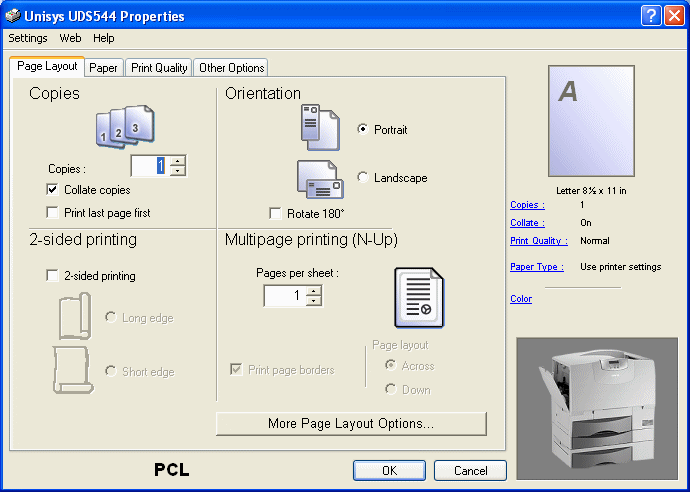
After setting the properties of the printer, you can click OK. Once you are
ready to print, you can click OK on the Print dialog box to send the job to
the printer
- If you select Quick Print from the Print menu of the Office Button, the
print job would be sent directly to the printer. Microsoft Access would use
the default printer that is set in Control Panel and would use the previous
settings that were set on that default printer
- If you select Print Preview, Microsoft Access would draw a print job on
the screen for you. This allows you to see what the final job would look
like on the paper. The characters on the screen may appear too small for
you. To zoom in, you can click the middle of the window. To zoom out, you
can click it again. Once you are ready to print, on the ribbon and in the
Print section, you can click Print. This would send the print job to the
printer
|
 Practical Learning: Printing Tables Practical Learning: Printing Tables
|
|
- In the Navigation Pane, click Customers: Table to select the table
- To print data from the table, click the Office button, position the
mouse on Print and click Quick Print
- From the Navigation Pane, double-click the Company Assets table to open
it
- Click the Office Button, position the mouse on Print and click Print
- Select the desired printer Name combo box and click Properties
- Based on your printer, select the Landscape radio button (usually in the Orientation section of a Paper
Layout tab) and click OK
- On the Print dialog box, click OK
- Close the table
Although not part of their primary role, forms provide a quick means
of printing data, especially in the absence of desired reports. There are various issues
related to printing forms, including printing all records or just some of them.
You can print a form without opening it. Once you know the form you
would like to print, locate its name in the Navigation Pane and use the
same steps reviewed for a table.
When a form is opened, you have the option of printing all of its
records or the selected one. In the Form View, to print just one record, navigate to the record you would like to print, click
the Form Selection bar to select the record and proceed to print.
|
 Practical Learning: Printing Forms Practical Learning: Printing Forms
|
|
- From the Navigation Pane, under Customers: Table, double-click the Customers form to open it
- Click the Office Button, position the mouse on Print and click Quick
Print
- To navigate to the 3rd customer, click the Next Record button
 twice
twice
- Click
the Office Button -> Print -> Print
- On the Print dialog box, click the Selected Record(s) radio button
- Click OK
- Verify that only the displaying customer's record was printed
- Close the Customers form
- Open the Cruise2 database you were working on earlier
- In the Navigation Pane, under the Cabins: Table, double-click Cabins
- We will print records from 3 to 7.
Click the Next Record button  twice navigate to record number 3
- Click the Record Selector bar
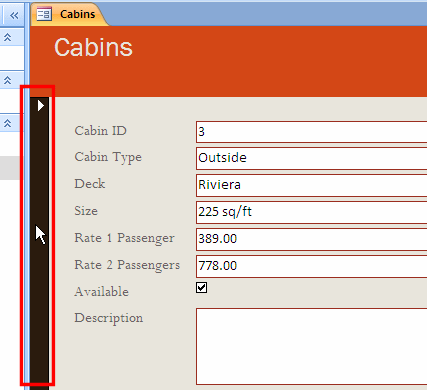
- Press and hold Shift. Click the Next Record button
 four times to display the seventh record where the Cabin ID field would
display 7 (even though the record # still displays 3)
- Release Shift
- On the ribbon, click the Office Button -> Print -> Print
- On the Print dialog box, click the Selected Record(s) radio button and click OK
- Verify that records from 3 to 7 have been printed
- Close the Cabins form
A report provides an object used to print a database's records. Although you can print
tables or forms, reports are customized to be printer friendly. They can perform and display calculations. Once again, Microsoft Access provides wizards to quickly create reports.
Microsoft Access can help you quickly create a report using one of the pre-designed layouts. This is done using the Report Wizard. The Report Wizard is available from the Reports
section of the Create category of the ribbon.
|
 Practical Learning: Using the Report Wizard Practical Learning: Using the Report Wizard
|
|
- On the ribbon, click Create
- In the Reports section, click Report Wizard.
If you receive a Microsoft Office Access Security Notice, read it and
click Open
- On the first page of the wizard, click the arrow of the Tables/Queries combo box and select Table:
Cabins
- Click the Select All Fields button

- Click Next
- Accept anything in the second page and click Next
- Accept anything in the third page and click Next
- In the Layout section, click the Columnar radio button:
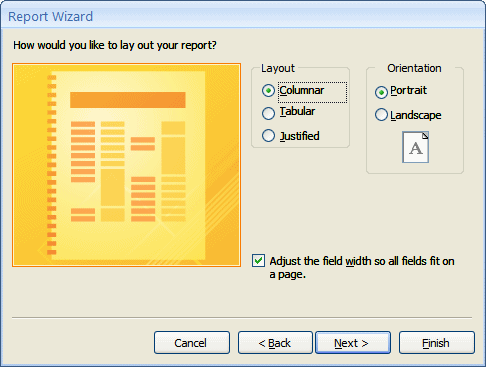
- Click Next
- Select the Office style and click Next
- Accept the suggested Title of the report as Cabins and press Enter
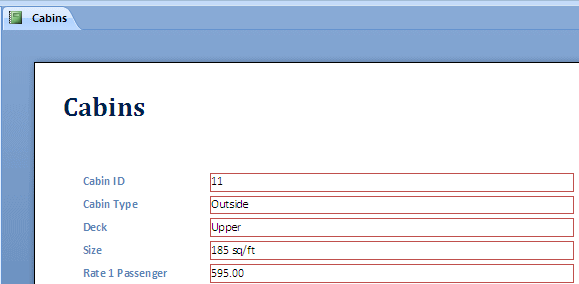
The report is the favorite object used to print
data. As done with the other objects, you can print a report whether it is opened or not.
Before printing a report, you must first select or open it. If you want to print a report
without opening it, in the Navigation Pane, locate the desired report and
click it to select it. Then, proceed from the Office Button as we reviewed
for the table and the form. In the same way, you can first open the report
from the Navigation Pane and use the Print menu from the Office Button the
same way we described for the other objects.
|
|

