
File-Based Databases
 |
File-Based Databases |
In Lesson 1, to get a list of items, we created and stored it in a variable-based list. The user had no way of storing items in the computer. This meant that once the computer was shut down or the application was closed, the information created while using the application was lost. In list-oriented business applications, to make sure that the same information is not entered over and over again, any new information can be saved and stored somewhere. Such a type of file-based application can be used to create new items, save them, and process them the next time they are needed. This is the basis of databases. A database is a information created as a list and stored somewhere so the list can be better managed. This means that the person using the database should be able to add information to the database, to retrieve information from the database, to change the information stored in the database, to manipulate it, to manage the database as an ensemble, and to save new or changed information.
There are various types of databases used with different goals. The .NET Framework provides various means of creating and managing such various types of databases. Those we will review are categorized as follows:
As mentioned above, a file-based database consists of creating one or more files that can be used as a database. To do this, you can create an array of a list of objects as we learned in Lesson 1. The problem with arrays is that they have a fixed size and you must know from the beginning the number of items that can created in the list. The alternative is to use a linked-list. As seen in Lesson 1, this is easily supported through the ArrayList class.
A file-based database is primarily a technique of storing values in files so they can be retrieved when needed. Based on this, the files are created like any other and they can have any extension of your choice. When a file is created, its contents can be stored in a portable medium such as a hard disc, a floppy disc, a compact disc, or any valid and supported type of storage. File processing is support in the .NET Framework through the System::IO namespace that contains many different classes to handle almost any type of file operation you may need to perform.
When creating a file-base application, you should know where the files are located, even if you don't explicitly communicate this to the user. This means that you may need to create a folder that would hold the files of your database. In some cases you can create a new folder on the C: drive, under the the Program Files folder or in the My Documents folder. In some other cases, you may use a network shared folder as the repository of users files. These are decisions you can make when planning the deployment. Once the application has been installed, you can allow the user to directly save the files to default or selected folder without being prompted to specify the name or path of the file.
Before saving a file, you may first want to check its existence. This can be done by calling the File::Exists() method. Once you have decided to save a file, you can specify the type of operation using the FileMode option of the Stream-based class you are using. The options of the FileMode are FileMode::Append, FileMode::Create, FileMode::CreateNew, FileMode::Open, FileMode::OpenOrCreate, and FileMode::Truncate. The FileAccess option allows you to specify the type of access the user will need when saving the file. The options are FileAccess::Write, FileAccess::Read, and FileAccess::ReadWrite. The FileShare allows you to decide whether or how other users (actually, processes) can access the file while it is being accessed. The options of the FileShare are FileShare::Inheritable, FileShare::None, FileShare::Read, FileShare::Write, and FileShare::ReadWrite.
In traditional file processing supported by most compiled languages such as C++, you learn to create values from primitive types (int, double, char, etc) and save them to a medium. If you create your own class in C++ and want to save information from its variable, you would have to save one member variable at a time. This is not the easiest job to perform in C++. Fortunately, many libraries such as MFC, VCL, and the .NET Framework provide built-in classes you can use to save a variable of your class as if the variable had been created from a primitive data type. Object serialization consists of saving the state of any object as a whole. Serialization makes it possible to easily create a file-based database since you are able to save and restore the object the same way you would use file processing of primitive types in C++. The .NET Framework provides all means of serializing any managed class through a concept referred to as binary serialization. To proceed with object serialization, you must first specify the object you would use. As with any other program, you can either use one of the classes built-in the .NET Framework or you can use your own programmer-created class. If you decide to use your own class, you can specify whether the whole class or just some parts of the class can be saved. Binary serialization consists of saving an object. This object is usually a class that either you create or is provided through the .NET Framework. For a class to be serializable, it must be marked with the Serializable attribute. This means that, when checking the MSDN documentation, any class you see with this attribute is already configured to be serialized. This is the case for almost all list-oriented classes such as Array, ArrayList, etc, including many of the classes we will use when we start studying ADO .NET and relational databases. If you create your own class and want to be able to save values from its variables, you can (must) mark the class with the Serializable attribute. To do this, type [Serializable] before starting to create the class. Here is an example: #pragma once
using namespace System;
[Serializable]
public __gc class CEmployee
{
public:
String *FirstName;
String *LastName;
DateTime DateHired;
Double Salary;
CEmployee()
{
this->FirstName = S"";
this->LastName = S"";
this->DateHired = DateTime::Now;
this->Salary = 0.00;
}
CEmployee(String *fn, String *ln, DateTime dte, Double sal)
{
this->FirstName = fn;
this->LastName = ln;
this->DateHired = dte;
this->Salary = sal;
}
};
The Serializable attribute informs the compiler that values from the class can be serialized. When creating a serializable class, you have the ability to specify whether all of the member variables of the class can be serialized or just some of them. |
|
|
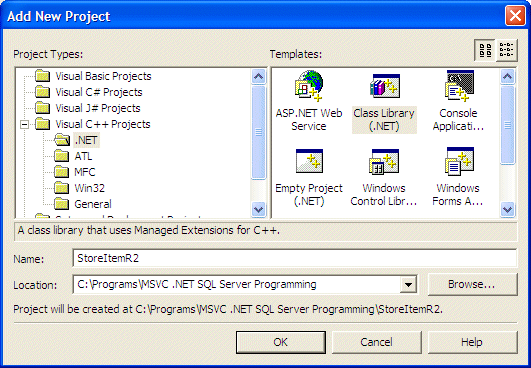
// StoreItemR2.h


#pragma once


using namespace System;


namespace StoreItemR2

{

	[Serializable]

	public __gc class CStoreItem

	{

	private:

		String *nbr;

		String *nm;

		String *sz;

		double  uprice;


	public:

		CStoreItem(void)

		{

			nbr = S"";

			nm  = S"";

			sz  = S"";

			uprice = 0.00;

		}


		CStoreItem(String *number, String *name, String *size, double price)

		{

			nbr    = number;

			nm     = name;

			sz     = size;

			uprice = price;

		}


		__property String *get_ItemNumber()

		{

			return nbr;

		}


		__property void set_ItemNumber(String *no)

		{

			nbr = no;

		}


		__property String *get_ItemName()

		{

			return nm;

		}


		__property void set_ItemName(String *desc)

		{

			nm = desc;

		}

		__property String *get_Size()

		{

			return sz;

		}


		__property void set_Size(String *s)

		{

			sz = s;

		}


		__property double get_UnitPrice()

		{

			return uprice;

		}


		__property void set_UnitPrice(double price)

		{

			uprice = price;

		}

	};

}
|
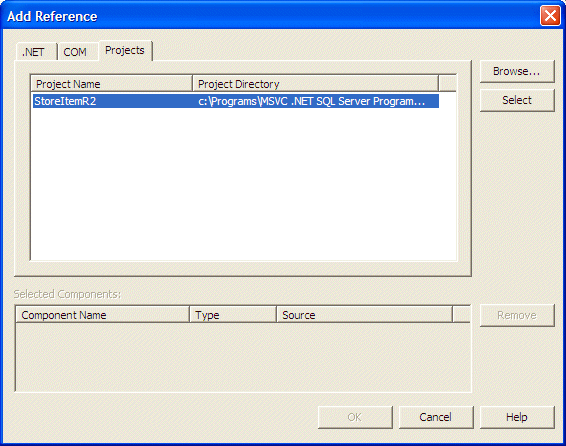
System::Void NewStoreItem_Load(System::Object *  sender, System::EventArgs *  e)

{

	lstStoreItems = new ArrayList;


	 DateTime tmeNow = DateTime::Now;


	 // Get ready to create a random item number

	 int mls = tmeNow.Millisecond;

	// Generate two random numbers between 100 and 999

 	Random *rndNumber = new Random(mls);

 	int NewNumber1 = rndNumber->Next(100, 999);

 	int NewNumber2 = rndNumber->Next(100, 999);

 	// Create an item number from the random numbers

 	String *strItemNumber = String::Concat(NewNumber1.ToString(), "-", NewNumber2.ToString());


	 // Display the created item number in the Item # text box

	 this->txtItemNumber->Text = strItemNumber;

}
|
#pragma once


. . . No Change


namespace DepartmentStore3b

{

	. . . No Change


	private:

		/// <summary>

		/// Required designer variable.

		/// </summary>

		System::ComponentModel::Container* components;

		ArrayList *lstAvailableItems;


		/// <summary>

		/// Required method for Designer support - do not modify

		/// the contents of this method with the code editor.

		/// </summary>

		void InitializeComponent(void)

		{

			. . . No Change


		}


		. . . No Change


private: System::Void CustomerOrder_Load(System::Object *  sender, System::EventArgs *  e)

		 {

			 lstAvailableItems = new ArrayList;

		 }


};
|
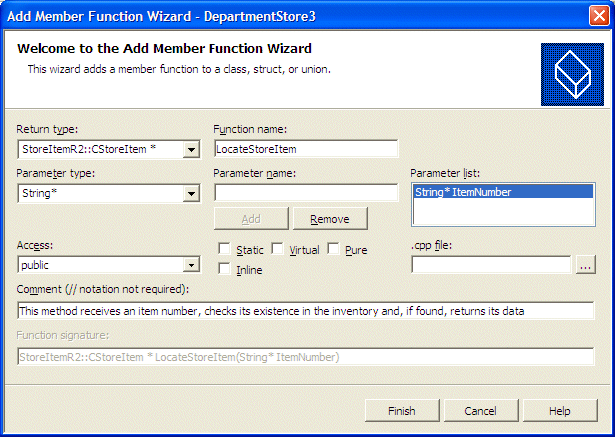
StoreItemR2::CStoreItem * LocateStoreItem(String* ItemNumber)

{

	StoreItemR2::CStoreItem *item = new StoreItemR2::CStoreItem;


	// Get a list of all items in the store

	for(int i = 0; i < this->lstAvailableItems->Count; i++)

	{

		// Get a reference to the current item

		item = dynamic_cast<StoreItemR2::CStoreItem *>(this->lstAvailableItems->Item[i]);


		// If the Item Number of the current item matches the argument,

		// then return it

		if( item->ItemNumber->Equals(ItemNumber) )

			return item;

	}


	// If the item was not found, then return nothing;

	return NULL;

}
|
void CalculateTotalOrder(void)

{

	 double subTotal1, subTotal2, subTotal3,

                             subTotal4, subTotal5, subTotal6,

                             subTotal7, subTotal8;

	double orderTotal;


	// Retrieve the value of each sub total

	subTotal1 = this->txtSubTotal1->Text->ToDouble(0);

	subTotal2 = this->txtSubTotal2->Text->ToDouble(0);

	subTotal3 = this->txtSubTotal3->Text->ToDouble(0);

	subTotal4 = this->txtSubTotal4->Text->ToDouble(0);

	subTotal5 = this->txtSubTotal5->Text->ToDouble(0);

	subTotal6 = this->txtSubTotal6->Text->ToDouble(0);

	subTotal7 = this->txtSubTotal7->Text->ToDouble(0);

	subTotal8 = this->txtSubTotal8->Text->ToDouble(0);


	// Calculate the total value of the sub totals

	orderTotal = subTotal1 + subTotal2 + subTotal3 +

		    subTotal4 + subTotal5 + subTotal6 +

		    subTotal7 + subTotal8;


	// Display the total order in the appropriate text box

	this->txtTotalOrder->Text = orderTotal.ToString(S"F");

}
|
System::Void txtItemNumber1_Leave(System::Object *  sender, System::EventArgs *  e)

{

	 String *strItemNumber = this->txtItemNumber1->Text;

	 StoreItemR2::CStoreItem *item = this->LocateStoreItem(strItemNumber);


	 if( item != 0 )

	 {

		 this->txtDescription1->Text = item->ItemName;

		 this->txtSize1->Text        = item->Size;

		 this->txtUnitPrice1->Text   = item->UnitPrice.ToString(S"F");

		 this->txtQuantity1->Text    = S"1";

		 this->txtSubTotal1->Text    = item->UnitPrice.ToString(S"F");


		 CalculateTotalOrder();

	 }

	 else

	 {

		 this->txtItemNumber1->Text  = S"";

		 this->txtDescription1->Text = S"";

		 this->txtSize1->Text        = S"";

		 this->txtUnitPrice1->Text   = S"0.00";

		 this->txtQuantity1->Text    = S"0";

		 this->txtSubTotal1->Text    = S"0.00";

	 }

}


System::Void txtItemNumber2_Leave(System::Object *  sender, System::EventArgs *  e)

{

	 String *strItemNumber = this->txtItemNumber2->Text;

	 StoreItemR2::CStoreItem *item = this->LocateStoreItem(strItemNumber);


	 if( item != 0 )

	 {

		 this->txtDescription2->Text = item->ItemName;

		 this->txtSize2->Text        = item->Size;

		 this->txtUnitPrice2->Text   = item->UnitPrice.ToString(S"F");

		 this->txtQuantity2->Text    = S"1";

		 this->txtSubTotal2->Text    = item->UnitPrice.ToString(S"F");


		 CalculateTotalOrder();

	 }

	 else

	 {

		 this->txtItemNumber2->Text  = S"";

		 this->txtDescription2->Text = S"";

		 this->txtSize2->Text        =S"";

		 this->txtUnitPrice2->Text   = S"0.00";

		 this->txtQuantity2->Text    = S"0";

		 this->txtSubTotal2->Text    = S"0.00";

	 }

}


System::Void txtItemNumber3_Leave(System::Object *  sender, System::EventArgs *  e)

{

	 String *strItemNumber = this->txtItemNumber3->Text;

	 StoreItemR2::CStoreItem *item = this->LocateStoreItem(strItemNumber);


	 if( item != 0 )

	 {

		 this->txtDescription3->Text = item->ItemName;

		 this->txtSize3->Text        = item->Size;

		 this->txtUnitPrice3->Text   = item->UnitPrice.ToString(S"F");

		 this->txtQuantity3->Text    = S"1";

		 this->txtSubTotal3->Text    = item->UnitPrice.ToString(S"F");


		 CalculateTotalOrder();

	 }

	 else

	 {

		 this->txtItemNumber3->Text  = S"";

		 this->txtDescription3->Text = S"";

		 this->txtSize3->Text        = S"";

		 this->txtUnitPrice3->Text   = S"0.00";

		 this->txtQuantity3->Text    = S"0";

		 this->txtSubTotal3->Text    = S"0.00";

	 }

}


System::Void txtItemNumber4_Leave(System::Object *  sender, System::EventArgs *  e)

{

	 String *strItemNumber = this->txtItemNumber4->Text;

	 StoreItemR2::CStoreItem *item = this->LocateStoreItem(strItemNumber);


	 if( item != 0 )

	 {

		 this->txtDescription4->Text = item->ItemName;

		 this->txtSize4->Text        = item->Size;

		 this->txtUnitPrice4->Text   = item->UnitPrice.ToString(S"F");

		 this->txtQuantity4->Text    = S"1";

		 this->txtSubTotal4->Text    = item->UnitPrice.ToString(S"F");


		 CalculateTotalOrder();

	 }

	 else

	 {

		 this->txtItemNumber4->Text  = S"";

		 this->txtDescription4->Text = S"";

		 this->txtSize4->Text        = S"";

		 this->txtUnitPrice4->Text   = S"0.00";

		 this->txtQuantity4->Text    = S"0";

		 this->txtSubTotal4->Text    = S"0.00";

	 }

}


System::Void txtItemNumber5_Leave(System::Object *  sender, System::EventArgs *  e)

{

	 String *strItemNumber = this->txtItemNumber5->Text;

	 StoreItemR2::CStoreItem *item = this->LocateStoreItem(strItemNumber);


	 if( item != 0 )

	 {

		 this->txtDescription5->Text = item->ItemName;

		 this->txtSize5->Text        = item->Size;

		 this->txtUnitPrice5->Text   = item->UnitPrice.ToString(S"F");

		 this->txtQuantity5->Text    = S"1";

		 this->txtSubTotal5->Text    = item->UnitPrice.ToString(S"F");


		 CalculateTotalOrder();

	 }

	 else

	 {

		 this->txtItemNumber5->Text  = S"";

		 this->txtDescription5->Text = S"";

		 this->txtSize1->Text        = S"";

		 this->txtUnitPrice5->Text   = S"0.00";

		 this->txtQuantity5->Text    = S"0";

		 this->txtSubTotal5->Text    = S"0.00";

	 }

}


System::Void txtItemNumber6_Leave(System::Object *  sender, System::EventArgs *  e)

{

	 String *strItemNumber = this->txtItemNumber6->Text;

	 StoreItemR2::CStoreItem *item = this->LocateStoreItem(strItemNumber);


	 if( item != 0 )

	 {

		 this->txtDescription6->Text = item->ItemName;

		 this->txtSize6->Text        = item->Size;

		 this->txtUnitPrice6->Text   = item->UnitPrice.ToString(S"F");

		 this->txtQuantity6->Text    = S"1";

		 this->txtSubTotal6->Text    = item->UnitPrice.ToString(S"F");


		 CalculateTotalOrder();

	 }

	 else

	 {

		 this->txtItemNumber6->Text  = S"";

		 this->txtDescription6->Text = S"";

		 this->txtSize6->Text        = S"";

		 this->txtUnitPrice6->Text   = S"0.00";

		 this->txtQuantity6->Text    = S"0";

		 this->txtSubTotal6->Text    = S"0.00";

	 }

}


System::Void txtItemNumber7_Leave(System::Object *  sender, System::EventArgs *  e)

{

	 String *strItemNumber = this->txtItemNumber7->Text;

	 StoreItemR2::CStoreItem *item = this->LocateStoreItem(strItemNumber);


	 if( item != 0 )

	 {

		 this->txtDescription7->Text = item->ItemName;

		 this->txtSize7->Text        = item->Size;

		 this->txtUnitPrice7->Text   = item->UnitPrice.ToString(S"F");

		 this->txtQuantity7->Text    = S"1";

		 this->txtSubTotal7->Text    = item->UnitPrice.ToString(S"F");


		 CalculateTotalOrder();

	 }

	 else

	 {

		 this->txtItemNumber7->Text  = S"";

		 this->txtDescription7->Text = S"";

		 this->txtSize7->Text        = S"";

		 this->txtUnitPrice7->Text   = S"0.00";

		 this->txtQuantity7->Text    = S"0";

		 this->txtSubTotal7->Text    = S"0.00";

	 }

}


System::Void txtItemNumber8_Leave(System::Object *  sender, System::EventArgs *  e)

{

	 String *strItemNumber = this->txtItemNumber8->Text;

	 StoreItemR2::CStoreItem *item = this->LocateStoreItem(strItemNumber);


	 if( item != 0 )

	 {

		 this->txtDescription8->Text = item->ItemName;

		 this->txtSize8->Text        = item->Size;

		 this->txtUnitPrice8->Text   = item->UnitPrice.ToString(S"F");

		 this->txtQuantity8->Text    = S"1";

		 this->txtSubTotal8->Text    = item->UnitPrice.ToString(S"F");


		 CalculateTotalOrder();

	 }

	 else

	 {

		 this->txtItemNumber8->Text  = S"";

		 this->txtDescription8->Text = S"";

		 this->txtSize8->Text        = S"";

		 this->txtUnitPrice8->Text   = S"0.00";

		 this->txtQuantity8->Text    = S"0";

		 this->txtSubTotal8->Text    = S"0.00";

	 }

}
|
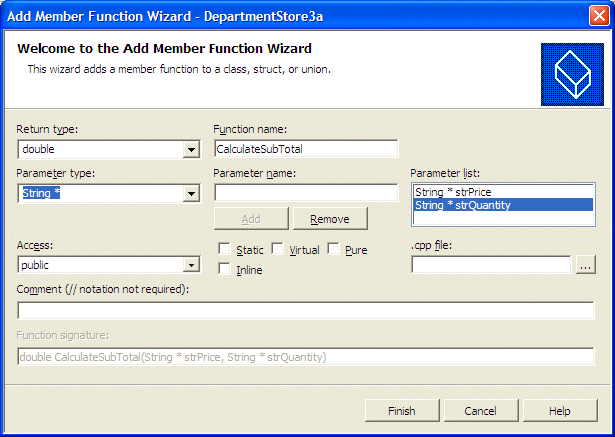
double CalculateSubTotal(String * strPrice, String * strQuantity)

{

	int qty;

	double unitPrice, subTotal;


	try {

		// Get the quantity of the current item

		qty = strQuantity->ToInt16(0);

	}

	catch(FormatException *)

	{

		MessageBox::Show(S"The value you provided for the quantity of the item is invalid"

				         S"\nPlease try again");

	}


	try {

		// Get the unit price of the current item

		unitPrice = strPrice->ToDouble(0);

	}

	catch(FormatException *)

	{

		MessageBox::Show(S"The unit price you provided for item is invalid"

				         S"\nPlease try again");

	}

	// Calculate the current sub total

	subTotal = qty * unitPrice;


	return subTotal;

}
|
System::Void txtQuantity1_Leave(System::Object *  sender, System::EventArgs *  e)

{

	 String *strUnitPrice = this->txtUnitPrice1->Text;

	 String *strQty = this->txtQuantity1->Text;

	 double subTotal = this->CalculateSubTotal(strUnitPrice, strQty);


	// Display the new sub total in the corresponding text box

	this->txtSubTotal1->Text = subTotal.ToString(S"F");

	// Update the order

	CalculateTotalOrder();

}


System::Void txtQuantity2_Leave(System::Object *  sender, System::EventArgs *  e)

{

	 String *strUnitPrice = this->txtUnitPrice2->Text;

	 String *strQty = this->txtQuantity2->Text;

	 double subTotal = this->CalculateSubTotal(strUnitPrice, strQty);


	this->txtSubTotal2->Text = subTotal.ToString(S"F");

	CalculateTotalOrder();

}


System::Void txtQuantity3_Leave(System::Object *  sender, System::EventArgs *  e)

{

	 String *strUnitPrice = this->txtUnitPrice3->Text;

	 String *strQty = this->txtQuantity3->Text;

	 double subTotal = this->CalculateSubTotal(strUnitPrice, strQty);


	this->txtSubTotal3->Text = subTotal.ToString(S"F");

	CalculateTotalOrder();

}


System::Void txtQuantity4_Leave(System::Object *  sender, System::EventArgs *  e)

{

	 String *strUnitPrice = this->txtUnitPrice4->Text;

	 String *strQty = this->txtQuantity4->Text;

	 double subTotal = this->CalculateSubTotal(strUnitPrice, strQty);


	this->txtSubTotal4->Text = subTotal.ToString(S"F");

	CalculateTotalOrder();

}


System::Void txtQuantity5_Leave(System::Object *  sender, System::EventArgs *  e)

{

	 String *strUnitPrice = this->txtUnitPrice5->Text;

	 String *strQty = this->txtQuantity5->Text;

	 double subTotal = this->CalculateSubTotal(strUnitPrice, strQty);


	this->txtSubTotal5->Text = subTotal.ToString(S"F");

	CalculateTotalOrder();

}


System::Void txtQuantity6_Leave(System::Object *  sender, System::EventArgs *  e)

{

	 String *strUnitPrice = this->txtUnitPrice6->Text;

	 String *strQty = this->txtQuantity6->Text;

	 double subTotal = this->CalculateSubTotal(strUnitPrice, strQty);


	this->txtSubTotal6->Text = subTotal.ToString(S"F");

	CalculateTotalOrder();

}


System::Void txtQuantity7_Leave(System::Object *  sender, System::EventArgs *  e)

{

	 String *strUnitPrice = this->txtUnitPrice7->Text;

	 String *strQty = this->txtQuantity7->Text;

	 double subTotal = this->CalculateSubTotal(strUnitPrice, strQty);


	this->txtSubTotal7->Text = subTotal.ToString(S"F");

	CalculateTotalOrder();

}


System::Void txtQuantity8_Leave(System::Object *  sender, System::EventArgs *  e)

{

	 String *strUnitPrice = this->txtUnitPrice8->Text;

	 String *strQty = this->txtQuantity8->Text;

	 double subTotal = this->CalculateSubTotal(strUnitPrice, strQty);


	this->txtSubTotal8->Text = subTotal.ToString(S"F");

	CalculateTotalOrder();

}
|
|
The Process of Serializing |
|
To support serialization of an object, the .NET Framework provides the BinaryFormatter class from the System::Runtime::Serialization::Formatters::Binary namespace. This class is derived from Object but implements the IRemotingFormatter and the IFormatter interfaces. One of the methods of this class is called Serialize. This method is overloaded with two versions. The syntax of the first version is: public: virtual void Serialize(Stream* serializationStream, Object* graph); The first argument of this method is a stream object that will carry the details of the streaming process. It must be a class derived from Stream. The second argument is a variable that carries the value(s) to be saved. It can be an instance of a class you created or a variable declared from a .NET Framework serializable class. |
|
|
System::Void NewStoreItem_Deactivate(System::Object *  sender, System::EventArgs *  e)

{

	 String *strFilename = S"StoreItems.sti";

	 FileStream *fStream = new FileStream(strFilename, FileMode::Create);

	 BinaryFormatter *binFormat = new BinaryFormatter;


	 try {

		 binFormat->Serialize(fStream, this->lstStoreItems);

	 }

	 catch(ArgumentNullException *)

	 {

		 MessageBox::Show(S"The inventory could not be accessed");

	 }

	 catch(SerializationException *)

	 {

		 MessageBox::Show(S"The inventory could not be saved");

	 }

	 __finally {

		 fStream->Close();

	 }

}
|
|
Object Deserialization |
|
The opposite of serialization is deserialization. Deserialization is the process of retrieving an object that was serialized. When this is done, an exact copy of the object that was saved is created and restored as the origin. To support deserialization, the BinaryFormatter class provides the Deserialize() method, which is overloaded in two versions. The syntax of the first version: public: virtual Object* Deserialize(Stream* serializationStream); This method as argument the object that holds the file and the details on how the file will be opened.
|
|
|
#pragma once


using namespace System;

using namespace System::ComponentModel;

using namespace System::Collections;

using namespace System::Windows::Forms;

using namespace System::Data;

using namespace System::Drawing;

using namespace System::IO;

using namespace System::Runtime::Serialization;

using namespace System::Runtime::Serialization::Formatters::Binary;


namespace DepartmentStore3

{

	. . . No Change


	private:

		/// <summary>

		/// Required designer variable.

		/// </summary>

		System::ComponentModel::Container* components;

		ArrayList *lstStoreItems;


		/// <summary>

		/// Required method for Designer support - do not modify

		/// the contents of this method with the code editor.

		/// </summary>

		void InitializeComponent(void)

		{

			. . . No Change


		}

System::Void NewStoreItem_Activated(System::Object *  sender, System::EventArgs *  e)

{

	 // This file holds the items sold in the store

	 String *strFilename = S"StoreItems.sti";

	 FileStream *fStream;


	 if( File::Exists(strFilename) )

	 {

		 try {

			 // Create a stream of store items

			 fStream = new FileStream(strFilename, FileMode::Open);


			 BinaryFormatter *binFormat = new BinaryFormatter;

			 lstStoreItems = dynamic_cast<ArrayList *>(binFormat->Deserialize(fStream));

		 }

		 catch(ArgumentNullException *)

		 {

			 MessageBox::Show(S"The inventory could not be accessed");

		 }

		 catch(SerializationException *)

		 {

			 MessageBox::Show(S"The application failed to retrieve the inventory");

		 }

		 __finally

		 {

			 fStream->Close();

		 }

	 }

	 else

		 return;

}

};

}
|
System::Void btnAddItem_Click(System::Object *  sender, System::EventArgs *  e)

{

	 StoreItemR2::CStoreItem *item = new StoreItemR2::CStoreItem;


	 // Make sure the record is complete before attempting to add it

	 if( this->txtItemNumber->Text->Equals(S"") )

		 return;

	 if( this->txtItemName->Text->Equals(S"") )

		 return;

	 if( this->txtUnitPrice->Text->Equals(S"") )

		 return;


	 // Now the record seems to be ready: build it

	 item->ItemNumber = this->txtItemNumber->Text;

	 item->ItemName   = this->txtItemName->Text;

	 item->Size       = this->txtSize->Text;

	 item->UnitPrice  = this->txtUnitPrice->Text->ToDouble(0);

	 // Add the record

	 this->lstStoreItems->Add(item);


	 DateTime tmeNow = DateTime::Now;


	 // Get ready to create a unique item number

	 bool FoundUniqueNumber = false;

	 String *strItemNumber = S"000000";


	 int mls = tmeNow.Millisecond;

	 // Generate two random numbers between 100 and 999

	Random *rndNumber = new Random(mls);

 	int NewNumber1 = rndNumber->Next(100, 999);

 	int NewNumber2 = rndNumber->Next(100, 999);

 	// Create an item number from the random numbers

 	strItemNumber = String::Concat(NewNumber1.ToString(), "-", NewNumber2.ToString());


	 // Reset the form for a new record

	 this->txtItemNumber->Text = strItemNumber;

	 this->txtItemName->Text = S"";

	 this->txtSize->Text = S"";

	 this->txtUnitPrice->Text = S"";

	 this->txtItemName->Focus();

}
|
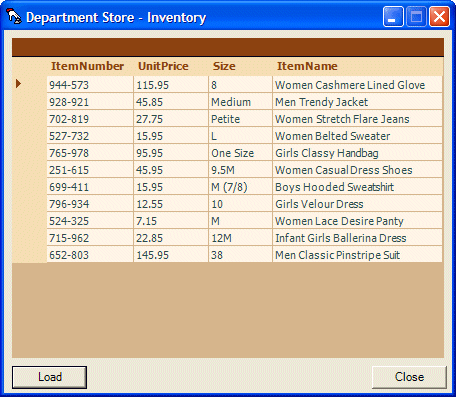
| Item Name | Size | Unit Price |
| Women Cashmere Lined Glove | 8 | 115.95 |
| Men Trendy Jacket | Medium | 45.85 |
| Women Stretch Flare Jeans | Petite | 27.75 |
| Women Belted Sweater | L | 15.95 |
| Girls Classy Handbag | One Size | 95.95 |
| Women Casual Dress Shoes | 9.5M | 45.95 |
| Boys Hooded Sweatshirt | M (7/8) | 15.95 |
| Girls Velour Dress | 10 | 12.55 |
| Women Lace Desire Panty | M | 7.15 |
| Infant Girls Ballerina Dress | 12M | 22.85 |
| Men Classic Pinstripe Suit | 38 | 145.95 |
using namespace System::IO; using namespace System::Runtime::Serialization; using namespace System::Runtime::Serialization::Formatters::Binary; |
System::Void btnLoad_Click(System::Object *  sender, System::EventArgs *  e)

{

	 ArrayList *lstItems= new ArrayList();

	 String *strFilename = S"StoreItems.sti";


	 if( File::Exists(strFilename) )

	 {

		 FileStream *fStream = new FileStream(strFilename, FileMode::Open);


		 try {

			 BinaryFormatter *binFormat = new BinaryFormatter;

			 lstItems = dynamic_cast<ArrayList *>(binFormat->Deserialize(fStream));


			 this->dataGrid1->DataSource = 0;

			 this->dataGrid1->DataSource = lstItems;

		 }

		 catch(ArgumentNullException *)

		 {

			 MessageBox::Show(S"The inventory could not be accessed");

		 }

		 catch(SerializationException *)

		{

			 MessageBox::Show(S"The application failed to retrieve the inventory");

		 }

		 __finally

		 {

			 fStream->Close();

		 }

	 }

}
|
#pragma once


using namespace System;

using namespace System::ComponentModel;

using namespace System::Collections;

using namespace System::Windows::Forms;

using namespace System::Data;

using namespace System::Drawing;

using namespace System::IO;

using namespace System::Runtime::Serialization;

using namespace System::Runtime::Serialization::Formatters::Binary;


namespace DepartmentStore3a

{

	private:

		/// <summary>

		/// Required designer variable.

		/// </summary>

		System::ComponentModel::Container* components;

		ArrayList *lstAvailableItems;


	. . . No Change


}


private: System::Void CustomerOrder_Activated(System::Object *  sender, System::EventArgs *  e)

{

	lstAvailableItems = new ArrayList;


	 // This file holds the items sold in the store

	 String *strFilename = S"StoreItems.sti";

	 FileStream *fStream;


	 if( File::Exists(strFilename) )

	 {

		 try {

			 // Create a stream of store items

			 fStream = new FileStream(strFilename, FileMode::Open);


			 BinaryFormatter *binFormat = new BinaryFormatter;

			 lstAvailableItems = dynamic_cast<ArrayList *>(binFormat->Deserialize(fStream));

		 }

		 catch(ArgumentNullException *)

		 {

			 MessageBox::Show(S"The inventory could not be accessed");

		 }

		 catch(SerializationException *)

		 {

			 MessageBox::Show(S"The application failed to retrieve the inventory");

		 }

		 __finally

		 {

			 fStream->Close();

		 }

	 }

	 else

		 return;

}


};

}
|
// SalesInventory.h


#pragma once


using namespace System;


namespace SalesInventory

{

	[Serializable]

	public __gc class CSaleInventory

	{


	private:

		String *strNbr;

		String *strName;

		String *strSize;

		double  uPrice;

		int     iQty;

		double  stotal;


	public:

		CSaleInventory(void)

		{

			strNbr  = S"";

			strName = S"";

			strSize = S"";

			uPrice  = 0.00;

			iQty    = 0;

			stotal  = 0.00;

		}


		CSaleInventory(String *number, String *name, String *size,

			            double price, int qty, double total)

		{

			strNbr  = number;

			strName = name;

			strSize = size;

			uPrice  = price;

			iQty    = qty;

			stotal  = total;

		}


		__property String *get_ItemNumber()

		{

			return strNbr;

		}


		__property void set_ItemNumber(String *no)

		{

			strNbr = no;

		}


		__property String *get_ItemName()

		{

			return strName;

		}


		__property void set_ItemName(String *name)

		{

			strName = name;

		}

		__property String *get_Size()

		{

			return strSize;

		}


		__property void set_Size(String *size)

		{

			strSize = size;

		}


		__property double get_UnitPrice()

		{

			return uPrice;

		}


		__property void set_UnitPrice(double price)

		{

			uPrice = price;

		}


		__property int get_Quantity()

		{

			return iQty;

		}


		__property void set_Quantity(int qty)

		{

			iQty = qty;

		}


		__property double get_SubTotal()

		{

			return stotal;

		}


		__property void set_SubTotal(double total)

		{

			stotal = total;

		}

	};

}
|
System::Void btnSaveOrder_Click(System::Object *  sender, System::EventArgs *  e)

{

	 DateTime dteCurrent = this->dtpSaleDate->Value;

	 int month = dteCurrent.Month;

	 int day   = dteCurrent.Day;

	 int year  = dteCurrent.Year;


	 String *strFilename = String::Concat(month.ToString(), S"-", day.ToString(), S"-", year.ToString(), S".dly");

	 ArrayList *lstCurrentSoldItems = new ArrayList;

	 SalesInventory::CSaleInventory *curOrder;

	 FileStream *fStream;

	 BinaryFormatter *binFormat = new BinaryFormatter;


	// If this is not the first order of this file, then first open the file

	 // and store its orders in a temporary list

	 if( File::Exists(strFilename) )

	 {

		 try {

			 // Create a stream of store items

			 fStream = new FileStream(strFilename, FileMode::Open, FileAccess::Read, FileShare::Read);


			 lstCurrentSoldItems = dynamic_cast<ArrayList *>(binFormat->Deserialize(fStream));

		 }

		 catch(ArgumentNullException *)

		 {

			 MessageBox::Show(S"The inventory could not be accessed");

		 }

		 catch(SerializationException *)

		 {

			 MessageBox::Show(S"The application failed to retrieve the inventory");

		 }

		 __finally

		 {

			 fStream->Close();

		 }

	 }


	 // Whether the file existed already or not, add the current items to the list

	 if( !this->txtItemNumber1->Text->Equals(S"") )

	 {

		 curOrder = new SalesInventory::CSaleInventory;

		 curOrder->ItemNumber = this->txtItemNumber1->Text;

		 curOrder->ItemName   = this->txtDescription1->Text;

		 curOrder->Size       = this->txtSize1->Text;

		 curOrder->UnitPrice  = this->txtUnitPrice1->Text->ToDouble(0);

		 curOrder->Quantity   = this->txtQuantity1->Text->ToInt16(0);

		 curOrder->SubTotal   = this->txtSubTotal1->Text->ToDouble(0);

		 lstCurrentSoldItems->Add(curOrder);

	 }


	 if( !this->txtItemNumber2->Text->Equals(S"") )

	 {

		 curOrder = new SalesInventory::CSaleInventory;

		 curOrder->ItemNumber = this->txtItemNumber2->Text;

		 curOrder->ItemName   = this->txtDescription2->Text;

		 curOrder->Size       = this->txtSize2->Text;

		 curOrder->UnitPrice  = this->txtUnitPrice2->Text->ToDouble(0);

		 curOrder->Quantity   = this->txtQuantity2->Text->ToInt16(0);

		 curOrder->SubTotal   = this->txtSubTotal2->Text->ToDouble(0);

		 lstCurrentSoldItems->Add(curOrder);

	 }


	 if( !this->txtItemNumber3->Text->Equals(S"") )

	 {

		 curOrder = new SalesInventory::CSaleInventory;

		 curOrder->ItemNumber = this->txtItemNumber3->Text;

		 curOrder->ItemName   = this->txtDescription3->Text;

		 curOrder->Size       = this->txtSize3->Text;

		 curOrder->UnitPrice  = this->txtUnitPrice3->Text->ToDouble(0);

		 curOrder->Quantity   = this->txtQuantity3->Text->ToInt16(0);

		 curOrder->SubTotal   = this->txtSubTotal3->Text->ToDouble(0);

		 lstCurrentSoldItems->Add(curOrder);

	 }


	 if( !this->txtItemNumber4->Text->Equals(S"") )

	 {

		 curOrder = new SalesInventory::CSaleInventory;

		 curOrder->ItemNumber = this->txtItemNumber4->Text;

		 curOrder->ItemName   = this->txtDescription4->Text;

		 curOrder->Size       = this->txtSize4->Text;

		 curOrder->UnitPrice  = this->txtUnitPrice4->Text->ToDouble(0);

		 curOrder->Quantity   = this->txtQuantity4->Text->ToInt16(0);

		 curOrder->SubTotal   = this->txtSubTotal4->Text->ToDouble(0);

		 lstCurrentSoldItems->Add(curOrder);

	 }


	 if( !this->txtItemNumber5->Text->Equals(S"") )

	 {

		 curOrder = new SalesInventory::CSaleInventory;

		 curOrder->ItemNumber = this->txtItemNumber5->Text;

		 curOrder->ItemName   = this->txtDescription5->Text;

		 curOrder->Size       = this->txtSize5->Text;

		 curOrder->UnitPrice  = this->txtUnitPrice5->Text->ToDouble(0);

		 curOrder->Quantity   = this->txtQuantity3->Text->ToInt16(0);

		 curOrder->SubTotal   = this->txtSubTotal5->Text->ToDouble(0);

		 lstCurrentSoldItems->Add(curOrder);

	 }


	 if( !this->txtItemNumber6->Text->Equals(S"") )

	 {

		 curOrder = new SalesInventory::CSaleInventory;

		 curOrder->ItemNumber = this->txtItemNumber6->Text;

		 curOrder->ItemName   = this->txtDescription6->Text;

		 curOrder->Size       = this->txtSize6->Text;

		 curOrder->UnitPrice  = this->txtUnitPrice6->Text->ToDouble(0);

		 curOrder->Quantity   = this->txtQuantity6->Text->ToInt16(0);

		 curOrder->SubTotal   = this->txtSubTotal6->Text->ToDouble(0);

		 lstCurrentSoldItems->Add(curOrder);

	 }


	 if( !this->txtItemNumber7->Text->Equals(S"") )

	 {

		 curOrder = new SalesInventory::CSaleInventory;

		 curOrder->ItemNumber = this->txtItemNumber7->Text;

		 curOrder->ItemName   = this->txtDescription7->Text;

		 curOrder->Size       = this->txtSize7->Text;

		 curOrder->UnitPrice  = this->txtUnitPrice7->Text->ToDouble(0);

		 curOrder->Quantity   = this->txtQuantity7->Text->ToInt16(0);

		 curOrder->SubTotal   = this->txtSubTotal7->Text->ToDouble(0);

		 lstCurrentSoldItems->Add(curOrder);

	 }


	 if( !this->txtItemNumber8->Text->Equals(S"") )

	 {

		 curOrder = new SalesInventory::CSaleInventory;

		 curOrder->ItemNumber = this->txtItemNumber8->Text;

		 curOrder->ItemName   = this->txtDescription8->Text;

		 curOrder->Size       = this->txtSize8->Text;

		 curOrder->UnitPrice  = this->txtUnitPrice8->Text->ToDouble(0);

		 curOrder->Quantity   = this->txtQuantity8->Text->ToInt16(0);

		 curOrder->SubTotal   = this->txtSubTotal8->Text->ToDouble(0);

		 lstCurrentSoldItems->Add(curOrder);

	 }


	 fStream = new FileStream(strFilename, FileMode::Create, FileAccess::Write, FileShare::None);


	 try {

		 binFormat->Serialize(fStream, lstCurrentSoldItems);

	 }

	 catch(ArgumentNullException *)

	 {

		 MessageBox::Show(S"The customer order could not be accessed");

	 }

	 catch(SerializationException *)

	 {

		 MessageBox::Show(S"The customer order could not be saved");

	 }

	 __finally {

		 fStream->Close();

	 }


	 // Reset the order

	 this->txtItemNumber1->Text = S"";

	 this->txtItemNumber2->Text = S"";

	 this->txtItemNumber3->Text = S"";

	 this->txtItemNumber4->Text = S"";

	 this->txtItemNumber5->Text = S"";

	 this->txtItemNumber6->Text = S"";

	 this->txtItemNumber7->Text = S"";

	 this->txtItemNumber8->Text = S"";


	 this->txtItemNumber1_Leave(sender, e);

	 this->txtItemNumber2_Leave(sender, e);

	 this->txtItemNumber3_Leave(sender, e);

	 this->txtItemNumber4_Leave(sender, e);

	 this->txtItemNumber5_Leave(sender, e);

	 this->txtItemNumber6_Leave(sender, e);

	 this->txtItemNumber7_Leave(sender, e);

	 this->txtItemNumber8_Leave(sender, e);


	 this->txtTotalOrder->Text = S"0.00";

	 this->dtpSaleDate->Value = DateTime::Today;


	 this->txtItemNumber1->Focus();

}
|
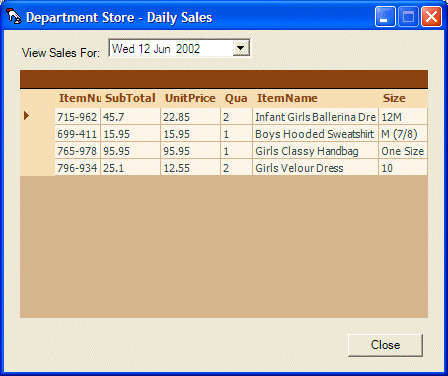
#pragma once


using namespace System;

using namespace System::ComponentModel;

using namespace System::Collections;

using namespace System::Windows::Forms;

using namespace System::Data;

using namespace System::Drawing;

using namespace System::IO;

using namespace System::Runtime::Serialization;

using namespace System::Runtime::Serialization::Formatters::Binary;


namespace DepartmentStore3a

{

	. . . No Change


private: System::Void btnClose_Click(System::Object *  sender, System::EventArgs *  e)

{

	 Close();

}


private: System::Void dtpSaleDate_ValueChanged(System::Object *  sender, System::EventArgs *  e)

{

	 DateTime dteCurrent = this->dtpSaleDate->Value;

	 int month = dteCurrent.Month;

	 int day   = dteCurrent.Day;

	 int year  = dteCurrent.Year;


	 String *strFilename = String::Concat(month.ToString(), S"-", day.ToString(), S"-", year.ToString(), S".dly");


	 ArrayList *lstDaySoldItems = new ArrayList;

	 BinaryFormatter *binFormat = new BinaryFormatter;


	// Find out if the file exists, that is, if some orders were placed on that day

	 if( File::Exists(strFilename) )

	 {

		 FileStream *fStream = new FileStream(strFilename, FileMode::Open, FileAccess::Read, FileShare::Read);


		 try {

			 BinaryFormatter *binFormat = new BinaryFormatter;

			 lstDaySoldItems = dynamic_cast<ArrayList *>(binFormat->Deserialize(fStream));


			 this->dataGrid1->DataSource = 0;

			 this->dataGrid1->DataSource = lstDaySoldItems;

		 }

		 catch(ArgumentNullException *)

		 {

			 MessageBox::Show(S"The inventory could not be accessed");

		 }

		 catch(SerializationException *)

		{

			 MessageBox::Show(S"The application failed to retrieve the inventory");

		 }

		 __finally

		 {

			 fStream->Close();

		 }

	 }

	 else

		 this->dataGrid1->DataSource = 0;

		 }


};

}
|
 |
|
|
||
| Home | Copyright © 2005-2016, FunctionX | |
|
|
||