|
Controlling the Conditional Statements |
|
|
Nesting a Conditional Statement
|
|
You can write
one conditional statement inside of another. This is referred to as nesting.
To create a conditional statement inside of another, simply proceed as
we have done so far to create them.
|
 Practical
Learning: Introducing Conditional Switches Practical
Learning: Introducing Conditional Switches
|
|
- Start Microsoft Visual Studio or Microsoft Visual Web Developer
- Start creating a web site
- Set the language to Visual C# et set the site name to timesheet3
- Click OK
- In the Solution Explorer, right-click Default.aspx and click Rename
- Type index.aspx and press Enter
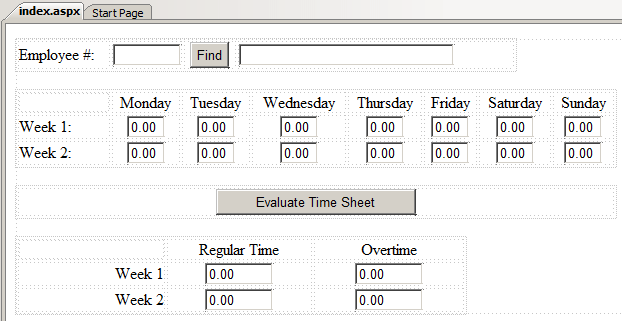
- Click the Source button and change the file as follows:
<%@ Page Language="C#"
AutoEventWireup="true"
CodeFile="index.aspx.cs"
Inherits="_Default" %>
<!DOCTYPE html PUBLIC "-//W3C//DTD XHTML 1.0 Transitional//EN"
"http://www.w3.org/TR/xhtml1/DTD/xhtml1-transitional.dtd">
<html xmlns="http://www.w3.org/1999/xhtml">
<head runat="server">
<title>Time Sheet</title>
</head>
<body>
<form id="frmTimeSheet" runat="server">
<div>
<table style="width: 500px">
<tr>
<td style="width:90px">Employee #:</td>
<td style="width:20px">
<asp:TextBox ID="txtEmployeeNumber"
Columns="10" runat="server"></asp:TextBox>
</td>
<td style="width:50px; text-align: center">
<asp:Button ID="btnFind" runat="server" Text="Find" />
</td>
<td>
<asp:TextBox ID="txtEmployeeName"
Width="215px" runat="server"></asp:TextBox>
</td>
</tr>
</table>
<table border="0" width="600">
<tr>
<td style="width:90px"></td>
<td align="center">Monday</td>
<td align="center">Tuesday</td>
<td align="center">Wednesday</td>
<td align="center">Thursday</td>
<td align="center">Friday</td>
<td align="center">Saturday</td>
<td align="center">Sunday</td>
</tr>
<tr>
<td>Week 1:</td>
<td align="center">
<asp:TextBox ID="txtWeek1Monday"
runat="server"
Columns="5">0.00</asp:TextBox>
</td>
<td align="center">
<asp:TextBox ID="txtWeek1Tuesday"
Columns="5" runat="server">0.00</asp:TextBox>
</td>
<td align="center">
<asp:TextBox ID="txtWeek1Wednesday"
Columns="5" runat="server">0.00</asp:TextBox>
</td>
<td align="center">
<asp:TextBox ID="txtWeek1Thursday"
Columns="5" runat="server">0.00</asp:TextBox>
</td>
<td align="center">
<asp:TextBox ID="txtWeek1Friday"
Columns="5" runat="server">0.00</asp:TextBox>
</td>
<td align="center">
<asp:TextBox ID="txtWeek1Saturday"
Columns="5" runat="server">0.00</asp:TextBox>
</td>
<td align="center">
<asp:TextBox ID="txtWeek1Sunday"
Columns="5" runat="server">0.00</asp:TextBox>
</td>
</tr>
<tr>
<td>Week 2:</td>
<td align="center">
<asp:TextBox ID="txtWeek2Monday"
Columns="5" runat="server">0.00</asp:TextBox>
</td>
<td align="center">
<asp:TextBox ID="txtWeek2Tuesday"
Columns="5" runat="server">0.00</asp:TextBox>
</td>
<td align="center">
<asp:TextBox ID="txtWeek2Wednesday"
Columns="5" runat="server">0.00</asp:TextBox>
</td>
<td align="center">
<asp:TextBox ID="txtWeek2Thursday"
Columns="5" runat="server">0.00</asp:TextBox>
</td>
<td align="center">
<asp:TextBox ID="txtWeek2Friday"
Columns="5" runat="server">0.00</asp:TextBox>
</td>
<td align="center">
<asp:TextBox ID="txtWeek2Saturday"
Columns="5" runat="server">0.00</asp:TextBox>
</td>
<td align="center">
<asp:TextBox ID="txtWeek2Sunday"
Columns="5" runat="server">0.00</asp:TextBox>
</td>
</tr>
</table>
<table width="600">
<tr>
<td align="center">
<asp:Button ID="btnEvaluate" Width="200"
Text="Evaluate Time Sheet" runat="server" />
</td>
</tr>
</table>
<table border="0" style="width:450px">
<tr>
<td style="width:350px;"></td>
<td align="center">Regular Time</td>
<td align="center">Overtime</td>
</tr>
<tr>
<td align="right">Week 1</td>
<td width="33%" align="center">
<asp:TextBox ID="txtWeek1RegularTime"
Columns="10" runat="server">0.00</asp:TextBox>
</td>
<td width="34%" align="center">
<asp:TextBox ID="txtWeek1Overtime"
Columns="10" runat="server">0.00</asp:TextBox>
</td>
</tr>
<tr>
<td align="right">Week 2</td>
<td width="33%" align="center">
<asp:TextBox ID="txtWeek2RegularTime"
Columns="10" runat="server">0.00</asp:TextBox>
</td>
<td width="34%" align="center">
<asp:TextBox ID="txtWeek2Overtime"
Columns="10" runat="server">0.00</asp:TextBox>
</td>
</tr>
</table>
<table style="width:600px">
<tr>
<td align="center">
<asp:Label ID="lblMessage" runat="server" Text="."></asp:Label>
</td>
</tr>
</table>
</div>
</form>
</body>
</html>
|
- Save the file and click the Design button

- Double-click the top button on the form and implement its event as
follows:
protected void btnFind_Click(object sender, EventArgs e)
{
        if (txtEmployeeNumber.Text.Equals("22-804"))
        {
            txtEmployeeName.Text = "Helene Mukoko";
            lblMessage.Text = "";
        }
        else if (txtEmployeeNumber.Text.Equals("92-746"))
        {
            txtEmployeeName.Text = "Raymond Kouma";
            lblMessage.Text = "";
        }
        else if (txtEmployeeNumber.Text.Equals("54-080"))
        {
            txtEmployeeName.Text = "Henry Larson";
            lblMessage.Text = "";
        }
        else if (txtEmployeeNumber.Text.Equals("86-285"))
        {
            txtEmployeeName.Text = "Gertrude Monay";
            lblMessage.Text = "";
        }
        else if (txtEmployeeNumber.Text.Equals("20-860"))
        {
            txtEmployeeName.Text = "Paul Bertrand Yamaguchi";
            lblMessage.Text = "";
        }
        else
        {
            txtEmployeeName.Text = "Unidentified Employee";
            lblMessage.Text = "You must enter a valid employee number.";
        }
}
|
- Click the index.aspx tab to return to the form
- Double-click the Evaluate and
implement the event as follows:
protected void btnEvaluate_Click(object sender, EventArgs e)
{
        if( txtEmployeeNumber.Text.Equals("") )
        {
            double Week1Monday, Week1Tuesday, Week1Wednesday,
               Week1Thursday, Week1Friday, Week1Saturday, Week1Sunday;
            double Week2Monday, Week2Tuesday, Week2Wednesday,
                   Week2Thursday, Week2Friday, Week2Saturday, Week2Sunday;
            double Week1RegularTime, Week1Overtime,
                   Week2RegularTime, Week2Overtime;
            double Week1Total, Week2Total;

            Week1Monday = double.Parse(txtWeek1Monday.Text);
            Week1Tuesday = double.Parse(txtWeek1Tuesday.Text);
            Week1Wednesday = double.Parse(txtWeek1Wednesday.Text);
            Week1Thursday = double.Parse(txtWeek1Thursday.Text);
            Week1Friday = double.Parse(txtWeek1Friday.Text);
            Week1Saturday = double.Parse(txtWeek1Saturday.Text);
            Week1Sunday = double.Parse(txtWeek1Sunday.Text);

            Week2Monday = double.Parse(txtWeek2Monday.Text);
            Week2Tuesday = double.Parse(txtWeek2Tuesday.Text);
            Week2Wednesday = double.Parse(txtWeek2Wednesday.Text);
            Week2Thursday = double.Parse(txtWeek2Thursday.Text);
            Week2Friday = double.Parse(txtWeek2Friday.Text);
            Week2Saturday = double.Parse(txtWeek2Saturday.Text);
            Week2Sunday = double.Parse(txtWeek2Sunday.Text);

            Week1Total = Week1Monday + Week1Tuesday + Week1Wednesday +
                         Week1Thursday + Week1Friday +
                         Week1Saturday + Week1Sunday;

            if (Week1Total < 40)
            {
                Week1RegularTime = Week1Total;
                Week1Overtime = 0;
            }
            else
            {
                Week1RegularTime = 40;
                Week1Overtime = Week1Total - Week1RegularTime;
            }

            Week2Total = Week2Monday + Week2Tuesday + Week2Wednesday +
                         Week2Thursday + Week2Friday +
                         Week2Saturday + Week2Sunday;

            if (Week2Total < 40)
            {
                Week2RegularTime = Week2Total;
                Week2Overtime = 0;
            }
            else
            {
                Week2RegularTime = 40;
                Week2Overtime = Week2Total - Week2RegularTime;
            }

            txtWeek1Monday.Text = Week1Monday.ToString("F");
            txtWeek1Tuesday.Text = Week1Tuesday.ToString("F");
            txtWeek1Wednesday.Text = Week1Wednesday.ToString("F");
            txtWeek1Thursday.Text = Week1Thursday.ToString("F");
            txtWeek1Friday.Text = Week1Friday.ToString("F");
            txtWeek1Saturday.Text = Week1Saturday.ToString("F");
            txtWeek1Sunday.Text = Week1Sunday.ToString("F");

            txtWeek2Monday.Text = Week2Monday.ToString("F");
            txtWeek2Tuesday.Text = Week2Tuesday.ToString("F");
            txtWeek2Wednesday.Text = Week2Wednesday.ToString("F");
            txtWeek2Thursday.Text = Week2Thursday.ToString("F");
            txtWeek2Friday.Text = Week2Friday.ToString("F");
            txtWeek2Saturday.Text = Week2Saturday.ToString("F");
            txtWeek2Sunday.Text = Week2Sunday.ToString("F");

            txtWeek1RegularTime.Text = Week1RegularTime.ToString("F");
            txtWeek1Overtime.Text = Week1Overtime.ToString("F");
            txtWeek2RegularTime.Text = Week2RegularTime.ToString("F");
            txtWeek2Overtime.Text = Week2Overtime.ToString("F");

            lblMessage.Text = "";
        }
        else
            lblMessage.Text = "You must enter a valid employee number.";
}
|
- Click the index.aspx tab to return to the form
- Press Ctrl + F5 to execute the application
- Click the top text box, type 92-746 and click the top button
|
Breaking the Flow of a Conditional Statement
|
|
The break statement is used to stop a loop for any
reason or condition when necessary.
The formula of the break statement is:
break;
Although made of only one word, the break statement
is a complete statement; therefore, it can (and should always) stay on
its own line (this makes the program easy to read).
The break statement applies to the most previous
conditional statement to it; provided that previous statement is
applicable. The break
statement can be used in a while condition, in a
do…while or a for loops to stop an ongoing action. Here is
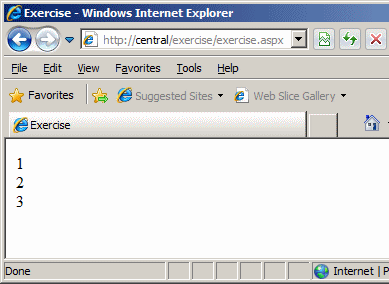
an example that is used to count the levels of a house from 1 to 12 but
it is asked to stop at 3:
<%@ Page Language="C#" %>
<html>
<head>

<title>Exercise</title>
</head>
<body>

<%
    for(int stories = 1; stories <= 12; stories++)
    {
        Response.Write(stories.ToString() + "<br />");
        if( stories == 3 )
            break;
    }
%>

</body>
</html>
This would produce:

|
Continuing a Conditional Statement
|
|
The continue statement uses the following
formula:
continue;
When processing a loop, if the statement finds a
false value, you can use the continue statement inside of a while,
a do…while or a for conditional statements to ignore the subsequent
statement or to jump from a false Boolean value to the subsequent valid
value, unlike the break statement that would exit the loop. Like the
break statement, the continue keyword applies to the most previous
conditional statement and should stay on its own line. Here is an
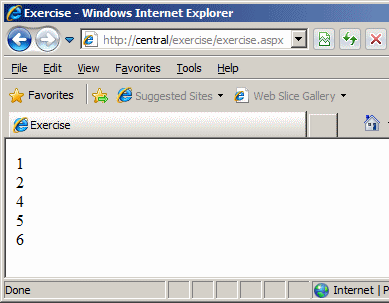
example when a program is supposed to count the levels of a house from 1
to 6:
<%@ Page Language="C#" %>
<html>
<head>

<title>Exercise</title>
</head>
<body>

<%
    for (int stories = 1; stories <= 6; stories++)
    {
        if (stories == 3)
            continue;
        Response.Write(stories.ToString() + "<br />");
    }
%>

</body>
</html>
This would produce:

|
Going to a Designated Label
|
|
The goto statement allows a program execution
to jump to another section of the function in which it is being used. In order to use the goto statement, insert a
name on a particular section of your function so you can refer to that
name. The name, also called a label, is made of one word and follows the
rules we have learned about C++ names (the name can be anything), then
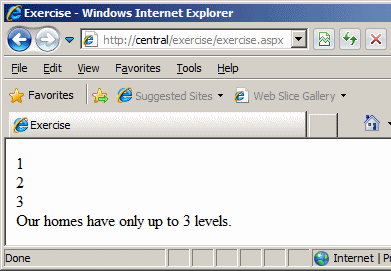
followed by a colon. Here is an example where the program is supposed to
count the levels of a 14 story building:
<%@ Page Language="C#" %>
<html>
<head>

<title>Exercise</title>
</head>
<body>

<%
    for(int stories = 1; stories <= 14; stories++)
    {
        if(stories == 4)
            goto CountUpTo3;
        Response.Write(stories.ToString() + "<br />");
    }

    CountUpTo3:
        Response.Write("Our homes have only up to 3 levels.");
%>

</body>
</html>
This would produce:

Some functions are meant to return a value that is
conditional of their processing. The fact that a function indicates the type of
value it would return may not be clear at the time the function is closed but a function defined other than
void must always
return a value. You can write a conditional statement, such as if,
inside of a function and return a value from that condition.
To get out of a function, you can use the return
keyword where you want it to stop.
Imagine that you want to count the positive odd numbers from
a certain maximum to a certain minimum. For example, to count the odd numbers
from 1 to 9, you would use:
9, 7, 5, 3, and 1
Notice that, to perform this operation, you consider the
highest. Then you subtract 2 to get the previous. Again, you subtract 2 from the
number to get
the previous. What you are simply doing is to subtract a constant to what you already
have and you invent very little. In computer programming, you can solve this type of problem
by first writing a function, and then have the function call itself. This is the
basis for recursion.
|
Creating a Recursive Functions
|
|
A type of formula to create a recursive method is:
ReturnValue Function(Arguments, if any)
{
    Optional Action . . .
    Function();
    Optionan Action . . .
}
A recursive function
starts with a return value. If it would not return a value, you can define it
with void. After its name, the method can take one or more
arguments. Most of the time, a recursive function takes at least one argument
that it would then modify. In the body of the function, you can take the
necessary actions. There are no particular steps to follow when implementing a
recursive method but there are two main rules to observe:
- In its body, the method must call itself
- Before or after calling itself, the method must check a condition that
would allow it to stop, otherwise, it might run continuously
For our example of counting decrementing odd numbers, you
could start by creating a function that takes an integer as argument. To
exercise some control on the lowest possible values, we will consider only
positive numbers. In the body of the method, we will display the current value
of the argument, subtract 2, and recall the method itself.
|
Using Recursive Functions
|
|
Recursive functions provide a valuable mechanism for
building lists or series, which are value that are either increment or decrement
but follow a pattern. Imagine that, instead of simply displaying odd numbers as
we did above, you want to add them incrementally. If you have 1, it would also
produce 1. If you have 5, you would like to add 1 to 3, then the result to 5,
and so on. This can be illustrated as follows:
1 = 1
|
1 + 3 = 4
|
1 + 3 + 5 = 9
|
1 + 3 + 5 + 7 = 16
|
1 + 3 + 5 + 7 + 9 = 25
|
To perform this operation, you would consider 1. If the
number is less than or equal to 1, the method should return 1. Otherwise, add
2 to 1, then add 2 to the new result. Continue this until you get to the value
of the argument.