|
When creating a database object such as a table, you may
provide a column that allows a user to set a single value from a small list of
values. For example, you can create a column that would be used to specify the
gender of an applicant. Instead of letting the user enter either Female or Male,
you can create the options yourself and then let the user only select the
desired one. To implement this scenario in a Windows application,
you can use radio buttons.
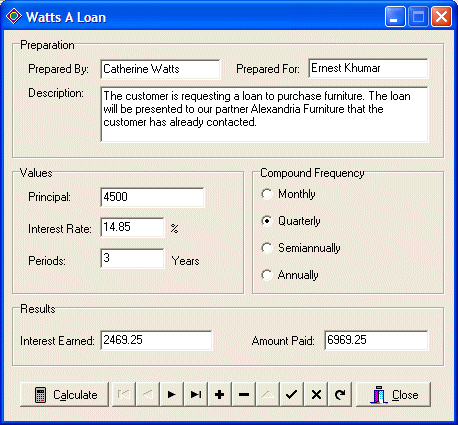
To support radio buttons in a database, the VCL provides the
DBRadioGroup control. The DBRadioGroup control primarily behaves like a
RadioGroup control. In fact, both descend from the TCustomRadioGroup
class. To use a DBRadioGroup in your application, you can click it from the Data Controls
section of the Component Palette and click the desired container.
Like the RadioGroup control, the radio buttons of a
DBRadioGroup object are represented by the Items property that is a list
based on the TStrings class. This also means that, when creating a table
for your application, you can create a string-based column and you would later
on associate it to a DBRadioGroup object. You probably already know that if you
create a text-based column, it can have just any value. If you intend to
associated such a column to a DBRadioGroup control, it is your responsibility to make
sure that the list of possible strings for this column should (must) be limited.
In fact, when planning your table, you should make sure that the user will not
be allowed to create new options. For example, if you create a column that you
anticipate to have a fixed list of strings, such as Female and Male, keep in
mind that you may not allow the user to add new strings such as Unknown or
Hermaphrodite.
|
 Practical Learning: Introducing the DB Radio Group Control
|
|
- To start a database application, on the main menu, click Tools ->
Database Desktop
- On the main menu of the Database Desktop, click File -> New ->
Table...
- Accept the Paradox 7 option and click OK
- Create the fields as follows:
| Field Name |
Type |
Size |
Key |
| LoanPrepID |
+ |
|
* |
| PreparedBy |
A |
50 |
|
| PreparedFor |
A |
50 |
|
| Description |
M |
240 |
|
| Principal |
A |
12 |
|
| InterestRate |
A |
12 |
|
| Periods |
A |
10 |
|
| CompoundFrequency |
A |
20 |
|
| InterestEarned |
A |
12 |
|
| AmountPaid |
A |
12 |
|

- To save the table, click the Save As button
- Set the name to LoanPreparation and select the BCDEMOS alias

- Click Save
- Close the Database Desktop
- In Borland C++ Builder, create a new Application
- Set the form's Caption to Watts A Loan
- Save the application in a new folder named WattsALoan1
- Save the unit as Exercise and the project as WattsALoan
- In the BDE section of the Component Palette, click Table and click the
form
- In the Object Inspector, set its properties as follows:
DatabaseName: BCDEMOS
Name: tblLoanPrep
TableName: LoanPreparation
- In the Data Access section of the Component Palette, click DataSource and
click the form
- In the Object Inspector, set its properties as follows:
DataSet: tblLoanPrep
Name: dsLoanPrep
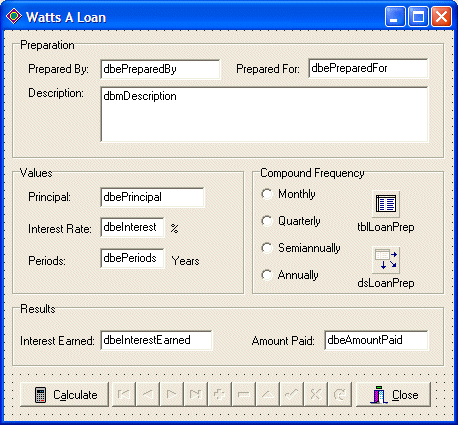
- Design of the form as follows:
 |
| Control |
Name |
Caption |
Other Properties |
| Form |
frmMain |
Watts A Loan |
BorderIcons: [biSystemMenu,biMinimize]
Position: poScreenCenter
ShowHint: true |
| GroupBox |
|
Preparation |
|
| Label |
|
Prepared By: |
|
| DBEdit |
dbePreparedBy |
|
DataSource: dsLoanPrep
DataField: PreparedBy |
| Label |
|
Prepared For: |
|
| DBEdit |
dbePreparedFor |
|
DataSource: dsLoanPrep
DataField: PreparedFor |
| Label |
|
Description: |
|
| DBEdit |
dbeDescription |
|
DataSource: dsLoanPrep
DataField: Description |
| GroupBox |
|
Values |
|
| Label |
|
Principal |
|
| DBEdit |
dbePrincipal |
|
DataSource: dsLoanPrep
DataField: Principal |
| Label |
|
Interest Rate: |
|
| DBEdit |
dbeInterestRate |
|
DataSource: dsLoanPrep
DataField: InterestRate |
| Label |
|
% |
|
| Label |
|
Periods: |
|
| DBEdit |
dbePeriods |
|
DataSource: dsLoanPrep
DataField: Periods |
|
- Save all
|
Characteristics of the DB Radio Group Control |
|
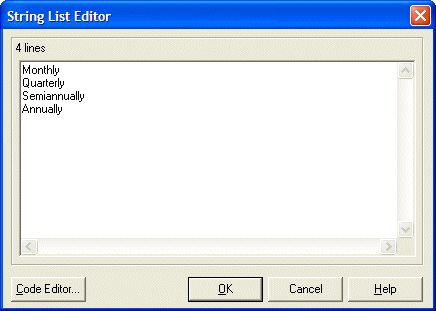
If you add a DBRadioGroup control to your application, at
design time, you should create a list of the available options yourself. To do
this, display the String List Editor from double-clicking the Strings field of
the Items property in the Object Inspector.
As described above, each item of the radio buttons of a
DBRadioGroup control is a member of a TStrings collection and therefore is of
type AnsiString. Such an item is represented by the Value
property of this control. This means that, when the user selects a radio button,
its Value, not its TStrings::ItemIndex property, gets stored in
the corresponding column of the table. This also implies the the value of the
record is saved as a string. This value is the caption of the radio button, as
you would have created it using the Items property. It is important to know that
you can use the properties of the TStrings class to identity the radio
button that the user had clicked but when the record is saved, it is the Value,
which is a string of type AnsiString, which is the caption of the radio
button, that is saved in the field, not the ItemIndex.
While each radio button holds Value string, the group of
values of the radio buttons is stored in the Values property of the DBRadioGroup
control.
|
|


