|
Characteristics of the Labeled Edit Control |
|
The LabeledEdit control is an object of type TLabeledEdit.
This control shares its ancestry with the edit control: their parent is the TCustomEdit
class. The TLabeledEdit class itself is derived from the based on the TCustomLabeledEdit
class. Based on its ancestry, the LabeledEdit control inherits the same
functionality as the edit control.
After adding a LabeledEdit control to your application, you
notice that it is accompanied by a label but both are treated as one control. By
default, the (accompanying) label is positioned above the edit control. The
position of the label is controlled by the LabelPosition property. This property
is type TLabelPosition, which is an enumerator. It can have one of four
values:
- lpAbove: (the defualt) Causes the label to be positioned on top of
the edit control
- lpBelow: Causes the label to be positioned under the edit control
- lpLeft: Positions the label to the left of the edit control
- lbRight: The label is positioned on the right side of the edit
control
If you use a separate label and edit controls in your
application, you know that you can decide about the distance between both
controls. For a LabeledEdit object, this characteristic is handled by the LabelSpacing
property, which is an integer. The default value of this property is 3.
In most cases, and especially if you decide to position the label to the left,
this value would be too little.
We mentioned that the TLabeledEdit class, on which the
LabeledEdit control is based, derived from the TCustomEdit class, which
provides functionality only for an edit control. To respect the avoidance of
double-inheritance in a VCL control, the LabeledEdit control is equipped with a
property called EditLabel. The role of this property is to identify or
represent the label part of the LabeledEdit. To support the whole functionality
of a label, the EditLabel property is of type TBoundLabel. The
TBoundLabel class is derived from the TCustomLabel class, which is the same
immediate class of the Label control. Based on this, to perform any
label-related operation on a LabeledEdit control, first invoke its EditLabel
property and then access any of the properties and characteristics we reviewed
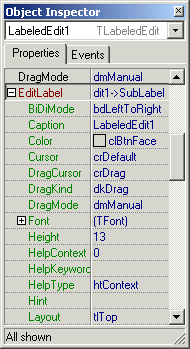
for the label control. At design time, the EditLabel property is represented
with a + field in the object inspector. As such, you can click the + button:

This allows you to manipulate the label side of the control.
|
 Practical
Learning: Using the LabeledEdit Control
|
|
- Start a new Application with its default form and change the form's
BorderStyle to bsDialog
- Save the application in a new folder named ColumnChart1
- Save the unit as Exercise and the project as ColumnChart
- In the Component Palette, click Additional. Click LabeledEdit
 and click form
- While the new control is still selected, in the Object Inspector, click Name
and type ledMonday
- Click the + button of the EditLabel field. Under it, click Caption
and type Monday
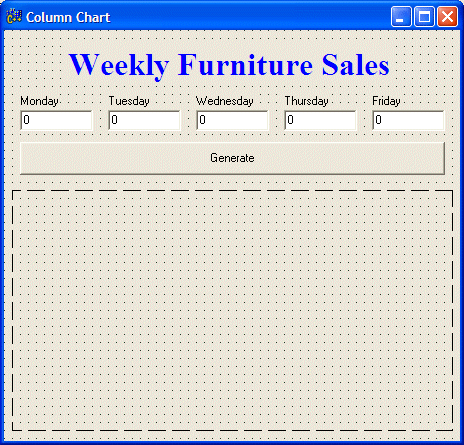
- Complete the design of the form as follows:
 |
| Control |
Caption |
Text |
EditLabel=>Caption |
Name |
| Label |
Furniture Sales |
|
|
|
| LabeledEdit |
|
|
Monday |
ledMonday |
| LabeledEdit |
|
|
Tuesday |
ledTuesday |
| LabeledEdit |
|
|
Wednesday |
ledWednesday |
| LabeledEdit |
|
|
Thursday |
ledThursday |
| LabeledEdit |
|
|
Friday |
ledFriday |
| Button |
Generate |
|
|
btnGenerate |
| PaintBox |
|
|
|
|
|
- Press F12 to access the Code Editor. In the header file (Exercise.h),
declare a private variable as
Graphics::TBitmap *DrawingBoard;
- Access the source code of the form and initialize the variable in the
constructor as follows:
//---------------------------------------------------------------------------
__fastcall TForm1::TForm1(TComponent* Owner)
    : TForm(Owner)
{
    DrawingBoard = new Graphics::TBitmap;
    DrawingBoard->Width  = PaintBox1->Width;
    DrawingBoard->Height = PaintBox1->Height;
}
//---------------------------------------------------------------------------
|
- Press F12 to display the form. On the form, click the PaintBox1 control to
select it
- In the Object Inspector, click the Events tab and double-click the right
field to OnPaint
- Implement its event as follows:
//---------------------------------------------------------------------------
void __fastcall TForm1::PaintBox1Paint(TObject *Sender)
{
    PaintBox1->Canvas->Draw(0, 0, DrawingBoard);
}
//---------------------------------------------------------------------------
|
- Return to the form and double-click the Generate button
- Implement its event as follows:
//---------------------------------------------------------------------------
void __fastcall TForm1::btnGenerateClick(TObject *Sender)
{
    this->DrawingBoard->Canvas->Brush->Color = clWhite;
    this->DrawingBoard->Canvas->Brush->Style = bsSolid;
    this->DrawingBoard->Canvas->Pen->Color   = clWhite;
    this->DrawingBoard->Canvas->Rectangle(0, 0, Width, Height);

    Invalidate();

    int monday    = this->ledMonday->Text.ToInt() / 100;
    int tuesday   = this->ledTuesday->Text.ToInt() / 100;
    int wednesday = this->ledWednesday->Text.ToInt() / 100;
    int thursday  = this->ledThursday->Text.ToInt() / 100;
    int friday    = this->ledFriday->Text.ToInt() / 100;

    this->DrawingBoard->Canvas->Brush->Color = clGreen;
    this->DrawingBoard->Canvas->Brush->Style = bsCross;
    this->DrawingBoard->Canvas->Pen->Color   = clBlack;
    this->DrawingBoard->Canvas->Pen->Width = 1;
    this->DrawingBoard->Canvas->Rectangle(ledMonday->Left+20,
                                          PaintBox1->Height-20-monday,
                                          ledMonday->Left+60,
                                          PaintBox1->Height-20);

    this->DrawingBoard->Canvas->Brush->Color = clRed;
    this->DrawingBoard->Canvas->Brush->Style = bsBDiagonal;
    this->DrawingBoard->Canvas->Rectangle(ledTuesday->Left+20,
                                          PaintBox1->Height-20-tuesday,
                                          ledTuesday->Left+60,
                                          PaintBox1->Height-20);

    this->DrawingBoard->Canvas->Brush->Color = clBlue;
    this->DrawingBoard->Canvas->Brush->Style = bsFDiagonal;
    this->DrawingBoard->Canvas->Rectangle(ledWednesday->Left+20,
                                          PaintBox1->Height-20-wednesday,
                                          ledWednesday->Left+60,
                                          PaintBox1->Height-20);

    this->DrawingBoard->Canvas->Brush->Color = clFuchsia;
    this->DrawingBoard->Canvas->Brush->Style = bsDiagCross;
    this->DrawingBoard->Canvas->Rectangle(ledThursday->Left+20,
                                          PaintBox1->Height-20-thursday,
                                          ledThursday->Left+60,
                                          PaintBox1->Height-20);

    this->DrawingBoard->Canvas->Brush->Color = clNavy;
    this->DrawingBoard->Canvas->Brush->Style = bsVertical;
    this->DrawingBoard->Canvas->Rectangle(ledFriday->Left+20,
                                          PaintBox1->Height-20-friday,
                                          ledFriday->Left+60,
                                          PaintBox1->Height-20);

    this->DrawingBoard->Canvas->Pen->Width = 4;
    this->DrawingBoard->Canvas->MoveTo(PaintBox1->Left+20,
                                       PaintBox1->Height-20);
    this->DrawingBoard->Canvas->LineTo(PaintBox1->Width-5,
                                       PaintBox1->Height-20);
    Invalidate();
}
//---------------------------------------------------------------------------
|
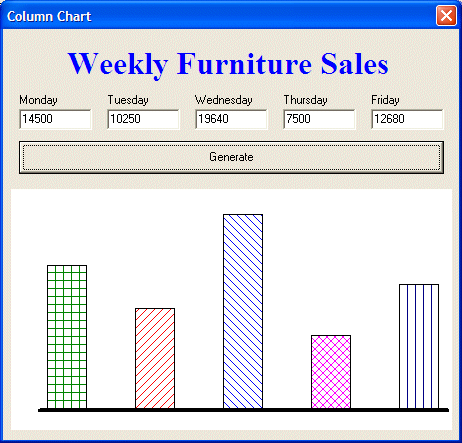
- Execute the application and enter some values in the edit boxes before
clicking Generate. Here is an example:

- Close the form and return to your programming environment
|
|

