|
 Practical
Learning: Introducing the RichEdit Control
|
|
- Start a new application with its default form
- To save it, on the Standard toolbar, click the Save All button
- Create a new folder called Editor1 and display it in the Save In combo box
- Save the unit as Main and save the project as Editor
- Change the Caption of the form to Editor – Untitled and change its
Name to frmMain
- Set the ShowHint property to true
- In the header file, declare a private AnsiString variable named CurrentFileName
//---------------------------------------------------------------------------
#ifndef MainH
#define MainH
//---------------------------------------------------------------------------
#include <Classes.hpp>
#include <Controls.hpp>
#include <StdCtrls.hpp>
#include <Forms.hpp>
//---------------------------------------------------------------------------
class TfrmMain : public TForm
{
__published: // IDE-managed Components
private:
	AnsiString CurrentFileName; // User declarations
public: // User declarations
	__fastcall TfrmMain(TComponent* Owner);
};
//---------------------------------------------------------------------------
extern PACKAGE TfrmMain *frmMain;
//---------------------------------------------------------------------------
#endif
|
- In the constructor of the form, initialize the variable as:
//---------------------------------------------------------------------------

#include <vcl.h>
#pragma hdrstop

#include "Main.h"
//---------------------------------------------------------------------------
#pragma package(smart_init)
#pragma resource "*.dfm"
TfrmMain *frmMain;
//---------------------------------------------------------------------------
__fastcall TfrmMain::TfrmMain(TComponent* Owner)
	: TForm(Owner)
{
	// The following string is not allowed for a Windows file
	// This will allow us to know when the name of the file has been changed
	CurrentFileName = "<Not Allowed>";
}
//---------------------------------------------------------------------------
|
- Display the form and double-click its body to access its OnCreate() event
- Because we will use the features of the rich edit control stored in a DLL, implement the event as
follows:
//---------------------------------------------------------------------------
void __fastcall TfrmMain::FormCreate(TObject *Sender)
{
	int iRichDLL = (int)LoadLibrary("RICHED20.DLL");

	if( !iRichDLL ) // If you could not load RICHED20.DLL
	{
		ShowMessage("Could not load the RICHED20.DLL");
		Application->Terminate();
		return;
	}
}
//---------------------------------------------------------------------------
|
- On the Win32 tab of the Component Palette, click RichEdit
 and click in the body of the form. Change its Name to rchEditor
- On the Win32 tab of the Component Palette, double-click ImageList
 and, on the form, double-click ImageList1
- Using the Add button, add the following bitmaps: New, Save, Redo, NumBullet, Mail, FirstIndent, IndentLeft, IndentRight, and Paragraph
- Click OK
- From the Standard tab of the Component Palette, double-click ActionList and, while the new ActionList1 is still selected, on the Object Inspector, set its Images property to ImageList1
- On the form, double-click ActionList1 to create a list of actions
- In the ActionList window, right-click an empty area and click New Action. Set its properties as follows:
Caption: &New
Category: File
Hint: New|Create a new document
ImageIndex: 0
Name: FileNew
Shortcut: Ctrl+N
- In the same way, create a new action and set its properties as follows:
Caption: &Save
Category: File
Hint: Save|Save the current document
ImageIndex: 1
Name: FileSave
Shortcut: Ctrl+S
- Once again, create a new action and set its properties as follows:
Caption: &Redo
Category: Edit
Hint: Redo|Redo the previous action
ImageIndex: 2
Name: EditRedo
Shortcut: Ctrl+Y
- Add Another action and set its properties as follows:
Caption: &Numbering
Category: Format
Hint: Numbering|Format a numeric list
ImageIndex: 3
Name: FormatNbr
- Add one more action and set its properties as follows:
Caption: &Numbering
Category: Format
Hint: Numbering|Format a numeric list
ImageIndex: 3
Name: FormatNbr
- Add one more action and set its properties as follows:
Caption: &Standard
Category: View
Checked: true
Hint: Standard|Toggle the Standard toolbar
Name: ViewStandard
- Add one more action and set its properties as follows:
Caption: &Formatting
Category: View
Checked: true
Hint: Formatting|Toggle the Formatting toolbar
Name: ViewFormatting
- Add one more action and set its properties as follows:
Caption: Status &Bar
Category: View
Checked: true
Hint: Status Bar|Toggle the Status Bar
Name: ViewStatusBar
- Right-click any frame in the Action List Editor and click New Standard Action. From the Standard Action Classes dialog box, under the Internet node, double-click TSendMail
- In the left frame of the ActionList Editor, click Internet and, in the right frame, click SendMail1. On the Object Inspector, set ImageIndex to 4
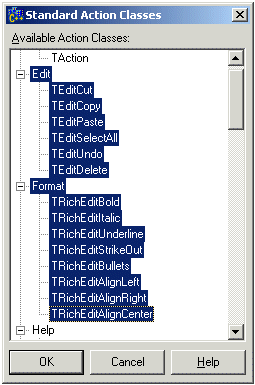
- Right-click an empty area in the ActionList Editor and click New Standard Action. Once in the Standard Action Classes dialog box, click Edit. Press and hold Shift. Then click TRichEditAlignCenter and release Shift:
- Click OK
- Right-click in the ActionList Editor again and click New Standard Action. Click TFileOpen. Press and hold Ctrl. Then click TFileSaveAs, TFilePrintSetup, TFileExit, TSearchFind, TSearchFindNext, TSearchReplace, TSearchFindFirst, TColorSelect, TFontEdit, and TPrintDlg. Release Ctrl and click OK
- In the ActionList Editor window, on the left frame, click File. In the right frame, click
FileSaveAs1
- In the Object Inspector, click the + button of Dialog to expand it
- Click DefaultExt and type rtf
- Click Filter and click its ellipsis button
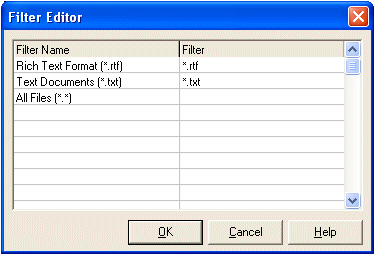
- Complete the Filter Editor dialog box as follows:
- Click OK
- Click Title, type Save File As and press Enter
- Click the - button of Dialog to collapse it and click the Events property page
- Double-click the empty box on the right side of OnAccept() and implement the event as follows:
//---------------------------------------------------------------------------
void __fastcall TfrmMain::FileSaveAs1Accept(TObject *Sender)
{
	// Save the file as we reviewed in the lesson on strings
	rchEditor->Lines->SaveToFile(FileSaveAs1->Dialog->FileName);
	// Change the name of the file
	CurrentFileName = FileSaveAs1->Dialog->FileName;
	// Retrieve the name of the file to display on the title bar
	AnsiString FName = ExtractFileName(CurrentFileName);
	Caption = "Editor - " + FName;
}
//---------------------------------------------------------------------------
|
- Press F12 to display the form. Save the project
- To proceed with the traditional Save As implementation, on the Component Palette, click Dialogs. Click the SaveDialog button
 and click on the form. While the new SaveDialog1 control is still selected, on the Object Inspector, click the Properties tab and click DefaultExt. Type rtf and click on the form. While the new SaveDialog1 control is still selected, on the Object Inspector, click the Properties tab and click DefaultExt. Type rtf
- Click Filter and click its ellipsis button
 . Complete the Filter Editor dialog box as follows: . Complete the Filter Editor dialog box as follows:

- Click OK
- Click Title, type Save File As and press Enter
- Double-click ActionList1 to return to the ActionList Editor window. On the left frame, click File. On the right frame, click FileSave1 and, in the Object Inspector, click the Events tab. Double-click the empty box on the right side of OnExecute and implement the event as follows:
//---------------------------------------------------------------------------
void __fastcall TfrmMain::FileSaveExecute(TObject *Sender)
{
	// Find out if the current document has never been saved
	// but is not empty
	if( rchEditor->Modified && CurrentFileName == "<Not Allowed>" )
	{
		// Since the document is dirty, display the Save As dialog box
		if( SaveDialog1->Execute() )
		{
			// Retrieve the new name file and display
			// the file in the rich edit control
			rchEditor->Lines->SaveToFile(SaveDialog1->FileName);
			// Change/Update the global and complete name of the file,
			// including its path
			CurrentFileName = SaveDialog1->FileName;
			// Extract the name of the file
			AnsiString FName = ExtractFileName(CurrentFileName);
			// Display the name of the current file on the title bar
			Caption = "Editor - " + FName;
		}
	}
	else
	{
		// It appears that this document already had a name
		// but the document was previously modified
		// Therefore, simply save it internally
		rchEditor->Lines->SaveToFile(CurrentFileName);
	}
}
//---------------------------------------------------------------------------
|
- Press F12 to display the form. Click the form to select it
- To handle the closing of the application, click the Events tab. Then, double-click the empty field of the OnClose event and implement it as follows:
//---------------------------------------------------------------------------
void __fastcall TfrmMain::FormClose(TObject *Sender, TCloseAction &Action)
{
	// Is the document dirty?
	if( rchEditor->Modified )
	{
	// Since the document is dirty, find out if the user wants to save it
		int Response = Application->MessageBox(
			"The document has changed. Do you want to save it?"
			"\nClick\n"
			"Yes:\tTo save the document and close the application.\n"
			"No:\tNot to save the document but close the application.\n"
			"Cancel:\tNot to do anything",
			"Editor - Saving a File",
			MB_YESNOCANCEL | MB_ICONQUESTION);

		// If the user wants to save it
		if( Response == IDYES )
		{
			// Behave as if the user had clicked File -> Save
			FileSave1Execute(Sender);
			// Free the action
			Action = caFree;
		}
		// If the user doesn't want to save the document
		else if( Response == IDNO )
			Action = caFree; // Simply free the action
		else
			Action = caNone; // The user cancelled the action: do nothing
	}
	else // There is no action to take
		Action = caFree;
}
//---------------------------------------------------------------------------
|
- Display the ActionList Editor. Make sure that File is selected on the left frame
- To handle the creation of a new document, click the FileNew. In the Object Inspector, click the Events tab if necessary. Double-click the empty box on the right side of OnExecute and implement the event as follows:
//---------------------------------------------------------------------------
void __fastcall TfrmMain::FileNewExecute(TObject *Sender)
{
	// When the user clicks the New button to start a new document,
	// find out if the document is dirty
	if( rchEditor->Modified )
	{
	// Since the document is dirty, find out if the user wants to save it
		int Response = Application->MessageBox(
			"The document has changed. Do you want to save it?"
			"\nClick\n"
			"Yes:\tTo save the document and create a new one.\n"
			"No:\tNot to save the document but create a new one.\n"
			"Cancel:\tNot to do anything",
			"Editor - Saving a File",
		MB_YESNOCANCEL | MB_ICONQUESTION);

		// If the user wants to save the document
		if( Response == IDYES )
		{
			// Behave as if the Save action was initiated
			FileSave1Execute(Sender);
			// After saving the document, delete the whole document
			rchEditor->Clear();
			// Reset the current file name to garbage
			CurrentFileName = "<Not Allowed>";
			// Show on the title bar that the file is clean
			Caption = "Editor - Untitled";
			// Reset the Modified flag of the Rich Edit control
			rchEditor->Modified = False;
		}
		// If the user doesn't want to save the document
		else if( Response == IDNO )
		{
			// Delete the whole contents of the rich edit text
			rchEditor->Clear();
			// Fill the file name with garbage
			CurrentFileName = "<Not Allowed>";
			// Show on the title bar that the document is clean
			Caption = "Editor - Untitled";
			// Reset the Modified flag
			rchEditor->Modified = False;
		}
		// The user clicked Cancel: Don't do nothing
		else
			Action = caNone;
	}
	else
	{
		rchEditor->Clear();
		CurrentFileName = "<Not Allowed>";
		Caption = "Editor - Untitled";
		rchEditor->Modified = False;
	}
}
//---------------------------------------------------------------------------
|
- In the ActionList Editor, in the right frame, click FileOpen1. Move FileOpen1 to be just under FileNew1 in the Actions list
- In the Object Inspector, click the Properties tab and expand the Dialog property if necessary. Click DefaultExt and type rtf
- Click Filter and click its ellipsis button . Complete the Filter Editor dialog box as follows:

- Click OK
- Click Title, type Open an Existing Document and press Enter
- Click the - button of Dialog to collapse it and click the Events tab
- Double-click the event field of OnAccept and implement it as follows:
//---------------------------------------------------------------------------
void __fastcall TfrmMain::FileOpen1Accept(TObject *Sender)
{
	// Before opening a new document, find out if the current one is dirty
	if ( rchEditor->Modified )
	{
		// Since the document is dirty, prompt the user to save
		int Response = Application->MessageBox(
			"The document has changed. Do you want to save it?"
			"\nClick\n"
			"Yes:\tTo save the document and open the new one.\n"
			"No:\tNot to save the document but open the new one.\n"
			"Cancel:\tNot to do anything",
			"Editor - Saving a File",
			MB_YESNOCANCEL | MB_ICONQUESTION);

		// If the user wants to save the current document
		if( Response == IDYES )
		{
			// Behave as if the Save action was initiated
			FileSaveExecute(Sender);
			rchEditor->Lines->LoadFromFile(FileOpen1->Dialog->FileName);
			CurrentFileName = FileOpen1->Dialog->FileName;
			AnsiString FName = ExtractFileName(CurrentFileName);
			Caption = "Editor - " + FName;
			rchEditor->Modified = False;
		}
		// If the user doesn't want to save the document
		else if( Response == IDNO )
		{
			// Open the new document after letting the user select it
			rchEditor->Lines->LoadFromFile(FileOpen1->Dialog->FileName);
			// Change the file name of our archives
			CurrentFileName = FileOpen1->Dialog->FileName;
			// Get the name of the file that the user selected
			AnsiString FName = ExtractFileName(CurrentFileName);
			// Display the file name on the title bar
			Caption = "Editor - " + FName;
			// Reset the Modified flag of the rich edit control
			rchEditor->Modified = False;
		}
	}
	// Apparently the current document is not dirty
	else
	{
		rchEditor->Lines->LoadFromFile(FileOpen1->Dialog->FileName);
		CurrentFileName = FileOpen1->Dialog->FileName;
		AnsiString FName = ExtractFileName(CurrentFileName);
		Caption = "Editor - " + FName;
		rchEditor->Modified = False;
	}
}
//---------------------------------------------------------------------------
|
- Close the Action Editor window. Save All and display the form
- From the Standard tab of the Component Palette, click the MainMenu button
 and click the form and click the form
- On the Object Inspector, click the Properties tab and set the Images of the MainMenu1 item to ImageList1
- On the form, double-click MainMenu1
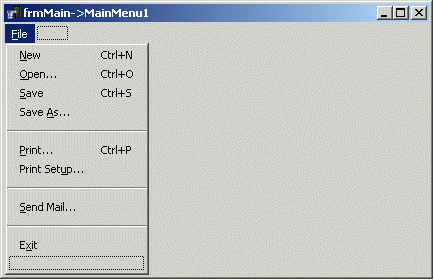
- Right-click an empty area in the Menu Designer and click Insert From Template. In the Insert Template dialog box, double-click File Menu
- Click the last item under Exit and, on the Object Inspector, set its Action property to SendMail1
- Set the caption of the empty box under SendMail to - to add a separator. Move the Send Mail menu item and its separator above the Exit menu item
- Set the Actions to the menu items as follows: New = FileNew, Open = FileOpen1, Save = FileSave, Save As = FileSaveAs1, Print = PrintDlg1, Print Setup = FilePrintSetup1, Exit = FileExit1
- Click the box on the right side of File. Right-click an empty area in the Menu Editor and click Insert From
Template
- In the Insert Template dialog box, double-click Edit Menu
- Delete the Paste Special, Go To, Links, and Object menu items
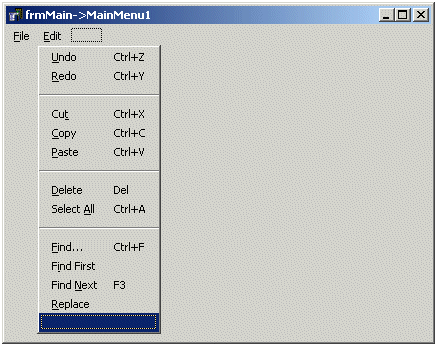
- In the Edit menu of the Menu Designer, Set the Actions as follows: Undo = EditUndo, Repeat <command> = EditRedo, Cut = EditCut1, Copy = EditCopy1, Paste = EditPaste1, Find = SearchFind1, Replace = SearchReplace1
- Using the empty boxes under the Replace menu item, Add the following actions: SearchFindFirst1, SearchFirstNext1, EditDelete1, EditSelectAll1. Arrange the menu item to have the following order:
- Click the box right to Edit. In the Object Inspector, click Caption and type
&View and press Enter
- Click View and click the box under View. Using the Object Inspector, set its Action to ViewStandard. Set the Action of the next empty box to ViewFormatting. Set the action of the next empty box to ViewStatusBar
- Close the Menu Editor
- From the Standard tab of the Component Palette, click PopupMenu
 and click on the form
- On the form, right-click PopupMenu1 and click Menu Designer
- As the first item is selected, on the Object Inspector, set the Action to EditCut1. Set the Action of the second menu item to EditCopy1. Set the Action of the third menu item to
EditPaste1
- Set the Caption of the 4th menu item to - to add a separator
- Set the 5th menu item to ColorSelect1. Set the new menu item’s Action to FontEdit1. Set the Action of the next item to RichEditBullets1
- Close the Menu Designer
- From the Win32 property page of the Component Palette, click ToolBar
 and click an empty area on the form.
- On the Object Inspector, set the Images property of the toolbar to ImageList1. Set its
Flat property to true and set its Height to 24. Set the
Name to tbrStandard
- Right-click the toolbar, position the mouse on Edit and click Copy
- Right-click an empty area on the form, position your mouse on Edit and click
Paste
- While the new toolbar is still selected, on the Object Inspector, change its
Name to tbrFormatting
- Right-click the top toolbar and click New Button. Set its Action property to FileNew. Add other buttons and set their Action values to FileOpen1, FileSave, a separator, EditCut1, EditCopy1, EditPaste1, a separator, EditUndo1, EditRedo, a separator, and PrintDlg1:

- Add the buttons and separators to the bottom toolbar and set their Action values to the RichEditBold1, RichEditItalic1, RichEditUnderline1, RichEditStrikeOut1, a separator, RichEditBullets1, FormatNbr, a separator, RichEditAlignLeft1, RichEditAlignCenter1, and RichEditAlignRight1, a separator
- Right-click the bottom toolbar again and click New Button. Set the ImageIndex to 5 (FirstIndex) and change its Name to btnFirstIndent
- Add a New Button to the bottom toolbar. Set the ImageIndex to 6 and change its Name to btnIndentLeft
- Add one more button for the ImageIndex 7 and named btnIndentRight

- From the Win32 tab of the Component Palette, click StatusBar and click an empty area on the form
- Using the Object Inspector, change its Name to StatusBar
- On the form, double-click the status bar
- In the Panels Editor, right-click and click Add and, on the Object Inspector, set the Width to 320
- Right-click in the Panels Editor again and click Add. Change the Width to 100
- Right-click the Panels Editor again and click Add
- Close the Panels Editor and save the project
- In the Class Explorer, right-click TfrmMain and click New Method...
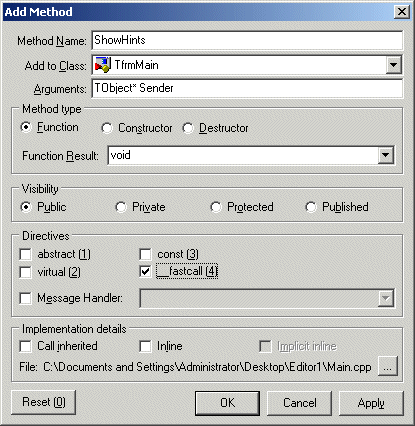
- Set the Method Name to ShowHints. Specify its Argument as TObject *Sender and the Function Result to void. Click the __fastcall check box and click
OK
- Implement the method as follows:
//---------------------------------------------------------------------------
void __fastcall TfrmMain::ShowHints(TObject * Sender)
{
	StatusBar->Panels->Items[0]->Text = Application->Hint;
}
//---------------------------------------------------------------------------
|
- Press F12 to get back to the form. Double-click in an unoccupied area of the form and change its OnCreate event as follows:
//---------------------------------------------------------------------------
void __fastcall TfrmMain::FormCreate(TObject *Sender)
{
	int iRichDLL = (int)LoadLibrary("RICHED20.DLL");

	if( !iRichDLL ) // If you could not load RICHED20.DLL
	{
		ShowMessage("Could not load the RICHED20.DLL");
		Application->Terminate();
	return;
	}

	Application->OnHint = ShowHints;
}
//---------------------------------------------------------------------------
|
- Press F12 to display the form
- On the form, double-click ActionList1 to open the Action List Editor. In the left frame, click View. In the right frame, click
ViewStandard. In the Object Inspector, click the Events tab. Double-click the event side of the OnExecute field and implement its event as
follows:
//---------------------------------------------------------------------------
void __fastcall TfrmMain::ViewStandardBarExecute(TObject *Sender)
{
	tbrStandard->Visible = !tbrStandard->Visible;
	ViewStandard->Checked = !ViewStandard->Checked;
}
//---------------------------------------------------------------------------
|
- In the right frame of the ActionList Editor, double-click ViewFormatting and implement its OnExecute event as follows:
//---------------------------------------------------------------------------
void __fastcall TfrmMain::ViewFormattingExecute(TObject *Sender)
{
	tbrFormatting->Visible = !tbrFormatting->Visible;
	ViewFormatting->Checked = !ViewFormatting->Checked;
}
//---------------------------------------------------------------------------
|
- In the right frame of the ActionList Editor, double-click ViewStatusBar and implement its OnExecute event as follows:
//---------------------------------------------------------------------------
void __fastcall TfrmMain::ViewStatusBarExecute(TObject *Sender)
{
	StatusBar->Visible = !StatusBar->Visible;
	StatusBar1->Checked = !StatusBar1->Checked;
}
//---------------------------------------------------------------------------
|
- Save your project
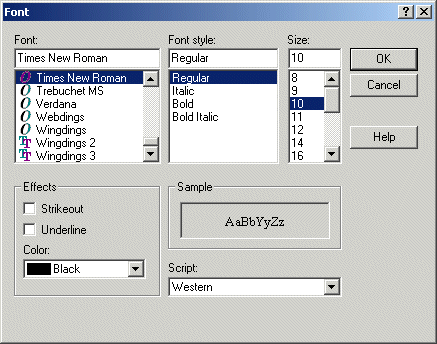
104. On the form, click the rich edit control to select it. In the Properties tab of the Object Inspector, click the Font field. Then click the ellipsis button
105. On the Font dialog box, scroll down in the Font combo box and select Times New Roman. In the Font Style combo box, select Regular. In the Size combo box, click 10. Make sure no style is selected in the Effects section and make sure the Color combo box displays Black:
- Click OK
- Save All
The most fundamental property on any text-based control is the text it holds, for a RichEdit, the text is stored in objects called lines and represented by the Lines property. For a RichEdit control, a Lines item is in fact an individual object based on the
TStrings class. We will learn many techniques of manipulating a TStrings object when we study lists.
For a text-based control, a paragraph is a series of words that start with a letter or empty space until the flow of text is interrupted, which is usually considered a carriage return, or simply the end of the document. The management of such a paragraph is performed for a
TRichEdit object using the Paragraph property. The paragraph is actually controlled by a class called
TParaAttributes. By itself, this paragraph controls the alignment of the block, whether the block is part of a bulleted list, and such details as Tab measurements or indentation. To set or change the properties of a paragraph, you must first select it. To select a paragraph, you do not need to formally select it or any portion of its text. As long as the cursor is positioned inside of the paragraph, any paragraph attribute you set or change would apply to the whole paragraph. To manipulate more than one paragraph at the same time, you or your user must select them. The paragraphs do not need to be wholly selected. As long as a section is selected on each, the paragraphs are considered selected.
The most common property of a paragraph is its alignment, which states whether the paragraph is positioned to the left, the center, or the right. This capability is controlled by the Alignment property. Its three possible values are
taLeftJustify, taCenter, and taRightJustify. To align text at design time, select the desired value using the Alignment property on the Object Inspector. Unfortunately, this would apply to the whole contents of the RichEdit control. Most of the time, you will want to let users change a paragraph's alignment while they are using your application. To change the alignment at run time, assign the desired value to the Alignment property. In the following examples, the alignment of the selected paragraph is set in response to the user clicking one of the buttons:
//---------------------------------------------------------------------------
void __fastcall TForm1::btnAlignLeftClick(TObject *Sender)
{
	rchEditor->Paragraph->Alignment = taLeftJustify;
}
//---------------------------------------------------------------------------
void __fastcall TForm1::btnCenterClick(TObject *Sender)
{
	rchEditor->Paragraph->Alignment = taCenter;
}
//---------------------------------------------------------------------------
void __fastcall TForm1::btnAlignRightClick(TObject *Sender)
{
	rchEditor->Paragraph->Alignment = taRightJustify;
}
//---------------------------------------------------------------------------
Indentation consists of pushing a paragraph from one of the margins of the document. The
TParaAttributes class allows you to indent the first line of a paragraph using the
FirstIndent property. It is an integer value that sets or controls the amount of indentation of the first line. The
LeftIndent property is an integer number that controls how much a paragraph is indented from the left margin of the document. The
RightIndent value controls a similar indentation from the right margin.
To create an unordered list of items in your document, you can use the TParaAttributes::Numbering property. This property controls the assignment of a bulleted list. You have two options, If the paragraph is a regular one and you want to create a list, assign the
nsBullet value to the Numbering property. If the paragraph is already a list but you want to convert it into a regular paragraph, assign the
nsNone value to the property. Here is an example that applies when the user clicks a button called
BulletList:
//---------------------------------------------------------------------------
void __fastcall TForm1::BulletList1Click(TObject *Sender)
{
	if( rchEditor->Paragraph->Numbering == nsBullet )
		rchEditor->Paragraph->Numbering = nsNone;
	else
		rchEditor->Paragraph->Numbering = nsBullet;
}
//---------------------------------------------------------------------------
One of the main characteristics of a rich text is the ability to set or control individual characteristics of sections of its text. The rich characteristics of text are controlled by the TTextAttributes class. This property allows you to change the font, its color, size, and/or style. To manipulate the text attributes, the text must be selected first. This means that the change applies only if there is a formal selection. For example, you can set or change the Bold style of the selected text when the user clicks a button called btnBold as follows:
//---------------------------------------------------------------------------
void __fastcall TForm1::btnBoldClick(TObject *Sender)
{
	if( btnBold->Down )
		rchEditor->SelAttributes->Style = TFontStyles() << fsBold;
	else
		rchEditor->SelAttributes->Style = TFontStyles() >> fsBold;
}
//---------------------------------------------------------------------------
Besides the proper characteristics of a rich text, the TRichEdit also shares or inherits the characteristics of a memo or an edit control.
Borland C++ Builder simplifies the configuring of a RichEdit control through the use of an ActionList control. The ActionList has many attributes already configured to seamlessly function with a RichEdit present on a form.
|
 Practical
Learning: Creating a RichEdit-Based Application
|
|
- On the form, click rchEditor to select the RichEdit control
- On the Object Inspector, change its Align property to alClient. Set HideSelection to false. Double-click the right field to Lines, delete the text and click OK. Set the PopupMenu property to PopupMenu1. Set the WantTabs property to
true
- In the Object Inspector, click the Events tab. Display the ActionList Editor. In the left frame, click Dialog. In the right frame, click FontEdit1. In the Object Inspector, double-click on the right field to BeforeExecute
- Implement the event as follows:
//---------------------------------------------------------------------------
void __fastcall TfrmMain::FontEdit1BeforeExecute(TObject *Sender)
{
	// Get the characteristics of the select text
	// Apply them to the Font dialog box
	FontEdit1->Dialog->Font->Name = rchEditor->SelAttributes->Name;
	FontEdit1->Dialog->Font->Style = rchEditor->SelAttributes->Style;
	FontEdit1->Dialog->Font->Size = rchEditor->SelAttributes->Size;
	FontEdit1->Dialog->Font->Color = rchEditor->SelAttributes->Color;
}
//---------------------------------------------------------------------------
|
- Go back to the ActionList Editor. On the Events tab of the FontEdit1, double-click the right field of OnAccept and implement the event as follows:
//---------------------------------------------------------------------------
void __fastcall TfrmMain::FontEdit1Accept(TObject *Sender)
{
	// Do the inverse of the BeforeExecute event
	// If the user clicks OK, get the characteristics of the font
	// Apply them to the selected text of the Rich Edit control
	rchEditor->SelAttributes->Name = FontEdit1->Dialog->Font->Name;
	rchEditor->SelAttributes->Style = FontEdit1->Dialog->Font->Style;
	rchEditor->SelAttributes->Size = FontEdit1->Dialog->Font->Size;
	rchEditor->SelAttributes->Color = FontEdit1->Dialog->Font->Color;
}
//---------------------------------------------------------------------------
|
- Press F12 to access the form. On the form, double-click MainMenu1. Click the box on the right side of View. In the Object Inspector, click the Properties tab and click Caption. Type F&ormat and press
Enter
- On the Menu Designer, click Format. Under the Format menu, click the empty box and, on the Object Inspector, set its Action to FontEdit1
- Close the Menu Designer
- On the bottom toolbar, double-click the FirstIndent button and implement its OnClick event as follows:
//---------------------------------------------------------------------------
void __fastcall TfrmMain::btnFirstIndentClick(TObject *Sender)
{
	rchEditor->Paragraph->FirstIndent += 10;
}
//---------------------------------------------------------------------------
|
- On the bottom toolbar, double-click the IndentLeft button and implement its OnClick event as
follows:
//---------------------------------------------------------------------------
void __fastcall TfrmMain::btnIndentLeftClick(TObject *Sender)
{
	rchEditor->Paragraph->LeftIndent += 10;
}
//---------------------------------------------------------------------------
|
- On the bottom toolbar, double-click the IndentRight button and implement its OnClick event as follows:
//---------------------------------------------------------------------------
void __fastcall TfrmMain::btnIndentRightClick(TObject *Sender)
{
	rchEditor->Paragraph->RightIndent += 10;
}
//---------------------------------------------------------------------------
|
- Save All
Because it can be asked to perform various and sometimes complex assignments, a rich edit control can process two categories of messages: those originally built-in the control and those that have been added over the years. This is why you may have to first load a rich edit DLL from the operating system because the control has mostly been updated since you installed your programming environment. All of the basic functionality of a text-based control is natively supported in the rich edit control as we have seen or used it so far. Common operations include cutting or copying from another document, pasting text to the current document, formatting characters and paragraphs. The new release of the control may have added functionality that the version in your VCL implementation does not have.
To allow users to print its content, the RichEdit control is equipped with the Print() method. This method only requires the name of the document that is being printed.
One of the regular actions users perform on a document is to do, undo, or redo something on the application. The ability to undo an action is already implemented in the original version of the rich edit control. To all a user to redo an action, you can send an
EM_REDO message to the control using the SendMessage() function. The
wParam and the lParam parameters are not used and must be passed as 0.
|
 Practical
Learning: Implementing Rich Text Messages
|
|
- Display the ActionList Editor and, on the left frame, click Dialog. On the right frame, click PrintDlg. On the Object Inspector, click the Events tab and double-click the event side of the OnAccept field
- Implement it as follows:
//---------------------------------------------------------------------------
void __fastcall TfrmMain::PrintDlg1Accept(TObject *Sender)
{
	rchEditor->Print(CurrentFileName);
}
//---------------------------------------------------------------------------
|
- Display the ActionList Editor. In the left frame, click Edit. In the right frame, double-click EditRedo and implement its
OnExecute() event as follows:
//---------------------------------------------------------------------------
void __fastcall TfrmMain::EditRedoExecute(TObject *Sender)
{
	SendMessage(rchEditor->Handle, EM_REDO, 0, 0);
}
//---------------------------------------------------------------------------
|
- On the main menu, click File -> New -> Other… In the New Items dialog box, click the Dialogs tab. Click Standard Dialog (Vertical) and click OK
- On the Object Inspector, change its Name to dlgFont and change its Caption to Font
- Save it as Font
- Test the application and return to Bcb
Advanced text formatting on a Microsoft rich edit control is performed using the
CHARFORMAT or the CHARFORMAT2 structures. Because we are interested in the latest features, we will use
CHARFORMAT2. It is defined as follows:
typedef struct _charformat2 {
	UINT cbSize;
	DWORD dwMask;
	DWORD dwEffects;
	LONG yHeight;
	LONG yOffset;
	COLORREF crTextColor;
	BYTE bCharSet;
	BYTE bPitchAndFamily;
	TCHAR szFaceName[LF_FACESIZE];
	WORD wWeight;
	SHORT sSpacing;
	COLORREF crBackColor;
	LCID lcid;
	DWORD dwReserved;
	SHORT sStyle;
	WORD wKerning;
	BYTE bUnderlineType;
	BYTE bAnimation;
	BYTE bRevAuthor;
	BYTE bReserved1;
} CHARFORMAT2;
To use this structure, declare a variable of it and use its cbSize member variable to specify its size. Here is an example:
//---------------------------------------------------------------------------
void __fastcall TForm1::Button1Click(TObject *Sender)
{
	CHARFORMAT2 cfm2;

	cfm2.cbSize = sizeof(CHARFORMAT2);
}
//---------------------------------------------------------------------------
Once the compiler is aware of the size of the structure, use the dwMask member variable to specify the type of formatting you want to perform. Formatting examples include all caps, bold, italic, subscript, etc.
After selecting the type of formatting that will applied, initialize the dwEffects member variable to the corresponding format. (Microsoft has highly improved the documentation on the RichEdit control libraries so much that, to save space on the book, we will not repeat that documentation here. Instead, we will provide examples).
|
 Practical
Learning: Formatting Text
|
|
- Display the main form. Double-click ImageList1. From the resources that accompany this book, add the
AllCaps,
- Right-click the bottom toolbar and click Separator
- Right-click it again and click New Button. Set its ImageIndex to 29 (AllCaps). Change its Name to
btnAllCaps. Double-click it again and implement its OnClick event as
follows:
//---------------------------------------------------------------------------
void __fastcall TfrmMain::btnAllCapsClick(TObject *Sender)
{
	Richedit::CHARFORMAT2 cfm2;

	cfm2.cbSize = sizeof(cfm2);
	cfm2.dwMask = CFM_ALLCAPS;
	cfm2.dwEffects = CFE_ALLCAPS;
	SendMessage(RichEdit1->Handle, EM_SETCHARFORMAT,
	static_cast<WPARAM>(SCF_SELECTION),
	reinterpret_cast<LPARAM>(&cfm2));
}
//---------------------------------------------------------------------------
|
4. Test the application and return to Bcb
Besides the regular techniques provided by the TRichEdit class, paragraph formatting on a rich edit control can be performed using the
PARAFORMAT or the PARAFORMAT2 structures. Because everything available in the first is implemented in the second, we will use the
PARAFORMAT2 structure. It is defined as follows:
typedef struct _paraformat {
	UINT cbSize;
	DWORD dwMask;
	WORD wNumbering;
	WORD wEffects;
	LONG dxStartIndent;
	LONG dxRightIndent;
	LONG dxOffset;
	WORD wAlignment;
	SHORT cTabCount;
	LONG rgxTabs[MAX_TAB_STOPS];
	LONG dySpaceBefore;
	LONG dySpaceAfter;
	LONG dyLineSpacing;
	SHORT sStyle;
	BYTE bLineSpacingRule;
	BYTE bOutlineLevel;
	WORD wShadingWeight;
	WORD wShadingStyle;
	WORD wNumberingStart;
	WORD wNumberingStyle;
	WORD wNumberingTab;
	WORD wBorderSpace;
	WORD wBorderWidth;
	WORD wBorders;
} PARAFORMAT2;
#define wEffects wReserved
To use it, declare a PARAFORMAT2 variable and use the cbSize member variable to specify the size of the structure. After this, use the
dwMask to specify the type of formatting you want to perform.
|
|

