|
If you have used StarOffice, you are probably familiar
with the technique used on its Options dialog box. Otherwise, it consists
of a tree view on the left section and a right section that changes according to
the item selected on the left, almost like Windows Explorer. Although
it would look difficult at first, Borland C++ Builder makes this application
ridiculously easy. Usually, only the design would take you longer, thanks
to the Rapid Application Development available on your compiler. |
|
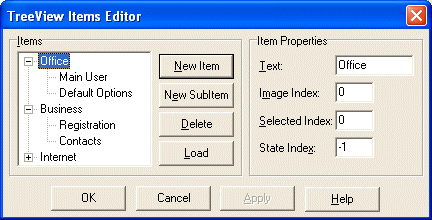
We will first create the tree's items
- If you didn't yet, start Borland C++ Builder with the default form.
To create the left tree, on the Component Palette, click the Win32
tab.
- Double-click the TreeView button
 to add a TreeView control
- Set the properties of the tree view as follows: AutoExpand = true; Height = 337; Left =
8; Top = 8; Width = 121
- Double-click the TreeView1 control on the form to create the list of
items associated with the tree.
- Click the New Item button and type Office
- Press Enter and type Business
- Press Enter and type Internet
- Click Office to select it. Click the New SubItem button and type
Main User
- Press Enter and type Default Options
- Click Business to select it
- Click the New SubItem button and type Registration
- Press Enter and type Contacts
- Click Internet and click New SubItem
- Type Web Resources:

- Click OK
|
|
Now will create the target items
- Click an empty area on the form to make sure nothing is selected
- On the Component Palette, click Standard. Double-click the Panel
button
 . .
- On the Object Inspector, delete the content of the Caption field.
Change the name of the Panel control to pnlNoSelection
- Set the properties of the Panel control as follows: Height = 289;
Left = 136; Top = 8; Width = 409.
- Click inside of the panel to make sure it is selected (and not one
of its properties). On the main menu, click Edit -> Copy.
- With the panel still selected, add a label to the panel. On the
Object Inspector, click Caption and type Rockville Technologies
- With the new label still selected, on the Object Inspector,
double-click the Font right field. Change the font to Garamond, Bold,
36, Blue. Click OK
- Click an empty area on the form to make sure that nothing is
selected (if you cannot see the form, click the TreeView control and
press Esc).
- On the main menu, click Edit -> Paste
- The newly pasted panel should be selected (otherwise select it).
Change its name to pnlMainUser
- Set its properties as follows: Left = 136; Top = 8.
- Add a few controls to the selected panel
- Click and empty area on the form.
- On the main menu, click Edit -> Paste.
- Set the properties to Left = 136; Top = 8; Name = pnlDefaultInfo
- Set its properties as follows: Left = 136; Top = 8.
- Add a few controls to the selected panel
|
|
Now we will implement the behavior of the form
- Click the TreeView control on the form.
- On the Object Inspector, click the Events tab.
- Double-click the right field of the OnChange event. Implement it as
follows:
//---------------------------------------------------------------------------
__fastcall TForm1::TForm1(TComponent* Owner)
    : TForm(Owner)
{
    pnlNoSelection->BringToFront();
}
//---------------------------------------------------------------------------
void __fastcall TForm1::TreeView1Change(TObject *Sender, TTreeNode *Node)
{
    if( Node->Text == "Default Options" )
        pnlDefaultInfo->BringToFront();
    else if( Node->Text == "Registration" )
        pnlMainUser->BringToFront();
    else
        pnlNoSelection->BringToFront();
}
//---------------------------------------------------------------------------
|
- Test your program
|
|
|

