Introduction to Application Design
|
|
Introduction to Application Design |
|
Fundamentals of Control Creation |
The Win32 library defines a window control as an object that displays on the screen. In order to give presence to such an object, its window must be explicitly created. There are two main categories of windows you will need to create for your application: parents and children: |
|
A child window can be a parent of another control. For example, the Standard toolbar of Embarcadero RAD Studio is the parent of the buttons on it. If you close or hide the toolbar, its children disappear. At the same time, the toolbar is a child of the application's frame. If you close the application, the toolbar disappears, along with its own children. In this example, the toolbar is a child of the frame but is a parent to its buttons.
From our knowledge of C++, we know that the fundamental block of a class is: //---------------------------------------------------------------------------
#ifndef CarH
#define CarH
//---------------------------------------------------------------------------
class TCar
{
};
//---------------------------------------------------------------------------
#endif
To be able to describe an object created from a class, the class can have member variables. A Windows control is an object that allows a computer user to interact with the machine. It can be used to write, read, draw, or calculate, etc. To present itself and make itself useful, a Windows control must have some characteristics. There are two sets of Windows controls we will use in our applications. The primary controls we will use come from the Visual Component Library (VCL). Most of the time, we will visually add and control those objects. Sometimes we will programmatically create those controls. The secondary controls we will use come from the Win32 library. As in C++, a method is a function created as a member of a class. Methods are used to access or manipulate the characteristics of an object, a variable, or a pointer to a class. There are mainly two categories of methods you will use in your classes:
The methods of a class are available only at run time. Except for the constructor, to access a method, first make sure you have the variable or pointer. Then use either the period operator for a variable or the arrow operator for a pointer to access the desired method. The most fundamental and the most common method of a class is its constructor. All Windows controls of the VCL are based each on a particular class, and each one of them has at least one constructor. Dynamically creating a control consists of declaring a pointer to its class using the new operator. If the control is a visual object, you must specify its parent, as we will see. This is done by calling its main constructor. If the class does not represent a visual object, call its default constructor. The second most popular method is the destructor. Based on the rules of RAD programming, you will never need to call the destructor of a control or a class, even if you dynamically create the variable. If you need to destroy an object that was programmatically created, you will use the delete operator. Most (in fact all) of the classes that consume resources, such as graphic-based objects, are equipped with a method named Free. Therefore, when it comes time to get rid of an object created from such a class, call its Free() method.
In Microsoft Windows, that is, in the Win32 library, to let you create a control, the library provides two classes named CreateWindow and CreateWindowEx and you can use either of them. They are declared as follows:
We will come back to them in later sections.
If for any reason you cannot or would not visually add a control at design time, you can create it programmatically. There are various techniques you can use. You can first decide what class will be used as the basis of your control. Once you have the object you want to use, declare a pointer to its class using the new operator.
If you are using a VCL control, you must know the name of the class on which the control is based (and each control is based on a particular class). If you have examined the types of classes available but none implements the behavior you need, you can first locate one that is close to the behavior you need, then use it as a base to derive a new class. To derive a class from an existing VCL control, you must at least declare a constructor that will specify the owner of the control. An example would be: //---------------------------------------------------------------------------
class TPlatform : public TSomeControl
{
public:
__fastcall TPlatform(TOwner *Owner);
};
//---------------------------------------------------------------------------
Besides the constructor, in your class, you can add the properties, methods, and/or events as you see fit. When implementing the constructor, specify the owner as the base class. You can also use it to globally set a value for a property of the base class. Here is an example: //---------------------------------------------------------------------------
__fastcall TPlatform::TPlatform(TOwner *Owner)
: TSomeControl(Owner)
{
}
//---------------------------------------------------------------------------
Once the control is ready, you can dynamically create it like any other VCL control.
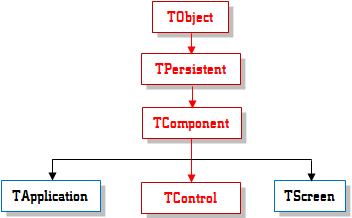
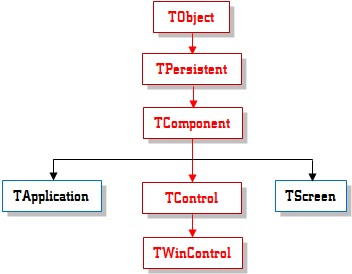
There are three main categories of controls we will use in our lessons: existing VCL controls, existing Win32 controls, and custom controls that are not directly available from the other categories. We will always prefer VCL controls because that is the subject of our lessons. If a control cannot do what we want, which will hardly happen, then we can use one of the Win32Æs. In extreme cases, we may have to create a new control. As stated already, a control is an object used in an application. In the VCL, a control is based on the TControl class:
The TControl class provides the characteristics that all controls, seen or unseen, share, including many characteristics from the TComponent class.
We know that a Windows control is an object that is visible on an application. A Windows control is an object of type TWinControl:
You will hardly, if ever, use the TWinControl class directly. Instead, to use a control, you will select it. As mentioned already, to create a control in Microsoft Windows, you can use either the CreateWindow() of the CreateWindowEx() function. In reality, the TWinControl class is a VCL adaptation of the Win32's CreateWindow() and CreateWindowEx() functions.
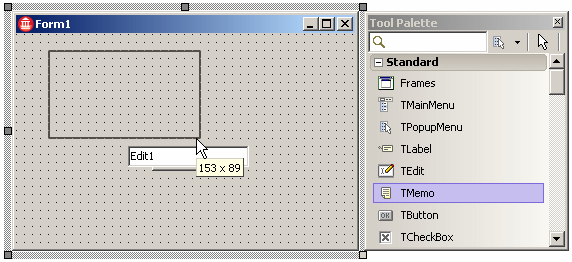
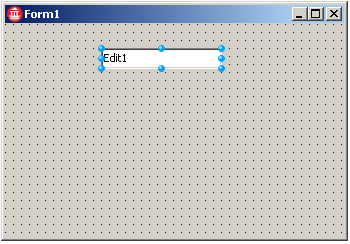
A Windows control is a graphical object that allows the user to interact with the computer. The controls are as varied as the needs and goals are. Because there are so many controls for various purposes, their design and creation are left to the computer programmer. Rapid application design (RAD) consists of visually selecting controls and adding them to your application. To assist you with this, Embarcadero RAD Studio provides an object named the Tool Palette:  Therefore, to visually add a control to your application, you will click that control in the Tool Palette and click an object on your application. Controls can be set by categories based on their function or role. A container is a control whose main purpose is to host other controls. To design it, you pick up objects from the Tool Palette and drop them where desired. The most common and the most widely used container is the form. All of the applications we will create in our lessons qualify as graphical user interface (GUI). A GUI application is one that displays Windows controls to the user who acts on them to interact with the computer. |
Creating a good-looking application is a combination of art, intuition, and logic. Not all IDEs provide the same features but C++Builder is enhanced on this aspect. We will learn how to configure various controls as we move on. The first thing to do is to get familiar with what can ease the userÆs experience with your application. When designing an application, you will usually position the desired controls on a form. You will decide what control you need, where it will be positioned on the form and, with regard to other controls, what appearance it should have, and what behavior should be customized.
|
|
|||||||||
|
|
|
|
||
| Previous | Copyright © 2010-2016, FunctionX | Next |
|
|
||