|
A speed is primarily a button. This means that, to use
it the user must click it. When this is done, the control fires an
OnClick event. In a mutual-exclusion scenario, the button that was
clicked stays down. Still, you can use the event of the button however you
want. For example, you can use the event as a normally clicked action. At
the same time, you can find out if the button that was click is currently
down.
|
 Practical
Learning: Using Speed Buttons Practical
Learning: Using Speed Buttons
|
|
- On the form, double-click the Addition button to generate its
OnClick event
- Implement the event as follows:
//---------------------------------------------------------------------------
void __fastcall TForm1::btnAdditionClick(TObject *Sender)
{
	int Operand1 = 0;
	int Operand2 = 0;
	Operation    = 1;

	if( Level == 1 )
	{
		Operand1 = Random(10);
		Operand2 = Random(10);
	}
	else if( Level == 2 )
	{
		Operand1 = Random(30);
		Operand2 = Random(30);
	}
	else if( Level == 3 )
	{
		Operand1 = Random(60);
		Operand2 = Random(60);
	}
	else // if( Level == 4 )
	{
		Operand1 = Random(80);
		Operand2 = Random(80);
	}

	lblOperand1->Caption  = IntToStr(Operand1);
	lblOperation->Caption = L"+";
	lblOperand2->Caption  = IntToStr(Operand2);
	edtResult->Text    = L"0";
}
//---------------------------------------------------------------------------
- In the Object Inspector, click Events
- In the top combo box of the Object Inspector, select btnSubtraction
- Double-click the right side of OnClick
- Implement the event as follows:
//---------------------------------------------------------------------------
void __fastcall TForm1::btnSubtractionClick(TObject *Sender)
{
	int Operand1 = 0;
	int Operand2 = 0;
	Operation    = 2;

	if( Level == 1 )
	{
		Operand1 = Random(10);
		Operand2 = Random(10);
	}
	else if( Level == 2 )
	{
		Operand1 = Random(30);
		Operand2 = Random(30);
	}
	else if( Level == 3 )
	{
		Operand1 = Random(60);
		Operand2 = Random(60);
	}
	else // if( Level == 4 )
	{
		Operand1 = Random(80);
		Operand2 = Random(80);
	}

	lblOperand1->Caption = IntToStr(Operand1);
	lblOperation->Caption = L"-";
	lblOperand2->Caption = IntToStr(Operand2);
	edtResult->Text    = L"0";
}
//---------------------------------------------------------------------------
- In the top combo box of the Object Inspector, select
btnMultiplication
- Double-click the right side of OnClick
- Implement the event as follows:
//---------------------------------------------------------------------------
void __fastcall TForm1::btnMultiplicationClick(TObject *Sender)
{
	int Operand1 = 0;
	int Operand2 = 0;
	Operation    = 3;

	if( Level == 1 )
	{
		Operand1 = Random(5);
		Operand2 = Random(5);
	}
	else if( Level == 2 )
	{
		Operand1 = Random(15);
		Operand2 = Random(15);
	}
	else if( Level == 3 )
	{
		Operand1 = Random(25);
		Operand2 = Random(25);
	}
	else // if( Level == 4 )
	{
		Operand1 = Random(40);
		Operand2 = Random(40);
	}

	lblOperand1->Caption = IntToStr(Operand1);
	lblOperation->Caption = L"*";
	lblOperand2->Caption = IntToStr(Operand2);
	edtResult->Text    = L"0";
}
//---------------------------------------------------------------------------
- In the top combo box of the Object Inspector, select btnDivision
- Double-click the right side of OnClick
- Implement the event as follows:
//---------------------------------------------------------------------------
void __fastcall TForm1::btnDivisionClick(TObject *Sender)
{
	int Operand1 = 0;
	int Operand2 = 1;
	int Factor   = 1;
	Operation    = 4;

	// Division is a special case
	if( Level == 1 )
	{
		Factor   = Random(3);
		Operand2 = Random(5);
	}
	else if( Level == 2 )
	{
		Factor   = Random(4);
		Operand2 = Random(10);
	}
	else if( Level == 3 )
	{
		Factor   = Random(6);
		Operand2 = Random(10);
	}
	else // if( Level == 4 )
	{
		Factor   = Random(10);
		Operand2 = Random(20);
	}

	Operand1 = Factor * Operand2;

	if( Operand2 == 0 )
		Operand2 == 1;

	lblOperand1->Caption = IntToStr(Operand1);
	lblOperation->Caption = L"/";
	lblOperand2->Caption = IntToStr(Operand2);
	edtResult->Text    = L"0";
}
//---------------------------------------------------------------------------
- In the top combo box of the Object Inspector, select btnLevel1
- Double-click the right side of OnClick
- Implement the event as follows:
//---------------------------------------------------------------------------
void __fastcall TForm1::btnLevel1Click(TObject *Sender)
{
	Level = 1;

	if( Operation == 1 )
		btnAdditionClick(Sender);
	else if( Operation == 2 )
		btnSubtractionClick(Sender);
	else if( Operation == 3 )
		btnMultiplicationClick(Sender);
	else
		btnDivisionClick(Sender);
}
//---------------------------------------------------------------------------
- In the top combo box of the Object Inspector, select btnLevel2
- Double-click the right side of OnClick
- Implement the event as follows:
//---------------------------------------------------------------------------
void __fastcall TForm1::btnLevel2Click(TObject *Sender)
{
	Level = 2;

	if( Operation == 1 )
		btnAdditionClick(Sender);
	else if( Operation == 2 )
		btnSubtractionClick(Sender);
	else if( Operation == 3 )
		btnMultiplicationClick(Sender);
	else
		btnDivisionClick(Sender);
}
//---------------------------------------------------------------------------
- In the top combo box of the Object Inspector, select btnLevel3
- Double-click the right side of OnClick
- Implement the event as follows:
//---------------------------------------------------------------------------
void __fastcall TForm1::btnLevel3Click(TObject *Sender)
{
	Level = 3;

	if( Operation == 1 )
		btnAdditionClick(Sender);
	else if( Operation == 2 )
		btnSubtractionClick(Sender);
	else if( Operation == 3 )
		btnMultiplicationClick(Sender);
	else
		btnDivisionClick(Sender);
}
//---------------------------------------------------------------------------
- In the top combo box of the Object Inspector, select btnLevel4
- Double-click the right side of OnClick
- Implement the event as follows:
//---------------------------------------------------------------------------
void __fastcall TForm1::btnLevel4Click(TObject *Sender)
{
	Level = 4;

	if( Operation == 1 )
		btnAdditionClick(Sender);
	else if( Operation == 2 )
		btnSubtractionClick(Sender);
	else if( Operation == 3 )
		btnMultiplicationClick(Sender);
	else
		btnDivisionClick(Sender);
}
//---------------------------------------------------------------------------
- In the top combo box of the Object Inspector, select frmAlgebra
- Double-click the right side of OnCreate
- Implement its event as follows:
//---------------------------------------------------------------------------
void __fastcall TForm1::FormCreate(TObject *Sender)
{
	btnAdditionClick(Sender);
}
//---------------------------------------------------------------------------
- In the top combo box of the Object Inspector, select btnCheckResult
- Double-click OnClick and implement the event as follows:
//---------------------------------------------------------------------------
void __fastcall TForm1::btnCheckResultClick(TObject *Sender)
{
	int Operand1   = StrToInt(lblOperand1->Caption);
	int Operand2   = StrToInt(lblOperand2->Caption);
	int UserResult = StrToInt(edtResult->Text);
	bool RightAnswer = False;

	if( (btnAddition->Down == True) &&
		(UserResult == (Operand1 + Operand2)) )
		RightAnswer = True;
	else if( (btnSubtraction->Down == True) &&
		(UserResult == (Operand1 - Operand2)) )
		RightAnswer = True;
	else if( (btnMultiplication->Down == True) &&
		(UserResult == (Operand1 * Operand2)) )
		RightAnswer = True;
	else if( (btnDivision->Down == True) &&
		(UserResult == (Operand1 / Operand2)) )
		RightAnswer = True;

	if(	RightAnswer == True )
		MessageBox(Handle, "WOW - Good Result", "Elementary Algebra", 0);
	else
		MessageBox(Handle,
			   "PSST - Wrong Answer\n"
			   "We hope you will get it right next time",
			   "Elementary Algebra", 0);
}
//---------------------------------------------------------------------------
- In the top section of the Object Inspector, select btnClose
- Double-click the right side of OnClick
- Implement its event as follows:
//---------------------------------------------------------------------------
void __fastcall TfrmAlgebra::btnCloseClick(TObject *Sender)
{
	Close();
}
//---------------------------------------------------------------------------
- In the Object Inspector, click the Properties tab
- To execute the application, press F9
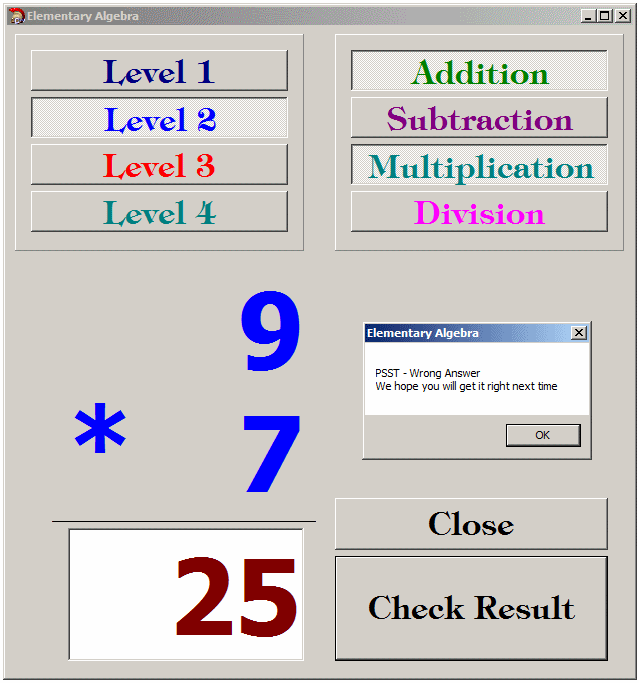
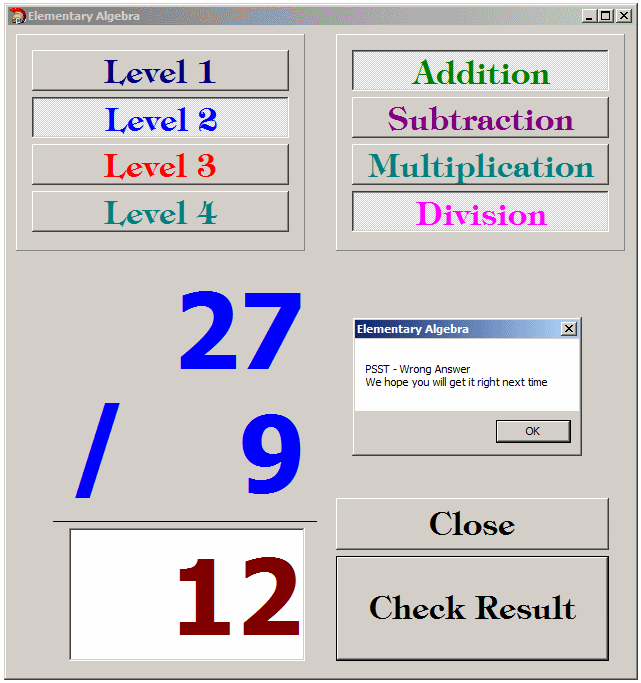
- Click the buttons to perform some operations. Here are examples:


- Click the Close button to close the form and return to your
programming environment
Normally, in a mutual exclusive group, if the user
clicks a speed button that is already down, nothing would happen. If you
want, when the user clicks a button that is already down, you can bring it
up so that all buttons become up. To support this feature, the TSpeedButton
class is equipped with a Boolean property named AllowAllUp:
__property bool AllowAllUp = {read=FAllowAllUp,write=SetAllowAllUp};
The default value of this property is False. If you set
this property to True, if the user clicks a button that is already down, it
would be raised and the buttons would keep their up-state.
By default, a speed button appears as a normal
rectangular command button. If you want to use a visual aesthetic
appearance, you can make it flat. This characteristic is controlled by the
Boolean Flat property of the TSpeedButton class:
__property bool Flat = {read=FFlat,write=SetFlat};
The default value of this property is False. If you set
this property to True, the button appears at the same level with its
container (the form or else). When the mouse is positioned on the button,
the borders appear.
|
 Practical
Learning: Setting Buttons Flat Practical
Learning: Setting Buttons Flat
|
|
--- The following exercise is optional and has no effect on the
application ---
- On the form, click the Level 1 button
- Press and hold Shift
- Click the Level 2 button
- Click the Level 3 button
- Click the Level 4 button
- Release Shift
- In the Object Inspector, click the check box of Flat to make it True
- On the form, click the Addition button
- Press and hold Shift
- Click the Subtraction button
- Click the Multiplication button
- Click the Division button
- Release Shift
- In the Object Inspector, click the check box of Flat to make it True
- Press F9 to test the application
- Continuously position the mouse on the top speed buttons
- Close the form and return to your programming environment
|
|

