Dialog Boxes
|
|
Dialog Boxes |
|
Introduction |
|
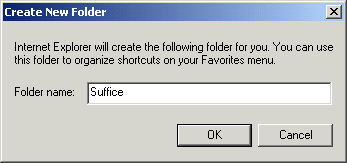
A dialog box is a form with particular properties. Like a form, a dialog box is referred to as a container. It is the primary interface of user interaction with the computer. By itself, a dialog box means nothing. The controls it hosts accomplish the role of dialog between the user and the machine. Here is an example of a dialog box:
|
|
A dialog box has the following characteristics:
|
There are two main actions you can perform on a form to qualify it as a dialog box; but normally, these are only suggestions, not rules. Based on the Microsoft Windows design and standards, to create a dialog box:
Often the user will be presented with various options on a dialog box and may be asked to make a decision on the available controls. Most of the time, if you are creating such a dialog box, besides the OK button, it should also have a Cancel button. The OK button should be the default so that if the user presses Enter, the dialog box would be closed as if the user had clicked OK. Clicking OK or pressing Enter would indicate that, if the user had made changes on the controls of the dialog box, those changes would be acknowledged and kept when the dialog box is closed and usually the changed values of the control would be transferred to another dialog box or form. The Cancel button is used to allow the user to dismiss whatever changes would have been made on the controls of the dialog box. The dialog box should also be configured so that if the user presses Esc, the dialog box would be closed as if the user had clicked Cancel. To fulfill these rules for the OK and the Cancel buttons, the Default property of the OK button should be set to true and the Cancel property of the Cancel button should be set to true. Besides the OK and the Cancel buttons, a dialog box can be created with additional buttons such as Finish or Help, etc. It depends on its role and the decision is made by the application developer.
There are two types of dialog boxes: modal and modeless. A Modal dialog box is one that the user must first close in order to have access to any other framed window or dialog box of the same application. One of the scenarios in which you use a dialog box is to create an application that is centered around one. In this case, if either there is no other form or dialog box in your application or all the other forms or dialog boxes depend on this central dialog box, it must be created as modal. Such an application is referred to as dialog-based. Some applications require various dialog boxes to complete their functionality. When in case, you may need to call one dialog box from another and display it as modal. After creating a dialog used as an addition to an existing form or an existing dialog box, to call it as modal, use the ShowModal() method. |
A dialog box is referred to as modeless if the user does not have to close it in order to continue using the application that owns the dialog box. Since the modeless dialog box does not display its button on the task bar, the user should know that the dialog box is opened. To make the presence of a modeless dialog box obvious to the user, it typically displays on top of its host application until the user closes it. Just like the Modal dialog box, to create a modeless dialog box, once you have added a form to your application, to call it as a modeless dialog box, simply call the Show() method. The only thing you need to take care of is the fact that the dialog box can disappear behind the form that called it. The fundamental difference between the ShowModal()
and the Show() methods is that the first displays a modal dialog box,
which makes sure that the called dialog box cannot go in the background of
the main application. By contrast, the Show() method only
calls the dialog box every time it is requested. For this reason, it is your
responsibility to make sure that the modeless dialog box always remains on
top of the application. This is easily taken care of by setting the
FormStyle property of the form to fsStayOnTop.
To make your development experience a little faster, C++Builder ships with a lot of dialog boxes ready for use. These dialog boxes are created as modal and are equipped with an OK and a Cancel buttons. These dialogs are available on the Dialogs property page of the New Items dialog box. To use a C++Builder dialog template, display the New Items dialog box. Click the Dialogs tab, select the desired template and click OK. Most dialog boxes are equipped with a bevel for aesthetic purposes and two or three buttons. The OK buttons are configured with the Default property set to true and the ModalResult property set to mrOk. The Cancel buttons have their Cancel property set to true and their ModalResult set to mrCancel. You can reposition the controls and add new ones to the form as you wish. You can add one of the template dialog boxes to your application. Alternatively, if you want to base your application on one of these templates, you can remove the default form from your application.
|
|
|||||||
|
|
|
|
||
| Home | Copyright © 2010-2016, FunctionX | |
|
|
||