A C++ Application and its Files
|
A C++ Application and its Files |
To create a source file in Microsoft Visual C++ 2005:
If you already have a source file somewhere on a drive or on the network and you want to use that file in your project, on the main menu, you can click Project -> Add Existing Item... In the Add Existing Item dialog box, in the Look In combo box, display the folder that contains the file, locate the file you want to use, select it, and click Add.
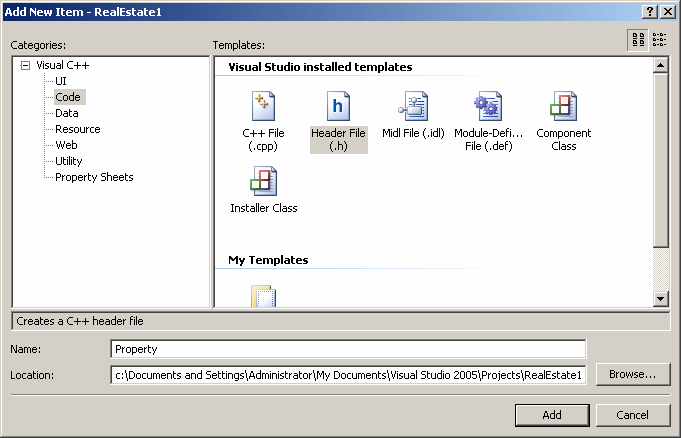
C++ is one of the few languages that have or use the concept of header files. A header file is one that contains code that source files or other header files of a project use. In the strict sense, there is no rule as to what type of code you can put in the header file. Traditionally, programmers put in a header file the items that are not defined. For example, you can put the "skeletons" of your functions or the "skeletons" of your classes. One reason you would do this is to only show to other people what your functions or classes look like, not how they behave. In some cases, if you are creating a library (a DLL) that you want to sell or distribute to other programmers, a header file allows you to show these skeletons. You can then use a source file to define these skeletons. When you sell or distribute such a library, you don't include the source file. You distribute only the header file and the library itself. Since your customers or your audience cannot "read" what is in a library, they cannot access your hard work source file. Because C# and Visual Basic don't use header files in the strict sense, some programmers don't encourage you to create them. In our lessons, we will adhere to C++ techniques. Therefore, we will create header files whenever we "feel like it". A header file is a C++ document with the extension .h and sometimes .hpp. As mentioned for source files, you can create a header file at any time, whether a project is opened or not. In Microsoft Visual C++ 2005, to create a header file:
If a header file exists somewhere in your computer in a network drive and you want to use it in your project, on the main menu, you can click Project -> Add Existing Item... In the Look In combo box of the Add Existing Item dialog box, display the folder that contains the file. Select the desired file and click Add. If the foundation of a class had been specified in a header file and you want o use such a file in your source file, you must include it using the formula: #include "FileName.h" When we do more detailed studies of classes, we will see how the header and source files are used in these scenarios.
After creating the header and source files, when you execute the project, the compiler will find and "synchronize" them to create an executable. The result that the compiler produces by unifying these and other necessary files of a project is called an assembly. If you are creating projects that you intend to use solely in C++, you usually don't care about this and it is done transparently.
We mentioned that the most fundamental function used in C++ was main(). The functionality of a program starts with main() and ends in main(). For this reason, main() is considered the entry and the exit point. We also mentioned that, with Microsoft Visual C++, you could create libraries that you can then sell or distribute to other programmers. One of the particularities of a library, as compared to the traditional projects we will mostly create, is that a library doesn't have an entry point: it may contain just functions and/or classes. You create it with the necessary header and source files, but you don't need to include an entry point. After creating or adding the necessary files to the project, you can then compile it. In this case, the compiler would also create an assembly. When an assembly has an entry point, which is the case for a regular executable, it is called an application.
As seen so far, you can create a class as follows: class house
{
};
As mentioned already, such a class is considered private. If you want this class to be accessible outside of its assembly, you must make it public. To do this, precede its struct or class keyword with the public keyword. Here is an example: public class house
{
};
If you don't specify public, the class is considered private. Based on this, the notation: class house
{
};
is the same as: private class house
{
};
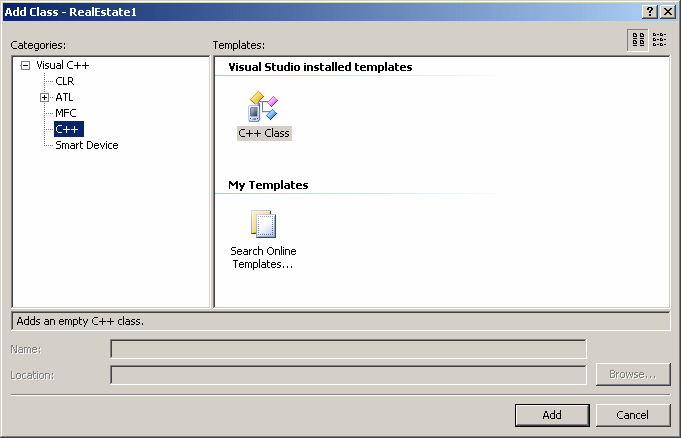
Microsoft Visual Studio provides a more flexible technique of creating a header file combined with a source file. This allows you to get both files with one click. Both files are created from a class. To create the class, on the main menu, you can click Project -> Add Class... In the Templates list of the Add Class dialog box, click C++ Class and click Add. Enter a name if the Class Name text box. By a tradition dating from the previous versions of Microsoft Visual C++, you should start the name of the class with C. If you start the name of the class with C, a header file and a source file without the C would be suggested, which you should accept, and click Finish. To keep this Visual C++ tradition, we will start most names of our classes with C.
|
|
|
||
| Previous | Copyright © 2006-2007 FunctionX, Inc. | Next |
|
|
||