Introduction to Classes II
Introduction to Classes II
Fundamentals of Classes
Definnition
A class is a list of definitions and descriptive behaviors that can be used to describe an object. A class also defines the actions its objects can perform.
![]() Practical Learning: Introducing Classes
Practical Learning: Introducing Classes
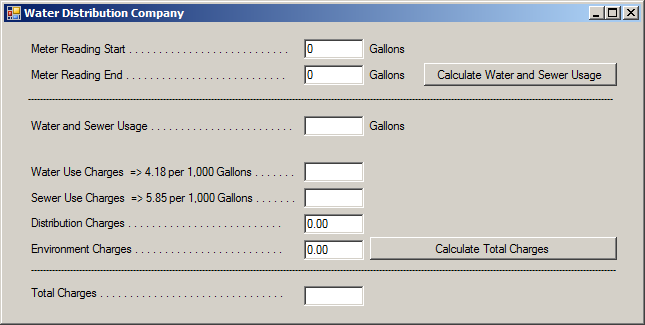
| Control | (Name) | Text |
| Label | Meter Reading Start . . . . . . . . . . . . | |
| TextBox | txtMeterReadingStarStart | 0 |
| Label | Gallons | |
| Label | Meter Reading End . . . . . . . . . . . . | |
| TextBox | txtMeterReadingStarEnd | 0 |
| Label | Gallons | |
| Button | btnCalculateWaterAndSewerUsage | Calculate Water and Sewer Usage |
| Label | _______________________________ | |
| Label | Water and Sewer Usage . . . . . . . . . . . . | |
| TextBox | txtWaterSewerUsage | |
| Label | Gallons | |
| Label | Water Use Charges => 4.18 per 1,000 Gallons . . . . . . . . . . . . . . . . . . . . . . | |
| TextBox | txtSewerUseCharges | |
| Label | Sewer Use Charges => 5.85 per 1,000 Gallons . . . . . . . . . . . . . . . . . . . . . | |
| TextBox | txtSewerUseCharges | |
| Label | Distribution Charges . . . . . . . . . . . . . . | |
| TextBox | txtDistributionCharges | 0.00 |
| Label | Environment Charges . . . . . . . . . . . . . . | |
| TextBox | txtEnvironmentCharges | 0.00 |
| Button | btnCalculateTotalCharges | Calculate Total Charges |
| Label | _______________________________ | |
| Label | Total Charges . . . . . . . . . . . . | |
| TextBox | txtTotalCharges |
Creating a Class
To create a class, use a text editor or the Code Editor of a programming environment. In your code, use the class keyword, a name, and a body delimited by curly brackets. In the body of the class, add the desired definitions, behaviors, and actions.
You can also use skeleton code to start a class:


A class with the default name MyClass would be added. You can accept that name or change it.
Classes and Files
A class is created in a file. A file can contain as many classes as necessary. One way you can organize the classes of your application is to put them in different files. A file can contain one or more classes. A file that contains (a) class(es) is a regular text-based file that has the extension .cs. To create a file for (a) class(es), start a text-based document, type your code, and save the file in the desired location. Normally, all files that belong the same application should be positioned in folders and sub-folders of the project. When saving the file, give it the extensio .cs. If you are using Microsoft Visual Studio, there are various ways you can create a class and each would result in a new file for the class.
In the class, you can add the desired members such as regular variables. Here is an example:
class Number
{
    int minimum;
    string sign;
}
![]() Practical Learning: Creating a Class
Practical Learning: Creating a Class
Sometimes you want your code to be shared among various languages such as C++/CLI, Visual Basic, F#, etc. In other words, code from these other languages should be able to "read" or access code written in a C# application. To make this possible, a C# class can be created as a public object.
If you want your class to be accessible to code written in other languages, precede the class keyword with the public keyword when creating it. Here is an example:
public class Number
{
    int minimum;
    string sign;
}
![]() Practical Learning: Sharing a Class
Practical Learning: Sharing a Class
namespace WaterCompany6
{
    public class WaterBill
    {
    }
}
Creating an Object
After creating a class, you can use it to describe an object that is based on that class. To do this, you must create an object. To create an object, declare a variable of the class. This is also referred to as declaring an instance of the class or creating an object. Here is an example:
public class Number
{
    int minimum;
    string sign;
}

public class Exercise
{
    static void Main()
    {
    	Number digit;
    }
}
An Object is a Reference
When you have declared a variable of a primitive type (int, double, etc), when you access its value, the compiler gets that value and makes it available to you. This means that a variable of a primitive type is accessed by value.
When you declare a variable of a class type, the compiler uses an area of the computer memory large enough to store the values associated with the class (the compiler calculates how much memory is necessary, based on the data types of the members of the class). At the appropriate time, when you access an object of the class, the compiler refers to the memory area where the object is located. This means that the compiler uses a reference to the computer memory where the object is located. This also means that an object is accessed by reference.
To indicate that an object must be accessed by reference, you must initializa a class variable using the new keyword. It is followed by the name of the class and parentheses. Here is an example:
public class Number
{
    int minimum;
    string sign;
}

public class Exercise
{
    static void Main()
    {
    	Number digit = new Number();
    }
}
As seen with the variables of primitive types, to declare a variable of a class, you can use the var keyword. In this case, you must initialize the variable immediately. Here is an example:
public class Contractor
{
}

public class Exercise
{
    static void Main()
    {
    	var staff = new Contractor();
    }
}
After creating an object, you can access the members of its class.
![]() Practical Learning: Creating an Object
Practical Learning: Creating an Object
using System.Windows.Forms;

namespace WaterCompany6
{
    public partial class Form1 : Form
    {
        public Form1()
        {
            InitializeComponent();
        }

        private void btnCalculateWaterAndSewerUsage_Click(object sender, System.EventArgs e)
        {
            WaterBill wb = new WaterBill();
        }

        private void btnCalculateTotalCharges_Click(object sender, System.EventArgs e)
        {
            var wb = new WaterBill();
        }
    }
}The Private Members of a Class
By default, the members of a class can be accessed only by other members of the same class. This means that, by default, the members of a class are private. To explicitly indicate that a member is private, precede its data type with the private keyword. Here is an example:
public class Number
{
    private int minimum;
    string sign;
}
The Internal Members of a Class
Normally, when you create a class, you may want to access its members in various of the project. That is, you may want other classes of the same project to access one or more members of the class, but you may not want other projects to access such a member. If you want to create a member of a class so that only objects of the same project can access that member, you can mark it with the internal keyword.
![]() Practical Learning: Adding Members to a Class
Practical Learning: Adding Members to a Class
namespace WaterCompany4
{
    public class WaterBill
    {
        internal int MeterReadingStart;
        internal int MeterReadingEnd;
        internal double WaterConsumption;
        internal double SewerServices;
        internal double WaterUseCharges;
        internal double SewerUseCharges;
        internal double DistributionCharges;
        internal double EnvironmentCharges;
    }
}The Public Members of a Class
Most of the classes you create will be used in only one project. If a class will be used in other projects, that is, if a member of a class will be accessed by objects in other projects, precede the data type of the member with the public keyword. Here is an example:
public class Number
{
    private int minimum;
    public string sign;
}
The differences between the private, the public, and the internal keywords can be resumed as follows:
| If a class member is marked as | |||
| private | internal | public | |
| Members of its class can access this member | Yes | Yes | Yes |
| Members of this project, including outside of the class, can access this member | No | Yes | Yes |
| Objects outside of this project can access this member | No | No | Yes |
If many variables use the same type and must use the same access level, you can apply their common access level. Here are examples:
class Drama
{
    public string category, enactment;
    private int length, reception, stage;
}
The Main File of a Project
If you decide to create various files for your project, one of the files must contain a class that contains a function named Main. That file is considered the main file of the project. The main file is created like any other file. If you create a project in Microsoft Visual Studio, it creates a file named Program that contains that function.
![]() Practical Learning: Creating and Using an Object
Practical Learning: Creating and Using an Object
using System;
using System.Windows.Forms;

namespace WaterCompany4
{
    public partial class Form1 : Form
    {
        public Form1()
        {
            InitializeComponent();
        }

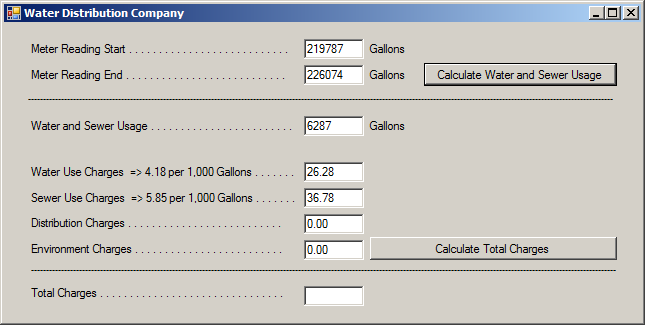
        private void btnCalculateWaterAndSewerUsage_Click(object sender, EventArgs e)
        {
            WaterBill wb = new WaterBill();

            double usage;

            wb.MeterReadingStart = int.Parse(txtMeterReadingStart.Text);
            wb.MeterReadingEnd = int.Parse(txtMeterReadingEnd.Text);

            usage = wb.MeterReadingEnd - wb.MeterReadingStart;

            wb.WaterConsumption = (usage * 4.18) / 1000;
            wb.SewerServices = (usage * 5.85) / 1000;

            txtWaterSewerUsage.Text = usage.ToString();
            txtWaterUseCharges.Text = wb.WaterConsumption.ToString("F");
            txtSewerUseCharges.Text = wb.SewerServices.ToString("F");
        }

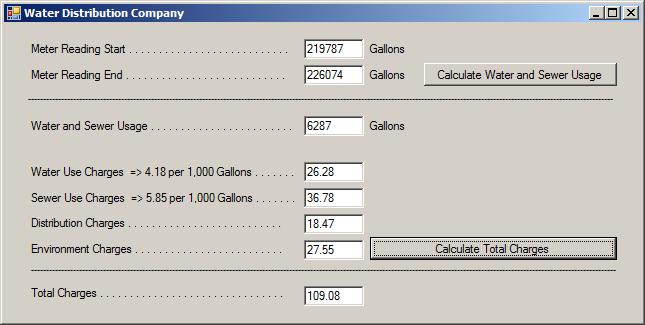
        private void btnCalculateTotalCharges_Click(object sender, EventArgs e)
        {
            var wb = new WaterBill();

            double amountDue;

            wb.WaterUseCharges = double.Parse(txtWaterUseCharges.Text);
            wb.SewerUseCharges = double.Parse(txtSewerUseCharges.Text);
            wb.DistributionCharges = double.Parse(txtDistributionCharges.Text);
            wb.EnvironmentCharges = double.Parse(txtEnvironmentCharges.Text);

            amountDue = wb.WaterUseCharges + wb.SewerUseCharges +
                        wb.DistributionCharges + wb.EnvironmentCharges;

            txtTotalCharges.Text = amountDue.ToString("F");
        }
    }
}
Introduction to the Methods of a Class
Introduction
In the last three previous lessons, we studied various issues about functions. A method is a function that is a member of a class. Because a method is primarily a function, everything we studied about functions is directly applicable to methods. Therefore, in the next few sections, we will review functions topics as the apply to methods. To start, as seen with functions, the primary formula to create a method is:
options return-type method-name(){}
New Convention:From now on, in our lessons, to refer to a function that belongs to a class, we may use the convention class-name.function-name(parameter(s)) This means that we are referring to the function function-name that is a member of the class class-name. The item in the parentheses will refer to the parameter(s) of the function. |
In the body of the function, you can ignore one or more parameters, you can ignore all parameters, you can use one or some of the parameters, or you can use all parameters.
New Convention:From now on, in our lessons, we may write "The syntax of this function is" (or something to that effect): return-type class-name.function-name(parameter(s)); This means that we are providing (reviewing) the return type, the name, and the number of parameters (if any) of a function. In our new convention, we may terminate the syntax with a semi-colon. |
The Access Modifier of a Method
The primary option you can provide is its access level. Like any member of a class:
Introduction to Calling a Method
As seen with function, when you access a method, you are said to call the method. To do this, type the name of the object, a period operator, the name of the desired method, and parentheses.
The Code Editor
Introduction
The Code Editor is a window specially designed for code writing.
|
|
Although all languages of the Microsoft Visual Studio programming environment share the Code Editor, once you have started a type of application, the Code Editor is adapted to the language you are using. Its parser (a program used internally to analyze your code) behaves according to the language of your choice. The features and behaviors of the Code Editor are also different, depending on your language. |
To display the code editor, in the Solution Explorer, you can click the View Code button ![]() . The Code Editor is divided in many sections.
. The Code Editor is divided in many sections.
The Headers Bar
The top section of the Code Editor displays headers. Each header represents a file:
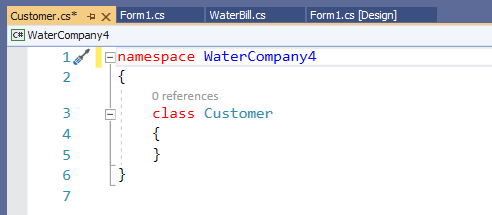
To add a new file to the project:
Once in the Add New Item dialog box, in the middle list, click the type of file you want to create, type a name in the Name text box, and press Enter or click Add. After the file has been created, it is represented by a labeled header in the top section of the Code Editor. In the same way, you can add as many files as you judge them necessary. To access a file:
By default, the header section displays the files in the order they were created or added to the project. If you don't like that arrangement, click and drag a header either left or right beyond the next header.
The Project of a Solution
In Microsoft Visual Studio, you can create a solution that includes many projects. The projects are represented under the name of the solution in the Solution Explorer. Here is an example:
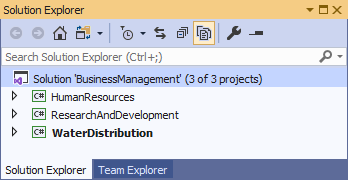
To select a project, click its name in the Solution Explorer.
When you are working in the Code Editor, the top-left section of the Code Editor displays a combo box. The Project combo box displays the name of the current project.
The Types Combo Box
The middle-top section of the Code Editor is the Types combo box. It holds a list of the classes in the file that is currently displaying. You can display the list if you click the arrow of the combo box:
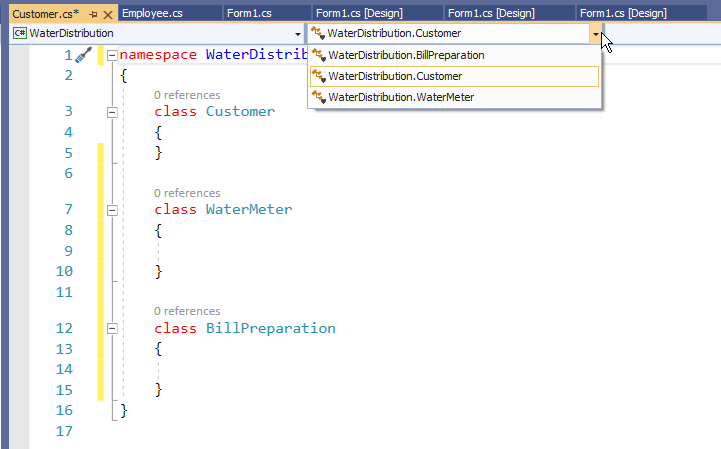
The top-right section of the Code Editor displays a combo box named Members. The Members combo box holds a list of the members of the class selected in the Types combo box. Therefore, before accessing the members of a particular class, you must first select that class in the Types combo box. Then, when you click the arrow of the Members combo box, the members of only that class display:
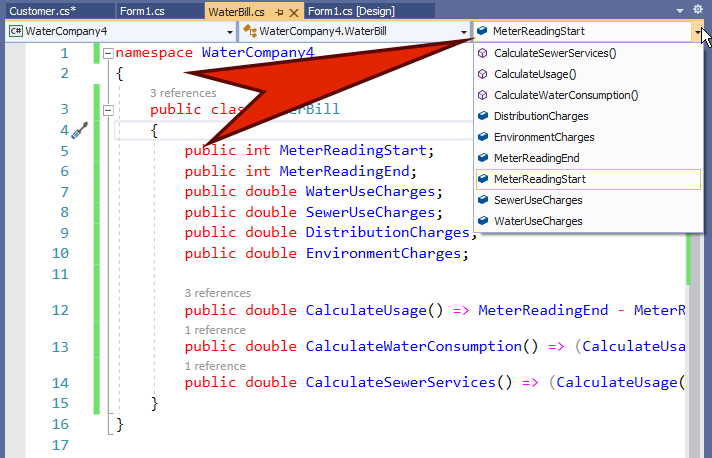
If you select an item from the Members combo box, the Code Editor jumps to that members and positions the cursor to the left of the member.
Introduction
As seen with functions, a method can be made to return a value. Everthing is done exactly as we studied with functions. That is, if a method does't produce an explicit value, set its return type to void. If a method must produce a value, write the data type of the return on the left of the name of the method you are creating. Here is an example:
class Rectangle
{
    public double Width;
    public double Height;

    public double Area()
    {

    }
}
Then, before the closing curly bracket of the method, type the return keyword followed by the returning value and a semicolon. Here is an example:
class Rectangle
{
    public double Width;
    public double Height;

    public double Area()
    {
        double result = 0.00;

        return result;
    }
}
Otherwise, you can perform any operation in the body of the method and return the desired value. Here is an example:
class Rectangle
{
    public double Width;
    public double Height;

    public double Area()
    {
        double result = 0.00;

        result = Width * Height;

        return result;
    }
}
![]() Practical Learning: Creating a Method that Returns a Value
Practical Learning: Creating a Method that Returns a Value
namespace WaterCompany4
{
    public class WaterBill
    {
        internal int MeterReadingStart;
        internal int MeterReadingEnd;
        internal double WaterUseCharges;
        internal double SewerUseCharges;
        internal double DistributionCharges;
        internal double EnvironmentCharges;

        internal double CalculateUsage()
        {
            return MeterReadingEnd - MeterReadingStart;
        }

        internal double CalculateWaterConsumption()
        {
            double usage = CalculateUsage() * 4.18;

            return usage / 1000;
        }

        internal double CalculateSewerServices()
        {
            return (CalculateUsage() * 5.85) / 1000;
        }
    }
}
A Simple Returning Method with no Body
As seen with functions, if a function is small enough and it returns a value, remove the body of the curly brackets of the body of the method. After the parentheses of the method, type => followed by the returning expression and a semicolon.
![]() Practical Learning: Creating a Method without a Body
Practical Learning: Creating a Method without a Body
namespace WaterCompany4
{
    public class WaterBill
    {
        public int MeterReadingStart;
        public int MeterReadingEnd;
        public double WaterUseCharges;
        public double SewerUseCharges;
        public double DistributionCharges;
        public double EnvironmentCharges;

        public double CalculateUsage() => MeterReadingEnd - MeterReadingStart;
        public double CalculateWaterConsumption() => (CalculateUsage() * 4.18) / 1000;
        public double CalculateSewerServices() => (CalculateUsage() * 5.85) / 1000;
    }
}Code is written in a wide area with a white background. The Code Editor uses some colors to differentiate categories of words or lines of text. The colors used are customizable. To change the colors, on the main menu, click Tools -> Options... In the Options dialog box, in the Environment section, click Fonts and Colors. To set the color of a category, in the Display Items section, click the category. In the Item Foreground combo box, select the desired color. Here is an example:
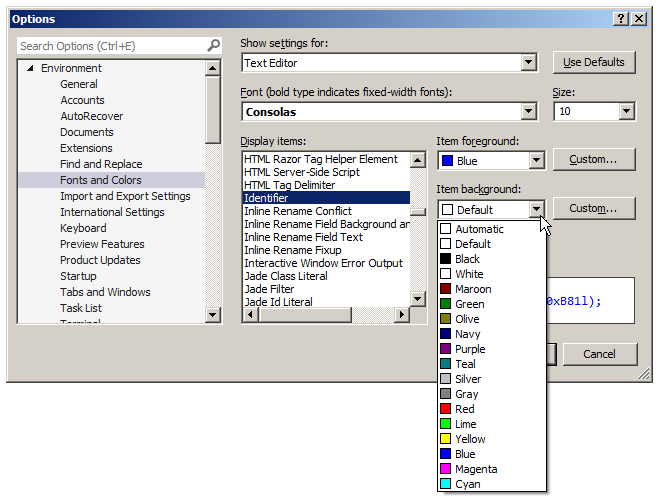
If you want the words of the category to have a colored background, click the arrow of the Item Background combo box and select one. In both cases, the combo boxes display a fixed list of colors. If you want more colors, click a Custom button to display the Color dialog box that allows you to "create" a color.
Code Sections Delimiters
Microsoft Visual Studio provides various techniques to assist you with code writing and management. The characteristics include color-coded words, intuitive indentation, the IntelliSense, delimitation of sections of code, etc. Consider the following contents of the Code Editor based on what we have reviewed so far:
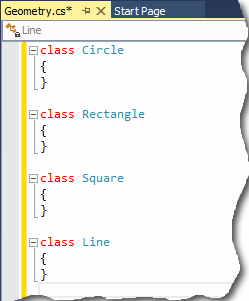
Notice that there are - buttons on the left side of some lines of code. These allow you to collapse a section of code if you think you don't need to see it. To do this, you can click the - button. If you click that - button, it changes into a + button. Here is an example:
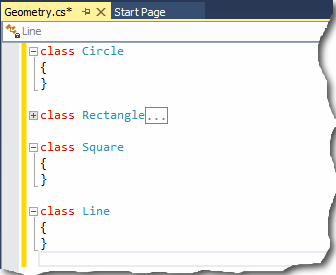
The + button allows you to expand a hidden code section. This behavior of creating + and - buttons is part of the Code Editor of Microsoft Visual Studio. To create these sections, the Code Editor follows some rules. For example, it looks for the start and end of such an item as a class.
Regions
Besides, or instead of, the sections of code created by the Code Editor, if you want, you can create your own sections. To create a section:
#region Whatever
and end it with
#endregion Whatever
When and where you start a region, the #region expression is required. On the right side of this expression, you can type anything you want on the line. To end the section, type #endregion, followed by anything you want. Consider the following example:
class Circle
{
}

#region This section is reserved for quadrilateral shapes
class Rectangle
{
}

class Square
{
}
#endregion This is the end of the quadrilateral section

class Line
{
}
You don't have to type anything on the right side of #endregion. After creating the region, the Code Editor would display a - button to the left side of #region with a line from there to the left of #endregion:
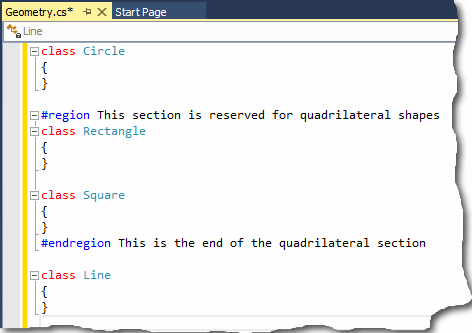
This then allows you to expand and collapse that section at will:
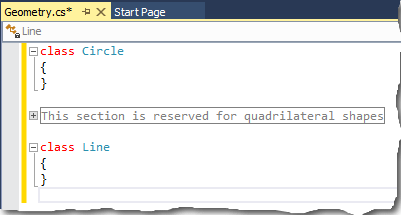
We mentioned that you didn't have to type anything on the right side of #endregion and you could leave it empty. In our example, notice that there is a rectangle with gray lines around the string that follows #region. This rectangle doesn't cover the string that follows #endregion. This means that if you don't type anything on the right side of #endregion, that section on the right side the #region line would not show.
![]() Practical Learning: Creating a Region
Practical Learning: Creating a Region
namespace WaterCompany4
{
    public class WaterBill
    {
        public int MeterReadingStart;
        public int MeterReadingEnd;
        public double WaterUseCharges;
        public double SewerUseCharges;
        public double DistributionCharges;
        public double EnvironmentCharges;

        #region Bill Management
        public double CalculateUsage() => MeterReadingEnd - MeterReadingStart;
        public double CalculateWaterConsumption() => (CalculateUsage() * 4.18) / 1000;
        public double CalculateSewerServices() => (CalculateUsage() * 5.85) / 1000;
        #endregion
    }
}Managing Classes
Introduction
Microsoft Visual Studio provides many tools and visual objects used to manage classes of an application. The studio makes it possible to conveniently locate, edit, or rename a class (or one of its members).
The Class View
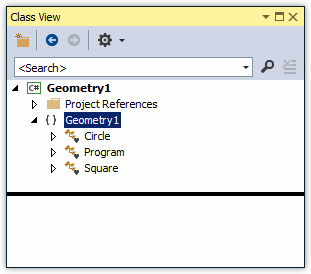
One of the windows used to manage classes is called the Class View. To get the Class View:
The Class View is made of six sections. The title bar and the use of the Class View follow the same description as for the Solution Explorer:
The second part of the title bar is its toolbar
![]() .
.
The Class View New Folder button allows you to create and add a new folder to the project. The Back and the Forward buttons allow you to navigate among the classes.
Under the toolbar, there is another bar made of a combo box and a button. These allow you to search.
The body of the Class View is made of two sections. The first node of the upper section displays the name of the project. Under the project node, the names of classes display. The bottom section of the Class View is used to display the members of a class. To see the members of a class, you can click it in the top window. Here is an example:

Accessing a Class
As mentioned already, you can create as many classes as you want for your project. You can create each class in its own file or you can create many classes in the same file. After creating them, to access a class:
Renaming a Class
If you don't like the name a class is using, you can change it. The primary technique consists of locating it in your text editor or the Code Editor and edit its name. If you use that approach, you will also have to find every section where the name of the class is used. This can be cumbersome and lead to mistakes. If you are working in Microsoft Visual Studio Express, it provides a better solution and would take care of everything behind the scenes.
To rename a class in Microsoft Visual Studio:

![]() Practical Learning: Ending the Lesson
Practical Learning: Ending the Lesson
|
|
||
| Previous | Copyright © 2001-2021, C# Key | Next |
|
|
||