Introduction to the Constructors of a Class
Introduction to the Constructors of a Class
The Default Constructor
Introduction
A constructor of a class is a special method with two main rules and one primary feature:
![]() Practical Learning: Introducing Constructors
Practical Learning: Introducing Constructors
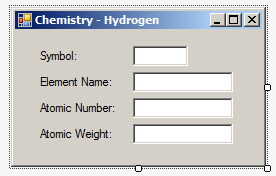
| Control | (Name) | Text |
| Label | Symbol: | |
| TextBox | txtSymbol | |
| Label | Element Name: | |
| TextBox | txtElementName | |
| Label | Atomic Number: | |
| TextBox | txtAtomicNumber | |
| Label | Atomic Weight: | |
| TextBox | txtAtomicWeight |
Introduction to the Default Constructor
A constructor is a special method that is created when the object comes to life. When you create a class, if you don't create a constructor, the compiler creates one for you. This compiler-created constructor is called the default constructor. If you want, you can create your own default constructor.
To initiate a constructor, create a method that holds the same name as the class and that doesn't return any value. Here is an example:
class Square
{
    Square()
    {
    }
}
Remember that any method that doesn't have an access level is considered private. This is also valid for constructors. Although you can have private constructors in very extreme scenarios, most of the constructors you will create or use must be public (or internal). Here is an example:
class Square
{
    public Square()
    {
    }
}
If you are using Microsoft Visual Studio, to create a default constructor, right-click inside the class and click Insert Snippet... Double-click Visual C#. In the list that appears, double-click ctor:
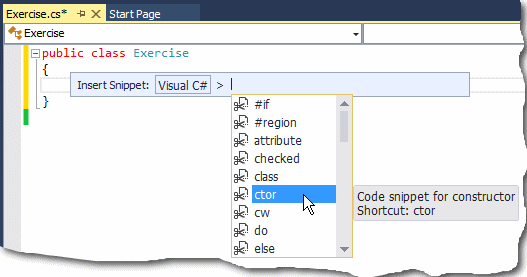
The Code Editor would use the name of the class to create the new method
When you create an object of the class (by declaring a variable of that class), whether you use that object or not, a constructor for the object is created. When an instance of a class has been declared, the default constructor is called, whether the object is used or not. This is illustrated in the following program:
public class BankAccount
{
    public BankAccount()
    {
        System.Console.WriteLine("New Bank Account");
    }
}

public class Exercise
{
    static void Main()
    {
        BankAccount account = new BankAccount();
    }
}
This would produce:
New Bank Account
Press any key to continue . . .
As you can see, even though the object was not used, just its creation was enough to call the default constructor. You may find it sometimes convenient to create your own constructor because, whether you create a default constructor or not, this does not negatively impact your program.
![]() Practical Learning: Using the Default Constructor
Practical Learning: Using the Default Constructor
namespace Chemistry01
{
    class Class1
    {
        internal string Name;
        internal string Symbol;
        internal int AtomicNumber;
        internal double AtomicWeight;
    }
}
Initializing the Members of a Class
If a class has a default constructor, when an object is created from that class, that default constructor is automatically called. This feature makes the default constructor a good place to initialize the members of the class. You have many options.
When creating a class, you can declare a member variable and initialize it in the body of the class. Here are examples:
public class Element
{
    int AtomicNumber = 1;
}
Remember that a member created without the access level (public, private, or internal) is treated as private, and to re-inforce this, you can precede the member with the private keyword:
public class Element
{
    private int AtomicNumber = 1;
}
In the same way, you can declare and initialize as many members as you want in the body of the class. Here are examples:
public class Element
{
    string Symbol = "H";
    int AtomicNumber = 1;
}
As an alternative, you can fields in the class, then create a constructor and initialize the field(s) in the constructor.
![]() Practical Learning: Creating a Constructor that Initializes
Practical Learning: Creating a Constructor that Initializes
namespace Chemistry01
{
    class Class1
    {
        internal string Name;
        internal string Symbol;
        internal int AtomicNumber;
        internal double AtomicWeight;

        public Class1()
        {
            Symbol = "H";
            AtomicNumber = 1;
            Name = "Hydrogen";
            AtomicWeight = 1.008;
        }
    }
}
Creating an Object Using a Constructor
As we have seen since Lesson 3, to create an object, declare a variable of a class. As we saw in Lesson 3 and in this lesson, if the class doesn't have any constructor or it has a default constructor, initialize the object using the default constructor. When accessing each member from the object variable, you can use the period operator.
![]() Practical Learning: Creating an Object Using a Constructor
Practical Learning: Creating an Object Using a Constructor
using System.Windows.Forms;

namespace Chemistry01
{
    public partial class Form1 : Form
    {
        public Form1()
        {
            InitializeComponent();

            Class1 elm = new Class1();

            txtElementName.Text = elm.Name;
            txtSymbol.Text = elm.Symbol;
            txtAtomicNumber.Text = elm.AtomicNumber.ToString();
            txtAtomicWeight.Text = elm.AtomicWeight.ToString();
        }
    }
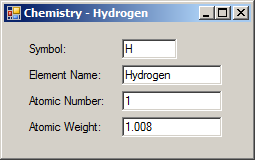
}
Initializing an Object
With or without a constructor, you can specify the values of an object at any time. This means that, even if a class has a default constructor and you have created its object, to set the values of the members of the class, access each member and assign the desired value.
![]() Practical Learning: Initializing an Object
Practical Learning: Initializing an Object
using System.Windows.Forms;

namespace Chemistry01
{
    public partial class Chemistry : Form
    {
        public Chemistry()
        {
            InitializeComponent();

            Element he = new Element();

            he.Symbol = "He";
            he.Name = "Helium";
            he.AtomicNumber = 2;
            he.AtomicWeight = 4.002602;

            txtElementName.Text = he.Name;
            txtSymbol.Text = he.Symbol;
            txtAtomicNumber.Text = he.AtomicNumber.ToString();
            txtAtomicWeight.Text = he.AtomicWeight.ToString();

            Text = "Chemistry - Helium";
        }
    }
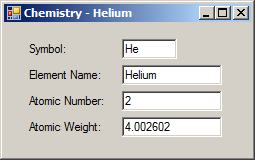
}
using System.Windows.Forms;

namespace Chemistry01
{
    public partial class Chemistry : Form
    {
        public Chemistry()
        {
            InitializeComponent();

            Element he = new Element();

            he.Symbol = "He";
            he.Name = "Helium";
            he.AtomicNumber = 2;
            he.AtomicWeight = 4.002602;

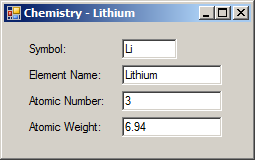
            Element li = new Element() { Name = "Lithium", AtomicWeight = 6.94, AtomicNumber = 3, Symbol = "Li" };

            txtElementName.Text = li.Name;
            txtSymbol.Text = li.Symbol;
            txtAtomicNumber.Text = li.AtomicNumber.ToString();
            txtAtomicWeight.Text = li.AtomicWeight.ToString();

            Text = "Chemistry - Lithium";
        }
    }
}
using System.Windows.Forms;

namespace Chemistry01
{
    public partial class Chemistry : Form
    {
        public Chemistry()
        {
            InitializeComponent();

            Element he = new Element();

            he.Symbol = "He";
            he.Name = "Helium";
            he.AtomicNumber = 2;
            he.AtomicWeight = 4.002602;

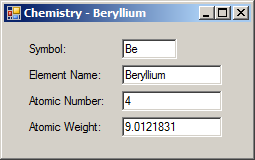
            Element li = new Element() { Name = "Lithium", AtomicWeight = 6.94, AtomicNumber = 3, Symbol = "Li" };

            Element be = new Element()
            {
                AtomicNumber = 4,
                Name = "Beryllium",
                AtomicWeight = 9.0121831,
                Symbol = "Be"
            };

            txtElementName.Text = be.Name;
            txtSymbol.Text = be.Symbol;
            txtAtomicNumber.Text = be.AtomicNumber.ToString();
            txtAtomicWeight.Text = be.AtomicWeight.ToString();

            Text = "Chemistry - Beryllium";
        }
    }
}
The Constructor as a Method
A Constructor with a Parameter
In your class, you can create a constructor that uses a parameter. Here is an example:
public class Square
{
    public Square(double side)
    {

    }
}
In the body of the class, you can ignore or use the parameter. One way you can use it is to pass its value to a member variable of the class. Here is an example:
public class Square
{
    private double s;

    public Square(double side)
    {
        s = side;
    }
}
Remember that the other members, such as methods, of the class can access any member of the same class. After creating the class, you can declare variables of it.
If you create a class with only one constructor as in the above example, when declaring an instance of the class, you must use that constructor: you cannot use the default constructor that doesn't use a parameter. When declaring the variable, initialize it with a constructor with parentheses and provide the value(s) in the parentheses of the constructor.
![]() Practical Learning: Using the Default Constructor
Practical Learning: Using the Default Constructor
namespace Geometry02
{
    class Figure
    {
        private double s;

        public Figure(double side)
        {
            s = side;
        }

        public double CalculatePerimeter()
        {
            return s * 4;
        }

        public double CalculateArea()
        {
            return s * s;
        }
    }
}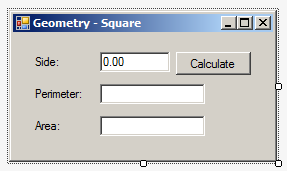
| Control | (Name) | Text | Other Properties |
| Label | Side: | ||
| TextBox | txtSide | 0.00 | TextAlign: Right |
| Button | btnCalculate | Calculate | |
| Label | Perimeter: | ||
| TextBox | txtPerimeter | TextAlign: Right | |
| Label | Area: | ||
| TextBox | txtArea | TextAlign: Right |
using System;
using System.Windows.Forms;

namespace Geometry02
{
    public partial class Geometry : Form
    {
        public Geometry()
        {
            InitializeComponent();
        }

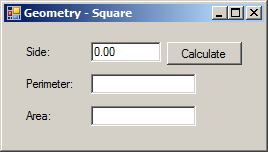
        private void btnCalculate_Click(object sender, EventArgs e)
        {
            double side = double.Parse(txtSide.Text);

            Figure sqr = new Figure(side);

            double perimeter = sqr.CalculatePerimeter();
            double area = sqr.CalculateArea();

            txtPerimeter.Text = perimeter.ToString();
            txtArea.Text = area.ToString();
        }
    }
}
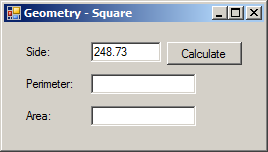
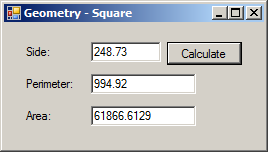
A Constructor with Many Parameters
In your class, you can create a constructor with as many parameters as you want. Here is an example of a constructor that uses three parameters:
public class Exercise
{
    public Exercise(string a, int b, int c)
    {
    }
}
In the body of the constructor, you can ignore or use the values of the parameters. To create an object of the class, declare a variable of the class and initialize it using the constructor. This means that you must pass an argument for each parameter.
![]() Practical Learning:
Using a Constructor with Many Parameters
Practical Learning:
Using a Constructor with Many Parameters
namespace Chemistry01
{
    class Element
    {
        internal string ElementName;
        internal string Symbol;
        internal int AtomicNumber;
        internal double AtomicWeight;

        public Element(int number, string symbol, string name, double mass)
        {
            Symbol = symbol;
            ElementName = name;
            AtomicWeight = mass;
            AtomicNumber = number;
        }
    }
}using System.Windows.Forms;
namespace Chemistry01
{
public partial class Chemistry : Form
{
public Chemistry()
{
InitializeComponent();
Element h = new Element(1, "H", "Hydrogen", 1.008);
Element he = new Element(2, "He", "Helium", 4.002602);
Element li = new Element(3, "Li", "Lithium", 6.94);
Element be = new Element(4, "Be", "Beryllium", 9.0121831);
Element b = new Element(5, "B", "Boron", 10.81);
txtElementName.Text = b.ElementName;
txtSymbol.Text = b.Symbol;
txtAtomicNumber.Text = b.AtomicNumber.ToString();
txtAtomicWeight.Text = b.AtomicWeight.ToString();
Text = "Chemistry - Boron";
}
}
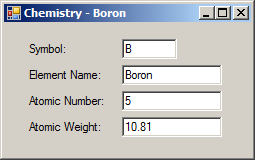
}
Passing an Argument by Name
As seen with methods, if you call a constructor that takes many arguments, you can access each parameter by its name, followed by a colon, and its value.
![]() Practical Learning:
Passing Arguments by Names
Practical Learning:
Passing Arguments by Names
using System.Windows.Forms;

namespace Chemistry01
{
    public partial class Chemistry : Form
    {
        public Chemistry()
        {
            InitializeComponent();

            Element h  = new Element(1, "H",  "Hydrogen",  1.008);
            Element he = new Element(2, "He", "Helium",    4.002602);
            Element li = new Element(3, "Li", "Lithium",   6.94);
            Element be = new Element(4, "Be", "Beryllium", 9.0121831);
            Element b  = new Element(5, "B",  "Boron",    10.81);
            Element c  = new Element(name: "Carbon", mass: 12.011, symbol: "C", number: 6);

            txtElementName.Text  = c.ElementName;
            txtSymbol.Text       = c.Symbol;
            txtAtomicNumber.Text = c.AtomicNumber.ToString();
            txtAtomicWeight.Text = c.AtomicWeight.ToString();

            Text = "Chemistry - Carbon";
        }
    }
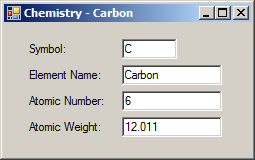
}
Constructor Overloading
In your class, you can create as many constructors as you want. If you decide to create different constructors, they must follow the rules of method overloading. This means that each constructor must be different from the others. To take care of this, each constructor can use a different number of parameters or different data types for parameters compared to other constructors. Here are examples:
using System.Windows.Forms;

public class Exercise
{
    public Exercise(string a)
    {
    }

    public Exercise(string a, int b, int c)
    {
    }
}
If you create different constructors, when declaring a (the) variable(s) for the class, you can choose what constructor is appropriate to initialize the variable.
![]() Practical Learning: Passing Arguments by Names
Practical Learning: Passing Arguments by Names
namespace Chemistry01
{
    class Element
    {
        internal string ElementName;
        internal string Symbol;
        internal int AtomicNumber;
        internal double AtomicWeight;

        public Element(int number)
        {
            AtomicNumber = number;
        }

        public Element(string symbol)
        {
            Symbol = symbol;
        }

        public Element(int number, string symbol, string name, double mass)
        {
            Symbol = symbol;
            ElementName = name;
            AtomicWeight = mass;
            AtomicNumber = number;
        }
    }
}using System.Windows.Forms;
namespace Chemistry01
{
public partial class Chemistry : Form
{
public Chemistry()
{
InitializeComponent();
Element h = new Element(1, "H", "Hydrogen", 1.008);
Element he = new Element(2, "He", "Helium", 4.002602);
Element li = new Element(3, "Li", "Lithium", 6.94);
Element be = new Element(4, "Be", "Beryllium", 9.0121831);
Element b = new Element(5, "B", "Boron", 10.81);
Element c = new Element(name: "Carbon", mass: 12.011, symbol: "C", number: 6);
Element n = new Element(7);
n.Symbol = "N";
n.AtomicWeight = 14.007;
n.ElementName = "Nitrogen";
txtElementName.Text = n.ElementName;
txtSymbol.Text = n.Symbol;
txtAtomicNumber.Text = n.AtomicNumber.ToString();
txtAtomicWeight.Text = n.AtomicWeight.ToString();
Text = "Chemistry - Nitrogen";
}
}
}
The Absence of a Default Constructor
If you create a class with only one constructor and that constructor uses at least one parameter, the default constructor would not be available anymore. If you want to access a default constructor of an object, you have two options:
using System.Windows.Forms;

public class Exercise
{
    public Exercise()
    {
        Form frmExercise = new Form();

        frmExercise.ShowDialog();
    }

    public Exercise(string caption)
    {
        Form frmExercise = new Form();

        frmExercise.Text = caption;

        frmExercise.ShowDialog();
    }

    public Exercise(string caption, int width, int height)
    {
        Form frmExercise = new Form();

        frmExercise.Width = width;
        frmExercise.Height = height;
        frmExercise.Text = caption;
    }
}
A class is usually made to contain many members. The primary reason you create a constructor is to have a tool to initialize an object of the class with one or some default values. The primary reason you create different constructors is to provide different values to objects depending on what constructor a user (actually a programmer) wants to use to create an object. To make this happen, you can initialize the members with values passed to the parameter(s). Here are examples:
using System.Windows.Forms;

public class Exercise
{
    Form frmExercise;

    public Exercise()
    {
        frmExercise = new Form();

        frmExercise.Text = "World Annotation";
        frmExercise.Width = 800;
        frmExercise.Height = 640;
    }

    public Exercise(string caption)
    {
        frmExercise = new Form();

        frmExercise.Text = caption;
        frmExercise.Width = 358;
        frmExercise.Height = 636;
    }

    public Exercise(string caption, int width)
    {
        frmExercise = new Form();

        frmExercise.Width = width;
        frmExercise.Text = caption;
    }

    public Exercise(string caption, int width, int height)
    {
        frmExercise = new Form();

        frmExercise.Width = width;
        frmExercise.Height = height;
        frmExercise.Text = caption;
    }
}
A Constructor with Default Values
Since a constructor is primarily a method, its parameter(s), if any, can use default values. The rules are exactly the same we reviewed for methods. To provide a default value for the parameter of a constructor, assign the desired but appropriate value to the parameter when creating the constructor. Here is an example:
public class Exercise
{
    public Exercise(string caption = "Exercise")
    {
    }
}
Once again, in the body of the constructor, you can use or ignore the parameter. If you create one constructor and it uses one parameter, when creating an object of the class, that single constructor would act as both (or either) a default constructor and (or) a constructor that uses one parameter. This means that you can declare a variable and use a constructor with empty parentheses. Here is an example:
using System.Windows.Forms;

public class Exercise
{
    public Exercise(string caption = "Exercise")
    {
        Form frmExercise = new Form();

        frmExercise.Text = caption;
    }
}

public class Program
{
    static void Main()
    {
        Exercise first = new Exercise();
    }
}
In the same way, you can create a constructor that uses different parameters and some parameters can have default values. When doing this, make sure you follow the rules we reviewed for methods that have default values for parameters. Here is an example:
using System.Windows.Forms;

public class Exercise
{
    public Exercise(string caption = "Exercise", int width = 640, int height = 480)
    {
        Form frmExercise = new Form();

        frmExercise.Width = width;
        frmExercise.Height = height;
        frmExercise.Text = caption;
    }
}

public class Program
{
    static void Main()
    {
        Exercise first = new Exercise();
        Exercise second = new Exercise("Employment Application");
        Exercise third = new Exercise("Student Registration", 1224);
        third = new Exercise("Student Registration", 824, 479);
        third = new Exercise(width : 545, height : 258, caption : "Introductory Learning");
    }
}
The Destruction of an Object
As opposed to a constructor, a destructor is called when a program has finished using an object. A destructor does the cleaning behind the scenes. Like the default constructor, the compiler always creates a default destructor if you don't create one. Unlike the constructor, the destructor cannot be overloaded. This means that, if you decide to create a destructor, you can have only one. Like the default constructor, a destructor also has the same name as its class. This time, the name of the destructor starts with a tilde "~".
To create a destructor, type ~ followed by the name of the class. Here is an example:
public class Exercise
{
    public Exercise(string caption = "Exercise", int width = 640, int height = 480)
    {
    }

    ~Exercise()
    {
    }
}
When you initialize a variable using the new operator, you are in fact reserving some space in the section of memory called the heap. Such memory is "allocated" for the variable. When that variable is no longer needed, such as when your program closes, the variable must be removed from memory and the space it was using should (must) be made available to other variables or other programs. In fact, when an object has been removed from memory, it is replaced by garbage, which is some value but that is of no use (that area of memory becomes filled with garbage). If you program in some languages such as C/C++, Assembly, Pascal, etc, you should (must) find a way to remove that garbage (it is not difficult, sometimes it takes a simple/single line of code, but you should (must) remember to do it); that is, you should (must) free the memory a variable (declared with new, and called a reference) was using. Freeing the memory is referred to as garbage collection. Normally, in languages like C++ or Pascal, that's one of the ways you use a destructor.
The .NET Framework solves the problem of garbage collection by "cleaning" the memory after you. This is done automatically when necessary so that the programmer doesn't need to worry about this issue.
![]() Practical Learning:
Ending the Lesson
Practical Learning:
Ending the Lesson
|
|
||
| Previous | Copyright © 2001-2021, C# Key | Next |
|
|
||