Topics on the if...else Conditional Statements
Topics on the if...else Conditional Statements
Variants of an else Conditional Statements
We have already learned what an if...else conditional statement is:
if(condition)
    statement1;
else
    statement2;
Here is an example of such a statement:
double SpecifyFee()
{
    double value;
    string ac = cbxAccountsTypes.Text;

    if(ac == "Residential")
        value = 16.55;
    else
        value = 19.25;

    return value;
}
If you have a condition that can be checked as an if situation with one alternate else, you can use the ternary operator that is a combination of ? and :. Its formula is:
condition ? statement1 : statement2;
The condition would first be checked. If the condition is true, then statement1 would execute. If not, statement2 would execute.
![]() Practical Learning: Using the Ternary Operator
Practical Learning: Using the Ternary Operator
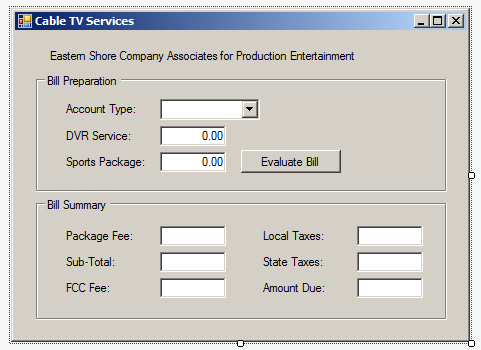
| Control | (Name) | Text | Other Properties |
| Label | Eastern Shore Company Associates for Production Entertainment | ||
| GroupBox | Bill Preparation | ||
| Label | Account Type: | ||
| ComboBox | cbxAccountsTypes | Items:
Hospital Residential Commercial Governmentl |
|
| Label | DVR Service: | ||
| TextBox | txtDVRService | 0.00 | TextAlign: Right |
| Label | Sports Package: | ||
| TextBox | txtSportsPackage | 0.00 | TextAlign: Right |
| Label | Sports Package: | TextAlign: Right | |
| TextBox | txtSportsPackage | TextAlign: Right | |
| Button | btnEvaluate | Evaluate Bill | |
| GroupBox | Bill Summary | ||
| Label | Package Fee: | ||
| TextBox | txtPackageFee | 0.00 | TextAlign: Right |
| Label | Local Taxes: | ||
| TextBox | txtLocalTaxes | TextAlign: Right | |
| Label | Sub-Total: | ||
| TextBox | txtSubTotal | TextAlign: Right | |
| Label | State Taxes: | ||
| TextBox | txtStateTaxes | TextAlign: Right | |
| Label | FCC Fee: | ||
| TextBox | txtFCCFee | TextAlign: Right | |
| Label | Amount Due: | ||
| TextBox | txtAmountDue | TextAlign: Right |
using System;
using System.Windows.Forms;

namespace ESCAPE2
{
    public partial class Form1 : Form
    {
        public Form1()
        {
            InitializeComponent();
        }

        void Summarize(double fee, double st, double fcc, double tax1, double tax2)
        {
            txtPackageFee.Text = fee.ToString("F");
            txtSubTotal.Text = st.ToString("F");
            txtFCCFee.Text = fcc.ToString("F");
            txtLocalTaxes.Text = tax1.ToString("F");
            txtStateTaxes.Text = tax2.ToString("F");
            txtAmountDue.Text = (st + fcc + tax1 + tax2).ToString("F");

            return;
        }

        private void btnEvaluate_Click(object sender, EventArgs e)
        {
            double packageFee;
            string ac = cbxAccountsTypes.Text;

            /* if (ac == "Residential")
                packageFee = 16.85;
            else
                packageFee = 21.05; */

            packageFee = (ac == "Residential") ? 16.85 : 21.05;

            double dvr = double.Parse(txtDVRService.Text);
            double sport = double.Parse(txtSportsPackage.Text);

            double subTotal = packageFee + dvr + sport;
            double fcc = subTotal * 0.00250881;
            double local = (subTotal + fcc) * 0.0372668;
            double state = (subTotal + fcc) * 0.0082493;

            Summarize(packageFee, subTotal, fcc, local, state);
            return;
        }
    }
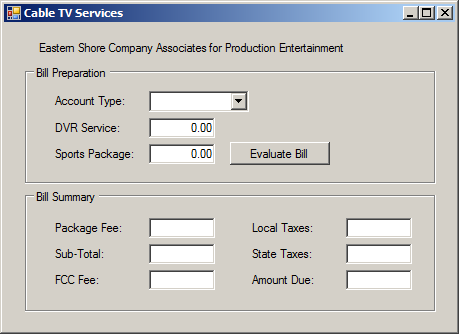
}
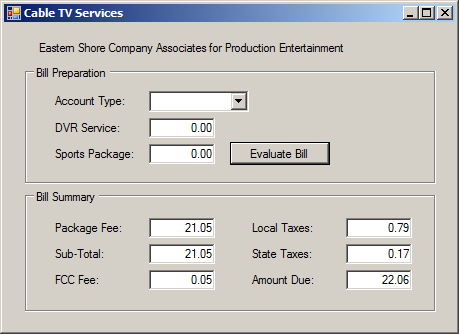
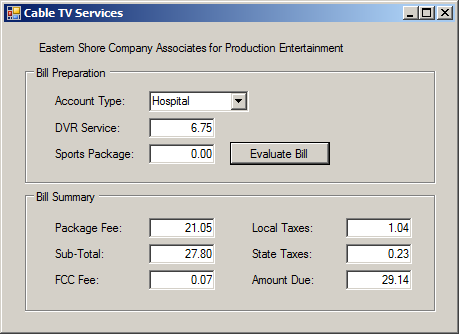
Account Type:   Hospital
DVR Service:    6.75
Sports Package: 0.00
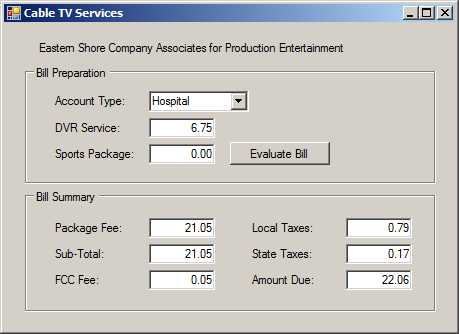
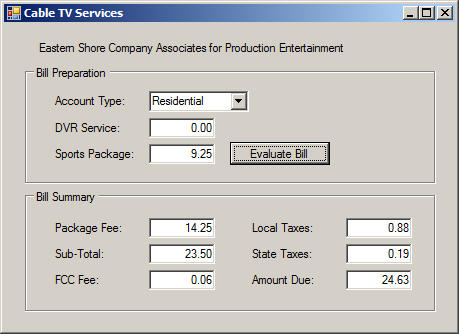
Account Type:   Residential
DVR Service:    0.00
Sports Package: 9.25
| Control | (Name) | Text |
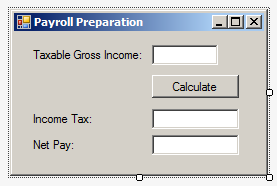
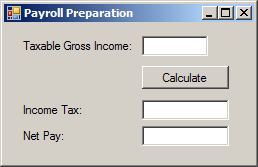
| Label | Taxable Gross Income: | |
| TextBox | txtTaxableGrossIncome | |
| Button | btnCalculate | Calculate |
| Label | Income Tax: | |
| TextBox | txtIncomeTax | |
| Label | Net Pay: | |
| TextBox | txtNetPay |
If you use an if...else situation, you can process only two statements. In some cases, you may deal with more than two conditions. In this case, you can use an if...else if condition. Its formula is:
if(condition1) statement1;
else if(condition2) statement2;
If you want, you can add a body delimited by curly brackets, as follows:
if(condition1) {
    statement1;
}
else if(condition2) {
    statement2;
}
The first condition, condition1, would first be checked. If condition1 is true, then statement1 would execute. If condition1 is false, then condition2 would be checked. If condition2 is true, then statement2 would execute. Any other result would be ignored.
Because there can be other alternatives, the C# language provides an alternate else condition as the last resort. Its formula is:
if(condition1)
    statement1;
else if(condition2)
    statement2;
else
    statement-n;
If you want, you can add a body delimited by curly brackets to any of the conditions:
if(condition1){
    statement1;
}
else if(condition2) {
    statement2;
}
else {
    statement-n;
}
![]() Practical Learning: Introducing if...else if...else
Practical Learning: Introducing if...else if...else
using System;
using System.Windows.Forms;

namespace PayrollEvaluation041
{
    public partial class Form1 : Form
    {
        public Form1()
        {
            InitializeComponent();
        }

        (double, double) EstimateTaxes(double amount)
        {
            double taxes, net;
            double lessThan500, between500And3000, over3000;

            if (amount <= 500.00)
            {
                lessThan500 = amount * 2.00 / 100;
                between500And3000 = 0.00;
                over3000 = 0.00; ;
            }
            else if ((amount > 500.00) && (amount <= 3000))
            {
                lessThan500 = 500 * 2.00 / 100;
                between500And3000 = (amount - 500) * 4.00 / 100;
                over3000 = 0.00; ;
            }
            else // if (amount > 3000))
            {
                lessThan500 = 500 * 2.00 / 100;
                between500And3000 = 3000 * 4.00 / 100;
                over3000 = (amount - 3000) * 5.00 / 100;
            }

            taxes = lessThan500 + between500And3000 + over3000;
            net = amount - taxes;

            return (taxes, net);
        }

        private void btnCalculate_Click(object sender, EventArgs e)
        {
            double grossSalary = double.Parse(txtTaxableGrossIncome.Text);

            (double incomeTaxes, double netPay) cal = EstimateTaxes(grossSalary);

            txtIncomeTax.Text = cal.incomeTaxes.ToString("F");
            txtNetPay.Text = cal.netPay.ToString("F");
        }
    }
}
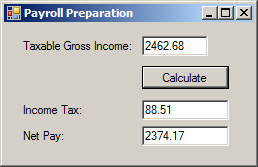
if...else if ... else if and else
The if...else conditional statement allows you to process many conditions. The formula to follow is:
if(condition1) statement1;
else if(condition2) statement2;
. . .
else if(condition_n) statement_n;
If you are writing the code in a webpage, each statement must be included in curly brackets. The formula to follow is:
if(condition1) { statement1; }
else if(condition2) { statement2; }
. . .
else if(condition_n) { statement_n; }
The conditions would be checked from the beginning one after another. If a condition is true, then its corresponding statement would execute.
If there is a possibility that none of the conditions would respond true, you can add a last else condition and its statetement. The formula to follow is:
if(condition1)
    statement1;
else if(condition2)
    statement2;
. . .
else if(condition_n)
    statement_n;
else
    statement-n;
In a webpage, the formula to follow is:
if(condition1) {
    statement1;
}
else if(condition2) {
    statement2;
}
. . .
else if(condition_n) {
    statement_n;
}
else {
    statement-n;
}
A condition may need many statements to execute. In this case, you must delimit the statements by curly brackets:
if(condition1)
{
    if-statement_1;
    if-statement_2;
    . . .
    if-statement_n;
}
else if(condition2)
{
    else-if-1-statement_1;
    else-if-1-statement_2;
    . . .
    else-if-1-statement_n;
}
. . .
else if(condition_n)
{
    else-if-n-statement_1;
    else-if-n-statement_2;
    . . .
    else-if-n-statement_n;
}
else
{
    else-statement_1;
    else-statement_2;
    . . .
    else-statement_n;
}
![]() Practical Learning: Introducing if...else if Conditions
Practical Learning: Introducing if...else if Conditions
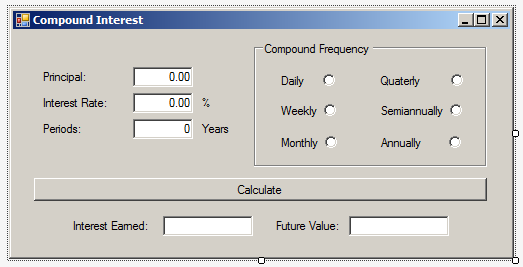
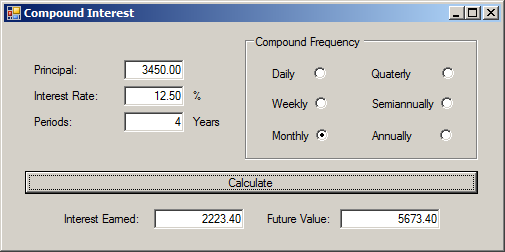
| Control | (Name) | Text | Other Properties |
| Label | Principal: | ||
| TextBox | txtPrincipal | 0.00 | TextAlign: Right |
| Label | Interest Rate: | ||
| TextBox | txtInterest Rate | 0.00 | TextAlign: Right |
| Label | % | ||
| Label | Periods: | ||
| TextBox | txtPeriods | 0 | TextAlign: Right |
| Label | Years: | ||
| GroupBox | Compound Frequency | ||
| RadioButton | rdoDaily | Daily | CheckAlign: MiddleRight |
| RadioButton | rdoQuaterly | Quaterly | CheckAlign: MiddleRight |
| RadioButton | rdoWeekly | Weekly | CheckAlign: MiddleRight |
| RadioButton | rdoSemiannually | Semiannually | CheckAlign: MiddleRight |
| RadioButton | rdoMonthly | Monthly | CheckAlign: MiddleRight |
| RadioButton | rdoAnnually | Annually | CheckAlign: MiddleRight |
| Button | btnCalculate | Calculate | |
| Label | Interest Earned: | ||
| TextBox | txtInterestEarned | TextAlign: Right | |
| Label | Future Value: | ||
| TextBox | txtFutureValue | TextAlign: Right |
using System;
using System.Windows.Forms;

namespace CompoundInterest2
{
    public partial class CompoundInterest : Form
    {
        public CompoundInterest()
        {
            InitializeComponent();
        }

        private void btnCalculate_Click(object sender, EventArgs e)
        {
            double frequency;

            double principal = Convert.ToDouble(txtPrincipal.Text);
            double interestRate = Convert.ToDouble(txtInterestRate.Text);
            double periods = Convert.ToDouble(txtPeriods.Text);

            if(rdoDaily.Checked)
                frequency = 365.00;
            else if (rdoWeekly.Checked)
                frequency = 52.00;
            else if (rdoMonthly.Checked)
                frequency = 12.00;
            else if (rdoQuaterly.Checked)
                frequency = 4.00;
            else if (rdoSemiannually.Checked)
                frequency = 2.00;
            else // if (rdoAnnually.Checked)
                frequency = 1.00;

            double rate = interestRate / 100.00;
            double futureValue = principal * Math.Pow((1.00 + (rate / frequency)), frequency * periods);

            txtFutureValue.Text = futureValue.ToString("F");
            txtInterestEarned.Text = (futureValue - principal).ToString("F");
        }
    }
}
Options on Conditional Statements
In the flow of your code, you can jump from one statement or line to another. To make this possible, the C# language forvides an operator named goto. Before using it, first create or insert a name on a particular section of code or in a method. The name, also called a label, is made of one word and it can be anything. That name is followed by a colon ":". Here is an example:
public class Exercise
{
    public static void Main()
    {
        proposition:
    }
}
In the same way, you can create as many labels as you want. The name of each label must be unique among the other labels in the same section of code (in the same scope). Here are examples:
public class Exercise
{
    public static void Main()
    {
        proposition:

something:

TimeToLeave:
    }
}
After creating the label(s), you can create a condition so that, when that condition is true, code execution would jump to a designated label. To do this, in the body of the condition, type goto followed by the label. Here are examples:
public class Exercise
{
    public static void Main()
    {
        int nbr = 248;
        double result = 0;

        if( nbr < 200)
            goto proposition;
        else
            goto something;

		proposition:
	    	result = 245.55;

		something:
	    	result = 105.75;
    }
}
Negating a Statement
As you should be aware by now, Boolean algebra stands by two values, True and False, that are opposite each other. If you have a Boolean value or expression, to let you validate its opposite, the C-based languages provide the ! operator that is used to get the logical reverse of a Boolean value or of a Boolean expression. The formula to use it is:
!expression
To use this operator, type ! followed by a logical expression. The expression can be a simple Boolean value. To make the code easier to read, it is a good idea to put the negative expression in parentheses. Here is an example:
using System.Windows.Forms;

public class Exercise
{
    public void Create()
    {
        bool employeeIsFullTime = true;

       string opposite = (!employeeIsFullTime).ToString();
    }
}
In this case, the ! (Not) operator is used to change the logical value of the variable. When a Boolean variable has been "notted", its logical value has changed. If the logical value was true, it would be changed to false and vice versa. Therefore, you can inverse the logical value of a Boolean variable by "notting" or not "notting" it.
Conditional Returns of Methods
Introduction
When performing its assignment, a method can encounter different situations, a method can return only one value but you can make it produce a result that depends on some condition.
Conditionally Returning a Value from a Method
We are already familiar with the ability for a function to return a value. In some cases, the value you want to return is not a simple constant: It may depend on some condition. To make this happen, you have various options.
![]() Practical Learning: Conditionally Returning a Value
Practical Learning: Conditionally Returning a Value
unamespace DepartmentStore2
{
    public class StoreItem
    {
        public int ItemNumber { get; set; }
        public string ItemName { get; set; }
        public string Size { get; set; }
        public double UnitPrice { get; set; }

        public double GetDiscountRate(int days)
        {
            double discountRate = 0.00;

            if (days > 70)
                discountRate = 70;
            else if (days > 50)
                discountRate = 50;
            else if (days > 30)
                discountRate = 35;
            else if (days > 15)
                discountRate = 15;

            return discountRate;
        }

        public double GetDiscountAmount(double rate)
        {
            double discountAmount = 0.00;

            if (rate == 0.00)
                discountAmount = 0.00;
            else
                discountAmount = UnitPrice * rate / 100.00;

            return discountAmount;
        }
    }
}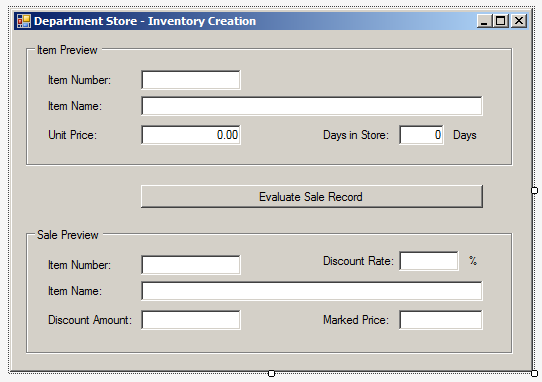
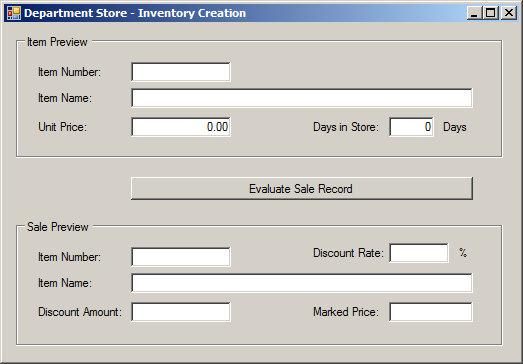
| Control | (Name) | Text | Other Properties |
| GroupBox | Item Preview: | ||
| Label | Item Number: | ||
| TextBox | txtItemNumber | ||
| Label | Item Name: | ||
| TextBox | txtItemName | ||
| Label | Unit Price: | ||
| TextBox | txtUnitPrice | 0.00 | TextAlign: Right |
| Label | Days in Store: | ||
| TextBox | txtDaysInStore | 0 | TextAlign: Right |
| Label | Days: | ||
| Button | btnCalculate | Evaluate Sale Record | |
| GroupBox | Sale Preview | ||
| Label | Item Number: | ||
| TextBox | txtRecordItemNumber | TextAlign: Right | |
| Label | Discount Rate: | ||
| TextBox | txtDiscountRate | TextAlign: Right | |
| Label | % | ||
| Label | Item Name: | ||
| TextBox | txtRecordItemName | ||
| Label | Discount Amount: | ||
| TextBox | txtDiscountAmount | TextAlign: Right | |
| Label | Marked Price: | ||
| TextBox | txtMarkedPrice | TextAlign: Right |
using System;
using System.Windows.Forms;

namespace DepartmentStore2
{
    public partial class DepartmentStore : Form
    {
        public DepartmentStore()
        {
            InitializeComponent();
        }

        private void btnEvaluate_Click(object sender, EventArgs e)
        {
            StoreItem si = new StoreItem();

            si.ItemNumber = int.Parse(txtItemNumber.Text);
            si.ItemName = txtItemName.Text;
            si.UnitPrice = double.Parse(txtUnitPrice.Text);
            int daysInStore = int.Parse(txtDaysInStore.Text);

            double discountRate = si.GetDiscountRate(daysInStore);
            double discountedAmount = si.GetDiscountAmount(discountRate);
            double markedPrice = si.UnitPrice - discountedAmount;

            txtDiscountRate.Text = discountRate.ToString("F");
            txtDiscountAmount.Text= discountedAmount.ToString("F");
            txtMarkedPrice.Text = markedPrice.ToString("F");

            txtRecordItemNumber.Text = si.ItemNumber.ToString();
            txtRecordItemName.Text = si.ItemName;
        }
    }
}
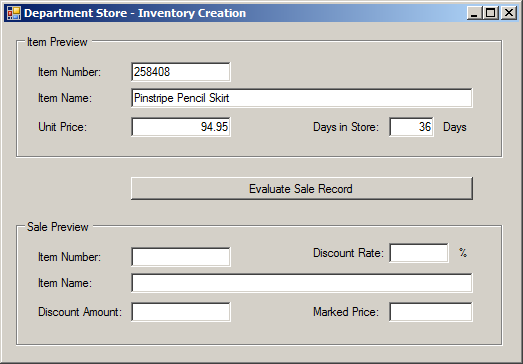
Item Number:   258408
Item Name:     Pinstripe Pencil Skirt
Unit Price:    94.95
Days in Store: 36
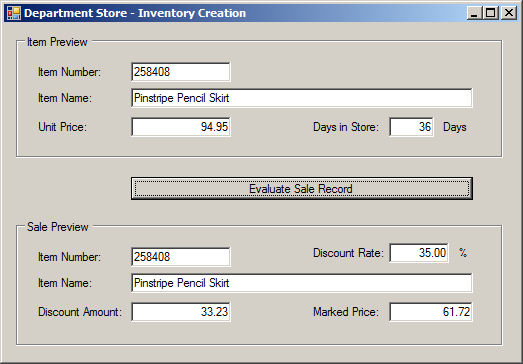
namespace DepartmentStore2
{
    public class StoreItem
    {
        public int ItemNumber { get; set; }
        public string ItemName { get; set; }
        public string Size { get; set; }
        public double UnitPrice { get; set; }

        public double GetDiscountRate(int days)
        {
            if (days > 70)
                return 70;
            else if (days > 50)
                return 50;
            else if (days > 30)
                return 35;
            else if (days > 15)
                return 15;
            else
                return 0;
        }

        public double GetDiscountAmount(double rate)
        {
            if (rate == 0)
                return 0;
            else
                return UnitPrice * rate / 100;
        }
    }
}namespace AppliancesStore2
{
class MicrowaveOven
{
public string Make { get; set; }
public string Model { get; set; }
public double Capacity { get; set; }
public int MenuOptions { get; set; }
public double Price { get; set; }
}
}
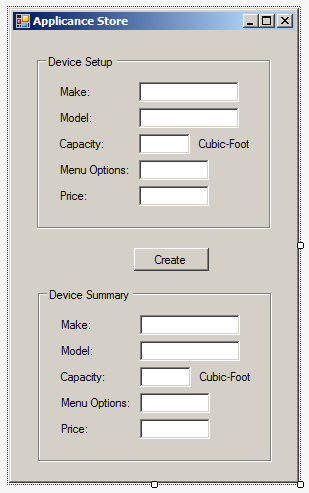
| Control | (Name) | Text |
| GroupBox | gbxDeviceSetup | Device Setup |
| Label | Make: | |
| TextBox | txtManufacturrer | |
| Label | Model: | |
| TextBox | txtIdentification | |
| Label | Capacity: | |
| TextBox | txtVolume | |
| Label | Cubic-Foot | |
| Label | Menu Options: | |
| TextBox | txtNumberOfMenus | |
| Label | Price: | |
| TextBox | txtValue | |
| Button | btnCreate | Create |
| GroupBox | gbxDeviceSummary | Device Summary |
| Label | Make: | |
| TextBox | txtMake | |
| Label | Model: | |
| TextBox | txtModel | |
| Label | Capacity: | |
| TextBox | txtCapacity | |
| Label | Cubic-Foot | |
| Label | Menu Options: | |
| TextBox | txtMenuOptions | |
| Label | Price: | |
| TextBox | txtPrice |
Returning From a Method
Normally, when defining a void method, it doesn't return a value. Here is an example:
public class Exercise
{
    private void Show()
    {
    }
}
In reality, a void method can perform a return, as long as it does not return a true value. This is used to signal to the compiler that it is time to get out of the method. To add such as flag, in the appropriate section of the void method, simply type return;. Here is an example:
public class Exercise
{
    private void Show()
    {
        Blah Blah Blah

        return;
    }
}
In this case, the return; statement doesn't serve any true purpose. It can be made useful when associated with a conditional statement.
Exiting Early From a Method
One of the goals of a condition statement is to check a condition in order to reach a conclusion. One of the goals of a function is to perform an action if a certain condition is met. In fact, by including a condition in a function, you can decide whether the action of a function is worth pursuing or completing. In the body of a function where you are checking a condition, once you find out that a certain condition is not met, you can stop checking the condition and get out of the function. This is done with the return keyword. To apply it, in the body of a conditional statement in a function, once you decide that the condition reaches the wrong outcome, type return and a semicolon.
![]() Practical Learning: Exiting Early From a Method
Practical Learning: Exiting Early From a Method
using System;
using System.Windows.Forms;

namespace AppliancesStore2
{
    public partial class Form1 : Form
    {
        public Form1()
        {
            InitializeComponent();
        }

        void Present(MicrowaveOven mo)
        {
            if (mo is null)
            {
                MessageBox.Show("Ain't no microwave oven like that in the store.",
                                "Appliances Store");
                return;
            }

            txtMake.Text = mo.Make;
            txtModel.Text = mo.Model;
            txtCapacity.Text = mo.Capacity.ToString();
            txtMenuOptions.Text = mo.MenuOptions.ToString();
            txtPrice.Text = mo.Price.ToString("F");
        }

        void CreateStoreItem(out MicrowaveOven device)
        {
            device = new MicrowaveOven();

            if (txtManufacturer.Text == "")
            {
                MessageBox.Show("You must provide the name of the company that manufactures the microwave oven.",
                                "Appliances Store");
                return;
            }

            if (txtVolume.Text == "")
            {
                MessageBox.Show("What it the capacity of the microwave oven?",
                                "Appliances Store");
                return;
            }

            if (txtNumberOfMenus.Text == "")
            {
                MessageBox.Show("How many menu options does the microwave oven have?",
                                "Appliances Store");
                return;
            }

            if (txtValue.Text == "")
            {
                MessageBox.Show("You must indicate the price of the microwave oven.",
                                "Appliances Store");
                return;
            }

            device = new MicrowaveOven()
            {
                Make = txtManufacturer.Text,
                Model = txtIdentification.Text,
                Capacity = double.Parse(txtVolume.Text),
                MenuOptions = int.Parse(txtNumberOfMenus.Text),
                Price = double.Parse(txtValue.Text)
            };
        }

        private void btnCreate_Click(object sender, EventArgs e)
        {
            MicrowaveOven mo = new MicrowaveOven();

            CreateStoreItem(out mo);
            Present(mo);
        }
    }
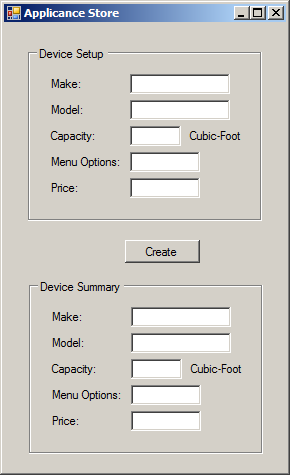
}
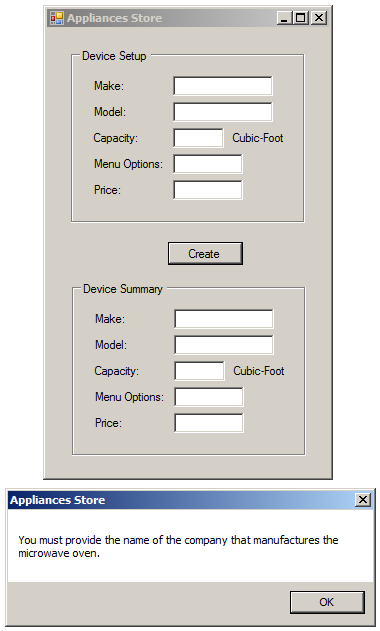
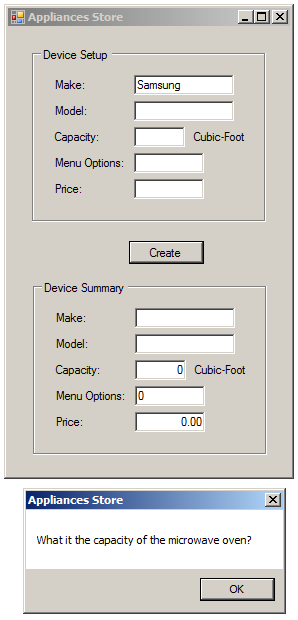
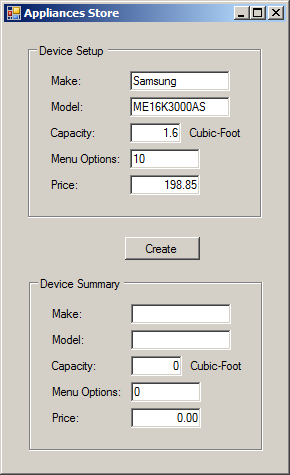
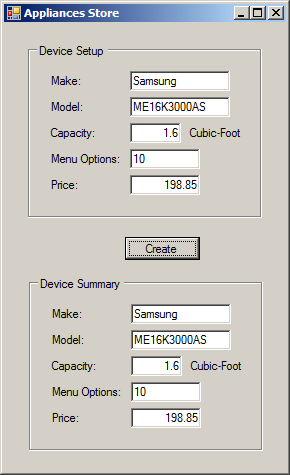
Nake: Samsung
Model: ME16K3000AS
Capacity: 1.6
Menu Options: 10
Price: 198.85
Introduction to Recursion
Recursion if the ability for a method (or functtion) to call itself. A possible problem is that the method could keep calling itself and never stops. Therefore, the method must define how it would stop calling itself and get out of the body of the method.
A type of formula to create a recursive method is:
return-value method-name(parameter(s), if any)
{
    Optional Action . . .
    method-name();
    Optionan Action . . .
}
A recursive method starts with a return value. If it would not return a value, you can define it with void. After its name, the method can use 0, one, or more parameters. Most of the time, a recursive method uses at least one parameter that it would modify. In the body of the method, you can take the necessary actions. There are no particular steps to follow when implementing a recursive method but there are two main rules to observe:
For an example of counting decrementing odd numbers, you could start by creating a method that uses a parameter of type integer. To exercise some control on the lowest possible values, we will consider only positive numbers. In the body of the method, we will display the current value of the argument, subtract 2, and recall the method itself. Here is our method:
namespace Exercises
{
    public class Exercise
    {
        public int Number = 0;

        public void OddNumbers(int a)
        {
            if (a >= 1)
            {
                Number += a;

                a -= 2;
                OddNumbers(a);
            }
        }
    }
}
-------------------------------------------
Exercise exo = new Exercise();

const int number = 9;
hc.OddNumbers(number);
Notice that the method calls itself in its body.
![]() Practical Learning: Ending the Lesson
Practical Learning: Ending the Lesson
|
|
||
| Previous | Copyright © 2001-2021, FunctionX | Next |
|
|
||