Home

The Pen Tool


Lines Fundamentals


Introduction

The Pen Tool is used to draw a line, a path, or a series of lines. It is also used to manipulate existing lines. It is also a wonderful tool to get curved lines. One of the most valuable characteristics of the Pen Tool is that it provides feedback or indicates what to do with it, using different cursors.

You can use the Pen tool to draw one line, many lines, or a shape. You can draw a line that stands by itself. You can draw a series of lines attached to each other. You can draw a closed shape; that is, a shape made of three or more lines where the starting point of the first line is also the closing point of the last line.

Practical LearningPractical Learning: Introducing Lines

  1. Start Adobe Flash
  2. In the opening dialog box, click Flash File (ActionScript 3.0)

Drawing a Line

To draw a line in using the Pen Tool, first click the Pen Tool in the Tools palette. Then click a point in the Stage, and press Esc.

Practical LearningPractical Learning: Drawing Lines

  1. In the Tools palette, click the Pen Tool Pen Tool
  2. On the Stage, click (that means click and release the mouse) somewhere in the top-right section (of the white area) (no need for precision)
     
    Line
  3. Click another point under it (no need for precision):
  4. Press Esc to end

Drawing Adjacent Lines

Instead of one, you can draw as many lines as you want.

To draw lines that are connected, in the Tools palette, click the Pen Tool. On the Stage, click somewhere, then click another point away, continue this to get the lines. Then press Esc.

Practical LearningPractical Learning: Drawing Adjacent Lines

  1. Make sure the Pen tool is still selected. Otherwise, in the Tools palette, click the Pen Tool.
    On the Stage, click somewhere in the lower-right section (no need for precision)
  2. Then click any point on the left side (no need for precision)
  3. Click another point just a little above the previous point (no need for precision)
  4. Click another point just a little to the right side (no need for precision)
     
    Line
  5. Press Esc to stop

Drawing a Closed Shape

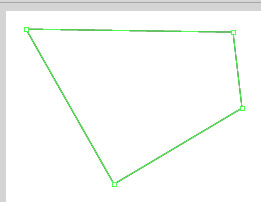
To draw a closed shape using the Pen Tool, first select it in the Tools palette. On the Stage, click somewhere, then click another point away, then click another point away, continue doing this to get the shape. To close the shape, click the first point (where you started), and press Esc.

Line Maintenance

Lines are maintained using the techniques we reviewed for the Line Tool:

  • Line selection is made the same way we reviewed for the Line Tool
  • You copy and paste lines the way we reviewed for the Line Tool
  • You move the lines as we saw for the Line Tool
  • You remove the lines just we saw for the Line Tool
  • You trim a line just as done for the Line Tool

Practical LearningPractical Learning: Clearing the Stage

  1. Click somewhere in the Stage and press Ctrl + A
  2. Press Delete to clear the Stage


Pen Tools and Anchors


Creating an Anchor

In the previous lesson, we had an introduction to anchors. If necessary, you can dd anchors to an existing line.

To add a new anchor to a line, in the Tools palette, click the Pen Tool. In the Stage, click the line or the shape to select it. Position the mouse on the line where you want to add the anchor until the cursor appears with +. Then click and press Esc. In the same way, you can add as many anchors as you want.

Practical LearningPractical Learning: Creating Anchors

  1. In the Tool palette, click the Pen Tool Pen Tool
  2. On the Stage, click the upper-left section
  3. Click somewhere in the upper-center section of the Stage to draw a line
  4. Click somewhere in the middle-right section of the Stage
  5. Click somewhere in the lower-middle section of the Stage
  6. Click the left section of the first line
  7. Press Esc
     
    Segments
  8. While the Pen Tool is still selected, click the shape to select it
  9. Position the mouse in the middle of the line on the right side
     
    Anchors
  10. Then Click
     
    Anchors
  11. Press Esc

Deleting an Anchor

If you have an undesired or unnecessary anchor on a line or in a shape, you can delete that anchor.

To remove an anchor, in the Tools palette, click the Pen Tool. In the Stage, click the line or shape to select it. Position the mouse on the undesired anchor until the cursor displays a - or x. Then click.

Practical LearningPractical Learning: Deleting an Anchor

  1. Click the shape to select it
  2. Position the mouse on the lower-right corner of the shape until the mouse show a -
     
    Anchors
  3. Click.
    Notice the resulting shape:
     
    Anchors
  4. Press Esc

Polygones and Irregular Line-Based Shapes

A polygone is a closed shape made of 3 or more lines. The most basic polygone is a triangle. Then there are shapes with four sides, such as the square and the rectangle, etc, and shapes with more sides.

We already saw how to draw a closed shape, using either the Line tool or the Pen tool. Sometimes you have a closed shape already but you just wand it to appear otherwise. With the presence of anchors, you can transform a shape to anything you want.

To transform an existing shape:

  • In the Tools palette, click the Selection tool. Press and hold the Ctrl key (or the Alt key). On the Stage, click and drag the anchor or part of the line. Once you get to the desired position, release the mouse and release Ctrl (or Alt)
  • In the Tools palette, click the Subselection Tool. On the Stage, click the line to select it. Then click and drag an anchor in the direction of your choice, and release the mouse

Practical LearningPractical Learning: Modifying a Shape

  1. Click somewhere in the Stage to give it focus.
    Pres Ctrl + A to select everything in the Stage
  2. Press Delete to clear the stage
  3. In the Tools palette, click the Pen Tool Pen Tool
  4. On the Stage, click the middle-top section (no need for precision)
  5. Click the lower-right section (no need for precision) 
  6. Click the lower-left section (no need for precision)
  7. Click the first point where you started (the following shape purposely looks messy so you will know you don't need to be precise)
     
    Shape
  8. Press Esc
  9. While the Pen Tool is still selected, click the shape to select it
  10. Position the mouse on the upper section of the right line (no need for precision) until the cursor appears with +
     
    Shape
  11. Click and press Esc
  12. Click the shape to select it
  13. Position the mouse on the middle section of the right line (no need for precision)
  14. Click and press Esc
  15. Click the shape to select it
  16. Position the mouse on the lower section of the right line (no need for precision)
  17. Click and press Esc
  18. Click the shape to select it
  19. Position the mouse on the middle section of the bottom line (no need for precision)
  20. Click and press Esc
  21. Click the shape to select it
  22. Position the mouse on the upper section of the left line (no need for precision)
  23. Click and press Esc
  24. Click the shape to select it
  25. Position the mouse on the middle section of the left line (no need for precision)
  26. Click and press Esc
  27. Click the shape to select it
  28. Position the mouse on the lower section of the left line (no need for precision)
     
    Anchors
  29. In the Tools palette, click the Subselection tool
  30. Click the shape to select it
  31. Position the mouse on the middle anchor of the right line
     
    Anchors
  32. Click and drag right a little bit
     
    Anchors
  33. Release the mouse
     
    Anchors
  34. In the same way, drag the middle anchor of the left line to the left
  35. Drag the middle anchor of the bottom line up (the following screen purposely looks bad so you can see we didn't primarily need to be precise)
     
    Anchors
  36. Seizing the anchors, adjust the shape to make it look like a reasonable star
     
    Anchors
  37. Close Flash
  38. When asked whether you want to save, click No


Previous Copyright © 2009-2019, FunctionX, Inc. Next