
The Presentation File
|
The Presentation File |
|
The Presentation as a File |
|
Introduction |
|
A Microsoft PowerPoint presentation is primarily a Windows file like any other. It must have a location, also called a path, which indicates how the file can be retrieved and made available. Although you can create a presentation on the root directory such as the C: drive, it is usually a good idea to create your files, including your presentations, in an easily recognizable folder. Starting with Microsoft Windows 95 but except in Windows NT 4.0, the operating system creates a folder called My Documents that provides a convenient place for a user to create files. With Windows 2000, XP, and Windows Server 2003, there is also a My Documents folder but because various people may use the same computer, there is a different My Documents folder for each user. When a user logs in, the operating system locates his or her corresponding My Documents folder and makes it available. |
Opening a presentation allows you to view what already exists. There are two main ways you open a presentation in Microsoft PowerPoint:
A Microsoft PowerPoint presentation is a computer file that should be stored somewhere for later use or reference. When saving a presentation, you can store it on your computer, on a floppy drive, or on another computer (network drive). To save a new presentation, you use the Save As dialog box. The shortcut to save the file is Ctrl + S. There are two pieces of information you should provide when saving a file: the file name and the location. A file name can have up to 255 characters. Refrain from using fancy characters; instead, give an easily recognizable name. A file location is where the file will be stored; on your (local) computer, this is called a folder. If you want to save your presentation on a floppy disk or another medium, make the selection from the Save In combo box. To save the presentation on another computer, make sure you are connected to that computer. If the presentation has already been saved, that is, if it has a recognizable name, if you click File -> Save or press Ctrl + S, the presentation would be saved behind the scenes. You can still save the presentation with a different name or at another location. To do this, on the main menu, you can click File -> Save As... The shortcuts to save the file with a different name or at a different location are F12 or Alt + F2.
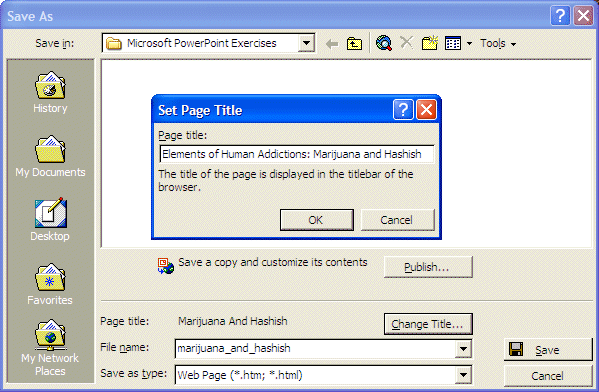
With the popularity of the Internet, you can perform a presentation online or simply post it on a web site. Microsoft PowerPoint makes it very easy to create presentations for the web. To save a presentation for online viewing, on the main menu, you can click File -> Save As Web Page... You can also start saving the file with File -> Save As... or by pressing F12 then change the Save As Type combo box to Web Page. |
|
|
|
|
Emailing a Presentation |
|
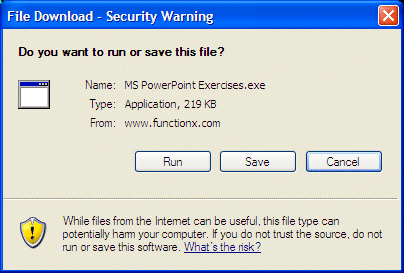
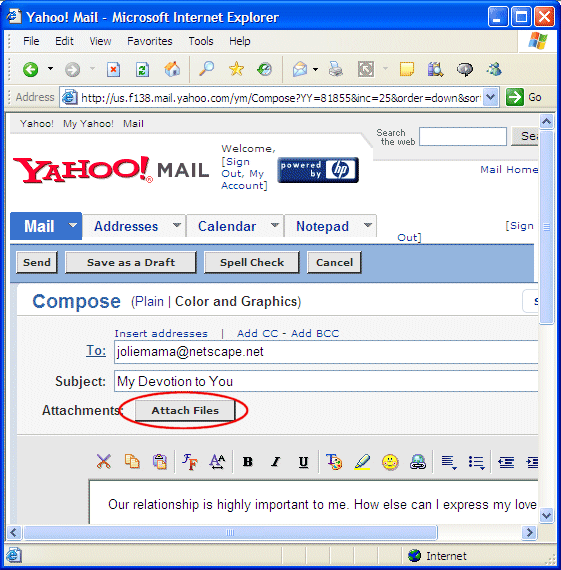
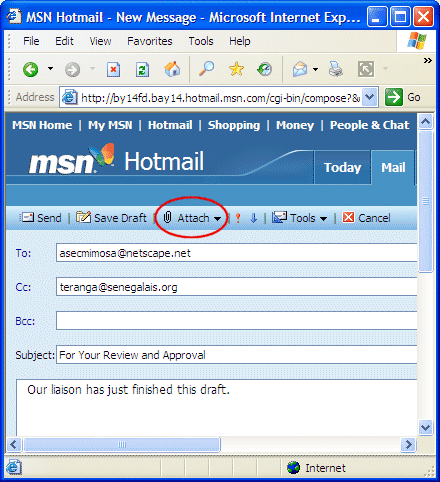
To deliver a presentation, in some cases, you don't have to physically meet with your clients or your audience. You can simply send it as an email. To send a presentation as email, you usually must attach it as an addition to your message. There are different ways to do this, depending on how your email system is setup. If you are using Microsoft Outlook, to send a presentation, start composing the message after clicking File -> New -> Mail Message on the main menu. Then compose your message:  Before or after composing the message, to attach a presentation, on the main menu, you can click Insert -> File..., locate the presentation and click Open: 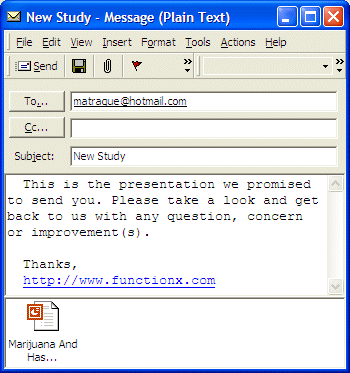 Notice that an attachment is added to the message. Once the message is ready, you can click Send. If you are using a universal email address such as one provided by Yahoo, Hotmail, Netscape, etc, you can start by clicking New Message or Compose and start creating the message. To attach the presentation, on the browser, you should see a link or a button labeled Attach Files or Attach
You can click the button, click Browse, locate the presentation file and continue with the wizard. Once the file has been attached, you can send your message. |
|
The Parts of a Presentation |
|
Introduction |
|
If you have previously used a text file, you may have noticed that it is made of different pages that segment the document into sections easy to locate or navigate. Such sections are referred to as pages. Unlike a text document, a presentation is divided into pages that each is called a slide. Just like you can have a text document that is made of only one page, you can also have a presentation that is made of only one slide. If you have a presentation made of different slides, which is usually the case, you can move from one slide to another as you see fit. This is referred to as slide navigation. By default, when Microsoft PowerPoint opens a file, it divides its screen in different sections. On top, there is the main menu and one or more toolbars. At the bottom, there is the status bar. We reviewed both sections in the previous lesson. |
|
|
|
|
The Normal Outline View |
|
The middle section of Microsoft PowerPoint is divided in two frames separated by a bar also called a splitter bar. This view made of two frames is also called a Normal View, the Outline View, or the Normal Outline View: 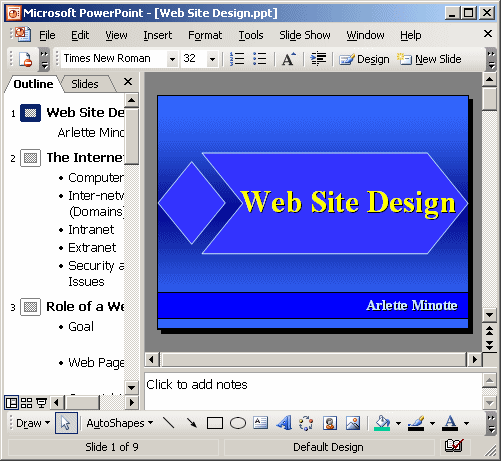 The left frame of this view displays the text
parts of slides. If there are many slides, the splitter bar is equipped
with a vertical scroll bar. Under the left frame, there are three buttons The right frame of the Normal View is itself divided in two frames. The top frame actually displays a slide but it displays only one slide at a time. The bottom frame can be used to create notes used during a presentation. Slide navigation consists of moving from one slide to another. In the Normal View, to navigate among slides, you can use either the left or the top right frames. In the left frame, if you click any text, the slide it belongs to would display in the right frame. In the right frame, to change a slide, you can click either the up arrow or the bottom arrow buttons of the vertical scroll bar. If you click the up arrow, the previous slide would display unless the first slide is displaying already, in which case nothing would happen. If you click the bottom arrow, the next slide would display unless the last slide is displaying already, in which case nothing would happen. To move to the very first slide, you can press Ctrl + Home. To move to the last slide, you can press Ctrl + End. |
|
|
|
|
The Slides View |
|
The last view we have introduced reduces the area dedicated to the slide. Of course, you can resize it to provide as much area as you need for each frame. That's what is offered by the Slides View. To display the Slides View, on the left frame, click the Slides tab. The Slides View is drawn exactly like the Outline view except that the left frame displays small slides: 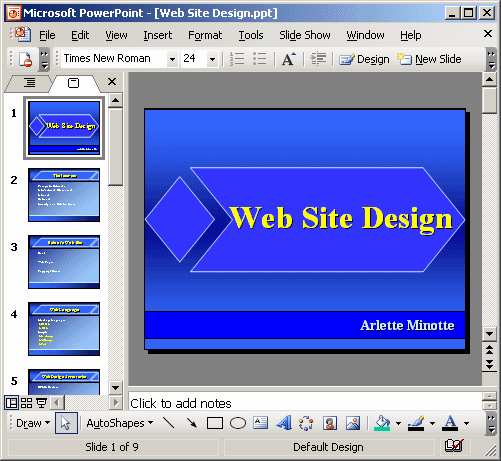 |
|
|
|
|
The Slide Sorter View |
|
Instead of getting only a smaller outline of slides, you can use a view that displays them a little larger. This is offered by the Slide Sorter view. To get the Slide Sorter View:
The Slide Sorter View is significantly different from the previous review. It shows as many slides as possible. Each slide displays as a smaller picture. If there are more slides than the view can display, it is equipped with a vertical scroll bar that allows you to view hidden slides:  If you double-click a slide, the view changes into Slide View and displays the slide you double-clicked. |
|
|
|
|
MOUS Topics |
| S5 | Navigate among different views (slide, outline, sorter, and tri-pane) |
| S8 | Create a blank presentation |
| S10 | Send a presentation via e-mail |
| S48 | Save as a new presentation |
| S49 | Publish a presentation to the Web |
|
|
||
| Previous | Copyright © 2004-2016, FunctionX, Inc. | Next |
|
|
||

 .
These buttons allow you to change the current view.
.
These buttons allow you to change the current view.