Home

The Sequence and Structure of Slides


The Sequence of Slides


Introduction

When a presentation is made of more than one slide, which is usually the case, the slides follow an incremental number, also referred to as their sequence. Based on this, there is the entry or first slide, followed by the 2nd, 3rd, etc slides. While creating your presentation and before showing it to your audience, you may find out that a slide is in the wrong order or a group of slides are out of sequence. Fortunately, Microsoft PowerPoint allows you to easily insert, delete, copy or move slides.

Copying Slides

One of the most routine tasks you will perform consists of copying slides. If you have a slide whose contents and/or structure should be used in another location of the presentation, you can copy it and paste it to another section of the presentation.

To copy a slide, in the Slide Sorter View or in the Normal View, right-click the slide button and click Copy. Then, right-click the slide that would precede it and click Paste.

Practical Learning: Copying Slides

  1. Open the Human Body Structure1 presentation.
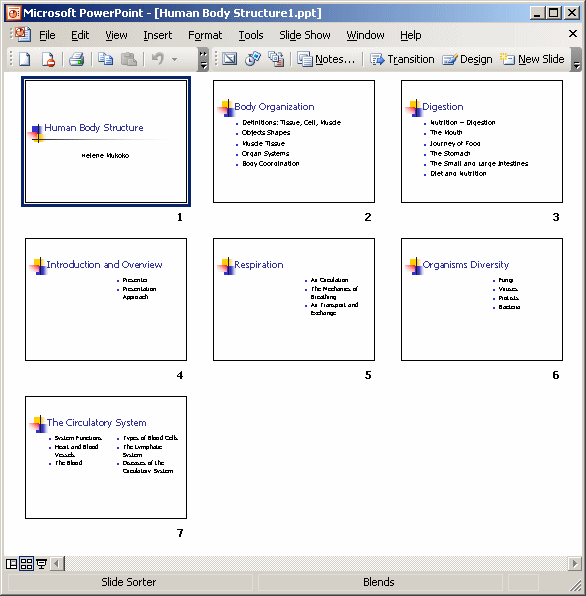
    In the lower left section, click the Slide Sorter View button
     
  2. Right-click slide 2 and click Copy
  3. Right-click slide 7 and click Paste
  4. In the lower left section of Microsoft PowerPoint, click the Normal View button Normal View
  5. If necessary, scroll up completely to see slide 1
    In the left section of the screen, position the mouse on the button header of slide 3 until the mouse pointer becomes a cross
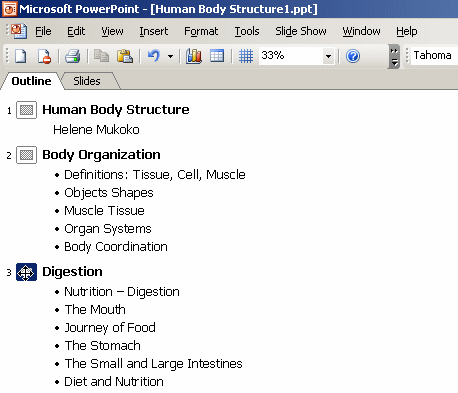
     Slide Selection
  6. Right-click and click copy
  7. Right-click the button of slide 5 and click Paste
  8. Still on the left side of the screen (Normal View), click anywhere on (any word of) slide 6 to give it focus.
  9. Press Ctrl + C
  10. Click anywhere on (any word of) slide 4 to give it focus
  11. Press Ctrl + V
  12. Notice that slide 6 has been pasted
  13. To save the presentation with an incremental name, press F12
  14. Change the name of the slide to Structure of the Human Body1
  15. Click Save

Moving Slides

Very often, you will find out that a certain slide is out of sequence based on your desired logic of the presentation. In this case you would have to move it to another location.

There are various ways you can move a slide:

  • You can cut it from its original location and paste it to the desired location
  • In Slide Sorter View or in Normal View, you can drag the button representing the slide and drop it to the new location

Practical Learning: Moving Slides

  1. As we are still in the Outline tab of the Normal View, if necessary, scroll up to make sure you can see slides from 4 to 2.
    Position the mouse on the button header of slide 4 until the mouse pointer turns into a cross and click. That selects the whole slide (clicking is not necessary but is recommended)
  2. Click the same button and hold your mouse down
  3. Drag it up. Notice that while you are dragging, there is a horizontal line that guides you
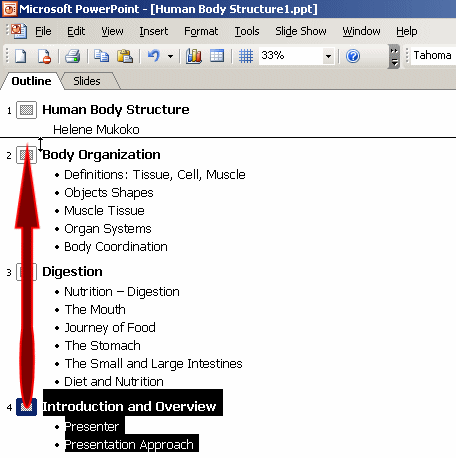
     
  4. When the horizontal line gets just above slide 2, release the mouse
  5. Right-click the button of slide 4 and click Cut
  6. Right-click the button of slide 8 and click Paste
  7. To switch to another view, in the lower left section, click the Slider Sorter View button
  8. In Slide Sorter View, click and hold your mouse on slide 4
  9. Drag it down and left. Notice that a vertical line guides you
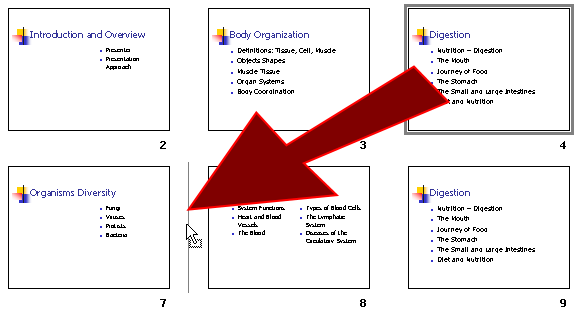
     
  10. When the vertical line gets between slides 7 and 8, release the mouse
  11. Save the presentation

Deleting Slides

Whenever a slide doesn't fit or is not necessary on a presentation, you can delete it.

There are two ways you can delete a slide. You can right-click it and click Cut. Although stored on the clipboard, the slide would disappear from the presentation. You can also click the slide button header in Normal View or in Slide Sorter View to select or highlight it, then press Delete.

Practical Learning: Deleting Slides

  1. Still in Slide Sorter View, click slide 10 (it should be titled Body Organization; otherwise click the second slide that is titled Body Organization) to select it
  2. Press Delete
  3. In the left section, click the Outline tab.
    Right-click the button of slide 7 (it should be titled Digestion; otherwise click the second slide that is titled Digestion) to select it
  4. Click Cut
  5. Still in the Outline View, click the button of slide 8 (Digestion) to select the whole slide
  6. Press Delete
  7. Press Ctrl + Home to make sure the first slide receives focus
  8. Press Ctrl + S to save the presentation
  9. To preview the presentation, on the main menu, click Slide Show -> View Show
  10. To advance in the presentation, press Enter after viewing each slide

Slide Layout


Layout Modification

As you probably realized in our previous lesson, when creating slides, Microsoft PowerPoint allows you to select a slide based on the intended layout. This is because various types of slides are available, those used to display text, those used for graphics or charts, those used for combined designs. At any time, you can change the layout of a slide if you judge its content suited for another type.

To change the layout of a slide, in Normal View, in the top-right section, right-click the title of the slide and click Slide Layout. In the Slide Layout window, and select the desired layout.


Practical Learning: Modifying Slide Layout

  1. In the lower left corner, click the Normal View button.
    If necessary, scroll up completely.
    On the left frame, click anywhere on slide 2 to make sure it is selected
  2. On the right frame, right-click the title of the slide (slide 2) and click Slide Layout...
  3. In the right side, under Text Layouts, click Title and Text
  4. Save the presentation
  5. Open the Web Site Design1 presentation
  6. On the lower left corner, click the Slide Sorter View button
  7. In the Slide Sorter View, double-click the slide 4 Web Languages
  8. Right-click an empty area on the slide and click Slide Layout...
  9. In the Slide Layout window, click Title and 2-Column Text
  10. In the slide, click Active Web
  11. Press and hold Shift. Then click SOAP and release Shift
  12. Click and hold the mouse down on the selected text
  13. Drag to the right section titled Click To Add Text
     
  14. Release the mouse
  15. Click just above Markup Language and press Delete
     
  16. To save the presentation with an incremental name, press F12
  17. Change the name of the presentation to Web Design1
  18. Click Save
 

Slide and Text Layout


Moving Text

If you happen to have a section of text in the wrong slide, you can move it to the appropriate slide. To do this, you can click the bullet button of a line of text and drag it to the desired slide. You can also copy or cut text, then paste it inside of the desired slide.

Practical Learning: Moving Text

  1. Open the Alcoholism1 presentation
    To make sure you are in the normal view, on the main menu, click View -> Normal
  2. In the left frame, in Slide 2, click the word Who
  3. Press and hold Shift
  4. In the same slide, click Diagnosis and release Shift
  5. Press Ctrl + X to cut the selected text
  6. In the left frame, click slide 3 (Drinkers: An Analysis)
  7. In the right frame, click Click to add text and press Ctrl + V
  8. In the left frame, click the empty line in slide 2 and press Delete
  9. To save the presentation with an incremental name, press F12
  10. Change the name of the presentation to Alcoholism Factor2
  11. Click Save
  12. Open the Human Body Structure2 presentation
  13. In the left frame, in slide 3: The Respiratory System, position the mouse on the bullet button of Air Transport and Exchange until the mouse pointer becomes a cross
     
  14. Click and drag up, until the guiding horizontal line is positioned under The Lungs
     
  15. Release the mouse
  16. Save the presentation

Promote and Demote Text

If some text inside of a slide is too important and should constitute its own slide, you can make it happen. In the same way, the header of a slide might not be suitable as its own slide and would rather fit inside of another slide, you can include it accordingly.

To make a bulleted item inside of a slide become the header of another slide, you can promote it. To make a header text become an item in a bulleted list of another slide, you demote it.

You can promote or demote items in the Normal View or in the Slide Sorter View.

Practical Learning: Promoting and Demoting Text

  1. Re-open the Alcoholism Factor2 presentation

  2. If necessary, activate the Normal View
    On the main menu, click View -> Toolbars -> Outlining

  3. In slide 5, click Assault

  4. To demote that bulleted item, on the Outlining toolbar, click Demote

  5. Position your mouse on the bullet of Homicide on slide 5 until the mouse pointer becomes a cross

  6. Click and drag right. Notice the vertical line that guides you

  7. When the line moves to the right,


    then release it.

  8. To promote the Assault bullet to the same level with Homicide, click Assault

  9. Press Shift + Tab

  10. In slide 5, click the bullet of the Suicide line to select the line

  11. Press Tab to demote the Suicide line

  12. To save the presentation, press Ctrl + S

  13. Open the Human Body Structure2 presentation
  14. In the lower left corner, if necessary, click Normal View
    Scroll down to get the outline of slide 7: The Circulatory System 
  15. In the left frame, click anywhere on the line The Cerebrum
  16. Press Tab. Notice that the bulleted item has been demoted
  17. Press the down arrow key and press Tab to demote the other bulleted item
  18. Scroll down and display the 9th slide (Body Organization)
  19. In the left frame, click anywhere on the Skeleton Structure
  20. On the Formatting toolbar, click the Demote button Demote (it should be on the right side of the toolbar, upper-right side of the screen)
  21. In the right frame, click The Joints and, on the Formatting toolbar, click the Demote button Demote
  22. Scroll up to slide 3: The Respiratory System
  23. Click anywhere in the line Air Circulation. Press and hold Shift then click anywhere in The Lungs and release Shift
  24. Press Tab to demote them
  25. Click Choking and press F4 to repeat the previous action
  26. Click Obstructive Pulmonary Disease and press F4 to repeat the previous action
  27. Make sure you can see both slides 3 and 4
    Click Organisms Diversity and, on the Formatting toolbar, click Demote
  28. Click Fungi. Press and hold Shift. Then click Bacteria and release Shift
  29. Press Backspace three times to delete the four bulleted lines
  30. Save the presentation
 

MOUS Topics

 
S1 Delete slides
S11 Change the order of slides using Slide Sorter view
S13 Change the layout for one or more slides
S15 Modify slide sequence in the outline pane
S26 Promote and Demote text in slide and outline panes
 

Previous Copyright © 2004-2016, FunctionX, Inc. Next