Topics on Data Selection
Topics on Data Selection
Data Selection and Expressions
Using an Alias Name for a Column
In your SELECT statement, after specifying the column(s), when you execute the SQL statement, the name of each column appears as the column header.
 |
If you want, you can display any string of your choice for the column header. To specify a column header other than the name of the column, if you are using the Query Designer, type the desired string in the Alias column corresponding to the column. Here is an example: |
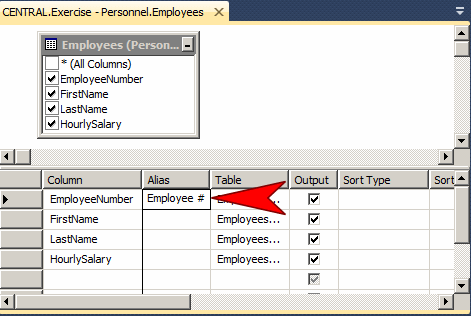
If you are writing your SELECT statement in a Query Editor or at a command prompt (PowerShell or else), on the right side of the column name, leave an empty space. Then type a letter or a word as the alias name of the column. Here are examples:
USE VideoCollection1;
GO

SELECT Title Name, Director Master, Rating Exclusion FROM Videos;
GO
If you want an alias name that uses more than one word and you want the words separate, you can put them in double-quotes. Here is an example:
USE VideoCollection1;
GO

SELECT Title Name,
       Director Master,
       Rating Exclusion,
       YearReleased "Copyright Year" FROM Videos;
GO
This would produce:
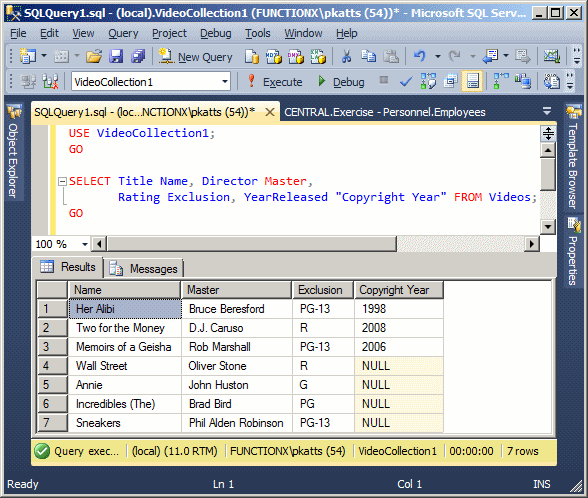
Another solution is to include the alias name between [ and ]. Whether the alias is in one or many words, you can inlude it in double-quotes or in square brackets [ ].
Instead of using just an empty space between the column name and its alias, you can type AS. Here are examples:
SELECT FirstName,
       LastName,
       HomePhone AS PhoneNumber,
       ParentsNames AS NamesOfParents
FROM   Registration.Students;
GO
Remember that if the alias is in more than one word and they are separate, you can either include it in double-quotes or between [ and ]. Here are examples:
SELECT FirstName [First Name],
       LastName  "Last Name",
       HomePhone AS [Phone Number],
       ParentsNames AS "Names of Parents"
FROM   Registration.Students;
GO
This would produce:
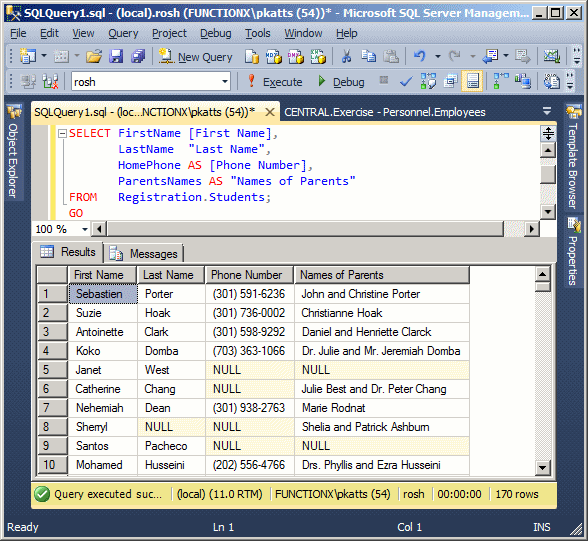
You can also qualify a column using the name of the table. Here are examples:
SELECT Students.FirstName AS [First Name],
       Students.LastName "Last Name",
       Students.HomePhone AS [Phone Number],
       Students.ParentsNames [Names of Parents]
FROM   Registration.Students;
GO
By specifying a schema, the statement can also be written as follows:
SELECT Registration.Students.FirstName AS [First Name],
       Registration.Students.LastName AS [Last Name],
       Registration.Students.HomePhone AS [Phone Number],
       Registration.Students.ParentsNames AS [Names of Parents]
FROM   Registration.Students;
GO
We have already seen how to create an alias for a table. If you are working in the Query Designer and if you create an alias in the Properties window, as soon as you do this, the alias is written immediately in both the Criteria and the SQL sections. Otherwise, you can directly create an lias in your SQL statement. After doing this, you can qualify each column by preceding it with the name of the alias and a period. Here is an example:
SELECT std.FirstName AS [First Name],
       std.LastName AS [Last Name],
       std.HomePhone AS [Phone Number],
       std.ParentsNames AS [Names of Parents]
FROM   Registration.Students std;
GO
You can also create an alias for some or all columns. Here are examples:
SELECT [Little Angels].FirstName [First Name],
       "Little Angels".LastName AS [Last Name],
       Gender,
       [Little Angels].EmailAddress "Email Address",
       ParentsNames [Parents Names],
       [Little Angels].HomePhone AS "Home Phone"
FROM   Registration.Students [Little Angels];
GO
|
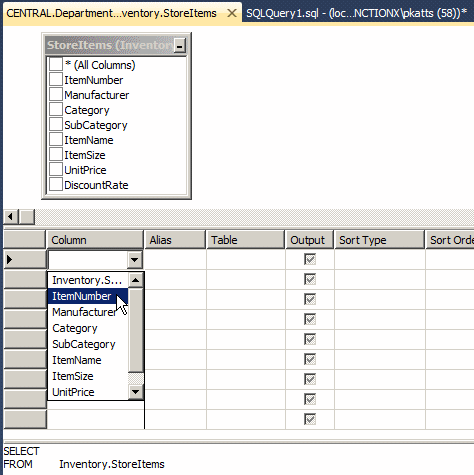
In this and other lessons, we will use a database named FunDS. Fun is fun. The DS stands for department store. FunDS is a fictitious company that sells clothes and beauty accessories at a nearby mall. We have been commissioned to create an application for the FunDS company. We start with a database that holds an inventory of the items sold in the store. To start (in this lesson), we have created a simple list of items and we will see how to assist the management with analyzing that inventory.
|

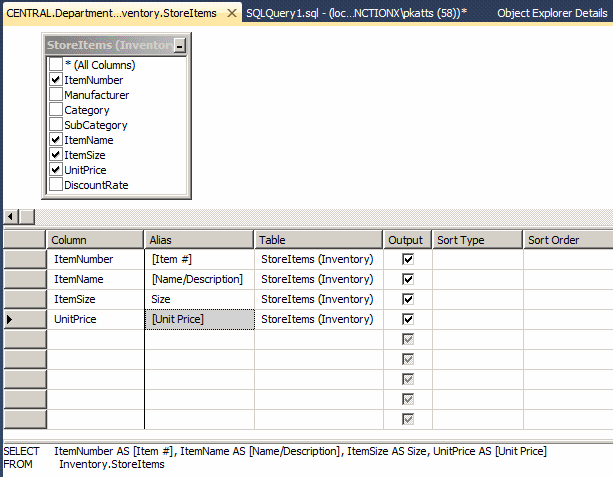
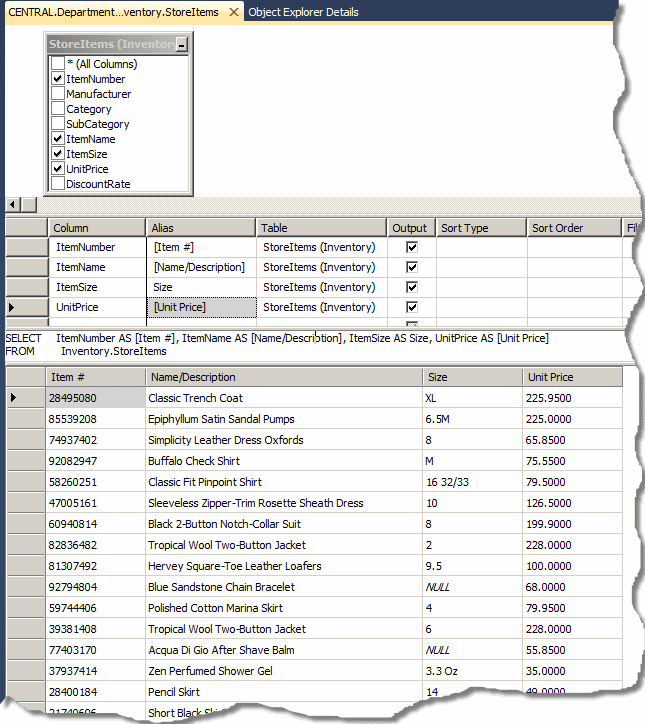
|
A Combination or Expression of Columns |
In our review of string-based functions, we saw how to concatenate strings. The operation is also available in a SELECT statement. This means that you can combine the values of separate columns to create a string or a value that is in fact an expression. For example, you can combine a first name and a last name to produce a full name as an expression. Another expression can use a date on the table, add a number to it to get a date on another day. An expression can also be used to perform a calculation on two or more columns such as employees weekly hours multiplied by their hourly salary to get their weekly salary.
The most common operator used is the addition. It can be used to combine two or more strings to get a new one. Here is an example:
SELECT FirstName + N' ' + LastName
FROM   Registration.Students;
GO
This would produce:
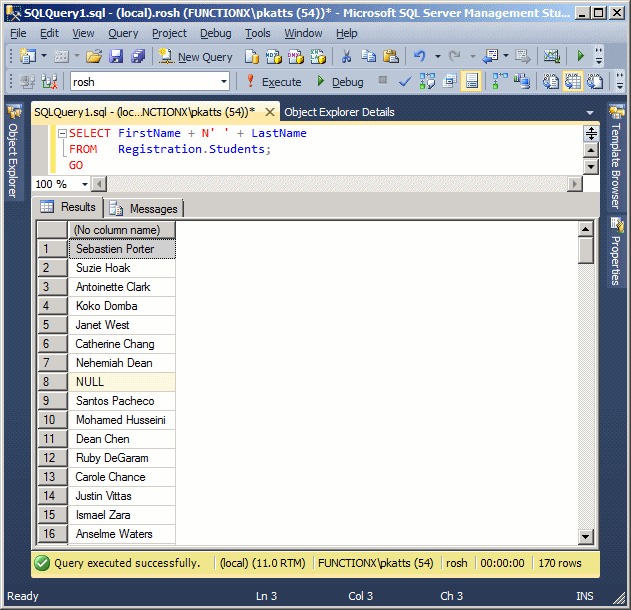
The addition can also be used on numeric values. All other arithmetic operators can be used. For example, you can multiply an employee's weekly time to an hourly salary to get a weekly salary. The statement of such an expression can be written as follows:
SELECT WeeklyHours * HourlySalary
FROM Payroll
You can also create an alias for an expression to give it the desired name. To do this, on the right side of the expression, type AS followed by the name. As we learned already, if the alias is in more than one word, include it in either single quotes or square brackets. Here is an example:
SELECT FirstName + N' ' + LastName AS N'Full Name',
       EmergencyName  + N' ' + EmrgPhone AS [Emergency Contact]
FROM   Registration.Students;
GO
This would produce:
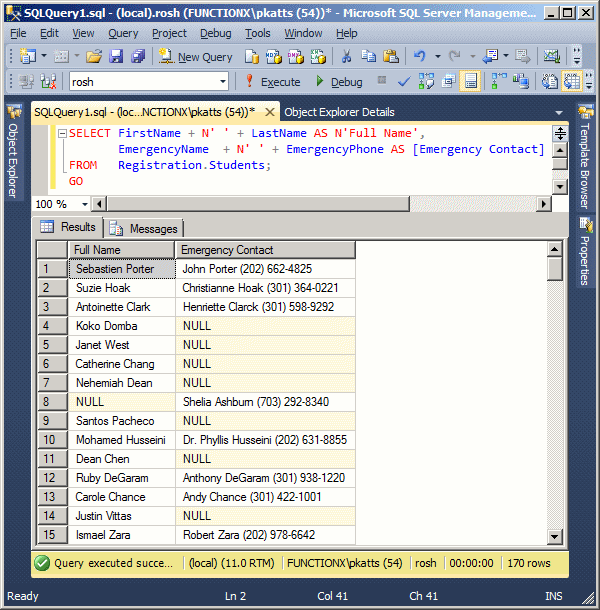
In the same way, you can create a longer and more complex expression that contains SQL keywords, the table's columns, and regular words. Here is an example:
SELECT 	PropertyType + N' in ' + City + N', ' + State + N', in ' + Condition +
       	N' condition. Equipped with ' + CAST(Bedrooms AS nvarchar(20)) +
       	N' bedrooms, ' + CAST(Bathrooms AS nvarchar(20)) +
       	N' bathrooms. Built in ' + CAST(YearBuilt AS nvarchar(20)) +
  	N' and selling for ' + CAST(MarketValue AS nvarchar(20))
	AS [Property Description]
FROM    Listing.Properties
Here is an example of what this would produce:
Remember that if you are adding strings to each other, you can use the CONCAT() function.
USE LambdaSquare1;
GO
SELECT aparts.UnitNumber,
       aparts.Bedrooms,
       aparts.Bathrooms,
       aparts.Price,
       aparts.Deposit,
       (aparts.Price + aparts.Deposit) "Due Before Moving",
       aparts.Available
FROM Presentation.Units aparts;
GO
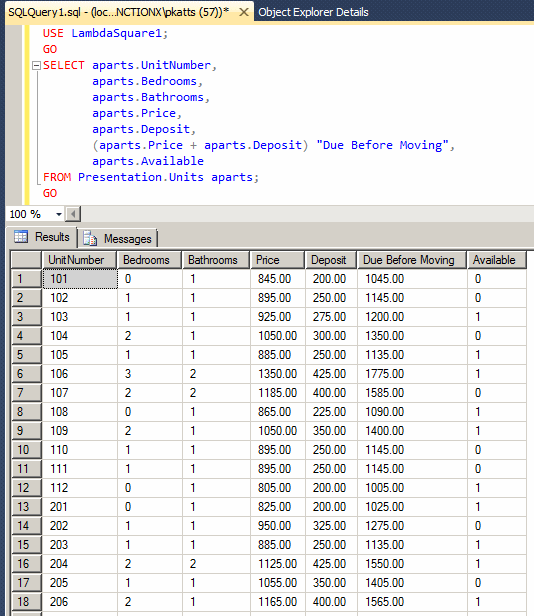
|
The Assignment Operator |
If you just create a regular expression using arithmetic operators, the new column would not have a name. Transact-SQL allows you to specify a different name for any column during data selection or a name for an expression. To do this, you can create a name and assign it to the actual column name using the assignment operator =.
To change the name of a column in data selection, on the right side of SELECT, type the desired name, followed by the assignment operator, followed by the actual name of the column. If the name you want to use is in one word, simply assign the column name to it. Here is an example:
SELECT EmergencyName = EmergencyName
FROM   Registration.Students;
GO
If the name you want to use is in more than one word, you can include it in single-quotes, in double-quotes, or between square brackets.
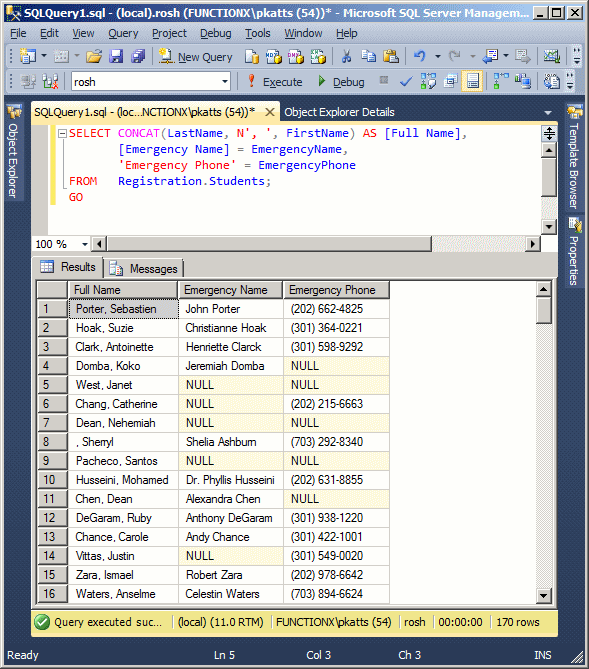
Here are examples: SELECT CONCAT(LastName, N', ', FirstName) AS [Full Name],
[Emergency Name] = EmergencyName,
'Emergency Phone' = EmergencyPhone
FROM Registration.Students;
GO
This would produce: |
 |
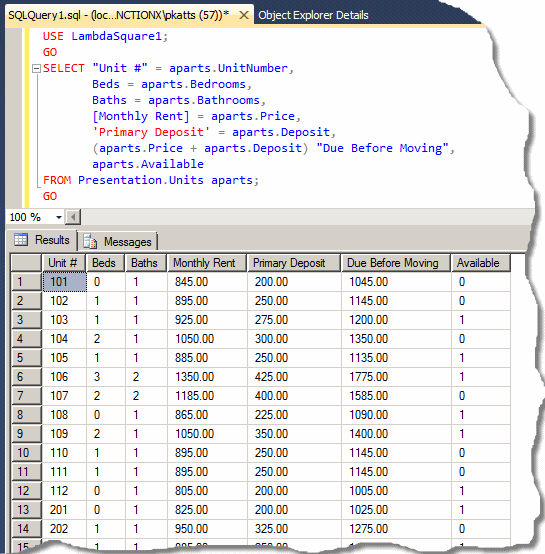
USE LambdaSquare1;
GO
SELECT "Unit #" = aparts.UnitNumber,
       Beds = aparts.Bedrooms,
       Baths = aparts.Bathrooms,
       [Monthly Rent] = aparts.Price,
       'Primary Deposit' = aparts.Deposit,
       (aparts.Price + aparts.Deposit) "Due Before Moving",
       aparts.Available
FROM Presentation.Units aparts;
GO
Other Topics on Data Selection
Selecting the TOP Number of Records
If you have a large group of records, you can specify that you want to see only a certain number of them.
If you are working in the Query Designer, to specify the maximum number of records you want to see, in the Properties window, expand Top Specification field to Yes (that's its default value when you have right-clicked a table in the Object Explorer and clicked Edit Top 200 Rows). Click the Expression field and type the desired number:

Then execute the statement. Using code, to specify the maximum number of returned records, after the SELECT operator, type TOP followed by an integral number. Continue the SELECT statement as you see fit. Here is an example:
USE Exercise;
GO

SELECT TOP 5 * FROM Employees;
GO
You can also include the number in parentheses. Here is an example:
USE Exercise;
GO

SELECT TOP(5) * FROM Employees;
GO
This statement asks the SQL interpreter to select the first 5 records from the Employees table. Just as done here, you can apply the TOP operator to any of the statements we will see for the rest of our lessons.
|
|
|
Selecting the TOP Percent Records |
Instead of selecting a specific number of records, you can ask the interpreter to produce a percentage of records.
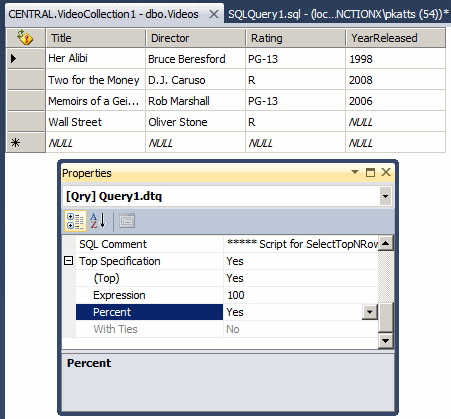
To visually specify the percentage of records to return, in the Properties window, after setting the Top Specification field to Yes, type the desired value in the Expression field. The value must be between 1.00 and 100.00 included. After typing the value, set the Percent field to Yes. Here are examples:
The formula to specify a percentage of records using code is:
SELECT TOP Value PERCENT WhatColumns FROM WhatObject
After the TOP keword type a number. To indicate that you want a percentage of values, use the PERCENT keyword. Here is an example:
SELECT TOP 25 PERCENT FirstName, LastName, HourlySalary
FROM Employees;
GO
As an alternative, you can include the Value in parentheses:
SELECT TOP (25) PERCENT FirstName, LastName, HourlySalary
FROM Employees;
GO
This statement would produce a quarter (25%) the number of records in the table. For example, if the table has 12 records, the interpreter would produce 3 records. In reality, the database engine would divide the number of records to the number in the parentheses and convert the value to the closest integer, then produce that number of records. For example, if the table has 11 records and you ask for 25%, the interpreter would produce 11 / (100/25) = 11 / 4 = 2.75. The closest high integer is 3. So the database engine would produce 3 records.
|
WHEN a Field's Value Meets a Criterion |
You can use a WHEN conditional statement to refine data selection. Consider the following Persons table:
USE Exercise;
GO

CREATE TABLE Persons(FirstName nvarchar(20), LastName nvarchar(20), GenderID int);
GO

INSERT INTO Persons VALUES(N'Gertrude', N'Monay', 2),
			  (N'Horace', N'Taylor', 1),
			  (N'Marc', N'Knights', 2),
			  (N'Tiernan', N'Michael', 3),
			  (N'Paul', N'Yamo', 1),
			  (N'Mahty', N'Shaoul', 3),
			  (N'Hélène', N'Mukoko', 2);
GO
Imagine you want to select the GenderID column:
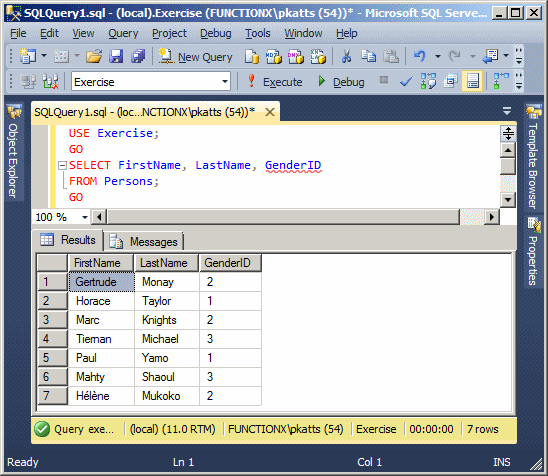
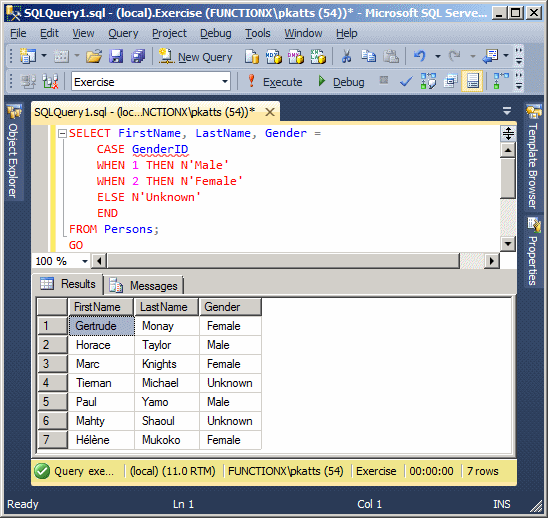
If a column has values that are difficult to identify, you can use a CASE conditional statement to customize the result(s). Here is an example:
SELECT FirstName, LastName, Gender =
    CASE GenderID
	WHEN 1 THEN N'Male'
	WHEN 2 THEN N'Female'
	ELSE N'Unknown'
    END
FROM Persons
|
|
|
|
||
| Previous | Copyright © 2008-2022, FunctionX, Inc. | Next |
|
|
||