The Types of Relationships
The Types of Relationships
Creating and Using Relationships
A One-to-Many Relationship: A Re-Introduction to Relationships
In a typical database, you can create, among other things, two tables that each has a primary key and one of them has a foreign key. As seen previously, the foreign key allows a child table to get records from a parent table.
Normally, each record in the child table gets 0 or only one value from the parent table and a record in the parent table can provide one of its values to many records of the child table. An example would be a list of employees where each employee belongs to a department. Obviously, each employee can belong to only one department but many employees can belong to the same department. This can be illustrated as follows:

This type of relationship is referred to as one-to-many. This is the most regular type of relationship used in a relational database and that's the type we have used so far.
We will create a new database for a computer training center. The database will be named ComputerTrainingCenter1 (Computer Training Center version 1.00). It will contain the following tables:
|
![]() Practical Learning: Introducing Types of Joins
Practical Learning: Introducing Types of Joins
CREATE DATABASE CTC1;
GO

USE CTC1;
GO

CREATE SCHEMA Administration;
GO
CREATE SCHEMA Academics;
GO
A Mutual One-To-Many Relationship
Mutual reference is a scenario in which each of two tables references the other. As a variant to a one-to-many relationship, some records of a table A may get their foreign value from a table B, then some records of table B may get their foreign value from a table C, and finally some records of table C would get their foreign value from table A.
Another variant is where some records of a table A would get their foreign value from a table B but also some records of the table B would get their foreign value from table A. To illustrate, once again imagine you have a table of employees and each employee is recorded as belonging to a certain department. Obviously, an employee can (should) belong to only one department. This can be illustrated as follows:
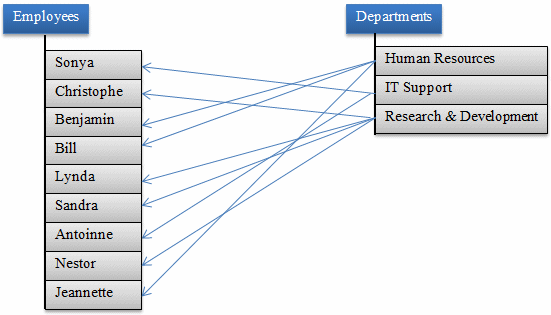
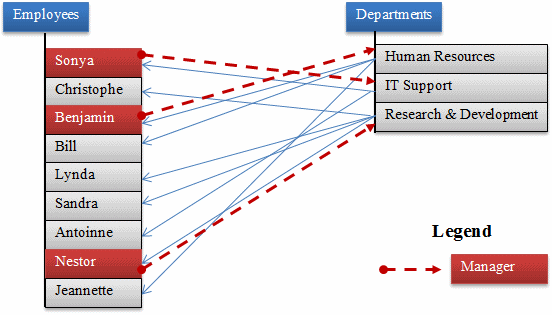
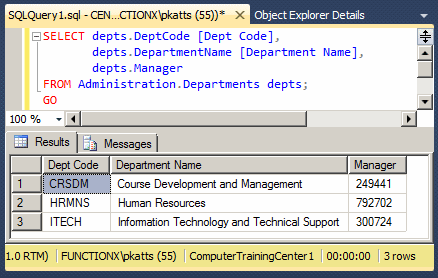
For each department, you may want to specify who the manager is. Obviously, the manager must be an employee, from the table of employees. This can be illustrated as follows:
|
|
| Column Name | Data Type | Allow Nulls |
| DeptCode | nchar(5) | Unchecked |
| DepartmentName | nvarchar(50) | Unchecked |
| Manager | nchar(7) |
| Column Name | Data Type | Computed Column Specification (Formula) |
| EmployeeNumber | nchar(7) | |
| FirstName | nvarchar(25) | |
| LastName | nvarchar(25) | |
| EmployeeName | CONCAT(LastName, N', ', FirstName) | |
| Title | nvarchar(50) | |
| DeptCode | nchar(5) |
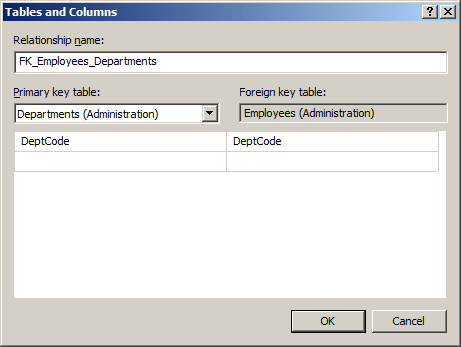

| Column Name | Data Type | Computed Column Specification (Formula) |
| TeacherNumber | nchar(7) | |
| FirstName | nvarchar(25) | |
| MiddleName | nvarchar(25) | |
| LastName | nvarchar(25) | |
| TeacherName | CONCAT(LastName, N', ', FirstName) | |
| DeptCode | nchar(5) | |
| StartDate | date | |
| PhoneNumber | nvarchar(20) | |
| EmailAddress | nvarchar(50) |
USE CTC1;
GO
INSERT Administration.Departments(DeptCode, DepartmentName)
VALUES(N'HRMNS', N'Human Resources'),
      (N'ITECH', N'Information Technology and Technical Support'),
      (N'CRSDM', N'Course Development and Management');
GO
INSERT Administration.Employees(EmployeeNumber, FirstName, LastName, Title, DeptCode)
VALUES(N'792-702', N'Frank', N'Cassini', N'General Manager', N'HRMNS'),
      (N'249-441', N'Patrick', N'Levine', N'Course Developer and Teaching Manager', N'CRSDM'),
      (N'302-484', N'Catherine', N'Borrow', N'Database Developer and Administrator', N'ITECH'),
      (N'485-052', N'Jerry', N'Fesman', N'Cashier', N'HRMNS'),
      (N'974-005', N'David', N'Miller', N'Intern', N'ITECH'),
      (N'381-848', N'John', N'Hough', N'Course Researcher', N'CRSDM'),
      (N'300-724', N'Matt', N'Kern', N'Technology Manager', N'ITECH'),
      (N'908-047', N'Grace', N'McDermott', N'Cashier', N'HRMNS'),
      (N'974-115', N'Elsa', N'Steinberg', N'Webmaster', N'ITECH'),
      (N'279-475', N'Alex', N'Simkins', N'Intern', N'HRMNS'),
      (N'273-941', N'Jessica', N'Redding', N'Teaching Coordinator', N'HRMNS'),
      (N'395-822', N'Craig', N'Newman', N'Network Administrator', N'ITECH');
GO

UPDATE Administration.Departments
SET Manager = N'792-702' WHERE DeptCode = N'HRMNS';
GO
UPDATE Administration.Departments
SET Manager = N'300-724' WHERE DeptCode = N'ITECH';
GO
UPDATE Administration.Departments
SET Manager = N'249-441' WHERE DeptCode = N'CRSDM';
GO
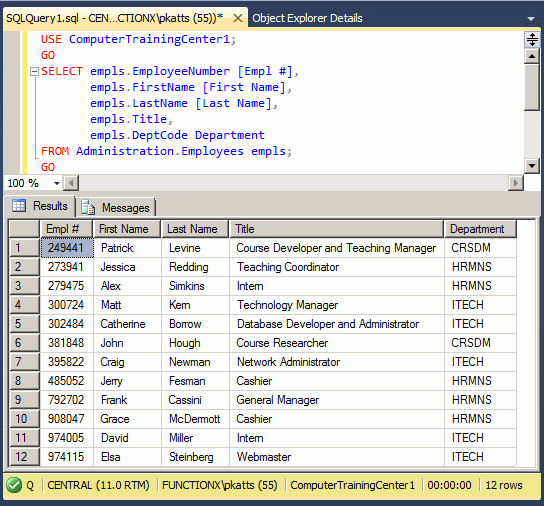
USE CTC1;
GO
SELECT empls.EmployeeNumber [Empl #],
       empls.FirstName [First Name],
       empls.LastName [Last Name],
       empls.Title,
       empls.DeptCode Department
FROM Administration.Employees empls;
GO
SELECT depts.DeptCode [Dept Code],
       depts.DepartmentName [Department Name],
       depts.Manager
FROM Administration.Departments depts;
GO
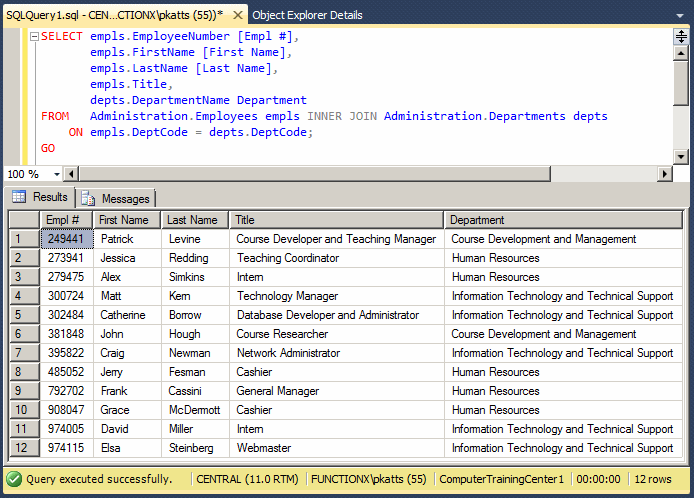
SELECT empls.EmployeeNumber,
       empls.FirstName,
       empls.LastName,
       empls.Title,
       depts.DepartmentName Department
FROM   Administration.Employees empls INNER JOIN Administration.Departments depts
    ON empls.DeptCode = depts.DeptCode;
GO
|
A One-to-One Relationship: A Self-Referencing Table |
Imagine you have two lists where a value from one list can provide 0 or 1 value to a record of the other list, and only one record of a child list can get its foreign value from the other list. This can be illustrated as follows:
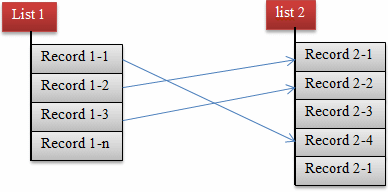
This type of relationship is referred to as one-to-one. To give you an example, imagine you have a list of employees and you want to specify the supervisor or manager of each employee. This can be illustrated as follows:

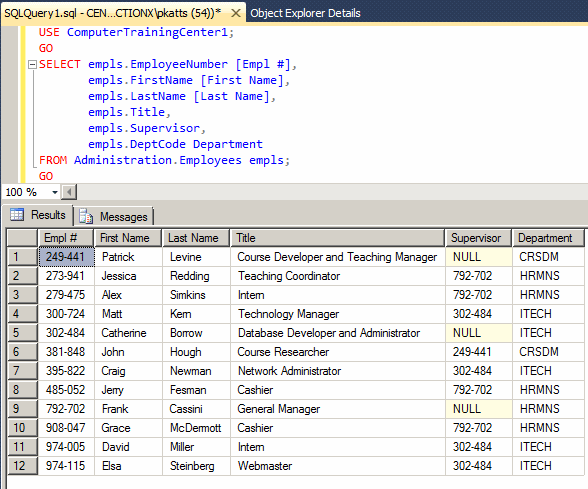
By definition, a manager is primarily an employee like any other. This means that the primary information of a manager is the same as that of any other employee. This also implies that if you had to use separate tables, one for managers and another for employees, you would have two similar tables, and there is a chance that information would be duplicated in both tables. As a result, a one-to-one relationship is usually created using only one table, in which case the table would reference itself. In other words, some records would reference (be linked to) other records of the same table. This can be illustrated as follows:

|
|
USE master;
GO
DROP DATABASE CTC1;
GO

CREATE DATABASE ComputerTrainingCenter1;
GO

USE ComputerTrainingCenter1;
GO

CREATE SCHEMA Administration;
GO
CREATE SCHEMA Academics;
GO
CREATE TABLE Administration.Departments
(
	DeptCode nchar(5) not null,
	DepartmentName nvarchar(50),
	Manager nchar(7),
	Constraint PK_Departments Primary Key(DeptCode)
);
GO
CREATE TABLE Administration.Employees
(
	EmployeeNumber nchar(7) not null,
	FirstName nvarchar(25),
	LastName nvarchar(25),
	EmployeeName AS CONCAT(LastName, N', ', FirstName),
	Title nvarchar(50),
	Supervisor nchar(7) null,
	DeptCode nchar(5),
	Constraint PK_Employees Primary Key(EmployeeNumber),
	Constraint FK_Departments Foreign Key(DeptCode)
		References Administration.Departments(DeptCode)
);
GO

INSERT Administration.Departments(DeptCode, DepartmentName)
VALUES(N'HRMNS', N'Human Resources'),
      (N'ITECH', N'Information Technology and Technical Support'),
      (N'CRSDM', N'Course Development and Management');
GO
INSERT Administration.Employees(EmployeeNumber, FirstName, LastName, Title, DeptCode)
VALUES(N'792-702', N'Frank', N'Cassini', N'General Manager', N'HRMNS'),
      (N'249-441', N'Patrick', N'Levine', N'Course Developer and Teaching Manager', N'CRSDM'),
      (N'302-484', N'Catherine', N'Borrow', N'Database Developer and Administrator', N'ITECH');
GO

UPDATE Administration.Departments
SET Manager = N'792-702' WHERE DeptCode = N'HRMNS';
GO
UPDATE Administration.Departments
SET Manager = N'300-724' WHERE DeptCode = N'ITECH';
GO
UPDATE Administration.Departments
SET Manager = N'249-441' WHERE DeptCode = N'CRSDM';
GO

INSERT Administration.Employees(EmployeeNumber, FirstName, LastName, Title, DeptCode, Supervisor)
VALUES(N'485-052', N'Jerry', N'Fesman', N'Cashier', N'HRMNS', N'792-702'),
      (N'974-005', N'David', N'Miller', N'Intern', N'ITECH', N'302-484'),
      (N'381-848', N'John', N'Hough', N'Course Researcher', N'CRSDM', N'249-441'),
      (N'300-724', N'Matt', N'Kern', N'Technology Manager', N'ITECH', N'302-484'),
      (N'908-047', N'Grace', N'McDermott', N'Cashier', N'HRMNS', N'792-702'),
      (N'974-115', N'Elsa', N'Steinberg', N'Webmaster', N'ITECH', N'302-484'),
      (N'279-475', N'Alex', N'Simkins', N'Intern', N'HRMNS', N'792-702'),
      (N'273-941', N'Jessica', N'Redding', N'Teaching Coordinator', N'HRMNS', N'792-702'),
      (N'395-822', N'Craig', N'Newman', N'Network Administrator', N'ITECH', N'302-484');
GO
USE ComputerTrainingCenter1;
GO
SELECT empls.EmployeeNumber [Empl #],
       empls.FirstName [First Name],
       empls.LastName [Last Name],
       empls.Title,
       empls.Supervisor,
       empls.DeptCode Department
FROM Administration.Employees empls;
GO
USE ComputerTrainingCenter1;
GO
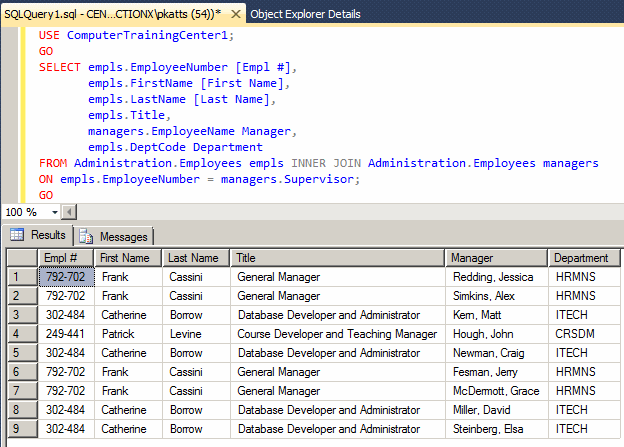
SELECT empls.EmployeeNumber [Empl #],
       empls.FirstName [First Name],
       empls.LastName [Last Name],
       empls.Title,
       managers.EmployeeName Manager,
       empls.DeptCode Department
FROM Administration.Employees empls INNER JOIN Administration.Employees managers
ON empls.EmployeeNumber = managers.Supervisor;
GO
CREATE TABLE Administration.Employees
(
	EmployeeNumber nchar(7) not null,
	FirstName nvarchar(25),
	LastName nvarchar(25),
	EmployeeName AS CONCAT(LastName, N', ', FirstName),
	Title nvarchar(50),
	Supervisor nchar(6)
		CONSTRAINT FK_Employees References Administration.Employees(EmployeeNumber),
	DeptCode nchar(5),
	Constraint PK_Employees Primary Key(EmployeeNumber),
	Constraint FK_Departments Foreign Key(DeptCode)
		References Administration.Departments(DeptCode)
);
GO
In the Object Explorer, under ComputerTrainingCenter1, click Database Diagrams

USE ComputerTrainingCenter1;
GO
SELECT empls.EmployeeNumber [Empl #],
       empls.FirstName [First Name],
       empls.LastName [Last Name],
       empls.Title,
       managers.EmployeeName Manager,
       depts.DepartmentName Department
FROM Administration.Employees empls
	 INNER JOIN Administration.Employees managers
		ON empls.EmployeeNumber = managers.Supervisor
	 INNER JOIN Administration.Departments depts
		ON empls.DeptCode = depts.DeptCode;
GO
USE ComputerTrainingCenter1;
GO
CREATE TABLE Academics.CourseLevels
(
CourseLevel nvarchar(20) not null,
[Description] nvarchar(max),
Constraint PK_CourseLevels Primary Key(CourseLevel)
);
GO
CREATE TABLE Academics.Courses
(
CourseCode nvarchar(10) not null,
CourseName nvarchar(60) not null,
CourseLevel nvarchar(20),
Notes nvarchar(max),
Constraint PK_Courses Primary Key(CourseCode),
Constraint FK_CourseLevels Foreign Key(CourseLevel) References Academics.CourseLevels(CourseLevel)
);
GO
CREATE TABLE Administration.Students
(
StudentNumber nvarchar(10) not null,
FirstName nvarchar(25),
MiddleName nvarchar(25),
LastName nvarchar(25),
StudentName AS CONCAT(LastName, N', ', FirstName),
PhoneNumber nvarchar(20),
EmailAddress nvarchar(50),
Constraint PK_Students Primary Key(StudentNumber)
);
GO
CREATE TABLE Administration.Teachers
(
TeacherNumber nchar(7) not null,
FirstName nvarchar(25),
MiddleName nvarchar(25),
LastName nvarchar(25),
TeacherName AS CONCAT(LastName, N', ', FirstName),
StartDate date,
PhoneNumber nvarchar(20),
EmailAddress nvarchar(50),
Constraint PK_Teachers Primary Key(TeacherNumber)
);
GO
INSERT INTO Academics.CourseLevels
VALUES(N'Beginning', N'This is an introductory class for which the student is not supposed to know anything about the subject.'),
(N'Intermediate', N'The student is supposed to be familiar with introductory material. Some parts are used as a refresher. Some some other parts, it is assumed that the student meets the necessary pre-requisites.'),
(N'Advanced', N'This level is for those who master the fundamentals and need knowledge beyond the regular use of the application.');
GO
INSERT INTO Academics.Courses
VALUES(N'BGNKBD', N'Introduction to Keyboarding', N'Beginning', N'The course assumes no heavy use of the computer keyboard. The, student will be introduced to the keys on the keyboard, the categories of letters, and the special keys.'),
(N'BGNWDP', N'Introduction to Text and Word Processing', N'Beginning', N'This is an introduction to all types of text manipulations, including text styles, the various characteristics of paragraphs, fonts, and paging. This course assumes no prior knowledge of word processing. Still, the student is supposed to be familiar with computers, namely the use of the keyboard, the mouse, the objects on the screen, and basic ways to use text.'),
(N'BGNSPS', N'Introduction to Electronic Spreadsheets', N'Beginning', N'This course introduces the students to paper and electronic spreadsheets, the use of columns, rows, and cells. This course assumes no prior knowledge of spreadsheets or computer calculations. The student is supposed to be familiar with computers, namely the use of the keyboard, the mouse, and the objects on the screen.'),
(N'BGNPRS', N'Introduction to Computer Presentations', N'Beginning', N'This course assumes no prior knowledge of presentations using the computer. The student will learn how to create slides and apply aesthetic features to text. Applications used are Google Presentation, Microsoft PowerPoint, and OpenOffice.org.');
GO
INSERT INTO Academics.Courses(CourseCode, CourseName, CourseLevel)
VALUES(N'BGNMKT', N'Introduction to Marketing', N'Beginning');
GO
INSERT INTO Academics.Courses
VALUES(N'BGNRSC', N'Introduction to Research', N'Beginning', N'This course presents different types of research, including paper and the Web. Techniques of writing scholar papers, quoting, and creating references are reviewed.');
GO
INSERT INTO Academics.Courses(CourseCode, CourseName, CourseLevel)
VALUES(N'BGNSMB', N'Starting a Small Business', N'Beginning');
GO
INSERT INTO Academics.Courses
VALUES(N'BGNWDS', N'Introduction to Web Design', N'Beginning', N'This course introduces the student to the web, the concept of a web site, the appearance and layout of a web page, and a critique to web sites. The student is then introduced to HTML and other scripting languages with light (minimal) programming.'),
(N'BGNDBS', N'Introduction to Computer Databases', N'Beginning', N'This course introduces the students to difference types of computer databases, including historical paper spreadsheets, electronic spreadsheets, and desktop databases. After the introduction, the student will start creating databases. The exercises are done using Microsoft Access, Oracle Express, Microsoft SQL Server Express, and MySQL.'),
(N'BGNGRD', N'Introduction to Graphic Design', N'Beginning', N'This course introduces the student to various modern means of creating graphics, including paper and electronic. The student will learn to use create own graphics, to use own pictures, to use other pictures, and to manipulate all types of graphics in the environment.'),
(N'NTMKBD', N'Intermediate Keyboarding', N'Intermediate', N'This is a continuation to introduction to keyboarding. The student must be familiar with the keyboard to know the letter-based keys, the positions of the control, shift, and other special keys. The student will learn to type fast.'),
(N'NTMWDP', N'Intermediate Word Processing', N'Intermediate', N'This course teaches advanced techniques of producing text to create industrial papers. The student will get familiar with various features of Microsoft Word, WordPerfect, and OpenOffice.org Writer, including embedding objects, performing calculations in tables, etc.'),
(N'NTMPRS', N'Intermediate and Graphic Presentations', N'Intermediate', N'This course advances the techniques of delivering a presentation, including optical media presentation, screen recording and production, tutorial productions, and web presentation.'),
(N'NTMSPS', N'Spreadsheets and Data Analysis', N'Intermediate', N'This course presents various ways of using statistics, functions, graphs, and other techniques of electronically analyzing data. Macros and programming are introduced.');
GO
INSERT INTO Academics.Courses(CourseCode, CourseName, CourseLevel)
VALUES(N'NTMSMB', N'Running and Growing a Small Business', N'Intermediate');
GO
INSERT INTO Academics.Courses
VALUES(N'NTMDBS', N'Database Design and Implementation', N'Intermediate', N'In this course, the student will learn to create a complete database, distribute, and maintain it. Intermediate to advanced techniques of using the SQL are used to further create and manipulate queries.'),
(N'NTMGRD', N'Intermediate Graphic Design', N'Intermediate', N'This course shows various ways of using both traditional (static) graphics and animations. The course also including sessions on advanced photo manipulation, commercial billboards, and TV announcements.');
GO
INSERT INTO Academics.Courses(CourseCode, CourseName, CourseLevel)
VALUES(N'NTMMKT', N'Marketing and New Technologies', N'Intermediate');
GO
INSERT INTO Academics.Courses
VALUES(N'NTMWDS', N'Introduction to Web Development', N'Advanced', N'In this course, the student will create, publish, and maintain a web site accessed from the Internet. The student will also learn to create interactive web sites using a scripting language such as PHP and a database such as MySQL and/or Microsoft Access.'),
(N'ADVGRD', N'Advanced Graphic Design and Production', N'Advanced', N'In this course, the student will learn to produce industrial graphics for advertisement, both paper and TV. The student will also learn to create short animations, using static pictures, moving objects, and film.'),
(N'ADVWDP', N'Advanced Word Processing and Publishing', N'Advanced', N'This course is for people who use Microsoft Word intensely, such as in a production environment. The student will learn to produce business papers, catalogues, and newspapers. The student will also learn how Microsoft Word can interact with other aplications.'),
(N'ADVDBS', N'Databases Distribution and Maintenance', N'Advanced', N'This course introduces database production in a distribution or network environment. Enterprise databases are reviewed, including Oracle, Microsoft SQL Server, and IBM DB2 are explored. Client/Server applications and enterprise connectivity are also reviewed.');
GO
INSERT INTO Administration.Students(StudentNumber, FirstName, MiddleName, LastName, PhoneNumber, EmailAddress)
VALUES(N'290-80-249', N'Rose', N'Marie', N'Hobson', N'202-208-0058', N'hobbiesrus@yaho.com');
GO
INSERT INTO Administration.Students(StudentNumber, FirstName, LastName, PhoneNumber)
VALUES(N'805-15-691', N'Ayodele ', N'Adegbosun', N'703-203-1405');
GO
INSERT INTO Administration.Students(StudentNumber, FirstName, MiddleName, LastName)
VALUES(N'402-48-885', N'Laura', N'Claire', N'Wayne');
GO
INSERT INTO Administration.Students(StudentNumber, FirstName, MiddleName, LastName, EmailAddress)
VALUES(N'280-14-513', N'Kimberly', N'Danielle', N'Barnett', N'kimbarnett@juniorland.com');
GO
INSERT INTO Administration.Students(StudentNumber, FirstName, LastName)
VALUES(N'108-24-972', N'Meghan', N'Brawer');
GO
INSERT INTO Administration.Students(StudentNumber, FirstName, LastName, PhoneNumber)
VALUES(N'481-85-913', N'Fatima', N'Djouda', N'(301) 701-1583');
GO
INSERT INTO Administration.Students(StudentNumber, FirstName, MiddleName, LastName, PhoneNumber, EmailAddress)
VALUES(N'108-96-156', N'Matthew', N'Richard', N'Perez', N'(240) 901-8094', N'myperez@gmail.com');
GO
INSERT INTO Administration.Students(StudentNumber, FirstName, LastName)
VALUES(N'393-46-377', N'Joan', N'York');
GO
INSERT INTO Administration.Students(StudentNumber, FirstName, MiddleName, LastName, PhoneNumber, EmailAddress)
VALUES(N'681-07-049', N'Faustino', N'Raymondo', N'Castanuela', N'410-928-4795', N'raycasting@att.net');
GO
INSERT INTO Administration.Students(StudentNumber, FirstName, LastName)
VALUES(N'186-04-379', N'Judith', N'Wu');
GO
INSERT INTO Administration.Students(StudentNumber, FirstName, MiddleName, LastName, PhoneNumber, EmailAddress)
VALUES(N'104-46-624', N'James', N'Arnold', N'Hornett', N'(202) 400-3807', N'jarnett202@hotmail.com');
GO
INSERT INTO Administration.Students(StudentNumber, FirstName, LastName)
VALUES(N'183-04-202', N'Patricia', N'Graham');
GO
INSERT INTO Administration.Students(StudentNumber, FirstName, MiddleName, LastName)
VALUES(N'179-38-027', N'Jennifer', N'Gabriella', N'Rubenstein');
GO
INSERT INTO Administration.Students(StudentNumber, FirstName, LastName)
VALUES(N'208-58-050', N'Patrick', N'Dixon');
GO
INSERT INTO Administration.Students(StudentNumber, FirstName, LastName)
VALUES(N'927-40-351', N'Daniel', N'Gibson');
GO
INSERT INTO Administration.Students(StudentNumber, FirstName, MiddleName, LastName)
VALUES(N'273-04-775', N'NoŽlle', N'Gabrielle', N'Pellotti');
GO
INSERT INTO Administration.Students(StudentNumber, FirstName, MiddleName, LastName, EmailAddress)
VALUES(N'574-36-379', N'Laetishia', N'Justine', N'Roberts', N'larobertson@yahoo.com');
GO
INSERT INTO Administration.Students(StudentNumber, FirstName, LastName)
VALUES(N'279-97-405', N'James', N'Dixxon');
GO
INSERT INTO Administration.Students(StudentNumber, FirstName, MiddleName, LastName, PhoneNumber)
VALUES(N'284-95-006', N'Joshua', N'Gregory', N'Efemba', N'443-394-8275');
GO
INSERT INTO Administration.Students(StudentNumber, FirstName, LastName, PhoneNumber, EmailAddress)
VALUES(N'920-92-270', N'Ahmed', N'Khamil', N'240-927-0053', N'roasterman@gmail.com');
GO
INSERT INTO Administration.Students(StudentNumber, FirstName, LastName)
VALUES(N'293-74-635', N'Arthur', N'Drewise');
GO
INSERT INTO Administration.Students(StudentNumber, FirstName, MiddleName, LastName, PhoneNumber, EmailAddress)
VALUES(N'695-88-473', N'Lynette', N'Michelle', N'Lace', N'(301) 700-8304', N'lazymichelle@gmail.com');
GO
INSERT INTO Administration.Students(StudentNumber, FirstName, MiddleName, LastName)
VALUES(N'357-96-927', N'Courtney', N'Jane', N'Kemp');
GO
INSERT INTO Administration.Students(StudentNumber, FirstName, MiddleName, LastName)
VALUES(N'842-50-960', N'John', N'Lucas', N'Finelly');
GO
INSERT INTO Administration.Students(StudentNumber, FirstName, LastName)
VALUES(N'294-80-275', N'Edward', N'Vasquez');
GO
INSERT INTO Administration.Students(StudentNumber, FirstName, LastName)
VALUES(N'949-29-204', N'Anna', N'Hutchinson');
GO
INSERT INTO Administration.Students(StudentNumber, FirstName, MiddleName, LastName)
VALUES(N'296-61-805', N'Mary', N'Danielle', N'Means');
GO
INSERT INTO Administration.Students(StudentNumber, FirstName, MiddleName, LastName, PhoneNumber, EmailAddress)
VALUES(N'606-39-722', N'Daniel', N'Lewis', N'Jefferson', N'(301) 806-9300', N'djefferson2@hr.hamaleck.net');
GO
INSERT INTO Administration.Students(StudentNumber, FirstName, MiddleName, LastName)
VALUES(N'485-05-940', N'Aaron', N'Paul', N'Fox');
GO
INSERT INTO Administration.Students(StudentNumber, FirstName, MiddleName, LastName)
VALUES(N'530-47-225', N'Erin', N'Joan', N'Spears');
GO
INSERT INTO Administration.Teachers(TeacherNumber, FirstName, MiddleName, LastName, StartDate, PhoneNumber, EmailAddress)
VALUES(N'624-633', N'Denise', N'Jane', N'Harrington', N'20110411', N'301-201-8405', N'djharry@hotmail.com');
GO
INSERT INTO Administration.Teachers(TeacherNumber, FirstName, MiddleName, LastName, StartDate)
VALUES(N'264-005', N'William', N'Philippe', N'Melton', N'20101214');
GO
INSERT INTO Administration.Teachers(TeacherNumber, FirstName, LastName, StartDate, PhoneNumber, EmailAddress)
VALUES(N'726-115', N'Saheed', N'Hussieni', N'26-October-2011', N'240-209-8160', N'husseinis@faculty.mduniv.edu');
GO
INSERT INTO Administration.Teachers(TeacherNumber, FirstName, LastName, StartDate, PhoneNumber)
VALUES(N'420-108', N'Saheer', N'Aliou', N'14-Aug-2009', N'(240) 901-8304');
GO
INSERT INTO Administration.Teachers(TeacherNumber, FirstName, MiddleName, LastName, StartDate, PhoneNumber, EmailAddress)
VALUES(N'100-326', N'Joseph', N'Harry', N'Lemeck', N'20101006', N'(202) 208-4135', N'joseph.lemeck@courts.maryland.gov');
GO
INSERT INTO Administration.Teachers(TeacherNumber, FirstName, MiddleName, LastName, StartDate)
VALUES(N'740-925', N'Margareth', N'Felicia', N'Gundlehach', N'04-JAN-2012');
GO
INSERT INTO Administration.Teachers(TeacherNumber, FirstName, LastName, StartDate, PhoneNumber, EmailAddress)
VALUES(N'685-108', N'Joan', N'Tilton', N'20081028', N'703-601-8044', N'jtilton@fairfax.gov');
GO
INSERT INTO Administration.Teachers(TeacherNumber, FirstName, MiddleName, LastName, StartDate)
VALUES(N'292-572', N'Daniel', N'Robert', N'Coppit', N'20120104');
GO
| Column Name | Data Type |
| ScheduleID | int |
| CourseCode | nvarchar(10) |
| TeacherNumber | nchar(7) |
| DaysTaught | nvarchar(20) |
| TimeTaught | nvarchar(20) |
| StartDate | date |
| EndDate | date |
| RoomNumber | nvarchar(10) |
USE ComputerTrainingCenter1;
GO
INSERT INTO Academics.CoursesSchedules(CourseCode, TeacherNumber, DaysTaught,
    TimeTaught, StartDate, EndDate, RoomNumber)
VALUES(N'BGNKBD', N'420-108', N'Mon, Wed', N'1800-2200', N'20120116', N'20120206', N'101'),
      (N'BGNWDP', N'624-633', N'Mon, Wed', N'1800-2200', N'20120116', N'20120206', N'102'),
      (N'BGNPRS', N'740-925', N'Mon, Wed', N'1800-2200', N'20120116', N'20120206', N'103'),
      (N'BGNSPS', N'292-572', N'Mon, Wed', N'1800-2200', N'20120116', N'20120207', N'104'),
      (N'BGNGRD', N'740-925', N'Tue, Thu', N'1800-2200', N'20120117', N'20120207', N'101'),
      (N'BGNDBS', N'100-326', N'Tue, Thu', N'1800-2200', N'20120117', N'20120207', N'102'),
      (N'BGNMKT', N'264-005', N'Tue, Thu', N'1800-2200', N'20120117', N'20120207', N'103'),
      (N'BGNSMB', N'624-633', N'Tue, Thu', N'1800-2200', N'20120117', N'20120207', N'104'),
      (N'BGNWDS', N'740-925', N'Sat',      N'0900-1700', N'20120121', N'20120211', N'102'),
      (N'NTMKBD', N'420-108', N'Mon, Wed', N'1800-2200', N'20120220', N'20120312', N'101'),
      (N'NTMWDP', N'685-108', N'Mon, Wed', N'1800-2200', N'20120220', N'20120312', N'102'),
      (N'NTMPRS', N'264-005', N'Mon, Wed', N'1800-2200', N'20120220', N'20120312', N'103'),
      (N'NTMSPS', N'292-572', N'Mon, Wed', N'1800-2200', N'20120220', N'20120312', N'104'),
      (N'NTMGRD', N'740-925', N'Tue, Thu', N'1800-2200', N'20120221', N'20120313', N'101'),
      (N'NTMDBS', N'726-115', N'Tue, Thu', N'1800-2200', N'20120221', N'20120313', N'102'),
      (N'NTMMKT', N'264-005', N'Tue, Thu', N'1800-2200', N'20120221', N'20120313', N'103'),
      (N'NTMSMB', N'420-108', N'Tue, Thu', N'1800-2200', N'20120221', N'20120313', N'104'),
      (N'NTMWDS', N'264-005', N'Sat',      N'0900-1700', N'20120225', N'20120317', N'102');
GO

SELECT * FROM Academics.CoursesSchedules;
GO
A Many-To-Many Relationship: Junction Tables
Consider a database for a university with its tables of students and courses:
CREATE DATABASE University6;
GO
USE University6;
GO
CREATE SCHEMA Studies;
GO
CREATE SCHEMA Admissions;
GO
CREATE TABLE Studies.Courses
(
	CourseCode nchar(10) not null,
	CourseName nvarchar(100),
	Credits smallint not null,
	CourseDescription nvarchar(max),
	CONSTRAINT PK_Courses PRIMARY KEY(CourseCode)
);
GO

INSERT INTO Studies.Courses(CourseCode, CourseName, Credits)
VALUES(N'CMIS 101', N'Introduction to Problem Solving and Algorithm Design', 3),
      (N'CMIS 170', N'Introduction to XML', 3),
      (N'CMIS 320', N'Relational Databases', 3),
      (N'CMIS 420', N'Advanced Relational Databases', 3),
      (N'CMST 306', N'Introduction to Visual Basic Programming', 3),
      (N'CMST 385', N'Internet and Web Design', 3);
GO

CREATE TABLE Admissions.Students
(
	StudentNumber nchar(20) not null,
	FirstName nvarchar(20),
	MiddleName nvarchar(20),
	LastName nvarchar(20),
	CONSTRAINT PK_Students PRIMARY KEY(StudentNumber)
);
GO
INSERT INTO Admissions.Students
VALUES(N'8130480', N'Frank', N'Daniel', N'Bigg'),
      (N'2946681', N'Marianne', NULL, N'Roberts'),
      (N'7113159', N'Angele', N'Cecilia', N'Douala'),
      (N'2049220', N'James', NULL, N'Davidson'),
      (N'7927413', N'Larry', N'Herbert', N'Bibang'),
      (N'2048800', N'Ann', NULL, N'Roberts'),
      (N'9701328', N'Celia', N'Gabriela', N'Edison'),
      (N'9720048', N'Hermine', NULL, N'Nkolo');
GO
Imagine you have a list of students who are registering for courses in a new semester:
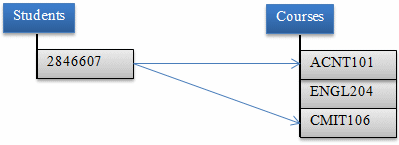
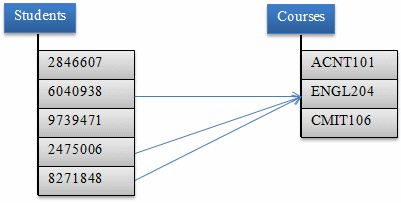
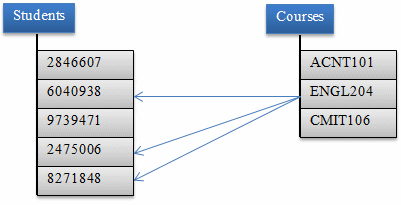
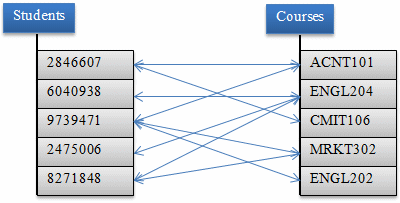
This type of relationship is referred to as many-to-many.
Most of the time, to implement a many-to-many relationship, besides the two tables that hold the normal records, you would create one more table referred to as a junction table. The job of the junction table is to get a value from one table, associate it to the desired value of another table, repeat this step as many times as necessary, and produce the necessary list. This can be illustrated as follows:
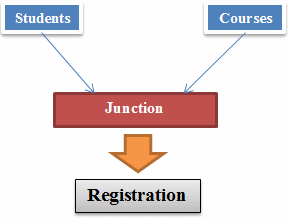
Obviously, the junction table should (must) have a foreign key for each of the concerned tables. Here is an example of such a table:
CREATE TABLE Admissions.Registrations
(
    StudentNumber nchar(20),
    CourseCode nchar(10),
);
In reality, you can add as many fields as you judge necessary. Here is an example:
CREATE TABLE Admissions.Registrations
(
    RegistrationID int identity(1, 1) not null,
    StudentNumber nchar(20),
    CourseCode nchar(10),
    CONSTRAINT PK_Registrations PRIMARY KEY(RegistrationID)
);
GO
As mentioned already, when creating the records, you get a value from one table and another value from the other table. Here are examples:
INSERT INTO Admissions.Registrations(StudentNumber, CourseCode)
VALUES(N'8130480', N'CMIS 101'),
      (N'2946681', N'CMIS 170'),
      (N'7113159', N'CMST 385'),
      (N'2049220', N'CMIS 320'),
      (N'7927413', N'CMIS 320'),
      (N'2946681', N'CMST 306'),
      (N'2048800', N'CMIS 420'),
      (N'2049220', N'CMST 306'),
      (N'7113159', N'CMST 306'),
      (N'9701328', N'CMIS 170'),
      (N'9720048', N'CMIS 420'),
      (N'9701328', N'CMST 306');
GO
| Column Name | Data Type |
| EnrollmentID | int |
| StudentNumber | nvarchar(10) |
| ScheduleID | int |
| StudentNumber | ScheduleID |
| 104-46-624 | 9 |
| 108-96-156 | 2 |
| 280-14-513 | 1 |
| 284-95-006 | 9 |
| 290-80-249 | 1 |
| 481-85-913 | 1 |
| 606-39-722 | 1 |
| 681-07-049 | 3 |
| 695-88-473 | 4 |
| 805-15-691 | 2 |
| 920-92-270 | 4 |
| 974-36-379 | 1 |
| 208-58-050 | 2 |
| 402-48-885 | 2 |
| 296-61-805 | 4 |
| 293-74-635 | 3 |
| 530-47-225 | 3 |
| 842-50-960 | 4 |
| 927-40-351 | 3 |
| 974-36-379 | 5 |
| 280-14-513 | 5 |
| 104-46-624 | 5 |
| 280-14-513 | 10 |
| 290-80-249 | 10 |
| 481-85-913 | 10 |
| 606-39-722 | 10 |
| 974-36-379 | 10 |
| 485-05-940 | 7 |
| 606-39-722 | 9 |
| 290-80-249 | 5 |
| 280-14-513 | 9 |
| 949-29-204 | 6 |
| 393-46-377 | 6 |
| 186-04-379 | 6 |
| 183-04-202 | 6 |
| 104-46-624 | 18 |
| 284-95-006 | 18 |
| 280-14-513 | 18 |
| 606-39-722 | 18 |
| 357-96-927 | 7 |
| 273-04-775 | 7 |
| 294-80-275 | 7 |
| 279-97-405 | 7 |
| 695-88-473 | 13 |
| 290-80-249 | 8 |
| 481-85-913 | 8 |
| 606-39-722 | 8 |
| 974-36-379 | 8 |
| 179-38-027 | 8 |
| 108-96-156 | 11 |
| 805-15-691 | 11 |
| 208-58-050 | 11 |
| 402-48-885 | 11 |
| 681-07-049 | 12 |
| 293-74-635 | 12 |
| 530-47-225 | 12 |
| 927-40-351 | 12 |
| 179-38-027 | 17 |
| 920-92-270 | 13 |
| 296-61-805 | 13 |
| 842-50-960 | 13 |
| 104-46-624 | 14 |
| 280-14-513 | 14 |
| 290-80-249 | 14 |
| 974-36-379 | 14 |
| 949-29-204 | 16 |
| 393-46-377 | 16 |
| 186-04-379 | 16 |
| 183-04-202 | 16 |
| 290-80-249 | 17 |
| 481-85-913 | 17 |
| 606-39-722 | 17 |
| 974-36-379 | 17 |
| 108-24-972 | 4 |
| 108-24-972 | 6 |
|
A Variance to a Many-To-Many Relationship |
As a variance of a many-to-many relationship, instead of just two tables, you can create a junction table that unites three or more tables. Once again, consider the example of students registering for courses:
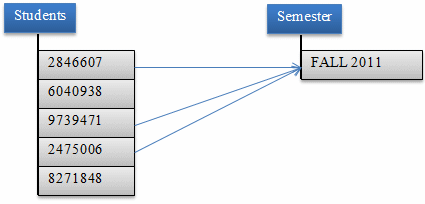
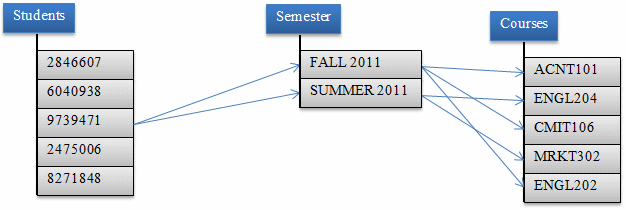
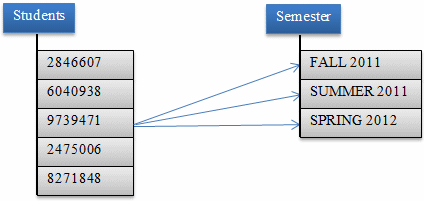
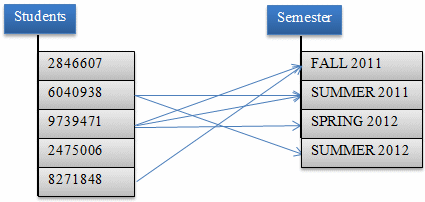
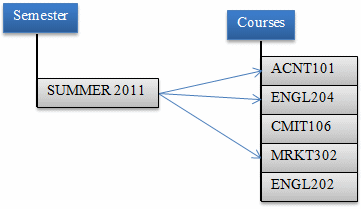

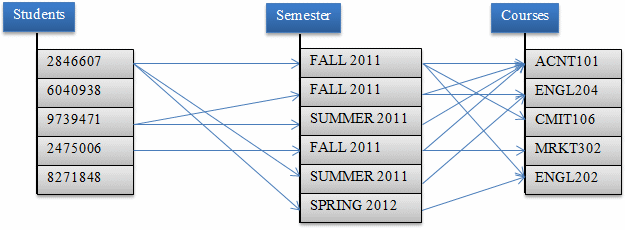
You create the junction table the same way you do for two tables: Add a foreign key for each of the tables. During data entry:
The beauty of this variant of a many-to-many relationship would be revealed during data analysis when you want to find out
![]() Practical Learning: Ending the Lesson
Practical Learning: Ending the Lesson
|
|
|||
| Previous | Copyright © 2000-2022, FunctionX | Thursday 26 May 2022 | Next |
|
|
|||