Options on Joins
Joining More Than Two Tables
So far, our join statements involved only two tables. Actually, you can use more than that. The basic formula to join three tables is:
SELECT WhatColumn(s) FROM FirstTable
FirstJoinType SecondTable ON Condition1
SecondJoinType ThirdTable ON Condition2
You start the expression by joining the first to the second table, which means that both tables should share a column in a primary key-foreign key type of relationship. In the same way, you can create the second join. of course, the second and the third table should have a common column. In most cases, there should be a column that all three tables share. Most of the time, the relationship starts with a primary column from the first table. That column is then represented as a foreign key in the other two tables.
 Practical Learning: Creating a One-to-Many Relationship
- Open the Monson University DDL file
- Click inside the document, press Ctrl + A and press Ctrl + C to copy
- Start Microsoft SQL Server and click Connect
- On the Standard toolbar, click the New Query button

- Click inside the empty window and press Ctrl + V
- To execute, on the SQL Editor toolbar, click the Execute button

- Open the Monson University DML file
- Click inside the document, press Ctrl + A and press Ctrl + C
- Click inside the empty window and press Ctrl + V
- To execute, on the SQL Editor toolbar, click the Execute button

- Click inside the Query Editor and press Ctrl + A to select everything
- To create a few shortcut names, type the following code:
USE MonsonUniversity1;
GO

CREATE SYNONYM Sems FOR Academics.Semesters;
GO
CREATE SYNONYM Empls FOR Administration.Employees;
GO
CREATE SYNONYM Studs FOR Admissions.UndergraduateStudents;
GO
CREATE SYNONYM Studs FOR Admissions.UndergraduateStudents;
GO
CREATE SYNONYM Regs FOR Admissions.UndergraduateRegistrations;
GO
CREATE SYNONYM Ugs FOR Catalogs.UndergraduateSchedules;
GO
CREATE SYNONYM Ugc FOR Catalogs.UndergraduateCourses;
GO
- To execute, press F5
- In the Object Explorer, expand Databases. If you don't see MonsonUniversity1, right-click Databases and click Refresh
- Under MonsonUniversity1, right-click Database Diagram and click New Database Diagram
- Read the message box and click Yes
- In the Add Table dialog box, click Add continuously until the Tables property page is empty
- Click Close
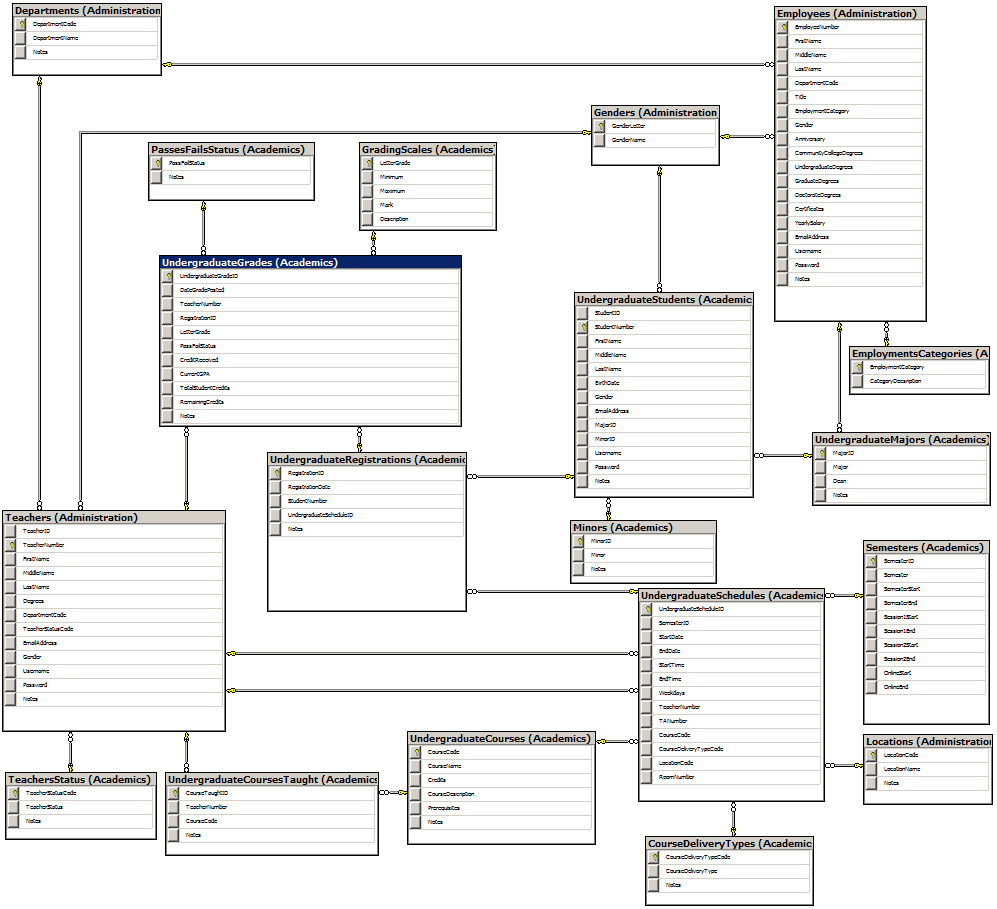
- Close the diagram
- When asked whether you want to save it, click yes
- Set the name to dgmMonsonUniversity
- Click OK
- Click inside the Query Editor and press Ctrl + A to select everything
- To see the list of courses offered, type:
USE MonsonUniversity1;
GO
SELECT * FROM Catalogs.UndergraduateCourses;
GO
- To see the result, on the main menu, click Query -> Execute
- Click inside the Query Editor and press Ctrl + A to select everything
- To see the records of the first 10 students, type:
USE MonsonUniversity1;
GO
SELECT TOP 10 * FROM Admissions.UndergraduateStudents;
GO
- To see the result, on the main menu, click Query -> Execute
- Click inside the Query Editor and press Ctrl + A to select everything
- To see the employees of the human resources department, type:
USE MonsonUniversity1;
GO
SELECT * FROM Administration.Employees
WHERE DepartmentCode = N'ADMN';
GO
- To see the result, on the main menu, click Query -> Execute
Introduction to Joins and Data Analysis
As demonstrated so far and in previous lessons, the main reason for creating queries is to isolate records. This is done using conditions and criteria. Joins enhance this capability because they allow you to consider records from different tables and include them in a common SQL statement.
In the joins we have created so far, we considered all records and let the database engine list them using only the rules of joins built-in the SQL. To make such a list more restrictive, you can pose your own conditions that should be respected to isolate records, like a funnel. As done in previous lessons, to include a criterion in a SELECT statement, you can create a WHERE clause.
 Practical Learning: Introducing Joins and Data Analysis
- Click inside the Query Editor and press Ctrl + A
- Press Delete
- On the main menu, click Query -> Design Query in Editor...
- In the Add Table dialog box, double-click UndergraduateStudents
(Admissions)
- Double-click UndergraduateMajors (Academics)
- Click Close
- On the tables, click the check boxes of the following fields:
FirstName, LastName, and Major
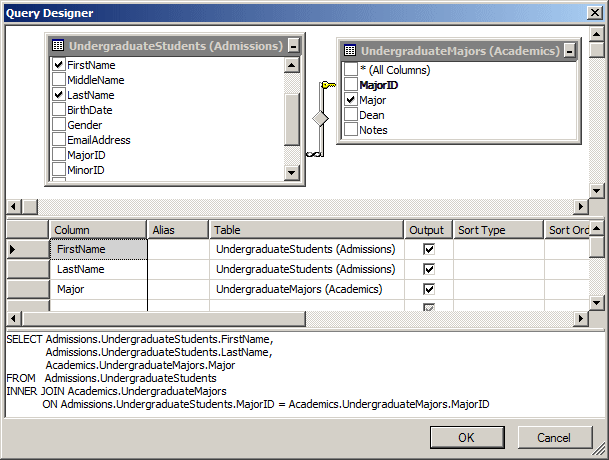
- Click OK
- To see the result, on the main menu, click Query -> Execute
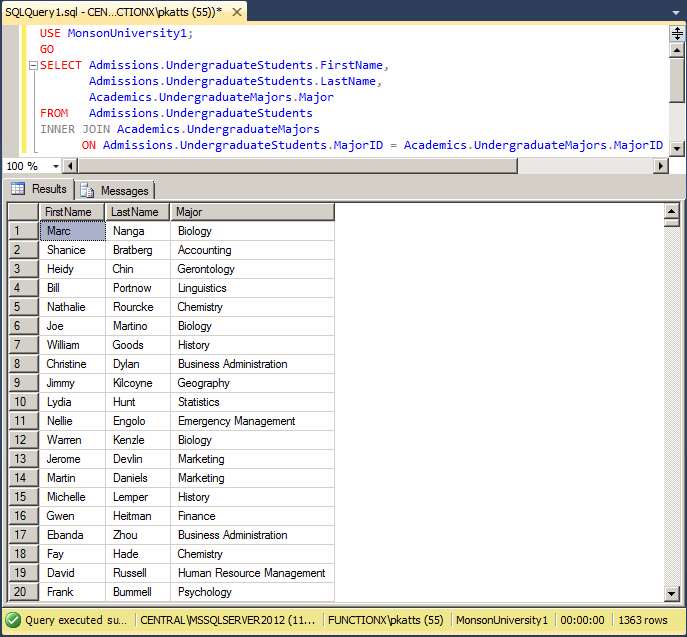
Using a Criterion
To create a criterion in a query you create from the
SQL Server Management Studio, first select a column to display it in the
Grid section. When creating the query, to specify a criterion, in the
Criteria box corresponding to the column, type the condition using any of
the operators we reviewed in previous lessons. Here is an example:
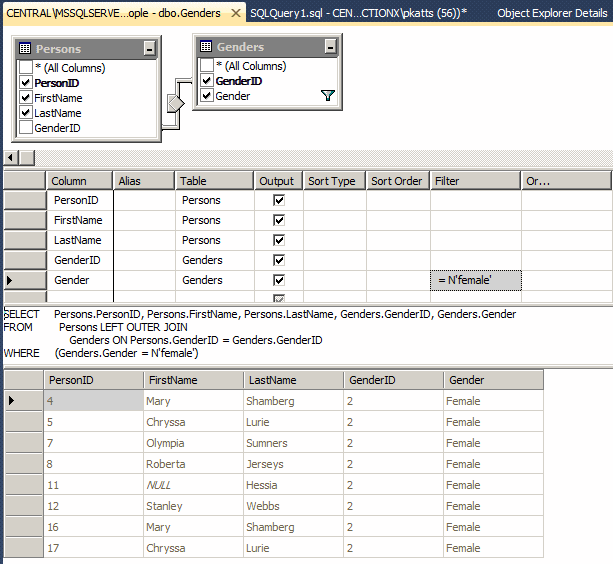
SELECT Persons.PersonID, Persons.FirstName, Persons.LastName,
       Genders.GenderID, Genders.Gender
FROM   Persons LEFT OUTER JOIN
       Genders ON Persons.GenderID = Genders.GenderID
WHERE  Genders.Gender = N'female';
GO
This would produce:
>
 Practical Learning: Analyzing Data With Joins
- (At this time, or in the real world, we would simply edit the SQL statement in the Query Editor but, for the sake of learning and to let the database engine do the work for us, we will visually recreate the query).
Click in the top section of the Query Editor where the code was written and press Ctrl + A to select everything
- Press Delete
- Right-click inside the top section of the Query Editor and click Design Query in Editor...
- To get a list of students attendance based on semesters, in the Add Table dialog box, double-click Semesters (Academics)
- Double-click UndergraduateRegistrations (Admissions)
- Double-click UndergraduateCourses (Catalogs)
- Double-click UndergraduateSchedules (Catalogs)
- Click Close
- On the tables, click the check boxes of the following fields:
Semesters(Admissions): Semester
UndergraduateRegistrations (Admissions): StudentNumber
UndergraduateCourses (Catalogs): CourseCode, CourseName, Credits
- In the Criteria pane, click the box at the intersection of the Semester and Sort Type
- Select Ascending

- Click OK
- To see the result, on the SQL Editor toolbar, click the Execute
SQL button


- Click inside the Query Editor and press Ctrl + A
- Press Delete
- Right-click inside the Query Editor and click Design Query in
Editor...
- In the Add Table dialog box, double-click UndergraduateStudents
(Admissions)
- Double-click UndergraduateMajors (Academics)
- Click Close
- On the tables, click the check boxes of the following fields:
FirstName, LastName, and Major
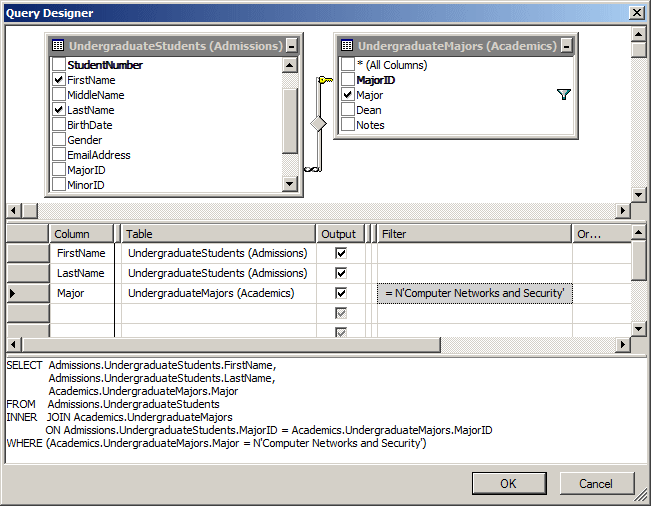
- To see a list of students who are majoring in CNS, in the Criteria
pane, under Filter, click the box that corresponds to Major and type
N'Computer Networks and Security'
- Click OK
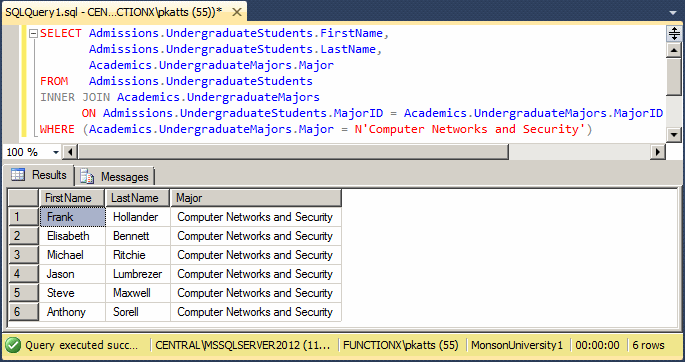
- On the SQL Editor toolbar, click the Execute SQL button

- Click in the top section of the Query Editor and press Ctrl + A
- Press Delete
- To see the list of courses attended by a certain student in
various semesters, right-click inside the top section of the Query
Editor and click Design Query in Editor...
- In the Add Table dialog box, double-click UndergraduateStudents
(Admissions)
- Double-click UndergraduateRegistrations (Admissions)
- Double-click Semesters (Acadmics)
- Double-click UndergraduateSchedules (Catalogs)
- Double-click UndergraduateCourses (Catalogs)
- Click Close
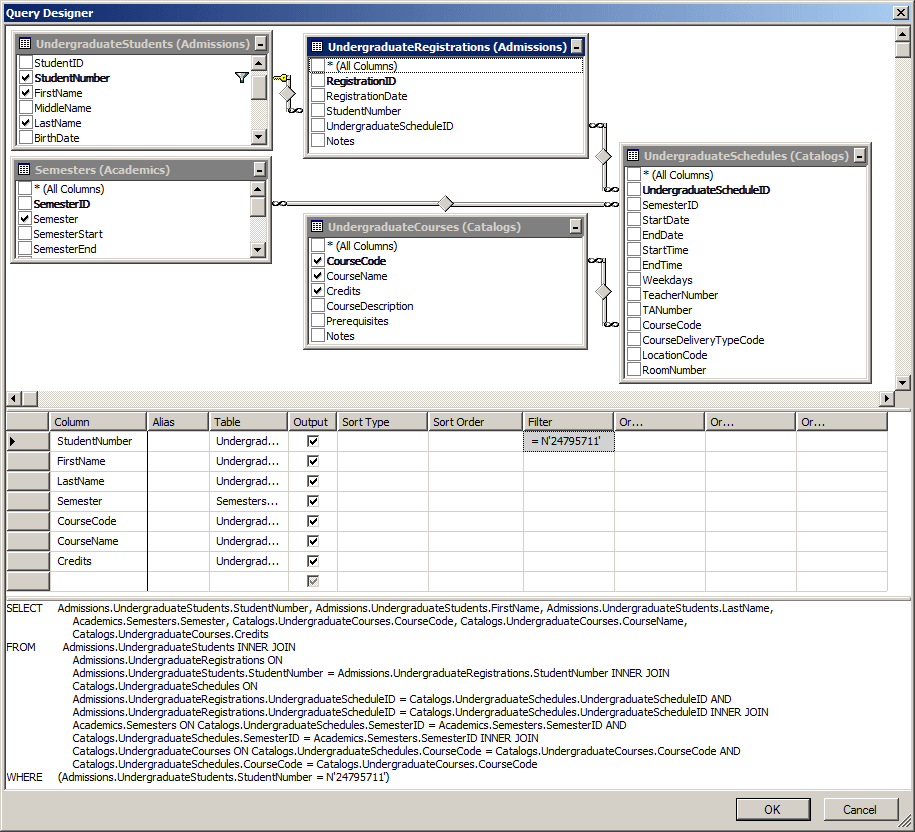
- On the tables, click the check boxes of the following fields:
- UndergraduateStudents (Admissions): StudentNumber, FirstName,
and LastName
- Semesters (Admissions): Semester
- UndergraduateCourses (Catalogs): CourseCode, CourseName, and
Credits
- In the Criteria pane, click the box at the intersection of
StudentNumber and Filter
- Type 24795711
- Click OK
- To see the result, on the SQL Editor toolbar, click the Execute
SQL button


- Click inside the Query Editor and press Ctrl + A
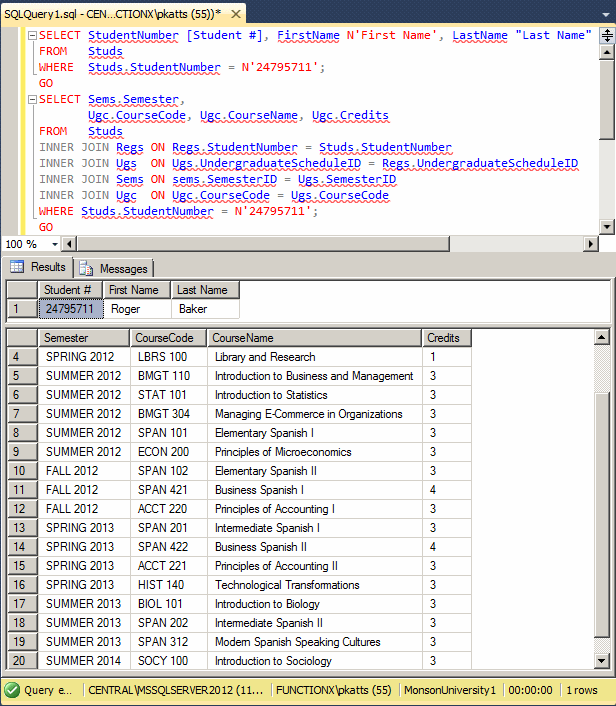
- To create another version of the above SQL statement, type the
following code:
SELECT StudentNumber [Student #],
       FirstName N'First Name',
       LastName "Last Name"
FROM   Studs
WHERE  Studs.StudentNumber = N'24795711';
GO
SELECT Sems.Semester,
       Ugc.CourseCode,
       Ugc.CourseName,
       Ugc.Credits
FROM   Studs
INNER JOIN Regs ON Regs.StudentNumber = Studs.StudentNumber
INNER JOIN Ugs  ON Ugs.UndergraduateScheduleID = Regs.UndergraduateScheduleID
INNER JOIN Sems ON sems.SemesterID = Ugs.SemesterID
INNER JOIN Ugc  ON Ugc.CourseCode = Ugs.CourseCode
WHERE Studs.StudentNumber = N'24795711';
GO
- To execute, press F5
A Parameterized Query
Introduction
In all conditional statements we have used so far, we
knew the value to check against a column. In reality, you can create a query
without specifying the value to check. A query is referred to as
parameterized if it would expect an external value to perform its
comparison. The statement starts like a normal SELECT
operation with a WHERE clause. Here is an example:
SELECT * FROM Students WHERE Sex = N'male';
Instead of specifying the value of the column(s) in the
WHERE clause, you can wait for the user to do so.
 Practical
Learning: Introducing Parameterized Queries
- In the Object Explorer, in the Tables section under
MonsonUniversity1, right-click Catalogs.UndergraduateCourses and click
Edit Top 200 Rows
- On the main menu, click Query Designer -> Pane -> Diagram
- On the main menu, click Query Designer -> Pane -> Criteria
- On the main menu, click Query Designer -> Pane -> SQL
- In the SQL pane, delete TOP (200)
- On the main menu, click Query Designer -> Add Table...
- To prepare to let a user select a semester to get a list of students
attendance based on that semester, in the Add Table dialog box,
double-click UndergraduateSchedules (Catalogs)
- Double-click Semesters (Academics)
- Double-click UndergraduateRegistrations (Admissions)
- Click Close
- In the Diagram pane, click the check boxes of Credits,
CourseDescription, Prerequisites, and Notes to remove them
- In the Semesters (Academics) table, click the check box of Semester
- In the UndergraduateRegistrations (Admissions) table, click the
check box of StudentNumber
- In the UndedrgraduateSchedules (Catalogs) table, click the check
boxes of LocationCode, RoomNumber, StartDate, StartTime, EndDate,
EndTime, Weekdays, and TeacherNumber
- In the Criteria pane, move the columns to get them in the following
order:
| Column |
Alias |
| StudentNumber |
Student # |
| Semester |
|
| CourseCode |
Course |
| CourseName |
Course Name |
| Weekdays |
|
| StartDate |
Start Date |
| EndDate |
End Date |
| StartTime |
Start Time |
| EndTime |
End Time |
| LocationCode |
Building |
| RoomNumber |
Room # |
| TeacherNumber |
Teacher # |
- To execute, on the main menu, click Query Designer -> Execute SQL
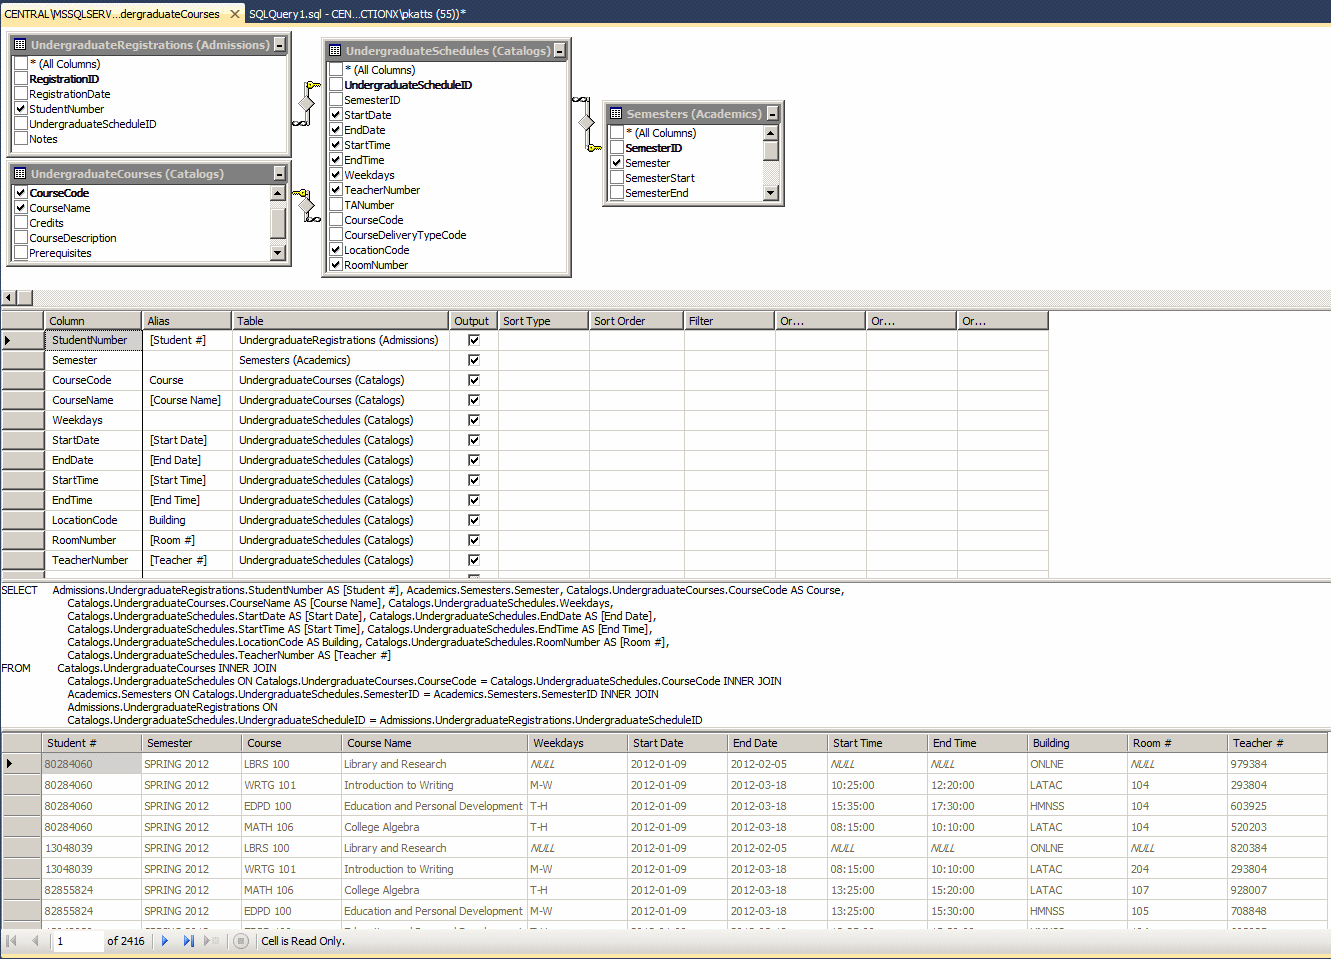
Creating a Parameterized Query
To visually create a parameterized statement, in the
Object Explorer, right-click the table and click Edit Top 200 Rows. In the
Criteria pane, click the box at the intersection of the column and Filter.
Type @ followed by a variable name.
To create a parameterized query with code, open a Query
Editor. Start a normal SELECT expression that contains a
condition. In the WHERE expression, replace the value with
the name of a variable starting with @. Here is an example:
SELECT StudentNumber, LastName, FirstName, City, State
FROM Students
WHERE StudentNumber = @StdNbr;
|
 Practical
Learning: Creating a Parameter Practical
Learning: Creating a Parameter
|
|
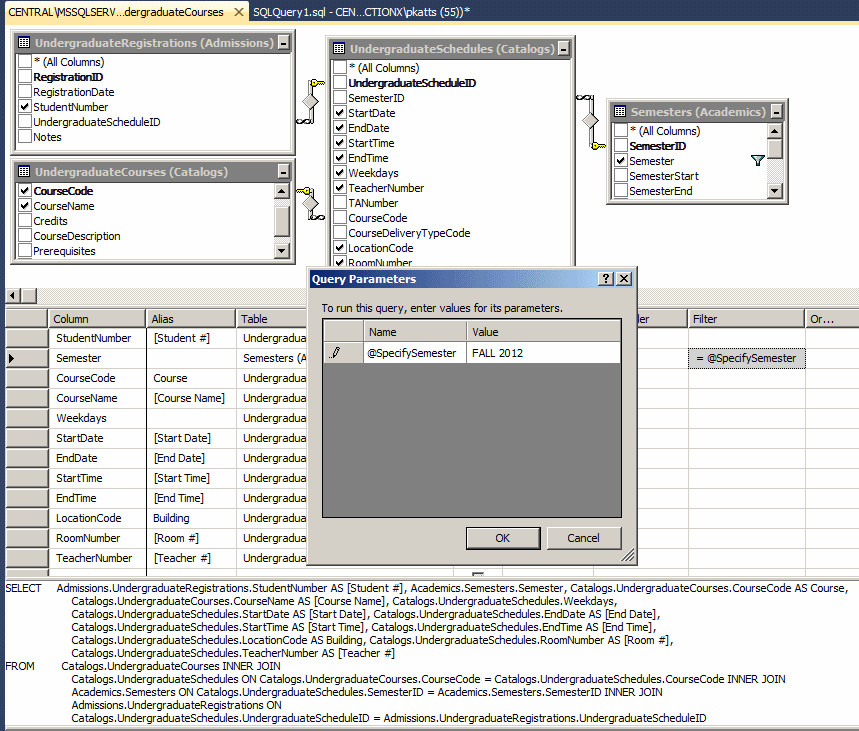
- In the Criteria pane, click the box at the intersection of Semester
and Filter
- Type @SpecifySemester
|
Executing a Parameterized Statement
|
|
After creating a parameterized statement, you can test
and/or use it. When you run the query, the SQL interpreter would request a
value for the column. When you execute the statement, a dialog box would
come up, asking you to enter a value for the filtered field. You can then
type the appropriate value and click OK (or press Enter).
|
 Practical
Learning: Executing a Parameterized Statement Practical
Learning: Executing a Parameterized Statement
|
|
- To see the result, on the main menu, click Query Designer -> Execute
SQL
- In the Query Parameters dialog box, under Value, type FALL
2012
- Click OK
- On the main menu, click Query Designer -> Add Table
- To get the name of the student, in the Add Table dialog box,
double-click UndergraduateStudents (Admissions)
- Click Close
- In the Criteria pane, click the first empty box under Column and
type
LastName + N', ' + FirstName
- Press Tab and type [Student Name]
- In the Criteria pane, move the new Student Name column and position
it under StudentNumber
- Still in the Criteria pane, click the box at the intersection of
StudentNumber and Filter
- Type @SpecifyStudentNumber
- To test the new version of the parameterized query, on the main
menu, click Query Designer -> Execute SQL
- At the intersection of @SpecifySemester and Value, type
SUMMER 2013
- At the intersection of @SpecifyStudentNumber and Value, type
18073572

- Click OK
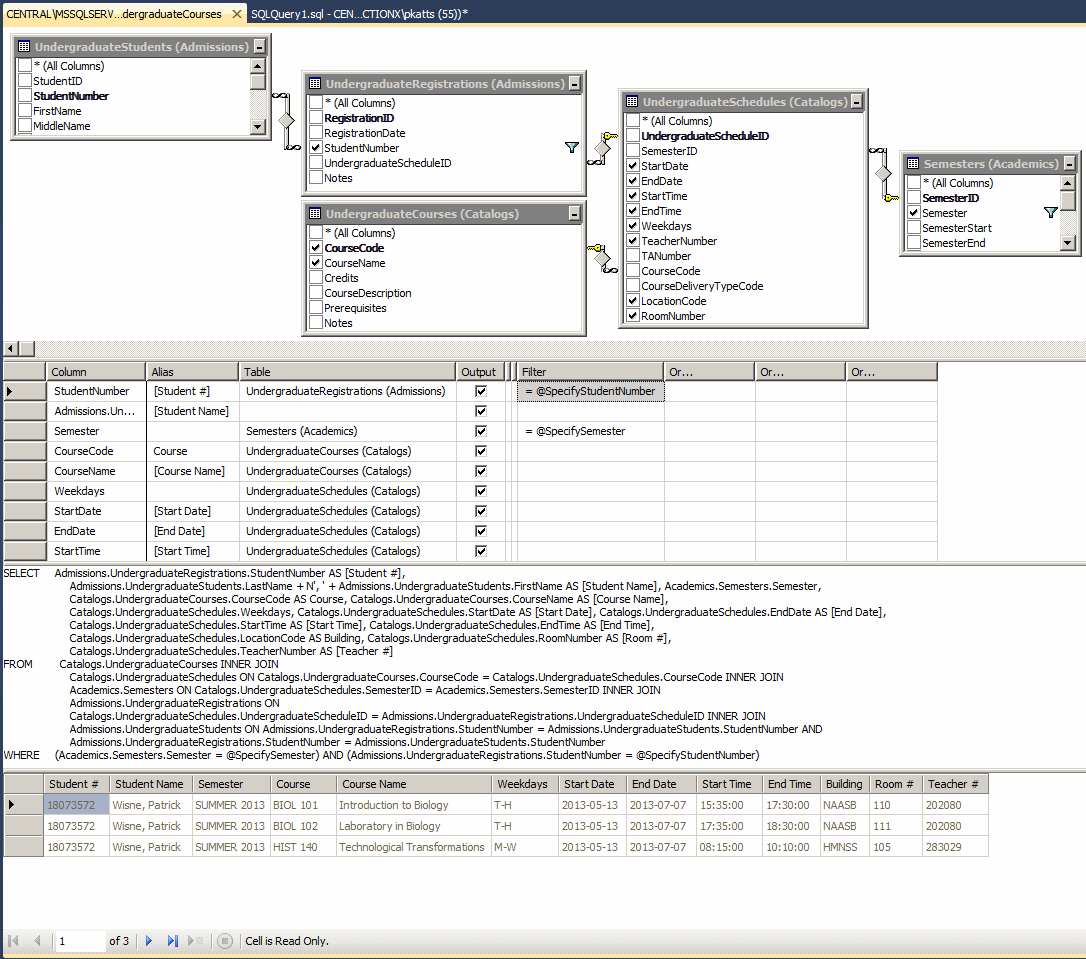
- To see another student's schedule for a different semester, on the main menu, click Query Designer -> Execute SQL
- At the intersection of @SpecifySemester and Value, type FALL 2012
- At the intersection of @SpecifyStudentNumber and Value, type 24795711
- Click OK
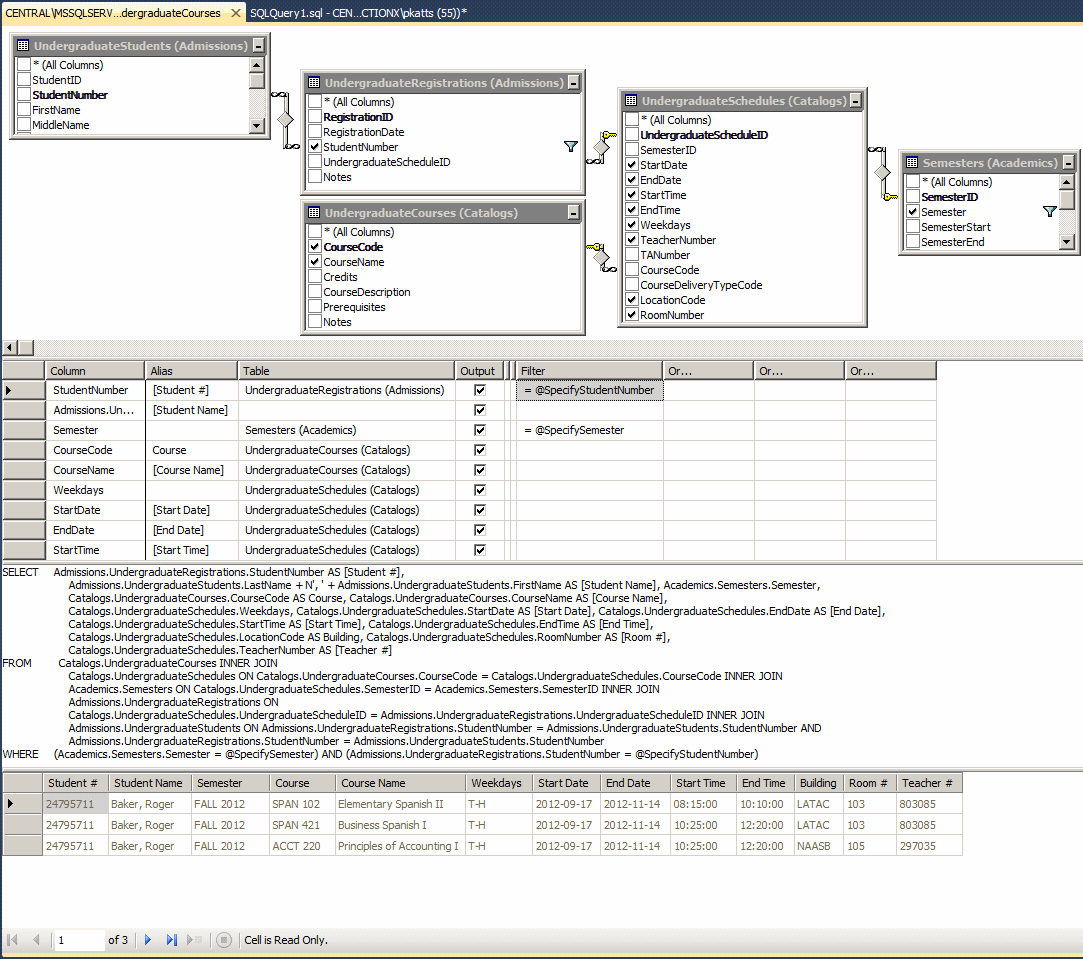
Notce a conflict in the schedule. The student registered to take two
courses at the same time in the same weekdays of the same semester
- Close Microsoft SQL Server
![]() Practical Learning: Creating a One-to-Many Relationship
Practical Learning: Creating a One-to-Many Relationship![]() Practical Learning: Introducing Joins and Data Analysis
Practical Learning: Introducing Joins and Data Analysis


![]() Practical Learning: Analyzing Data With Joins
Practical Learning: Analyzing Data With Joins

![]() Practical
Learning: Introducing Parameterized Queries
Practical
Learning: Introducing Parameterized Queries