Home

Starting Microsoft SQL Server


The Service and the Server


The MSSQLSERVER Service

After installing Microsoft SQL Server, you can start using it.

Because Microsoft SQL Server works as a service to the operating system, in order to use it, you must make sure its service has started. Sometimes you will have to start the service and sometimes you will have to stop it. To check it, you can open the Control Panel and the Administrative Tools. In the Administrative Tools window, open the Services.

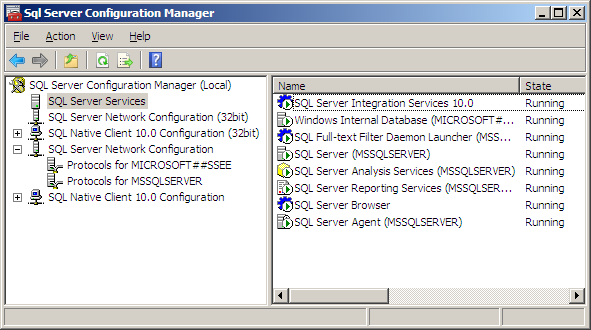
In the Services window, check the status of the SQL Server (MSSQLSERVER), the SQL Server Agent (MSSQLSERVER), and the SQL Server Browser:

Services

If the MSSQLSERVER service is stopped, you should start it. To do this, you can right-click it and click Start. If it fails to start, check the account with which you logged in:

  • If you are using Microsoft Windows XP-7 and you logged in as Administrator but did not provide a password, you should open Control Panel, access User Accounts, open the Administrator account, and create a password for it
  • If you are using a server (Microsoft Windows Server 2003 or Microsoft Windows Server 2008), make sure you logged in with an account that can start a service

Once the service has started, it should be labeled Started:

Services

Opening Microsoft SQL Server

To launch Microsoft SQL Server, you can click Start -> (All) Programs -> Microsoft SQL Server 2008 -> SQL Server Management Studio

Launching Microsoft SQL Server 2008

When it starts, it would present a dialog box that expects you to log in.

Practical LearningPractical Learning: Launching Microsoft SQL Server

  1. All Computers: Start the computer and log in
  2. All Computers: To launch Microsoft SQL Server, click Start -> (All) Programs -> Microsoft SQL Server 2008 -> SQL Server Management Studio. A splash screen will appear:
     
    Splash Screen
  3. All Computers: On the Connect to Server dialog box, click Cancel

The Microsoft SQL Server Management Studio


Introduction

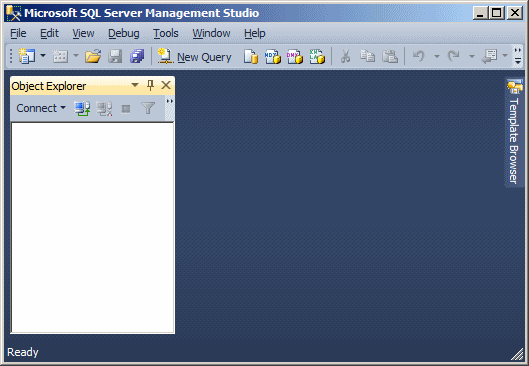
There are many tools you will use in Microsoft SQL server. One of them is called Microsoft SQL Server Management Studio. To access it, you can click Start -> (All) Programs -> Microsoft SQL Server 2008 -> SQL Server Management Studio. A dialog box would come up but you can click Cancel on it:

Microsoft SQL Server Management Studio

The top section of the SQL Server Management Studio displays the classic title bar of a regular window, with an icon on the left, followed by the title of the application, and the system buttons on the right side.

The Main Menu

Under the title bar, the menu bar displays categories of menus that you will use to perform the various necessary operations.

The Standard Toolbar

The Standard toolbar displays under the main menu:

The Standard toolbar displays under the main menu

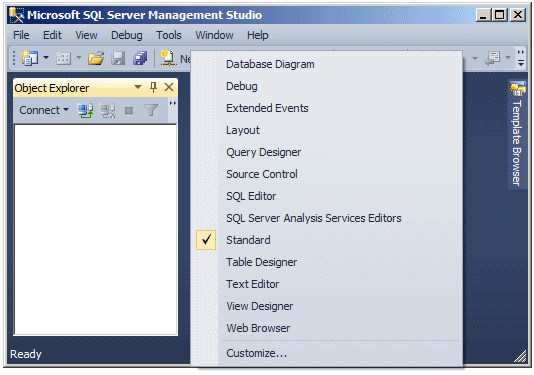
The Standard toolbar is just one of the available ones. Eventually, when you perform an action that would benefit from another toolbar, the Microsoft SQL Server Management Studio would display that toolbar. Still, if you want to show any toolbar, you can right-click any menu item on the main menu or any button on a toolbar.

Practical LearningPractical Learning: Checking the Toolbars

  1. All Computers: Right-click any menu item on the main menu or any button on a toolbar:

    Context-Sensitve Menu

  2. All Computers: Press Esc

The Object Explorer

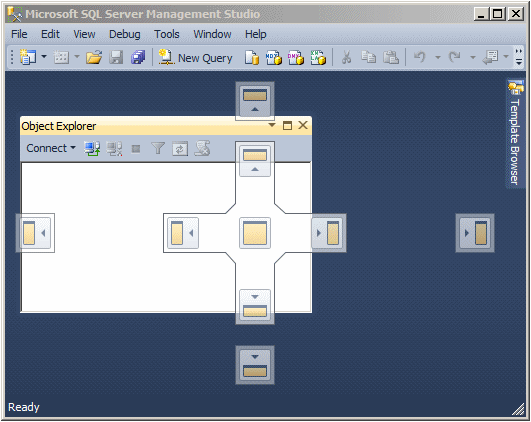
The left side of the interface displays, by default, the Object Explorer window, with its title bar labeled Object Explorer. If you don't see it, on the main menu, you can click View -> Object Explorer.

The Object Explorer is a dockable window, meaning you can move it from the left side to another side on the interface. To do this, you can click and drag its title bar to a location of your choice. When you start dragging, small boxes that represent the possible placeholders would come up:

Dragging

You can drag and drop to one of those placeholders.

The Object Explorer is also floatable, which means you can place it somewhere in the middle of the interface:

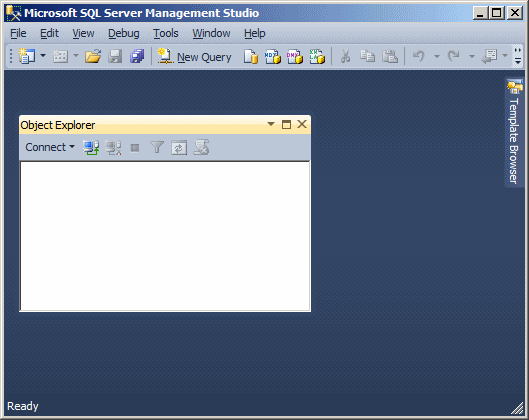
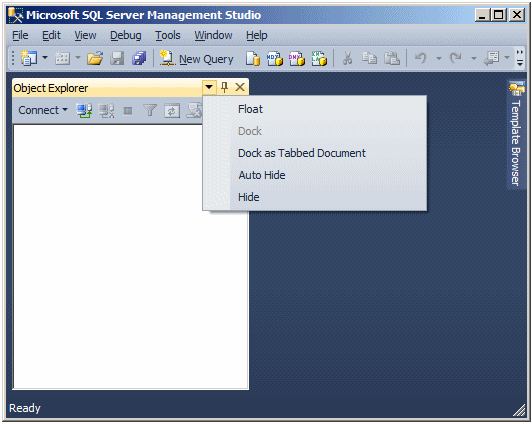
To place the window back to its previous position, you can double-click its title bar. The window can also be tabbed. This means that the window can be positioned either vertically or horizontally.

At any time, if you do not want the Object Explorer, you can close or hide it. To close the Object Explorer, click its close button.

On the right side of the Object Explorer title, there are three buttons. If you click the first button that points down, a menu would appear:

Object Explorer

The menu allows you to specify whether you want the window to be floated, docked, or tabbed.

The right side of the window is made of an empty window. This area will be used to display either the contents of what is selected in the Object Explorer, or to show a result of some operation. As you will see later on, many other windows will occupy the right section but they will share the same area. To make each known it will be represented with a tab and the tab shows the name (or caption) of a window.

Close Microsoft SQL Server

After using Microsoft SQL Server Management Studio, you can close it. To do this:

  • Click the icon on the left side of Microsoft SQL Server Management Studio and click Close
  • On the right side of the title bar, click the system Close button Close
  • On the main menu, click File -> Exit
  • Press Alt, F, X

Introduction to Connecting to Microsoft SQL Server


Overview

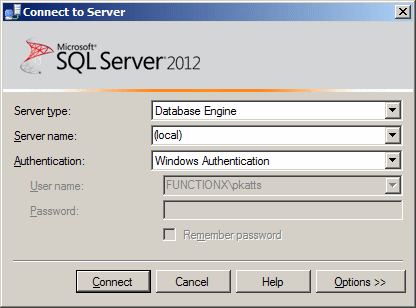
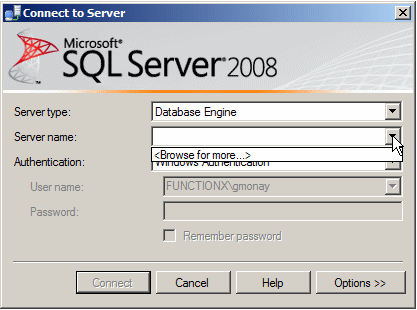
In order to do anything significant in Microsoft SQL Server, you will have to establish a connection to it. This depends on whether Microsoft SQL Server is installed on the computer you are using or you are connecting to an external server using a client/workstation.

If you start Microsoft SQL Server Management Studio from the Start button, the Connect To Server dialog box would come up:

Connect To Server

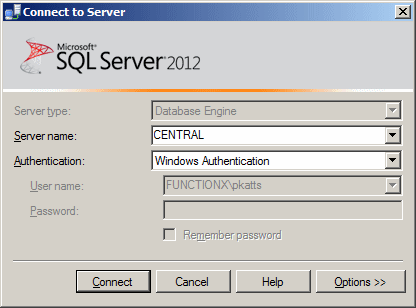
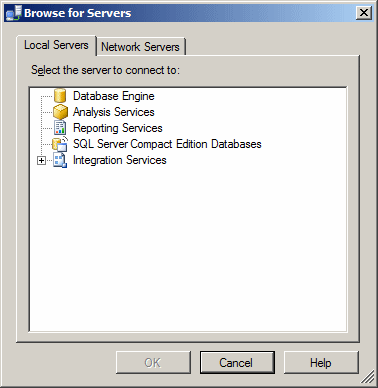
If you had started from the Start button but clicked Cancel, to connect to a server:

  • On the main menu, click File -> Connect Object Explorer...
  • On the Standard toolbar, click the New Query button New Query
  • In the Object Explorer, click the arrow of the Connect button and click one of the options, such as Database Engine...

Any of these actions would display the Connect to Server dialog box.

Using a Stand-Alone Computer

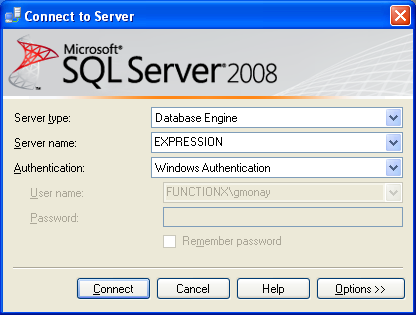
In the previous lesson, we saw two types of installations: on a lone computer or with a client tools. We also saw that the simplest way to use Microsoft SQL Server was with one computer. In this case, after starting the computer and logging in, especially if you log in with the same account you used to install Microsoft SQL Server, on the Connect to Server dialog box, the Database Engine option would be selected in the Server Type combo box. The name of the computer should be selected in the Server Name combo box. In this case also, the easiest way to connect is to select Windows Authentication in the Authentication combo box. The User Name combo box should have the name of the computer, followed by a back slash, and followed by the user name of the account that is currently logged in. You don't have to enter a password (this is because you are using Windows Authentication and because you are logged in already):

Connect to Server

Connection in a Client/Server Environment

  
Connection in a Client/Server Environment

Introduction

As mentioned in the previous lesson, if you are working in a network environment, you may use a client that connects to a computer on which Microsoft SQL Server is installed. If you had installed either Microsoft SQL Server or the client tools on the current computer, you can use that workstation to connect to Microsoft SQL Server. In this case, you use a different type of authentication.

Before being able to connect, you must prepare the server. Once the server can receive external connections, you can either connect to it when you launch SQL Server Management Studio or change the connection after starting Microsoft SQL Server.

Preparing the Server for Remote Connectivity

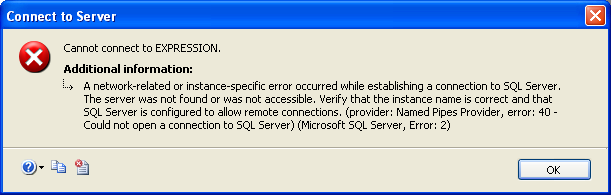
In most cases, the default installation of Microsoft SQL Server doesn't allow clients to connect to it. Sometimes, if you try establishing a connection to the server (in this and the next lessons, we will see how that connection is established), you may receive an error as "A network-related or instance-specific error occurred while establishing a connection to SQL Server.":

Connect to Server

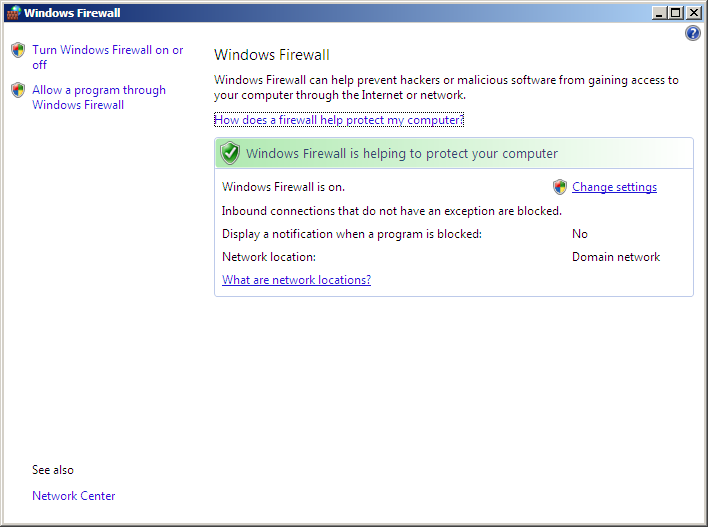
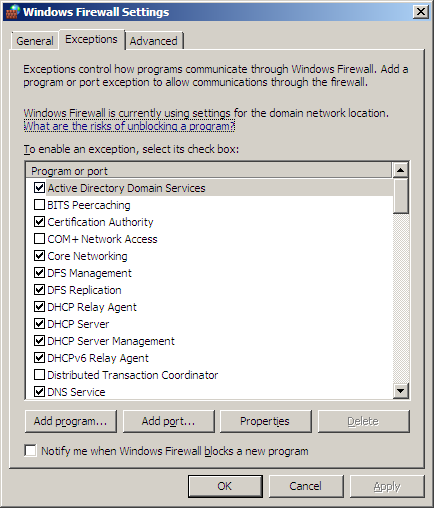
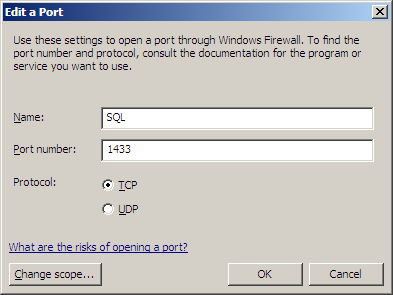
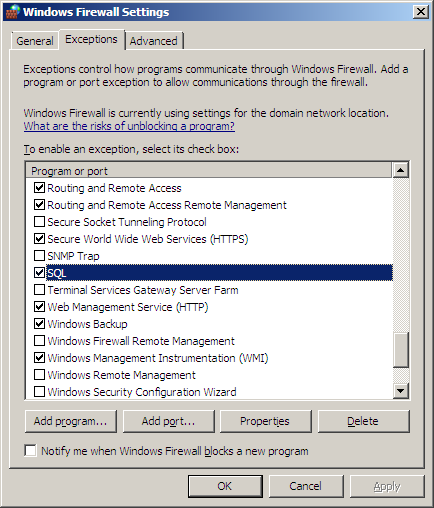
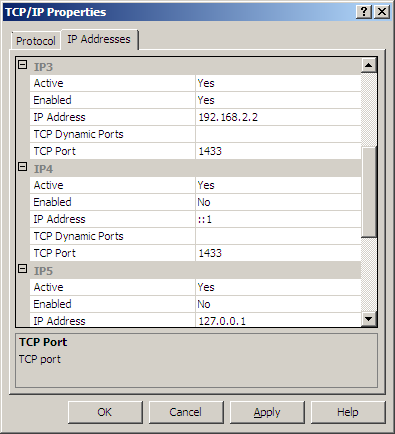
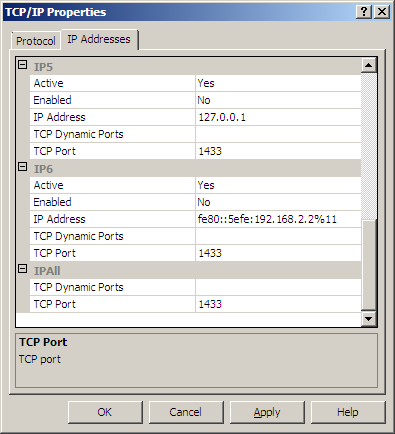
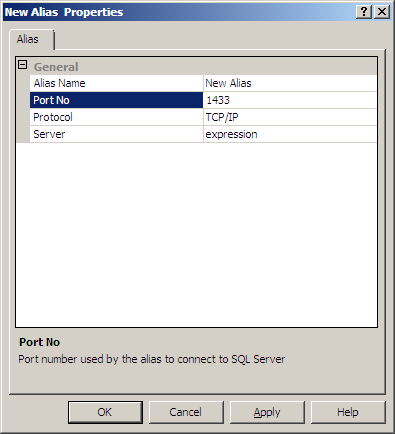
There are a few actions you must first perform, from the operating system's firewall to Microsoft SQL Server's own configuration.

One of the actions you should take care of for client connectivity is to dig/create a hole in the firewall. To do this, click Start -> Control Panel. Double-click Firewall. Using the Exceptions tab, create a firewall.

Besides taking care of the firewall, you should configure TCP/IP connectivity and create an alias.


Practical LearningPractical Learning: Creating Remote Connectivity

  1. Server: Click Start -> Control Panel
  2. Server: Double-click Windows Firewall
     
    Control Panel - Frewall
  3. Server: Click Change Settings. If you receive a warning message, click Continue
  4. Server: In the Windows Firewall Settings, click Exceptions
     
    Firewall - Exceptions
  5. Server: Click Add Port...
  6. Server: Set the Name to SQL
  7. Server: In the Port Number text box, type 1433 and make sure the TCP radio button is selected:
     
    Edit a Port
  8. Server: Click OK
     
    Windows Firewall Settings
  9. Server: Click OK
  10. Server: Close Windows Firewall
  11. Server: Close Control Panel
  12. Server: Click Start -> (All) Programs -> Microsoft SQL Server -> Configuration Tools -> SQL Server Configuration Manager. If you receive a warning message, click Continue
  13. Server: In the left frame, expand SQL Server Configuration Manager (Local)
  14. Server: Click SQL Server Services
  15. Server: In the right frame, right-click SQL Server (MSSQLSERVER) and click Stop
  16. Server: Right-click SQL Server Browser and click Stop
     
    SQL Server Configuration Manager
  17. Server: In the left frame, expand SQL Server Network Configuration
  18. Server: Click Protocols for MSSQLSERVER
  19. Server: In the right frame, right-click TCP/IP and click Properties
  20. Server: Click IP Addresses
  21. Server: In the IP1 section, click TCP Port, press Tab, and type 1433
  22. Server: Put the same value for the TCP Ports in the other sections
     
    TCP IP Properties
     
    TCP IP Properties
     
    TCP IP Properties
  23. Server: Click OK. You may receive a message box:
     
    Warning
     
    Server: Click the Protocol tab. Make sure the Status of TCP/IP is Enabled. If it is not, enable it
    Read it and click OK.
  24. Server: In the left frame, expand SQL Native Client 10.0 Configuration
  25. Server: Right-click Alias and click New Alias...
  26. Server: Accept the name of New Alias.
    Set the Port No to 1433 and accept the Protocol as TCP/IP
  27. Server: Type the name of the computer in the Server text box (case insensitive)
     
    New Alias Properties
  28. Server: Click OK
  29. Server: In the left frame, click SQL Server Services
  30. Server: In the right frame, right-click SQL Server (MSSQLSERVER)
     
    SQL Server Configuration Manager
  31. Server: Click Start
  32. Server: Right-click SQL Server Browser and click Start
  33. Server: Also start SQL Server Agent
     
    SQL Server Configuration Manager
  34. Server: Close SQL Server Configuration Manager
  35. Server: Start Microsoft SQL Server and connect
  36. Server: In the Object Explorer, right-click the name of the computer and click Properties
  37. Server: In the left frame, click Connections.
    In the right section, make sure Allow Remote Connections To This Server is checked. If it is not, check it
     
    Properties
  38. Server: Click OK

Client Remote Connection

After configuring the server for client connectivity, you can establish connections to it. When you start Microsoft SQL Server, you are presented with the Connect to Server dialog box. If you are working with only one computer, you can use Windows Authentication, in which case the computer name, the user name, and the password would be selected for you. If you are using one computer to connect to Microsoft SQL Server on another computer, you have to make a few selections.

In the Connect to Server dialog box, click the arrow of the Server Name combo box and select <Browse for more...>:

Connect to Server

If you are using a computer on which the server is not installed, the Local Servers property page would be empty:

Browse for Server

If the server is installed in the local computer, the tab would show more options:

Browse for Server

Click Network Servers. For a few seconds, the dialog box would start looking for the computers that have Microsoft SQL Server in your network:

Browse for Server

The names of servers would appear in a tree list:

Browse for Server

Click the name of the computer you want to connect to and click OK. Back in the Connect to Server dialog box:

Browse for Server

You will then decide whether to use Windows Authentication or not, which we will cover in the next sections.

Other Microsoft SQL Server Connection Tools


The SQL Command Prompt

Besides the SQL Server Management Studio, you can also work on Microsoft SQL Server from the DOS command prompt. This is done using an application or command named SQLCMD.EXE. To use it, open the Command Prompt, type SQLCMD (case-insensitive) and press Enter.

The Command Prompt

To see the names of the computers that have Microsoft SQL Server in your network, type SQLCMD -L and press Enter:

The Command Prompt

After using Microsoft SQL Server from the command prompt, to close it, type Quit (case-insensitive) and press Enter. To close the DOS window:

  • Type Exit (case-insensitive) and press Enter
  • Click the system Close button Close

The Windows PowerShell

When Microsoft SQL Server 2008 is installed, it also installs an application named Windows PowerShell 1.0, which is a new command-based application from Microsoft. Besides the SQL Server Management Studio and the Command Prompt, you can use PowerShell to create and manage databases. To access it:

  • You can click Start -> (All) Programs -> Windows PowerShell 1.0 -> Windows PowerShell
  • If you had already started Microsoft SQL Server, in the Object Explorer, right-click the name of the computer or the Databases node and click Start PowerShell

In both cases, a DOS window would display:

Windows PowerShell

Notice that the title bar displays Windows PowerShell. To access Microsoft SQL Server from PowerShell, type SQLCMD and press Enter:

Windows PowerShell

Notice that, this time, the title bar displays SQLCMD, which indicates that the application is ready to receive commands that relate to Microsoft SQL Server.

After using the PowerShell, to exit from Microsoft SQL Server, type Quit (case-insensitive) and press Enter:

Windows PowerShell

To close PowerShell and the DOS window, you can:

  • Type Exit (case-insensitive) and press Enter
  • Click the system Close button Close

Practical LearningPractical Learning: Closing Microsoft SQL Server

  • All Computers: To close Microsoft SQL Server, on the main menu, click File Exit


Previous Copyright © 2008-2012 Fianga.com Next