
Triggers
 |
Triggers |
|
Triggers Fundamentals |
|
Introduction to Triggers |
When an action has been performed on a table, such as adding a new record, changing (editing/updating) an existing record, or deleting a (or some) record(s), the table produces a notification. We say that the table fires an event. You can use that occurring event to take some action.
A trigger is an action that is performed behind-the-scenes when an event occurs on a table or a view.
|
|
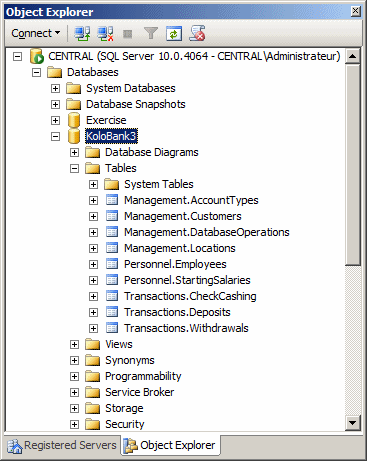
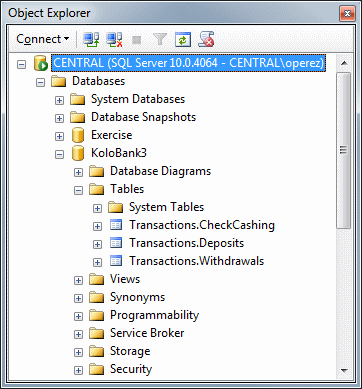
You create a trigger using SQL code. Later on, we will start analyzing the code necessary to do this. To assist you with skeleton code, open a Query window. Then, in the Template Explorer, expand the Triggers node. Drag Create T-SQL Trigger (New Menu) and drop it in the window:
-- ================================================
-- Template generated from Template Explorer using:
-- Create Trigger (New Menu).SQL
--
-- Use the Specify Values for Template Parameters
-- command (Ctrl-Shift-M) to fill in the parameter
-- values below.
--
-- See additional Create Trigger templates for more
-- examples of different Trigger statements.
--
-- This block of comments will not be included in
-- the definition of the function.
-- ================================================
SET ANSI_NULLS ON
GO
SET QUOTED_IDENTIFIER ON
GO
-- =============================================
-- Author:		<Author,,Name>
-- Create date: <Create Date,,>
-- Description:	<Description,,>
-- =============================================
CREATE TRIGGER <Schema_Name,
		sysname,
		Schema_Name>.<Trigger_Name,
			      sysname,
			      Trigger_Name>
   ON  <Schema_Name, sysname, Schema_Name>.<Table_Name, sysname, Table_Name>
   AFTER <Data_Modification_Statements, , INSERT,DELETE,UPDATE>
AS
BEGIN
	-- SET NOCOUNT ON added to prevent extra result sets from
	-- interfering with SELECT statements.
	SET NOCOUNT ON;

    -- Insert statements for trigger here

END
GO
|
Executing a Trigger |
Unlike a stored procedure, you never have to execute a trigger. The operating system (through the object(s) event(s)) and the database engine take care of this. A trigger acts behind the scenes when the object to which it is associated fires the appropriate event. In fact, the event fires whether the object received a change or not (whether a record was created, edited, deleted, or not).
Microsoft SQL Server supports three types of triggers: DML, DDL, and logon.
|
Introduction |
A DML trigger is a procedure that acts as a result of a data manipulation language (DML) event occurring on a table. This means that the trigger must be created in connection to a table of a non-system database.
|
AFTER/FOR INSERT Triggers |
An insert trigger is a DML trigger that acts when a new record is added to its intended table. Such a trigger uses the INSERT keywork. The primary formula to create an INSERT DML trigger on a table is:
CREATE TRIGGER TriggerName
ON TableName
AFTER/FOR INSERT
AS
    TriggerCode
The statement starts with CREATE TRIGGER followed by a name. The name follows the rules we have applied so far to database objects. After specifying the name of the trigger, write ON followed by the name of the table on which the trigger will be applied. Of course, the table must exist in the database.
In our formula, we assume that the trigger will apply when a record has been added to the table. Therefore, you use either the AFTER INSERT or the FOR INSERT expression.
To start the SQL code that constitutes the trigger, write AS, and then write your code.
After creating an INSERT trigger, at the right time (when its intended event fires), it will execute. When this happens, the database engine automatically and internally creates a temporary table named inserted. This table holds a copy of the records that were created. You can access those records if you want.
|
|
USE KoloBank4;
GO

-- ========================================================
-- DML Triggers:
-- Description:	These triggers update the Management.DatabaseOperations
--		by letting it know that a new operation has
--		taken place on a table of the database table. The trigger
--		also specifies the name of the employee
--		who performed the operation and the time
--		this occurred
-- ========================================================
CREATE TRIGGER Management.ForCustomers
ON Management.Customers
AFTER INSERT
AS
BEGIN
    INSERT INTO Management.DatabaseOperations
    VALUES(default, N'Customers', SUSER_SNAME(),
	       N'Created a new bank account.', GETDATE())
END
GO
-- ========================================================
CREATE TRIGGER Transactions.ForDeposits
ON Transactions.Deposits
AFTER INSERT
AS
BEGIN
    INSERT INTO Management.DatabaseOperations
    VALUES(default, N'Deposits', SUSER_SNAME(),
	       N'Made a deposit.', GETDATE())
END
GO
-- ========================================================
CREATE TRIGGER Transactions.ForWithdrawals
ON Transactions.Withdrawals
AFTER INSERT
AS
BEGIN
    INSERT INTO Management.DatabaseOperations
    VALUES(default, N'Withdrawals', SUSER_SNAME(),
	   N'Withdrew money', GETDATE())
END
GO
-- ========================================================
CREATE TRIGGER Transactions.ForChecksCashed
ON Transactions.CheckCashing
AFTER INSERT
AS
BEGIN
    INSERT INTO Management.DatabaseOperations
    VALUES(default, N'CheckCashing', SUSER_SNAME(),
	   N'Cashed a check', GETDATE())
END
GO| LocationID | EmployeeID | CustomerID | DepositDate | DepositAmount | Notes |
| 2 | 1 | 1 | 01/12/11 | 250.00 | Deposit for a new bank account |
| LocationID | EmployeeID | CustomerID | DepositDate | DepositAmount | Notes |
| 2 | 4 | 2 | 01/12/11 | 500.00 | Deposit for a new bank account |
| LocationID | EmployeeID | CustomerID | WithdrawalDate | WithdrawalAmount | Notes |
| 3 | 5 | 2 | 01/12/11 | 225.00 | Withdrawal from cashier |
| LocationID | EmployeeID | CustomerID | WithdrawalDate | WithdrawalAmount | Notes |
| 2 | 1 | 1 | 01/12/11 | 26.85 | Drive-in withdrawal |
| LocationID | EmployeeID | CustomerID | DepositDate | DepositAmount | Notes |
| 2 | 4 | 3 | 01/12/11 | 735.25 | Deposit for a new bank account |
| LocationID | EmployeeID | CustomerID | DepositDate | DepositAmount | Notes |
| 1 | 5 | 1 | 01/18/11 | 75.95 |
| LocationID | EmployeeID | CustomerID | DepositDate | DepositAmount | Notes |
| 2 | 1 | 4 | 01/18/11 | 1450.00 | Deposit for a new bank account |
| LocationID | EmployeeID | CustomerID | WithdrawalDate | WithdrawalAmount |
| 1 | 5 | 4 | 01/20/11 | 522.75 |
| LocationID | EmployeeID | CustomerID | WithdrawalDate | WithdrawalAmount |
| 2 | 1 | 3 | 01/20/11 | 440.00 |
| LocationID | EmployeeID | CustomerID | DepositDate | DepositAmount | Notes |
| 4 | 2 | 5 | 01/20/11 | 275.95 | The deposit for this new bank account was made from a check |
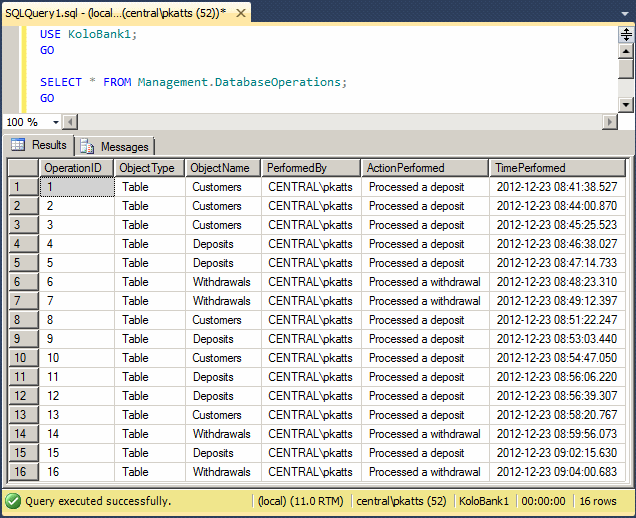
SELECT * FROM Management.DatabaseOperations;
GO
|
AFTER/FOR UPDATE Triggers |
Instead of record insertion time, a DML trigger can act when a record has been updated on a table. To support this operation, you can use the following formula:
CREATE TRIGGER TriggerName
ON TableName
AFTER/FOR UPDATE
AS
    TriggerCode
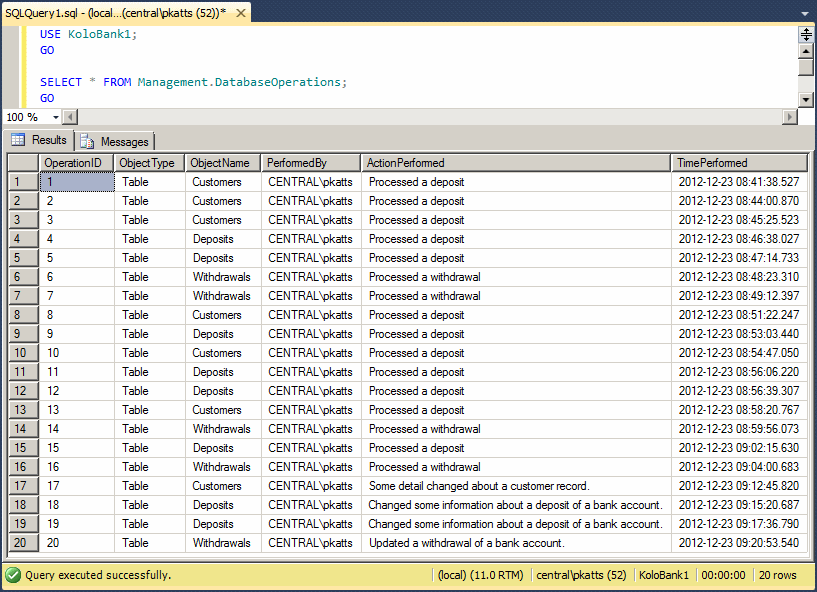
The new keyword in this formula is UPDATE. This indicates that the DML trigger will act when the record has been updated. Everything else is as described for the INSERT operator. Remember to use either AFTER UPDATE or FOR UPDATE.
|
|
USE KoloBank4;
GO

-- ========================================================
-- DML Triggers:Records Updates
-- Description:	These trigger adds a new record to the
--		Management.DatabaseOperations when an existing record
--		of a table has been updated.
-- ========================================================
CREATE TRIGGER Management.CustomerUpdated
ON Management.Customers
AFTER UPDATE
AS
BEGIN
    INSERT INTO Management.DatabaseOperations
    VALUES(default, N'Customers', SUSER_SNAME(),
	   N'Some detail changed about a customer record.',
	   GETDATE())
END
GO
CREATE TRIGGER Transactions.DepositUpdated
ON Transactions.Deposits
AFTER UPDATE
AS
BEGIN
    INSERT INTO Management.DatabaseOperations
    VALUES(default, N'Deposits', SUSER_SNAME(),
	   N'Changed some information about a deposit of a bank account.',
	   GETDATE())
END
GO
CREATE TRIGGER Transactions.WithdrawalUpdated
ON Transactions.Withdrawals
AFTER UPDATE
AS
BEGIN
    INSERT INTO Management.DatabaseOperations
    VALUES(default, N'Withdrawals', SUSER_SNAME(),
	   N'Updated a withdrawal of a bank account.', GETDATE())
END
GO

| DepositID | LocationID | EmployeeID | CustomerID | DepositDate | DepositAmount | Notes |
| 1 | 2 | 1 | 1 | 01/12/11 | 650.00 | There was a mistake in the amount deposited. Instead of 250.00, it was 650.00 |
| LocationID | EmployeeID | CustomerID | DepositDate | DepositAmount | Notes |
| 2 | 2 | 2 | 01/12/11 | 1500.00 | Oops, the money was deposited in the wrong bank account. It has been corrected with no incident |
| WithdrawalID | LocationID | EmployeeID | CustomerID | WithdrawalDate | WithdrawalAmount | Notes |
| 3 | 1 | 2 | 4 | 1/20/11 | 522.75 | The withdrawal was actually processed by 662-286. Everything else is the same. |
|
AFTER/FOR DELETE Triggers |
When a record has been removed from a table, you can apply a DML trigger in response. To make it possible, you can use the following formula:
CREATE TRIGGER TriggerName
ON TableName
AFTER/FOR DELETE
AS
    TriggerCode
This time, the formula uses the DELETE operator as in AFTER DELETE or FOR DELETE. The other things follow the same description we saw for the INSERT operator.
When a DELETE trigger has acted on a table, the database engine creates a special temporary table named deleted. This table holds a copy of the records that were deleted. Eventually, if necessary, you can access this table to find out about those records.
|
|
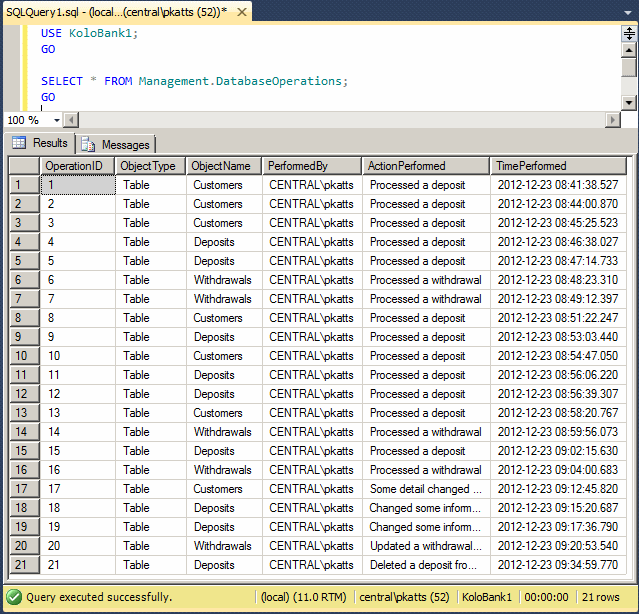
USE KoloBank4;
GO

-- ========================================================
-- Description:	These triggers add a new record to the
--		Management.DatabaseOperations when an existing record
--		of a table has been deleted.
-- ========================================================
CREATE TRIGGER DepositDeleted
ON Transactions.Deposits
AFTER DELETE
AS
BEGIN
    INSERT INTO Management.DatabaseOperations
    VALUES(default, N'Deposits', SUSER_SNAME(),
	   N'Deleted a deposit from a bank account.', GETDATE())
END
GO
CREATE TRIGGER WithdrawalDeleted
ON Transactions.Withdrawals
AFTER DELETE
AS
BEGIN
    INSERT INTO Management.DatabaseOperations
    VALUES(default, N'Withdrawals', SUSER_SNAME(),
	   N'Deleted a withdrawal from a bank account.', GETDATE())
END
GO
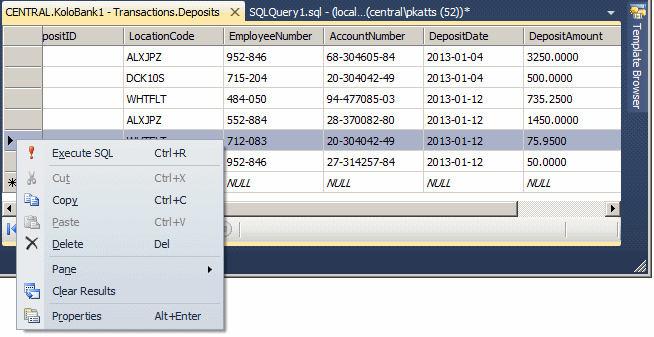
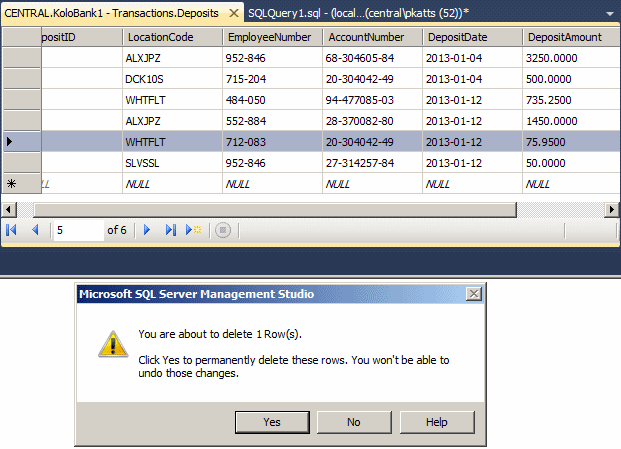

REVOKE SELECT, INSERT
ON OBJECT::Transactions.Deposits
TO Orly;
GO
REVOKE SELECT, INSERT
ON OBJECT::Transactions.Withdrawals
TO Orly;
GO
REVOKE SELECT, INSERT
ON OBJECT::Transactions.CheckCashing
TO Orly;
GO

DENY SELECT
ON OBJECT::Transactions.Deposits
TO Orly;
GO
DENY SELECT
ON OBJECT::Transactions.Withdrawals
TO Orly;
GO
DENY SELECT
ON OBJECT::Transactions.CheckCashing
TO Orly;
GO
|
Trigger Management |
|
Introduction |
A trigger is a database object. As such, it has a name. It can be modified. It can also be deleted.
If the behavior of a trigger is not appropriate, you can change it. The formula to modify a trigger is:
ALTER TRIGGER schema_name.trigger_name
ON  schema_name.table_name
AFTER , UPDATE>
AS
    statement
To get skeleton code generated for you, open a Query window. In the Templates Explorer, expand the Triggers node, drag the Alter option and drop it in the Query window:
--======================================
--  Alter T-SQL Trigger Template
--======================================
USE <database_name, sysname, AdventureWorks>
GO

ALTER TRIGGER <schema_name, sysname, Sales>.<trigger_name, sysname, uStore>
ON  <schema_name, sysname, Sales>.<table_name, sysname, Store>
AFTER <data_modification_statements, , UPDATE>
AS <T-SQL_statement,
   ,
   UPDATE Sales.Store
   SET ModifiedDate = GETDATE()
   FROM inserted WHERE inserted.CustomerID = Sales.Store.CustomerID>
GO
If you do not need a trigger anymore, you can remove it. The formula to do this is:
DROP TRIGGER TriggerName
After the DROP TRIGGER expression, enter the name (of the trigger).
|
Characteristics of DML Triggers |
|
Introduction |
Although we created only one trigger for a table so far, you can go farther than that:
DML triggers present many other characteristics.
|
DML Triggers and Constraints |
You know that, to assist a user with data entry, you can specify that a column would allow or not allow null values. If a column is marked as NOT NULL, during data entry, if the user does not or cannot provide a value for that column, the record cannot be created. If you create a DML trigger that must act against that table, if the nullity rule is violated, the trigger will not run.
You know that you can create a check constraint on a table to make sure that every new record, or a record that is being edited, follows a certain rule. You know that if the record does not abide by that rule, the record will not be created or changed. If a DML trigger is supposed to act on the table and if this rule is not respected, the trigger would fail.
One of the limitations of a check constraint is that it applies only to the table that owns it. A DML trigger can be created to perform a check constraint on more than one table. This provides its advantage over the normal check constraint.
You probably know already about data relationships and referential integrity. This makes sure that, when a record is edited in a parent table, the change is also made on the child table. This also means that the integrity is applied to more than one table. When a DML trigger runs, if a referential rule is violated, the trigger, which also checks the referential integrity, fails.
|
Instead of DML Triggers |
|
Introduction |
Consider the following tables in a database:
CREATE DATABASE SmallBusiness;
GO

USE SmallBusiness;
GO

CREATE TABLE Customers
(
    CustomerID int identity(1, 1) primary key not null,
    AccountNumber nchar(10),
    FullName nvarchar(50)
);
GO

CREATE TABLE Management.DatabaseOperations (
    EmployeeName nvarchar(50),
    ActionPerformed nvarchar(50),
    TimePerformed time
);
GO
From what we have seen so far, when a user opens a table or a view to perform data entry, when a new record has been created, the table or view fires an event. We saw that, using a DML trigger, you can make a notification. For example, you can fill out a log to keep track of the changes. By default, when a record is submitted, it gets saved. In some cases, when a user has opened a table and tried to make a change, such as adding a new record, editing an existing record, or deleting a record, instead of accepting the change, you can dismiss it. You can then use a DML trigger to make a note. This is the basis of another category of DML triggers: an "instead of" trigger.
|
Creating an INSTEAD OF Trigger |
While an AFTER/FOR trigger acts on a table after the action has occurred, you may want to do something before the event fires. For example, you may want to prevent the user from adding a new record on a table, or from changing an existing record, or from deleting a record. Of course, it is better to take care of this before the action is performed. One way you can do this is by creating an "instead of" trigger.
While an AFTER trigger can be applied to a table only, an "instead of" trigger can be associated with either a table or a view. Therefore, to create an "instead of" trigger, use the following formula:
CREATE TRIGGER TriggerName
ON TableOrViewName
INSTEAD OF INSERT/UPDATE/DELETE
AS
    TriggerCode
You start with the CREATE TRIGGER expression followed by a name for the trigger. After the name of the trigger, type ON followed by the name of either a table or a view on which the trigger will act.
From our review of the AFTER trigger, the new expression here is INSTEAD OF. This expression is followed by the type of operation to perform:
To start the triggering code, type AS and write the desired code.
If you use the INSTEAD OF expression, the trigger starts when the table or view is opened but before a change has taken place. The difference with the AFTER trigger is that, this time, you can perform some action(s) before the change is made on the table or view. This also implies that, if the code of the trigger is to create a new record, at this time, the record doest not yet exist, which means you cannot catch that record. At this time also, you can prevent the record from being created (since it has not yet been created anyway). For example, the following code will not accept that a new record be added to the table:
USE SmallBusiness;
GO

CREATE TRIGGER CreateCustomer
ON Customers
INSTEAD OF INSERT
AS
    BEGIN
        INSERT INTO Management.DatabaseOperations
        VALUES(SUSER_SNAME(),
	       N'Attempt to create new record', GETDATE())
    END
GO
If you want to get a copy of the record that was affected by the event, you can access it from the inserted (for an INSERT or UPDATE trigger) or from the deleted (for a DELETE) trigger. Here is an example:
USE SmallBusiness;
GO

DROP TRIGGER CreateCustomer;
GO

CREATE TRIGGER CreateCustomer
ON Customers
INSTEAD OF INSERT
AS
BEGIN
    INSERT INTO Customers
    SELECT AccountNumber, FullName FROM inserted
END
GO
|
|
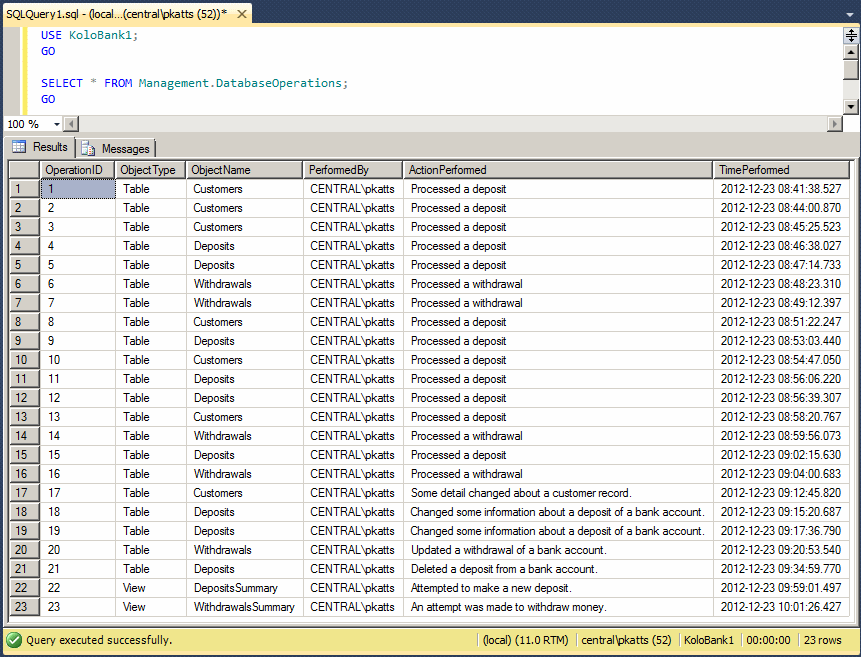
USE KoloBank4;
GO

-- ========================================================
-- This trigger acts on a view to update the
-- Management.DatabaseOperations to let it know that an
-- attempt was made to create a new room
-- ========================================================
CREATE TRIGGER Transactions.AttemptedDeposit
ON Transactions.DepositsSummary
INSTEAD OF INSERT
AS
BEGIN
    INSERT INTO Management.DatabaseOperations
    VALUES(N'View', N'DepositsSummary', SUSER_SNAME(),
	   N'Attempted to make a new deposit.', GETDATE())
END
GO

-- ========================================================
-- This trigger acts on a view to update the
-- Management.DatabaseOperations to let it know that an
-- attempt was made to create a new room
-- ========================================================
CREATE TRIGGER Transactions.AttemptedWithdrawal
ON Transactions.WithdrawalsSummary
INSTEAD OF INSERT
AS
BEGIN
    INSERT INTO Management.DatabaseOperations
    VALUES(N'View', N'WithdrawalsSummary', SUSER_SNAME(),
	   N'An attempt was made to withdraw money.', GETDATE())
END
GO

| LocationID | EmployeeID | CustomerID | DepositDate | DepositAmount |
| 2 | 5 | 2 | 01/22/11 | 137.85 |
| LocationID | EmployeeID | CustomerID | WithdrawalDate | WithdrawalAmount |
| 2 | 4 | 4 | 01/24/11 | 744.25 |
|
Characteristics of INSTEAD OF Triggers |
An AFTER/FOR and an INSTEAD OF triggers have many differences. For example:
|
Introduction |
You probably know that the creation of a database uses a Data Definition Language (DDL) command. You may also know another example of a DDL command that involves creating a table. Each one of these creation operations fires an event.
A DDL trigger is a trigger that acts when a certain type of DDL event fires. These include the creation, modification, or removal of an object, not its records. This is the primary difference with a DML trigger that fires when a record is added or acted upon.
A DDL trigger gives you the opportunity to do some administrative work in response to the event. For example, you can get a notification, or notify someone else using an automatically generated email, that an object (and what object) has been created. Or you can use a DDL trigger to discard the operation.
|
Creating a DDL Trigger |
You create a DDL trigger using code. The basic formula is:
CREATE TRIGGER TriggerName
ON DATABASE/ALL SERVER
FOR/AFTER WhatEvent
AS
    TriggerCode
You start a DDL trigger with the CREATE TRIGGER expression followed by a name for the new trigger. The name follows the same rules we have applied to objects so far. After the name of the trigger, type the ON keyword:
After specifying the object (the whole server or only the current database) on which the trigger will act, type either FOR or AFTER. This is followed by the event against which the trigger will act. As mentioned already, the events are DDL commands. To specify the event, use the formula of the command with the words separated by an underscore. For example, if you want the trigger to act when a CREATE TABLE command is executed, specify the event as CREATE_TABLE.
After specifying the event that will fire, type AS followed by the normal code of the trigger.
Here is an example that makes a note and adds it (the note) to a table when a new table has been created:
USE SmallBusiness;
GO

CREATE TRIGGER LogNewTableCreation
ON DATABASE
FOR CREATE_TABLE
AS
BEGIN
    INSERT INTO Management.DatabaseOperations
    VALUES(SUSER_SNAME(),
	   N'A new table was created', GETDATE())
END
GO
Whenever a new table is created in the current database, the trigger runs, gets the name of the user who created the table, the date and time the table was created, and a small message. These pieces of information are then stored in a log table.
As mentioned for DML triggers, you manage DDL triggers by modifying or deleting them. These are done using the same description we saw for DML triggers.
|
|
||
| Previous | Copyright © 2009-2012 Fianga.com | Next |
|
|
||