|
Microsoft Visual Basic is a development environment used to create programs or applications for the Microsoft Windows
family of operating
systems. To do this, it uses a computer language that was originally
called Basic but has been transformed in an advanced language also called
Visual Basic. This language makes it particularly easy to create effective
applications because it offers a working tool
as a studio equipped with necessary materials to keep you moving.
Microsoft Visual Basic ships in three packages and sometimes various formats. The way you launch it depends on how it was installed.
We will first analyze the studio and review some of its equipments, and then we will start creating small applications.
Starting Microsoft Visual Basic depends on how it was set up on your
machine. If it
were installed as a stand alone product, it would be available under the Programs menu; otherwise, it might be under the Microsoft Visual Studio group of applications. However it was installed, now is the time to launch it.
|
|
Integrated Development Environment (IDE)
|
|
- To launch Visual Basic, on the Taskbar, click Start -> (All) Programs -> Microsoft Visual
Studio 6.0 -> Microsoft Visual Basic 6.0
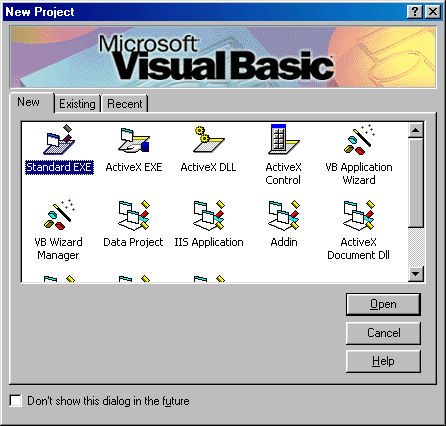
- When Microsoft Visual Basic starts, the New Project dialog box comes
up:

At this time, we will not go through what all these icons mean. Just make sure that the Standard EXE icon is selected and click
Open
- A typical studio such as the one used by Visual Basic is referred to as an Integrated Development Environment (IDE).
As a classic application, Microsoft Visual Basic displays a title bar on top. The title bar is mainly made of three sections.
On the most left side, there is the application icon. This icon has a menu of its own. To see the menu, click the small icon and click
Maximize (or Restore)
- On the right side of the application icon, the name of the file allows to identify what you are working on. Microsoft Visual Basic names each one of its
applications a project.
A Project is a collection of files used to build a particular application. When Visual Basic starts, it calls the first application Project1. When you save a project, you give it an appropriate name, and the name on the title bar gets updated.
On the right side of the Project1, the name helps to know what environment you are using to build your application.
The Microsoft Visual Basic name is followed by the empty area of the title. This area can be used as a menu to maximize or restore a window.
To experiment with it, double-click the empty section of the title bar. Notice that the window has been maximized
(or restored) again
- The last three buttons on the title bar are used to perform windows operations. Every one of the buttons has a name. To find out a button's name, position your mouse on top of it and a name will appear.
To experiment with the buttons, click the Minimize button 
- To bring back Microsoft Visual Basic, on the Task bar, click Project1.
- Under the title bar, you have a menu made of words such as File, Edit, View, etc. These allow you to perform almost any kind of operation. To use a menu, you click one of the words. A menu drops down and you make another selection from it.
We need to review how a menu functions because as a programmer, you will have to create a menu
or menus sooner or later.
There are typically four kinds of menus here.
 A disabled menu is a menu that is temporarily unavailable. This could be due to anything. For example, it might wait for another action to happen. Sometimes, there might be something running on the background and this would disable a function of your program or the application. A disabled menu is a menu that is temporarily unavailable. This could be due to anything. For example, it might wait for another action to happen. Sometimes, there might be something running on the background and this would disable a function of your program or the application.
To view an example of such menus, on the main menu, click Edit and observe a lot of disabled menus.
To see another, position the mouse on Diagram and notice that the whole Diagram menu is disabled.
 An enabled menu standing by itself will usually perform a brief action, sometimes leaving the impression that nothing happened. This kind of menu can be used to quickly save a file, display a toolbar, etc. An enabled menu standing by itself will usually perform a brief action, sometimes leaving the impression that nothing happened. This kind of menu can be used to quickly save a file, display a toolbar, etc.
To see an example, on the main menu, click Edit -> Copy. It looks like nothing happened. The form (or if anything else was selected) has been copied to the clipboard, which is a temporary storage area of your computer.- To see another kind, on the main menu, click View ->
Locals Window. Notice that there is a new section on the screen now.
 A menu with three periods (…) is typically used to launch or open a
dialog box.
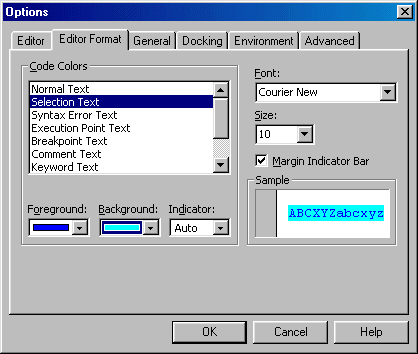
To experiment with it, on the main menu, click Tools -> Options… Notice that the Options dialog displays.- The Options dialog is made of various property sheets. Click the Editor Format property sheet.
From the Code Colors list box, click Normal Text. Click the Foreground combo box and select
a green color.
From the Code Colors list, click Selection Text. Click the Foreground combo box and select blue.
Click the background combo box and select the lime color

- Click Comment Text. Click the Foreground combo box and select dark gray.
Click Keyword Text. From the Foreground combo box, select blue.
Click Identifier Text. From the Foreground combo box, select pink.
- Click OK. At this time, we cannot yet experiment with the new settings.
 A menu with an arrow indicates that it has a sub-menu, which is a child menu. A menu with an arrow indicates that it has a sub-menu, which is a child menu.
To see an example, on the main menu, click View -> Toolbars. Notice the items under the Toolbars menu.- To see another menu like that, position the mouse on Format -> Center In Form.
- Whenever a menu is opened but you don't want to use it, you can dismiss it with the Esc key.
To dismiss the current menu, press Esc. Press Esc again.
- Some menu items present a key or a combination of keys on their line: this is
called a shortcut. A shortcut is a key or a combination of keys that allows you or the
user to perform an action quicker than using the menu.
Some shortcuts can be seen on the menu of Visual Basic. Some other shortcuts are part of Microsoft Windows operating systems.
To see a list of some of the shortcuts, on the main menu, click Edit. Observe the list of shortcuts and the actions they are associated with.
- Press Esc to dismiss the menu.
- To use a one-key shortcut, just press the corresponding key. For example, press F5. Notice that the form changes its looks. Actually the form went from its design state to its running state.
- To close the running form, click its close button
 . .
- To use a combination of keys, press the first key (or one of the keys), and then press the other or others. Finally release the keys.
To experiment with other shortcuts, press and hold Ctrl, then press F5. Notice that the form runs again as an application.
- To close the running form, since it is treated as a complete
application, press Alt + F4.
 |
|
|
Some other shortcuts are part of the operating system. For example, Ctrl + Esc would open the Start menu; Alt + F4 is used to close applications. |
- Under the menu, there is a toolbar. This first toolbar is called the Standard toolbar.
The Standard toolbar allows you to perform many of the most common actions that would require the main menu, except
that the toolbar is handier and closer to the user, which makes it faster.
A toolbar is made of buttons that you click to perform the corresponding action.
At first, nothing is obvious with these buttons. Therefore, to find out what a particular button is used for, position your mouse on top of it and keep it there for 2 seconds. A word and group of word will appear: this is the tool tip, allowing you to identify the button. The buttons are usually named after their tool tip.
To get acquainted with some of the buttons, position your mouse on the first button for
1 or 2 seconds and observe the tool tip.

- Move the mouse to another button and read the tool tip.
- To experiment with one of the button, on the Standard toolbar, click the Start
button
 . Notice that the form runs in its execution state. . Notice that the form runs in its execution state.
- To stop the running form, on the Standard toolbar, click the End
button
 . .
- Some of the buttons on the toolbar have an arrow on them. This indicates that the button, behaving like a menu or a combo box, can display more items when you click its arrow.
To see an example, click the arrow of the Add Form button. Notice other items available.
- Without clicking, move the mouse to the arrow of the first button on the toolbar, the Add Standard EXE Project button.
- To dismiss the menu, click the arrow of the same menu.
- The main area of the studio is made of a rectangular box called a form and
is typically identified as Form1; if you create additional forms, by
default, they would be identified as Form2, Form3, or FormX.
-
The Toolbox provides the necessary tools to create your applications.
 |
The Toolbox comes with a lot of controls to start working. It can also be enhanced with more objects that we will review as we move on.
Like the items on the Standard toolbar, the controls on the Toolbox are not always obvious. To find out what kind of control is
displayed, position your mouse on a control and observe the tool tip. Review different items until you find the one you want.
To use a control from the Toolbox, click it and draw it on your form. When no object is being used, the Pointer is selected. Once you select one of the controls, the pointer loses focus and you can use the selected control.
We will learn how to use the controls in another lesson.
Notice that the right section of the Standard toolbar displays
the dimensions of the form.

|
- The Properties Window displays a list of the properties associated with each control
or form that are part of your project.
A property is anything that characterizes an object. When you look at a control, you see that it has a size, a color, a caption (something written on some
controls; for example, on top of the form, the caption is Form1), etc.
Different controls have different sets of properties.
To experiment with controls properties, on the Properties Window, click the (Name) field and type frmTimeSheet
Notice that even though you clicked (Name), the name has been changed.
- Click the Caption field and type: Time Sheet
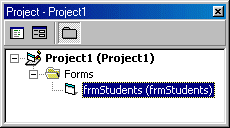
- The Project Explorer window gives a list of the forms and modules
that are part of the current project.
 |
To experiment with the Project
Explorer window, click the Toggle Folders button  . Notice that
the folders are collapsed. . Notice that
the folders are collapsed.
To expand the folders, click the Toggle Folders button again.
|
- Still on the Project Explorer window, click View Code. You are
presented with the Code Editor window.
- To send the Code Editor window to the background again, on the
Project Explorer window, click the View Object button
 . .
-
The Form Layout window allows you to position your form or forms with regard to the rest of the screen. It uses a graphical interface to guide you.
To experiment with it, click the small image inside the small screen and drag to the upper left corner inside the small screen. Notice that the small image can move. |
 |
- Drag the small rectangle in the Form Layout screen again and
position it to the middlw of the small screen.
- To verify the result, press F5 to run the form. Notice that the running form displays in the
center of the screen.
- To close the running form, click its close button.
|
|
|

