 |
Introduction to Button-Based Windows Controls |
|
The Button
Introduction
A button is an object or control the user clicks to produce an action. To support buttons, Microsoft Access VBA provides a class named Button.
 Practical Learning: Introducing Windows Controls
- Start Microsoft Access
- In the list of files, click FunDS1 from the previous lesson
- In the Navigation Pane, right-click the Department Store form and click
Design View
Creating a Button
To visually create a button, after displaying the form or report in the Design View, in the Controls section of the Ribbon, click the Button  and click the form or report. To assist with the action that a button should perform, Microsoft Access provides a wizard that leads to a long list of action. You
are encouraged to use that wizard. Of course, you can also take care of the actions yoursellf.
 Practical Learning: Introducing Buttons
- In the Controls section of the Ribbon, click the Button

- Click the form.
If a wizard starts, click Cancel
- While the button is still selected on the form, in the Property Sheet, click the Other tab and click Name
- Type cmdStoreItems and press Enter
- Save the Department Store form
Characteristics of a Button
The Caption of a Button
The primary visual aspect of a button is its caption. To support it, the Button class is equipped with a property named Caption. To visually set the caption of a button, access its Property Sheet. In the Format or the All property page, click Caption and type a string of your choice. To programmatically specify the caption of a button, access its Caption property and assign a string of your choice. Here is an example:
Private Sub cmdToday_Click()
    cmdToday.Caption = "Submit Time Sheet"
End Sub
 Practical Learning: Setting the Caption of a Button
- While the button is still selected on the form, in the Property Sheet, click the Format tab and click Caption
- Press the Space bar twice and type Store Items...
- On the Ribbon, click Home
- In the Text Formatting section of the Ribbon, click the arrow of the Font combo box and select Bodoni MT Black
(if you don't have that font, select Garamond or Times New Roman)
- Still in the Font section of the Ribbon, click the arrow of the Font Size button and select 20
- Save the form
The Size of a Button
The size of a button is primarily managed as done for the
other controls. Furthermore, you can resize a button to fit its caption, you can
proceed as done for a label: Select it and double-click one of its borders.
 Practical Learning: Resizing a Button
- While the button is still selected on the form, double-click one of its
borders
- Save the form
A Picture on a Button
To make your button appealing, you can make it display a small picture. To assist you with this the Button class is equipped with
a property named Picture
To visually specify the picture of a button, access its Property Sheet. In the Format or the All property page, click Picture and click its
ellipsis button  . To assist with pictures, Microsoft Access ships with many pre-designed icons.
If you click the Picture field, the Picture Builder dialog box will present a list in the Available Pictures section:

If you click an item in the Available Pictures
list, its preview would display on the left side. If none of the pictures suits you, click Browse and select a picture. After selecting the picture, click OK.
You can display only the caption, only the picture, or both the picture and the caption on a button. If you decide to use both, to let you
control the position of the picture with regards to the caption, the button has a property named Picture Caption Alignment in its Property Sheet.
 Practical Learning: Displaying a Picture on a Button
- While the button is still selected on the form, in the Property Sheet, click the Format tab, click Picture, and click its ellipsis button

- In the Available Pictures of the Picture Builder dialog box, scroll down and click MS Access Table:

- Click OK
- In the Property Sheet, in the Format tab, change the Picture Caption
Alignment field to Right
- Right-click the button on the form and click Copy
- Right-click an unoccupied area of the form and click Paste
- While the newly pasted button is still selected on the form, in the Property Sheet, click the All tab and
set the Name to
Name: cmdShoppingSessions
- Click
Caption and replace Store Items with Shopping Sessions
- Right-click one of the buttons on the form and click Copy
- Right-click an unoccupied area of the form and click Paste
- In the Property Sheet, change the Name to cmdEmployees
- Replace (only) the text of the Caption with Employees
- In the Controls section of the Ribbon, click the Button

- Click the form.
If a wizard starts, click Cancel
- While the button is still selected on the form, in the Property Sheet, click the All tab and change the following characteristics:
Name: cmdNewStoreItem
Caption: New Store Item...
Font Name: Bodoni MT Black (if you don't have that font, select Garamond or Times New Roman)
Font Size: 20
- Save the form
Colors on a Button
Like all Windows controls in Microsoft Access, a button can be painted with a color specified in the Back Color field of its Property Sheet.
The caption can also display with a font and a color of your choice. One way you can enhance the appearance of a button is to paint with different color based on how
the user is currently using the control. To support this, the button is equipped with the following properties in the Format or the All tab of its Property Sheet:
- Back Color: This is the color that paints the button when the control is not used. If there is no other change on the button, this will be the color
for everything
- Fore Color: This is the color that paints the caption when the control is not used. If there is no other change on the button, this will be the font
color at all times
- Hover Color: This is the color that paints the button when the mouse is positioned on the control
- Hover Fore Color: This is the color that paints the caption when the mouse is positioned on the control
- Pressed Color: This is the color that paints the button when the user presses and while holding the mouse on the control, that is, before the mouse is released
- Pressed Fore Color: This is the color that paints the caption when the user presses and is holding the mouse on the control, that is, before the mouse is released
 Practical Learning: Using Colors on a Button
- While the new button is still selected on the form, in the Property Sheet, click the Format tab and change the following characteristics:
Hover Color: Accent 1, Lighter 80%
Pressed Color:
#1F497D
Hover Color: Accent 5, Darker 50%
Pressed Fore Color: Background 1 (white)
- On the form, right-click the New Store Item button and click Copy
- Right-click an unoccupied area of the form and click Paste
- Right-click an unoccupied area of the form and click Paste
- Right-click an unoccupied area of the form and click Paste
- On the form, right-click the Tables label and click Copy
- Right-click an unoccupied area of the form and click Paste
- Click the newly pasted label to put into edit mode
- Replace its text with Forms and press Enter
- Complete the design of the form as follows:
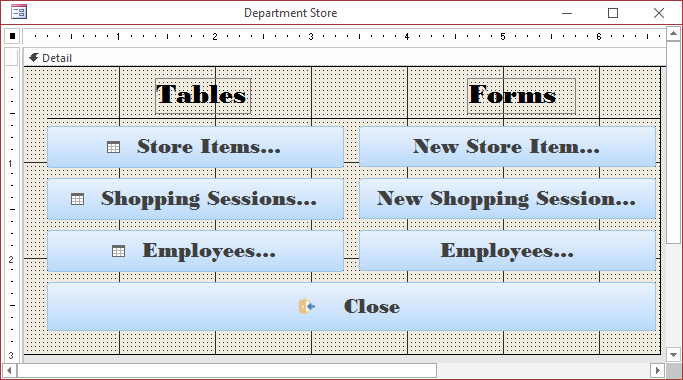
| Control |
Name |
Caption |
| Label |
 |
|
Tables |
| Label |
 |
|
Forms |
| Line |
 |
|
|
| Button |
 |
cmdStoreItems |
Store Items... |
| Button |
 |
cmdNewStoreItem |
New Store Item... |
| Button |
 |
cmdShoppingSessions |
Shopping Sessions... |
| Button |
 |
cmdNewShoppingSession |
New Shopping Session... |
| Button |
 |
cmdEmployees |
Employees... |
| Button |
 |
cmdNewEmployee |
New Employee... |
| Button |
 |
cmdClose |
Close |
- Save form
- On the Ribbon, click File and click Open
- In the list of files, click Whirl Water Shine from the previous lesson
- In the Navigation Pane, right-click Bill Preparation and click Design View
- In the Controls section of the Ribbon, click the Button
 and click below the Form Footer bar on the form
- Complete the design of the form as follows:

| Control |
Caption |
Name |
| Button |
 |
Submit |
cmdSubmit |
| Button |
 |
Close |
cmdClose |
- Save the Bill Preparation form
Introduction to the Web Browser
Overview
A web browser is a control that shows a file. The file can be a regular
picture or a web document that is identified as a Uniform Resource Locator (URL). A web browser
is very flexible with the type of document it can show. Still, you must follow some rules to
prepare the document.
The primary type of document intended for a browser is a webpage. You
probably already know how to create such a document. A browser can also be asked to
display a picture. The web browser of Microsoft Windows supports various
or all types of pictures, including those with the extensions .bmp, .jpg, .jpeg, .gif, .png, etc.
 Practical Learning: Introducing Web Browsers
- On the Ribbon, click File and click New
- Click Blank Desktop Database
- Set the file name to States Statistics2
- Click Create
- On the Ribbon, click File and click Options
- In the left list of the Access Options dialog box, click Current
Database
- In the main list, click Overlapping Windows
- Click OK on the dialog box
- Click OK on the message box
- On the Ribbon, click File and click Close
- In the list of files, click StatesStatistics2
- On the Ribbon, click Create and click Table Design
- In the first field of the table, type StateName and press Tab
- In the Tools section of the Design tab of the Ribbon, click the Primary Key button

- Change the
fields as follows:
| Field Name |
Data Type |
Field Size |
Format |
Decimal Places |
Caption |
| StateName |
|
40 |
|
|
State Name |
| Abbreviation |
|
5 |
|
|
Abbrv |
| AreaSqrMiles |
Number |
|
Standard |
0 |
Area in Sqr Miles |
| AreaSqrKms |
Number |
|
Standard |
0 |
Area in Sqr Kms |
| AdmissionUnionDate |
|
|
|
|
Admission to Union |
| AdmissionUnionOrder |
|
Byte |
|
|
Admission Order |
| Capital |
|
40 |
|
|
|
| Region |
|
25 |
|
|
|
| StateWebsite |
Hyperlink |
|
|
|
State's Website |
| Wikipedia |
Hyperlink |
|
|
|
|
- Close the table
- When asked whether you want to save, click Yes
- Set the table name to States and click OK (the resources that
accompany these lessons include a spreadsheet named States Statistics; you
can open it and use it to create records for the States table)
- In the Navigation Pane, double-click the States table
- If necessary, on the Ribbon, click Home.
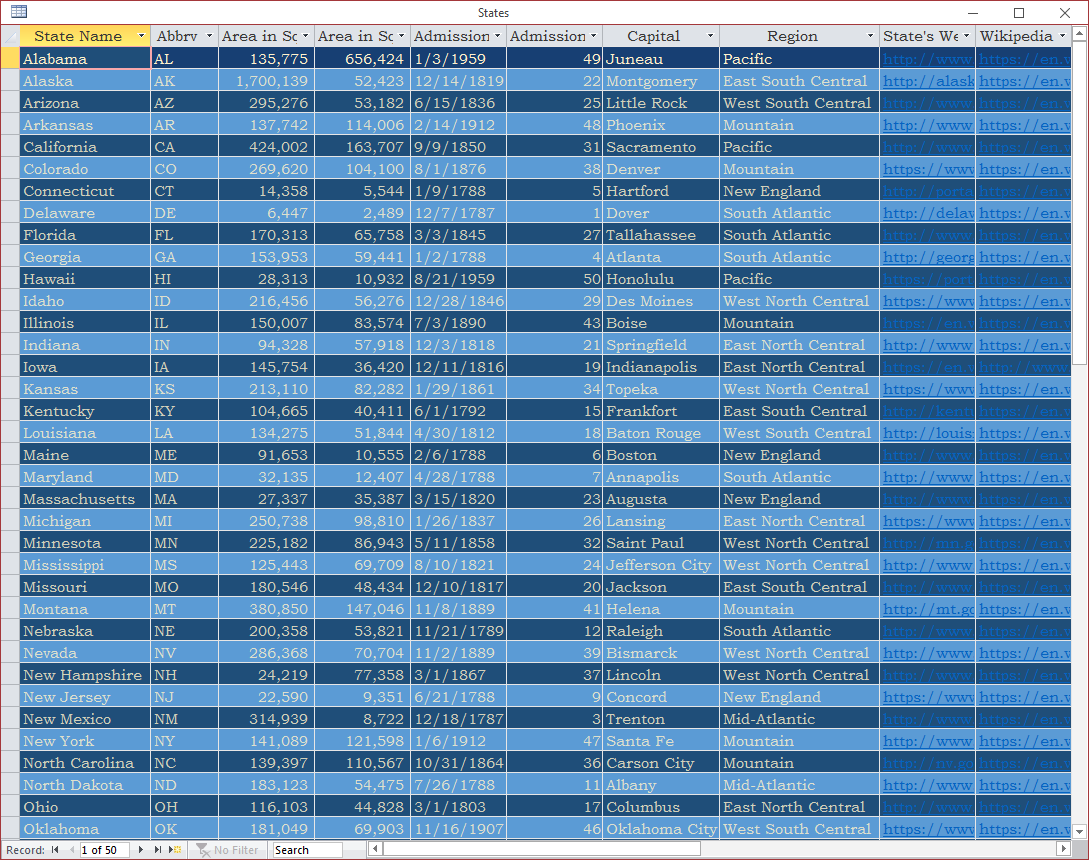
In the Home tab of the Ribbon, change the following characteristics:
Change the following characteristics:
Font Name: Bookman Old Style (if
you don't have that font, select Times New Roman)
Font Color: Gold,
Accent 4, Lighter 80% (Theme Colors: 8th column, 2nd row)
Background
Color: Blue, Accent 1, Darker 50% (Theme Colors: 5th column, 6th row)
Alternate Row Color: Blue, Accent 1 (Theme Colors: 5th column, 1st row)
- Close the States table
- On the Ribbon, click Create and click Form Design
- In the Property Sheet, set the Record Source to States
- Right-click the body of the form and click Form Header/Footer
- Drag the Form Footer down completely until it can't go any lower (it
may go down to the 22 measure maximum)
- Save the form as States
- In the Tools section of the Design tab of the Ribbon, click Add Existing
Fields
- In the Field List, double-click StateName, Abbreviation, AreaSqrMiles, AreaSqrKms, AdmissionUnionDate, AdmissionUnionOrder, Capital,
and Region
- Double-click any control or section on the form to display the Property
Sheet
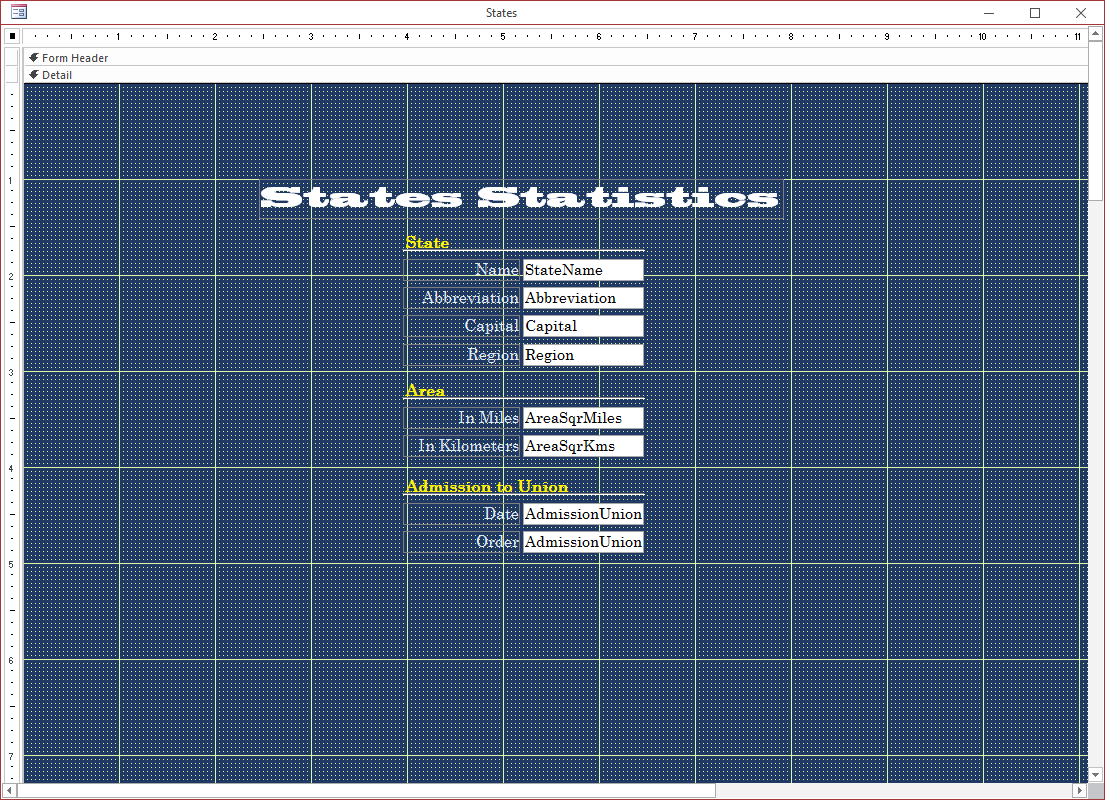
- Complete the design of the form as follows:
- Save the form
Creating a Browser
A web browser can be added to a form and not to a report. To get it, after displaying
the form in Design View, in the Controls section of the Design tab of the Ribbon, click
the Web Browser Control  and click the form.
 Practical
Learning: Introducing the Web Browser
- In the Controls section of the Ribbon, click the Web Browser Control

- Click below the other controls on the form.
If a wizard starts, click Cancel
- In the Controls section of the Ribbon, click the Web Browser Control
 and click below the previously added browser on the form.
If a wizard starts, click Cancel
Characteristics of a Web Browser
The Control Source of a Web Browser
Probably the most important detail of a web browser is the
document it displays. This is specified by the Control Source property. You
cannot create a web browser on a table. Instead, you can create a text-based
field, then use it as the record source of a browser.
When performing data
entry, enter the name of the file with extension, the complete path and name of
the file, or the URL of the web page that the browser would display.
 Practical
Learning: Using a Web Browser
- On the form, click the first (or one of the previously added) web browser(s)
- In the Property Sheet, click Data.
Click Control Source and set its value to StateWebsite
- On the form, click the other web browser
- In the Data tab of the Property Sheet, set the Control Source to Wikipedia
- Save the form
- On the Ribbon, click File and click Open
- In the list of files, click Exercise3 from Lesson 22
- On the Ribbon, click Create and click Form Design
- In the Property Sheet, change the following characteristics of the form:
Record Selectors: No
Navigation Buttons: No
- Right-click the form and click Form Header/Footer
- In the Property Sheet, change the Back Color of the Detail section to
Background Form
- Save the form as Navigator
- In the Controls section of the Ribbon, click the Text Box and click the
Form Header section of the form
- In the Property Sheet, change the characteristics of the text box as follows:
Name: txtAddress
Border Color: Text 1
Horizontal Anchor: Both
- Change the caption of the accompanying label to Web/Document Address:
- In the Controls section of the Ribbon, click the Button and click the form.
If a wizard starts, click Cancel
- In the Property Sheet, change the characteristics of the button as follows:
Name: cmdShow
Caption: Show
Horizontal Anchor: Right
- In the Controls section of the Ribbon, click the Web Browser Control
 and click the
Detail section of the form.
If a wizard starts, click Cancel
- In the Property Sheet, change the following characteristics of the browser:
Name: wbNavigator
Border Color: Text 1
Horizontal Anchor: Both
Vertical Anchor: Both
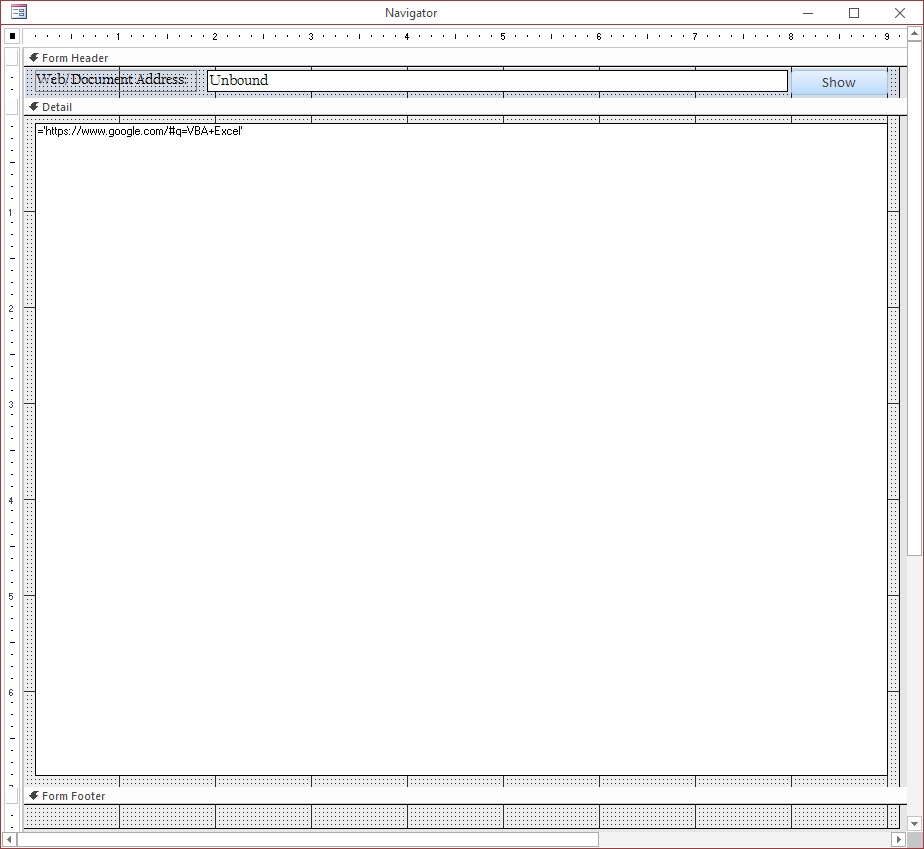
- Position the controls as follows:
- On the form, right-click the Show button and click Build Event...
- In the Choose Builder dialog box, click Code Builder and click OK
- Implement the event as follows:
Private Sub cmdShow_Click()
    Dim strAddress As String

    strAddress = txtAddress
    wbNavigator.ControlSource = "='" & strAddress & "'"
    txtAddress = strAddress
End Sub
- Return to Microsoft Access and switch the form to Form View
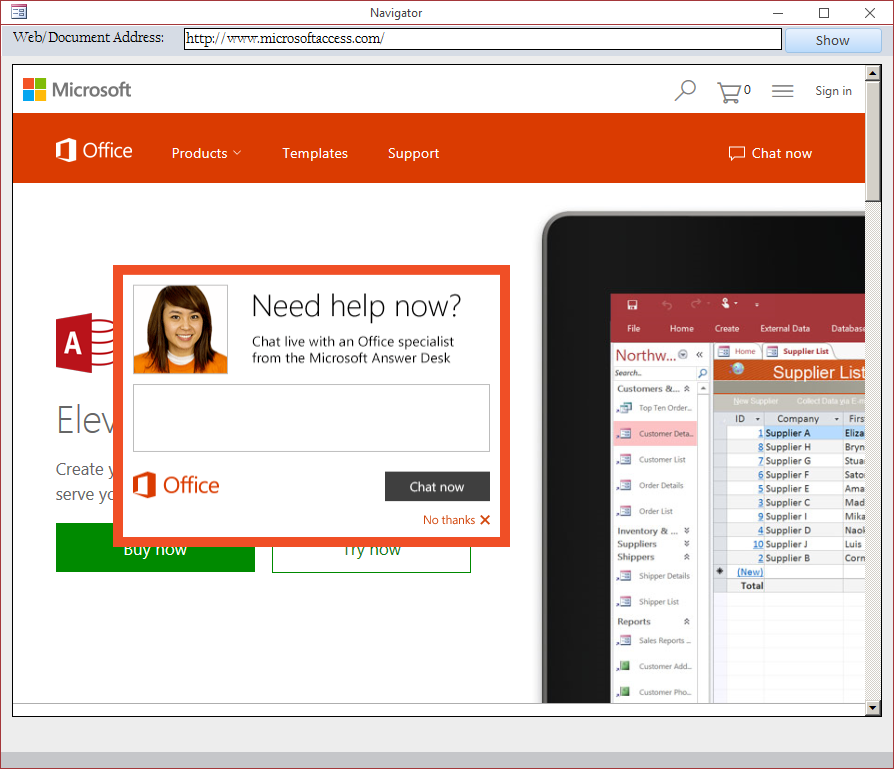
- Type an address, such as http://www.microsoftaccess.com/, in the text box and click the Show button
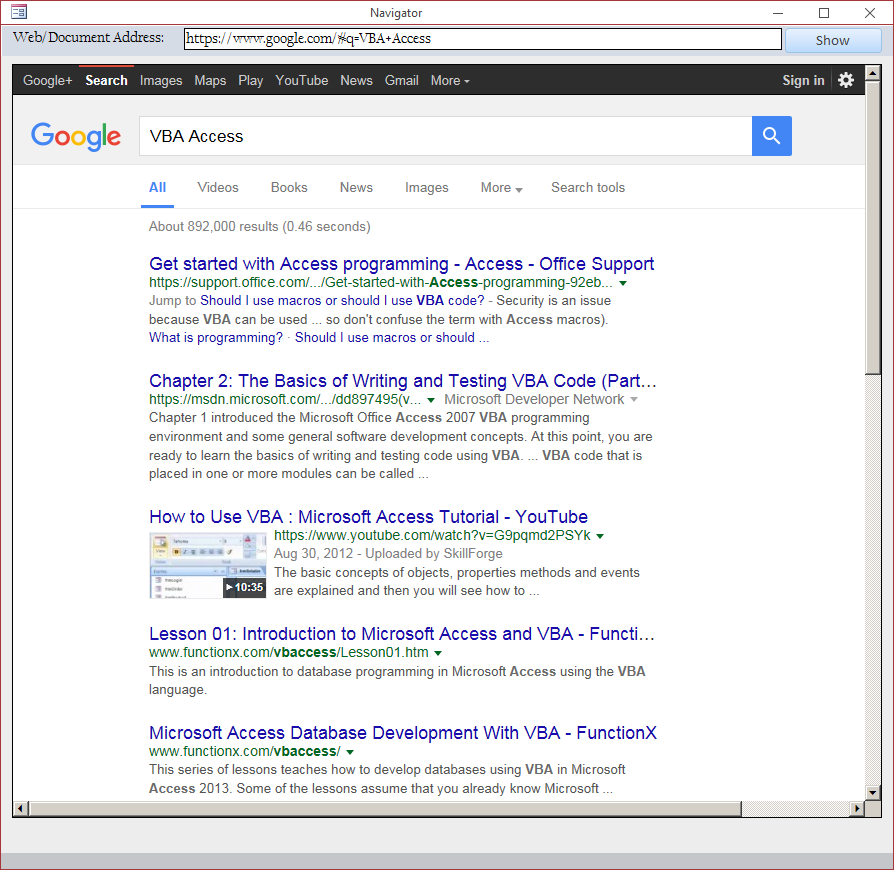
- Change the address to something else, such as https://www.google.com/#q=VBA+Access, and click Show
- Save the form
Web Browser Events
The web browser has many events appropriate for its
functionality:

We already know that you can submit the path of a file or a URL
to a browser. When a file path or a URL is given to a web browser, before it processes
it, the control fires an event named On Before Navigate2. It
appears as follows:
Private Sub wbNavigator_BeforeNavigate2(ByVal pDisp As Object, _
					URL As Variant, _
					flags As Variant, _
					TargetFrameName As Variant, _
					PostData As Variant, _
					Headers As Variant, _
					Cancel As Boolean)

End Sub
If
there is no problem in this event, the control shows the file or the web page.
When the control has finished displaying the document, the web browser fires the On Document Complete event. If there is a change on the
document, the control fires an On Progress Change event.
When a web browser has received a file path or a URL, it
makes an attempt to show that file or the web page. If it encounters a problem,
it fires an On Navigation Error event.
At any time, and if you allow it, the user can change the
document the control is displaying. When a new document must be displayed, the
control fires an On Updated event.
Page Breaks
Introduction
If you create a form or report that has many or large objects, you can divide the form
or report in sections called pages
(this has nothing to do with the Page Header or the Page Footer sections of a
form or report) . Then, you can ask Microsoft Access to display only
the desired section when necessary. To make this possible, Microsoft Access
provides a special control named Page Break.
As done for all controls, before creating a page break, you
must display the form or report in the Design View. To get a page break, in the
Controls section of the Ribbon, click the Insert Page Break control
 and click the desired section of the form or report. Normally, you should add it
to the Detail section. You can add as many page breaks as you need.
 Practical
Learning: Introducing Page Breaks
- On the Ribbon, click File and click Open
- In the list of files, click StatesStatistics2 used earlier
- In the Navigation Pane, right-click the States form and click Design
View
- In the Controls
section of the Ribbon, click the Insert Page Break control

- On the form, click just below the top web browser and position it as
follows:

- Scroll down on the form.
In the Controls
section of the Ribbon, click the Insert Page Break control

- On the form, click between both web browsers and position it as follows:

- Save the form
Implementing Page Breaks
You can provide buttons
that the user will click to access an area delimited by the page break.
To support page breaks, the Form class is
equipped with a method named GoToPage. In the same way, the static DoCmd is equipped with the same method. Its syntax is:
Form|DoCmd.GoToPage(ByVal PageNumber As Lond, _
		    Optional ByVal Right As Long = 0, _
		    Optional ByVal Down As Long = 0)
This method takes as argument the section to access. The
first section, or the section above the first page breake has an index of 1, the
second page break has an index of 2, and so on.
 Practical Learning:
Using Page Breaks
- In the Controls section of the Ribbon, click the Button
 and click below the Form Footer bar of the form.
If a wizard starts, click Cancel
- Right-click the newly added button and click Copy
- Right-click an empty area of the Form Footer section and click Paste
- In the Property Sheet, change the characteristics of the new button as follows:
Name: cmdStatesSummary
Caption: Statistics Summary
- Right-click an empty area of the Form Footer section and click Paste
- In the Property Sheet, change the characteristics of the new button as follows:
Name: cmdCharacteristics
Caption: Characteristics
- Right-click an empty area of the Form Footer section and click Paste
- In the Property Sheet, change the characteristics of the new button as follows:
Name: cmdStateWebsite
Caption: State's Website
- Right-click an empty area of the Form Footer section and click Paste
- In the Property Sheet, change the characteristics of the new button as follows:
Name: cmdWikipedia
Caption: Wikipedia
- Right-click an empty area of the Form Footer section and click Paste
- In the Property Sheet, change the characteristics of the new button as follows:
Name: cmdClose
Caption: Close
- Right-click the Statistics Summary and click Build Event...
- In the Choose Builder dialog box, click Code Builder and click OK
- Implement the event as follows:
Private Sub cmdCharacteristics_Click()
    DoCmd.GoToPage 1
End Sub
- In the Object combo box, select mdStateWebsite and implement the event
as follows:
Private Sub cmdStateWebsite_Click()
    GoToPage 2
End Sub
- In the Object combo box, select cmdWikipedia and implement the event
as follows:
Private Sub cmdWikipedia_Click()
    GoToPage 3
End Sub
- In the Object combo box, select cmdStatesSummary and implement the event
as follows:
Private Sub cmdStatesSummary_Click()
    DoCmd.OpenTable "States"
End Sub
- In the Object combo box, select cmdClose and implement the event
as follows:
Private Sub cmdClose_Click()
    DoCmd.Close
End Sub
- Return to Microsoft Access and close the form
- When asked whether you want to save, click Yes
- In the Navigation Pane, double-click the States form
- Click the different buttons
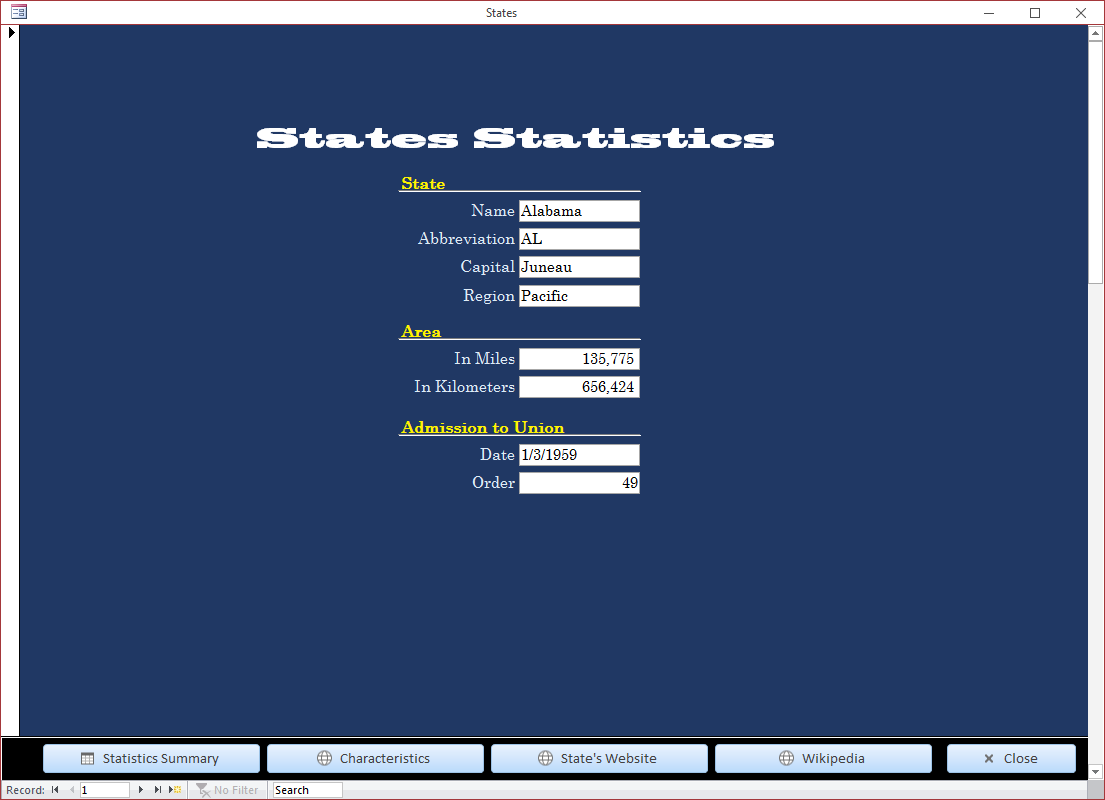
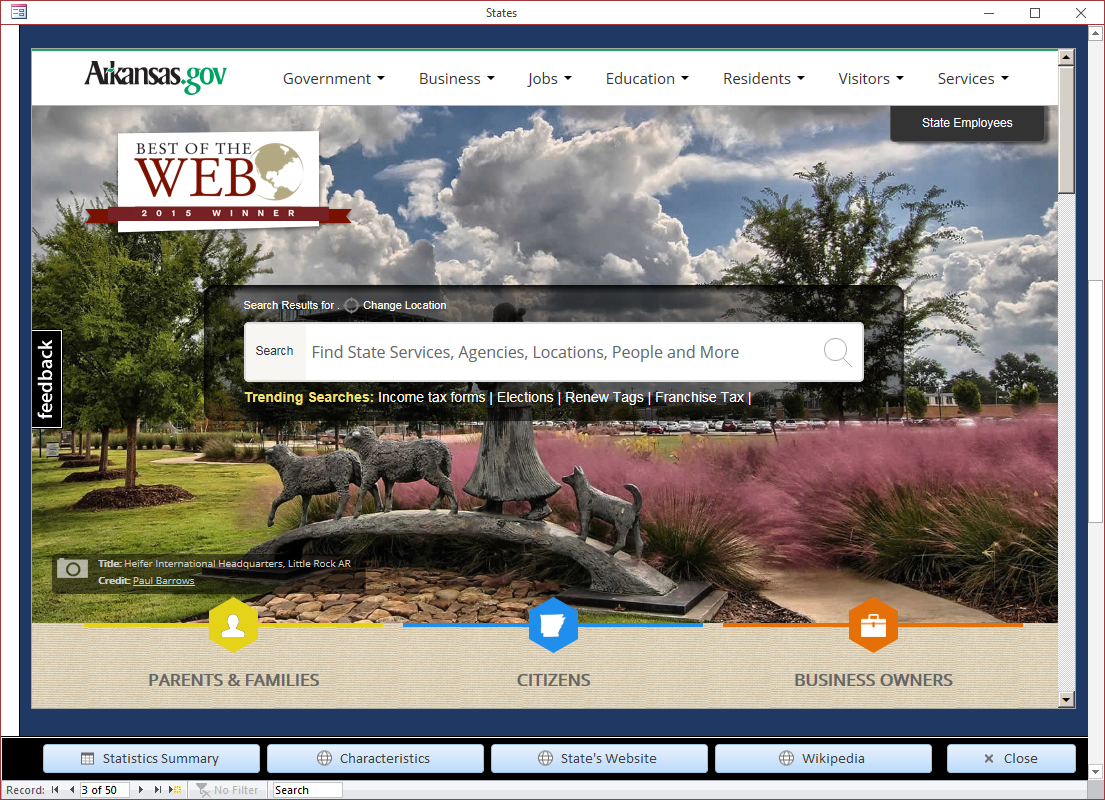
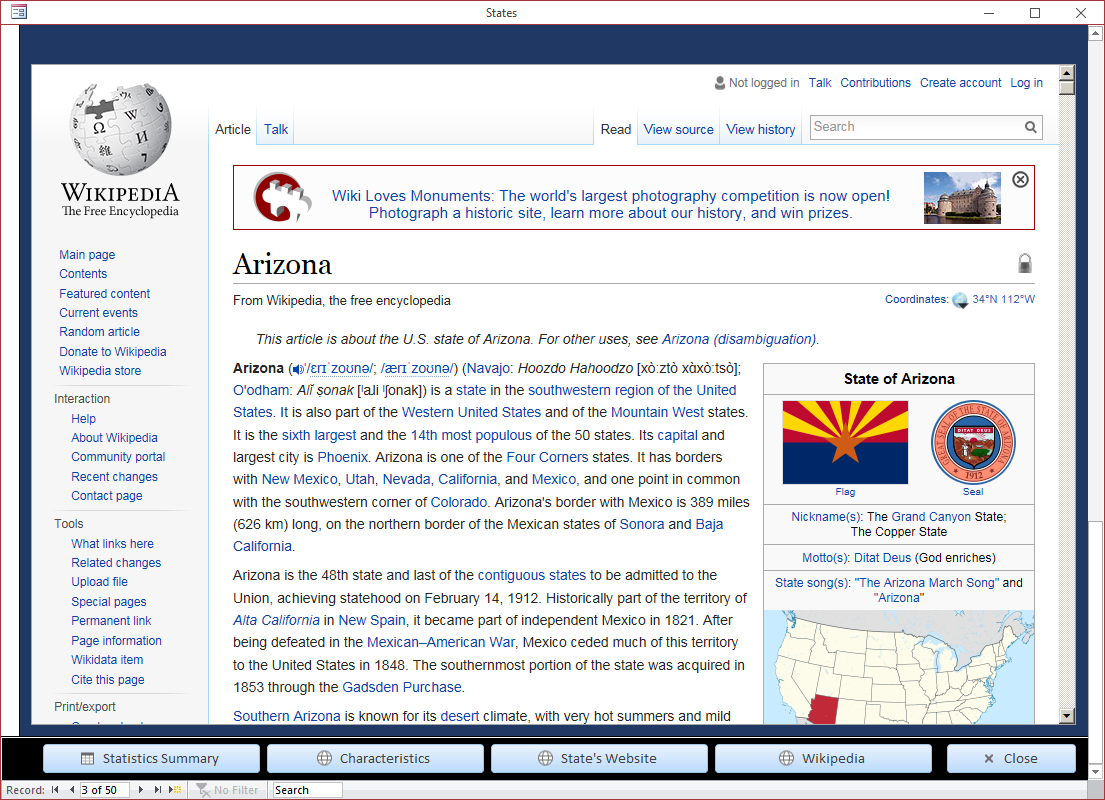
- Close Microsoft Access
- When asked whether you want to save the form, click Yes


![]() Practical Learning: Introducing Windows Controls
Practical Learning: Introducing Windows Controls![]() and click the form or report. To assist with the action that a button should perform, Microsoft Access provides a wizard that leads to a long list of action. You
are encouraged to use that wizard. Of course, you can also take care of the actions yoursellf.
and click the form or report. To assist with the action that a button should perform, Microsoft Access provides a wizard that leads to a long list of action. You
are encouraged to use that wizard. Of course, you can also take care of the actions yoursellf.![]() Practical Learning: Introducing Buttons
Practical Learning: Introducing Buttons![]() Practical Learning: Setting the Caption of a Button
Practical Learning: Setting the Caption of a Button![]() Practical Learning: Resizing a Button
Practical Learning: Resizing a Button![]() . To assist with pictures, Microsoft Access ships with many pre-designed icons.
If you click the Picture field, the Picture Builder dialog box will present a list in the Available Pictures section:
. To assist with pictures, Microsoft Access ships with many pre-designed icons.
If you click the Picture field, the Picture Builder dialog box will present a list in the Available Pictures section:
![]() Practical Learning: Displaying a Picture on a Button
Practical Learning: Displaying a Picture on a Button
![]() Practical Learning: Using Colors on a Button
Practical Learning: Using Colors on a Button

![]() Practical Learning: Introducing Web Browsers
Practical Learning: Introducing Web Browsers
![]() and click the form.
and click the form.![]() Practical
Learning: Introducing the Web Browser
Practical
Learning: Introducing the Web Browser![]() Practical
Learning: Using a Web Browser
Practical
Learning: Using a Web Browser
![]() and click the desired section of the form or report. Normally, you should add it
to the Detail section. You can add as many page breaks as you need.
and click the desired section of the form or report. Normally, you should add it
to the Detail section. You can add as many page breaks as you need.![]() Practical
Learning: Introducing Page Breaks
Practical
Learning: Introducing Page Breaks Practical Learning:
Using Page Breaks