
Topics on ADO
 |
Topics on ADO |
Stored Procedures
Introduction
We know that a procedure is an assignment used to take care of a task. The procedure is created in a module. Normally, such an assignment is intended to be used only by the object (such as a form) that owns that module, unless you decide to invoke that procedure somewhere else in the database. One of the main limitations of such a procedure is that it is not an object and it cannot be saved as such. ADO provides an alternative.
You can create a procedure and save it as an object. Although you may use the event of a button, a form, or another control to create the procedure, the object or control doesn't own the procedure. In fact, after creating the procedure, it becomes an object and you can access it from anywhere in the database. Also, the procedure is saved as an object (as done for a table, a query, or a form) and it is stored in the database. Because the procedure is stored as an object, it is referred to as a stored procedure.
Like tables, queries, forms, and reports, stored procedures are represented in the Navigation Pane with an icon and a name.
To create a stored procedure, use the following formula:
CREATE PROCEDURE ProcedureName
AS
Body of the Procedure
Start with the CREATE PROCEDURE expression. You can also use CREATE PROC. Both expressions produce the same result. Like everything in your database, you must name your stored procedure. The name of a stored procedure can be any string that follows the rules of objects.
After the name of the procedure, type the AS keyword. The section, group of words, or group of lines after the AS keyword is called the body of the procedure. It states what you want the procedure to do or what you want it to produce.
It is important to keep in mind that there are many other issues related to creating a procedure.
Probably the simplest procedure you can write would consist of selecting columns from a table. This is done with the SELECT keyword and applying the techniques we reviewed for data selection. A stored procedure can also be used to enter new records in a table or to update one or some values of one or some of the records. For example, imagine that a company is hiring some contractors and all of them would be paid the same salary. You can create a stored procedure that would enter this salary into each existing record by simply updating them. The stored procedure can be created as follows:
Private Sub cmdPrepareNewMinSalary_Click()
    Dim conEmployees As ADODB.Connection
    Dim strProcedure As String

    Set conEmployees = Application.CurrentProject.Connection
    strProcedure = "CREATE PROCEDURE SetNewMinSalary " & _
                   "AS " & _
                   "Update Employees " & _
                   "SET HourlySalary = 12.50;"

    conEmployees.Execute strProcedure
    conEmployees.Close
End Sub
This procedure would be used to visit each record and assign or change the hourly salary of the employee to 12.50.
After creating a procedure, to get its result, you would need to execute it. To execute a procedure, you use the EXECUTE keyword followed by the name of the procedure. Although there are some other issues related to executing a procedure, for now, we will consider that the simplest syntax to call a procedure is:
EXECUTE ProcedureName
Alternatively, instead of EXECUTE, you can use the EXEC keyword:
EXEC ProcedureName
For example, to execute the above procedure, you would use code as follows:
Private Sub cmdNewMinSalary_Click()
    Dim conEmployees As ADODB.Connection
    Dim strProcedure As String

    Set conEmployees = Application.CurrentProject.Connection
    strProcedure = "EXECUTE SetNewMinSalary;"

    conEmployees.Execute strProcedure
    conEmployees.Close
End Sub
Like a regular function, a stored procedure can take one or more arguments. To create a procedure that takes an argument, type the formula CREATE PROCEDURE or CREATE PROC followed by the name of the procedure, then type the name of the argument. The parameter is created like a column of a table. That is, a parameter must have a name, a data type and an optional length. Here is the syntax you would use:
CREATE PROCEDURE ProcedureName
(ParameterName DataType)
AS
Body of the Procedure
When implementing the procedure, you can define what you want to do with the parameter(s), in the body of the procedure. Consider the following list of employees;
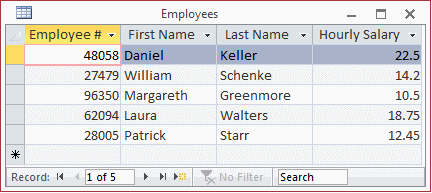
Imagine that you want to raise the salary of the employees who are still earning the minimum wage. Instead of simply setting everybody's minimum, you can create a stored procedure that would visit each record and, whenever it finds a salary below your minimum, it would raise it. You can create such as procedure as follows:
CREATE PROCEDURE SetNewMinSalary
(NewMinSalary Currency)
AS
	UPDATE Employees
        SET Salary = NewMinSalary
	WHERE HourlySalary < NewMinSalary
This can be done in code as follows:
Private Sub cmdCreateProcedure_Click()
    Dim conEmployees As ADODB.Connection
    Dim strProcedure As String

    Set conEmployees = Application.CurrentProject.Connection
    strProcedure = "CREATE PROCEDURE SetNewMinSalary " & _
                   "(NewMinSalary Currency) " & _
                   "AS " & _
                   "Update Employees " & _
                   "SET HourlySalary = NewMinSalary " & _
                   "WHERE HourlySalary < NewMinSalary;"

    conEmployees.Execute strProcedure

    MsgBox "The new stored procedure has been created.", _
	   vbOKOnly or vbInformation , "Exercise"
    conEmployees.Close
End Sub
When executing a procedure that takes a parameter, make sure you provide a value for the parameter. The syntax used is:
EXEC ProcedureName ParameterValue
If the parameter is Boolean or numeric, make sure you provide an appropriate value. If the parameter is a character or a string, type its value in single-quotes. If it is a number, provide a valid value. Here is an example:
Private Sub cmdExecuteProcedure_Click()
    Dim conEmployees As ADODB.Connection
    Dim strProcedure As String

    Set conEmployees = Application.CurrentProject.Connection
    strProcedure = "EXECUTE SetNewMinSalary 14.50;"

    conEmployees.Execute strProcedure

    MsgBox "The minimum hourly salary has been set to 14.50/hr", _
	   vbOKOnly or vbInformation , "Exercise"
    conEmployees.Close
End Sub
When this code executes, every employee whose salary is less than 10.15 would be raised to 14.50. The others would be kept as is. The above code would produce:

Another type of procedure can be made to take more than one parameter. In this case, create the parameters in the section before the AS keyword, separated by a comma. The syntax you would use is:
CREATE ProcedureName
(ParameterName1 DataType, ParameterName2 DataType, ParameterName_n DataType_n)
AS
Body of the Procedure
When calling a procedure that takes more than one parameter, you must still provide a value for each parameter but you have two alternatives. The simplest technique consists of providing a value for each parameter in the exact order they appear in the procedure.
Alternatively, you can provide the value for each parameter in the order of your choice. In this case, you must type the name of each parameter and assign it the corresponding value.
One of the strong characteristics of a stored procedure, as compared to functions in traditional languages, is that a stored procedure is treated like an object in its own right. Therefore, after creating it, if you don't need it anymore, you can get rid of it.
To visually delete a stored procedure, in the Navigation Pane, right-click its name and click Delete:

You will be asked to confirm your decision or change your mind.
To programmatically delete a stored procedure, execute the DROP PROCEDURE statement. The formula to follow is:
DROP PROCEDURE ProcedureName
Of course, you should make sure you are in the right database and also that the ProcedureName exists. Here is an example:
Private Sub cmdDeleteProcedure_Click()
    Dim conEmployees As ADODB.Connection
    Dim strProcedure As String

    Set conEmployees = Application.CurrentProject.Connection
    strProcedure = "DROP PROCEDURE SetNewMinSalary;"

    conEmployees.Execute strProcedure

    MsgBox "The procedure has been deleted."
    conEmployees.Close

End Sub
Introduction
From what we know already, a SQL statement is an expression that is presented to the SQL interpreter that interprets it and returns a result. ADO proposes yet another way to formulate and execute such a statement. A command is an action that is created or formulated and submitted to the database. The action can be any of the types of SQL statements and queries we have used so far. That is, it can consist of creating a database or a table. It could also consist of selecting fields or restricting the list of values from a table.
Command Creation
To support command, the ADO library provides a class named Command. To start a command, declare a variable of type ADODB.Command and initialize it using the New operator. Here is an example:
Private Sub cmdVideosRatedR_Click()
    Dim cmdVideos As ADODB.Command

    Set cmdVideos = New ADODB.Command

End Sub
One of the characteristics of a command is the action it is supposed to perform. This is specified as a string and it is represented by the CommandText property of the Command object. It can be similar to any of the SQL statements we have used so far. Here is an example:
Private Sub cmdVideosRatedR_Click()
    Dim cmdVideos As ADODB.Command

    Set cmdVideos = New ADODB.Command

    cmdVideos.CommandText = "SELECT * FROM Videos WHERE Rating='R'"
End Sub
Alternatively, you can use the name of a table as the text of the command. The text of a command can also be the name of a stored procedure.
After setting the action, you should specify the type of command that will be performed. The types of commands are members of the CommandTypeEnum enumerator. If the command is text-based, such as a SQL statement, you can specify the type as adCmdText. Here is an example:
Private Sub cmdVideosRatedR_Click()
    Dim cmdVideos As ADODB.Command

    Set cmdVideos = New ADODB.Command

    cmdVideos.CommandText = "SELECT * FROM Videos WHERE Rating='R'"
    cmdVideos.CommandType = adCmdText

End Sub
If the text of the command is specified as the name of a table, you can set the command type to adCmdTable. If the text of the command is represented by the name of a stored procedure, then you can specify the command type as adCmdStoredProc.
After using a Command object, you should close it. To do this, you can call its Close() method.
After creating a Command object, to use its action, you must execute it. To start, you should specify what connection would be used to pass it. To support this, the Command class is equipped with a property named ActiveConnection. You can assign a Connection object to this property. Here is an example:
Private Sub cmdVideosRatedR_Click()
    Dim rstVideos As ADODB.Recordset
    Dim cmdVideos As ADODB.Command

    Set cmdVideos = New ADODB.Command

    cmdVideos.CommandText = "SELECT * FROM Videos WHERE Rating='R'"
    cmdVideos.CommandType = adCmdText
    cmdVideos.ActiveConnection = CurrentProject.Connection

    rstVideos.Close
    Set rstVideos = Nothing
    Set cmdVideos = Nothing
End Sub
To execute a command, you can use the Command itself, a Connection, or a Recordset objects. To execute a command using the Command object, you can call its Execute() method and assign it to a Recordset object. Here is an example:
Private Sub cmdVideosRatedR_Click()
    Dim rstVideos As ADODB.Recordset
    Dim cmdVideos As ADODB.Command

    Set cmdVideos = New ADODB.Command

    cmdVideos.CommandText = "SELECT * FROM Videos WHERE Rating='R'"
    cmdVideos.CommandType = adCmdText
    cmdVideos.ActiveConnection = CurrentProject.Connection

    Set rstVideos = cmdVideos.Execute

    rstVideos.Close
    Set rstVideos = Nothing
    Set cmdVideos = Nothing
End Sub
Alternatively, you can create a command as a text-based SQL statement and pass it as the Source argument to the Open() method of the Recordset.
Introduction
We know that, after sorting or filtering records on a table, we could save the results of the table and the table would remember its previous state the next time it's opened. The most formal way to create and save sorting or filtering as an object is through a query. A query is saved as a regular object like a table or a form. The concept of queries is mostly used by Microsoft Access. Other database environments or libraries don't necessarily use queries as objects. For example, ADO allows you to create a list that is either sorted, filtered or both and save it as a formal object. This is referred to as a view.
A view is a technique of creating a list of records based on data from an existing table, a query, or another view.
Microsoft Access doesn't have its own means of creating a view. Instead, you can create it as part of an ADO database. To create a view, you can start with the following SQL syntax:
CREATE VIEW ViewName
AS
SELECT Statement
The creation of a view starts with the CREATE VIEW expression followed by a name. The name of a view follows the rules and suggestions we have applied to other objects so far. After the name of the view, use the AS keyword to indicate that you are ready to define the view.
Because a view is like a query, it can be defined using a SELECT statement, following the same rules we applied for data sorting or filtering. Here is an example that creates a view:
Private Sub cmdCreateRegistration_Click()
	Dim conDatabase As ADODB.Connection
	Dim SQL As String

    	Set conDatabase = Application.CurrentProject.Connection

    	SQL = "CREATE VIEW StudentsIdentification " & _
              "AS SELECT FirstName, LastName FROM Students"

	conDatabase.Execute SQL

	conDatabase.Close
    	Set conDatabase = Nothing
End Sub
After creating the view, it is represented in the Navigation Pane where you can access it.
After creating a view, you can use it as you would a query. For example, you can use it as the Record Source of a form. Here is an example:
Private Sub cmdApplyRegistration_Click()
    Me.RecordSource = "StudentsIdentification"
    Me.txtFirstName.ControlSource = "FirstName"
    Me.txtLastName.ControlSource = "LastName"
End Sub
You can also extract the values of a view using a SELECT statement. You can also display the value of a query in Datasheet View like a table or a query. To do this, call the OpenQuery() method of the DoCmd object.
A view is a list of values from a table, an existing query, or another view. A view is not a procedure but it can be used as if it were one. As imitating a procedure, a view can include a type of argument. The word argument here only means that some values can be passed to a view but these values can be specified only when creating the view. They are not real arguments.
When creating a view, you can create placeholders for columns and pass them in the parentheses of the view. This would be done as follows:
CREATE VIEW StudentsIdentification([First Name], [Family Name])
. . .
If you use this technique, the names passed in the parentheses of the view are the captions that would be displayed in place of the columns of the view. This technique allows you to specify the strings of your choice for the columns. If you want a column header to display the actual name of the column, write it the same. Otherwise, you can use any string you want for the column. If the name is in one word, you can just type it. If the name includes various words, include them between an opening square bracket "[" and a closing square bracket "]".
After listing the necessary strings as the captions of columns, in your SELECT statement of the view, you must use the exact same number of columns as the number of arguments of the view. In fact, each column of your SELECT statement should correspond to an argument of the same order.
Here is an example:
CREATE VIEW CarIdentifier([Tag #], Manufacturer, [Type of Car], Available)
AS
SELECT TagNumber, Make, Model, Available FROM Cars
Because, as we stated already, a view is not a procedure and the values passed to the view are not real arguments, when executing the view, don't specify the names of arguments. Simply create a SELECT statement and specify the name of the view as the source.
As mentioned earlier, after creating a view, it becomes a named object like a table, a query or a form. As such, it can be removed from a database.
To visually delete a view, in the Navigation Pane, right-click its name and click Delete.
To programmatically delete a view, use the DROP VIEW expression in the following formula:
DROP VIEW ViewName
On the right side of the DROP VIEW expression, enter the name of the undesired view and execute the statement. Here is an example:
Private Sub cmdAlterView_Click()
    Dim conDatabase As ADODB.Connection
    Dim SQL As String

    Set conDatabase = Application.CurrentProject.Connection

    SQL = "DROP VIEW StudentsIdentification"

    conDatabase.Execute SQL

    MsgBox "The RegistIdentification view has been deleted.", vbInformation

    conDatabase.Close
    Set conDatabase = Nothing
End Sub
You will not be warned before the interpreter deletes the view.
The Data Source of an Application
A Data Source
In Microsoft Access, a database is created as a computer file and it has a path, that is, where the database file is located. The path to a file is also known as its location. The path to a database, including its name, is also called the data source. Using the path to a database is probably the easiest way to access it but this is more convenient if you are working in Microsoft Access. If you plan to access your database from another programming environment, one solution is to create an ODBC data source. To do this, in the Control Panel (Start -> Control Panel, System and Security), click Administrative Tools. Double-click Data Source (ODBC) to open the ODBC Data Source Administrator. Click MS Access Database:

Click Add. You shoud receive a dialog box with many options including Microsoft Access Driver (*.mdb, *.accdb). You may receive a dialog box without Microsoft Access:

If that happens, click Cancel. In the ODBC Data Source Administrator, click Coonfigure... You may receive an error message box stating that "The setup routines for the Microsoft Access Driver ...":

If you receive such an error, close the ODBC Data Source Administrator dialog box and download an application from the Microsoft website. At the time of this writing, the file can be downloaded from http://www.microsoft.com/en-us/download/details.aspx?id=13255 and installed on your computer. After installing the application, restart the ODBC Data Source Administrator. Click the Add button. In the Create New Data Source wizard, click Microsoft Access Driver (*.mdb, *.accdb):
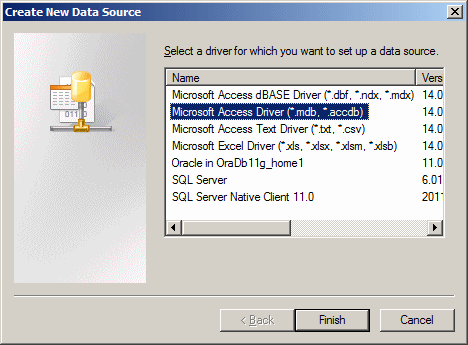
Click Finish. In the following screen, you would be asked to enter a name for the data source. You can enter the name in one or more words. In the Description text box, you can enter a short sentence anyway you like. Here is an example:/p>

TTo specify the database that would be used, click Select. If the database is located on a local drive, select it. Here is an example:
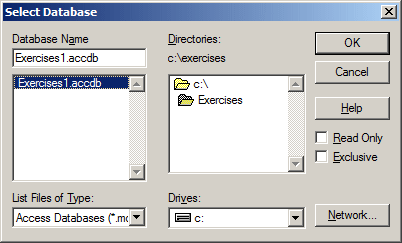
If the database is located in a shared drive of a computer connected to the one you are using, click Network, locate, and select the computer. After selecting the database, click OK. If you need to be authenticated in order to use the database (if the database is protected), click the Advanced button. By default, a database is meant to allow anybody to use. In this case, you can leave the Login Name and the Password empty. Otherwise, type the necessary credentials. Here is an example:/p>
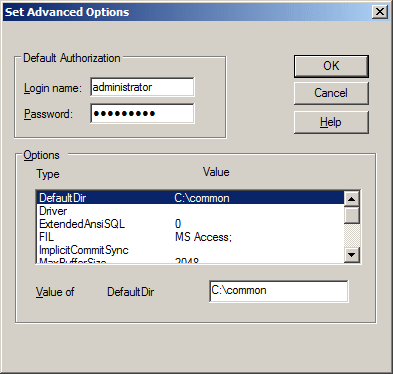
After using (that is, if you had used) the Set Advanced Options dialog box, click OK (or Cancel to keep it the way it previously was):
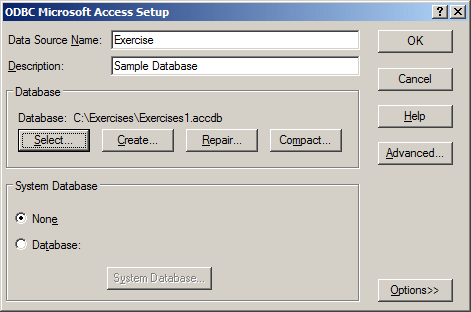
After entering the necessary information and selecting the desired database, you can click OK. Your new data source should appear in the list of User Data Sources:

Click OK to close the ODBC Data Source Administrator dialog box.
Using an ODBC Data Source
To use an ODBC data source to open a database, programmatically create an ADO connection. When opening, include the data source. Here is an example:
Private Sub cmdDataSource_Click()
    Dim connector As ADODB.Connection

    Set connector = New ADODB.Connection

    connector.Open "DSN=gdcs;UID=;PWD=;"

    Set connector = Nothing
End Sub
After opening the ADO connection and specifying its data source, you can perform any of the routine operations we have seen in ADO so far. Here is an example of creating a table and adding records to it:
Private Sub cmdCreateEmployees_Click()
    Dim dbConnection As ADODB.Connection

    Set dbConnection = New ADODB.Connection

    dbConnection.Open "DSN=Exercise;UID=;PWD=;"
    dbConnection.Execute "CREATE TABLE Employees" & _
                         "(" & _
                         "  EmployeeNumber Integer, " & _
                         "  FirstName Varchar(20), " & _
                         "  LastName Text(20), " & _
                         "  HourlySalary Double" & _
                         ");"

    dbConnection.Execute "INSERT INTO Employees VALUES(48058, 'Daniel', 'Keller', 22.50);"
    dbConnection.Execute "INSERT INTO Employees VALUES(27479, 'William', 'Schenke', 14.20);"
    dbConnection.Execute "INSERT INTO Employees VALUES(96350, 'Margareth', 'Greenmore', 10.50);"
    dbConnection.Execute "INSERT INTO Employees VALUES(62094, 'Laura', 'Walters', 18.75);"
    dbConnection.Execute "INSERT INTO Employees VALUES(28005, 'Patrick', 'Starr', 12.45);"

    MsgBox "A table named Employees has been created.", vbOKOnly Or vbInformation, "Exercise"

    Application.RefreshDatabaseWindow

    Set dbConnection = Nothing
End Sub
In the same way, you can perform any of the operations we have seen so far, including adding records, performing data analysis, navigating among records, and using data joins, etc.
|
|
||
| Previous | Copyright © 2000-2022, FunctionX, Inc. | Next |
|
|
||