Home

Modules, Procedures, and Functions


Modules


Introduction

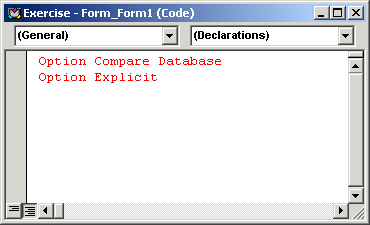
A module is a file that holds code or pieces of code that belong either to a form, a report, or is simply considered as an independent unit of code. This independence means that a unit may also not belong to a particular form or report. Each form or report has a (separate) module. To access the module of a form or report, open the object in Design View and click the Code button Code. If you initiate the coding of an event of a form (or report) or of a control that is positioned on the form, this would open the Code Editor window and display the module that belongs to the form (or report). If no code has been written for the form or report, its module would be empty:


If you have written events for a form (or report) or for the controls that belong to the form (or report), all these events would be part of the form's (or report's) module.


Creating a Module

Besides the modules that belong to forms (or reports), you can create your own module(s) that is(are) not related to a particular form (or report). There are three main ways you can create an independent module:

  • In Microsoft Access, on the Database Window, click Modules and click New. This would open the Code Editor with an empty file.
  • In the Code Editor (or Microsoft Visual Basic) window, on the main menu, click Insert -> Module
  • In the Code Editor (or Microsoft Visual Basic) toolbar, you can click the Insert Module button or click the arrow of the Insert Module button and select Module.

The names of modules are cumulative. This means that the first module would be called Module1; the second would be Module2, etc. It is a good idea to have names that are explicit especially if your application ends up with various modules. To use a custom name for a module, you must save it. This would prompt you to name the module. You can accept the suggested name or type your own and press Enter.

Practical Learning: Creating a Module

  1. From the resources that accompany this site, open the Exercise2 application. On the Database Window, if necessary, click Forms
  2. Double-click the frmProcedures form to open it in Form View. After viewing the form, switch it to Design View
  3. The accompanying resources include pictures of geometric figures. To enhance the form, you can add other pictures. To do that, on the Toolbox, click Image and click the left area of the labels. On the Insert Picture dialog box, locate the picture and add it
  4. To start a form module, with the form opened in Design View, on the Form Design toolbar, click the Code button

Sub Procedures


Introduction

A procedure is an assignment you ask Microsoft Visual Basic to perform besides, or to complete, the normal flow of the program. A procedure is created to work in conjunction with the controls events of a database. Structurally, a procedure appears similar to an event. The main difference is that, while an event belongs to a control, a procedure doesn't. While an event is specific to the user's intervention or interaction with a control, a procedure can be general and applied anyway you like.

Creating a Procedure Manually

There are two kinds of procedures in Microsoft Visual Basic: A sub procedure and a function. The difference lies on their behaviors but their coding (programming) depends of your goal.

A sub procedure is a section of code that carries an assignment but doesn't give back a result. To create a sub procedure, start the section of code with the Sub keyword followed by a name for the sub procedure. To differentiate the name of the sub procedure with any other regular name, it must be followed by opening and closing parentheses. The Sub keyword and the name of the procedure (including its parentheses) are written on one line (by default). The section of the sub procedure code closes with End Sub as follows:

Sub ShowMe()

End Sub

The name of a sub procedure should follow the same rules we learned to name the variables, omitting the prefix:

  • If the sub procedure performs an action that can be represented with a verb, you can use that verb to name it. Here are examples: show, display
  • To make the name of a sub procedure stand, you should start it in uppercase. Examples are Show, Play, Dispose, Close
  • You should use explicit names that identify the purpose of the sub procedure. If a procedure would be used as a result of another procedure or a control's event, reflect it on the name of the sub procedure. Examples would be: afterupdate, longbefore.
  • If the name of a procedure is a combination of words, start each word in uppercase. Examples are: AfterUpdate, SayItLoud

The section between the first Sub line and the End Sub line is called the body of the sub routine. In the body of a procedure, you define what the procedure is supposed to do. If you need to use a variable, you can declare it and specify what kind of variable you need. There is no restriction on the type of variables that can be declared in a procedure. Here is an example in which a string variable is declared in the body of a sub procedure:
Sub CreateName()
    Dim strFullName As String
End Sub

In the same way, you can declare as many variables as you need inside of a sub procedure. The actions you perform inside of a procedure depend on what you are trying to accomplish. For example, a sub procedure can simply be used to create a string. The above procedure can be changed as follows:
Sub CreateName()
    Dim strFullName As String
    strFullName = "Jacques Fame Ndongo"
End Sub

Similarly, a procedure can be used to perform a simple calculation such as adding two numbers. Here is an example:
Sub CalculateTotalStudents()
    Dim StudentsInClass1 As Integer
    Dim StudentsInClass2 As Integer
    Dim TotalNumberOfStudents As Integer
    
    StudentsInClass1 = 32
    StudentsInClass2 = 36
    TotalNumberOfStudents = StudentsInClass1 + StudentsInClass2
End Sub

There are two main ways a sub procedure receives values. To start, a procedure that is written in the module of a form (or report) has direct access to the controls that belong to the form (or report). This means that the procedure can call them and manipulate any of their available properties. Here is an example of a procedure implemented in a form that has a text box called txtCountry:

Sub ChangeColor()
    txtCountry.BackColor = 16763293
End Sub

In the same way, you can declare variables and perform operations inside of a procedure and hand the result to a control that is part of a form or report.

Practical Learning: Manually Creating a Procedure

  1. Click the first empty line in the Code Editor and type Sub SquareSolution and press Enter
  2. Notice that Visual Basic added the End Sub line and positioned the cursor inside the procedure
  3. Complete the sub procedure as follows:
     
    Sub SquareSolution()
        ' Declare the necessary variables for the square
        Dim dblSide As Double
        Dim dblPerimeter, dblArea As Double
        
        ' Retrieve the value of the side
        dblSide = txtSqSide
        ' Calculate the perimeter and the are of the square
        dblPerimeter = dblSide * 4
        dblArea = dblSide * dblSide
        ' Prepare to display the result in the appropriate text boxes
        txtSqPerimeter = dblPerimeter
        txtSqArea = dblArea
    End Sub
  4. Return to Microsoft Access and switch the form to Form View. Enter a value in the Side text box of the square and click the Calculate button. Notice that nothing happens.

Inserting a Procedure

Microsoft Visual Basic simplifies the creation of a procedure through the use of the Insert Procedure dialog box:
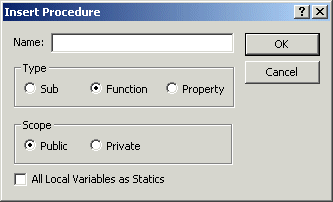
To display the Insert Procedure, you can click Insert -> Procedure on the main menu, or click the arrow of the Insert Procedure button on the toolbar. If you are creating a sub procedure, click the Sub radio button. If you want the procedure to be accessed only by the objects, events and procedure of the same module, click the Private radio button. If you want to access the procedure from outside of the current module, click the Public radio button.

Practical Learning: Inserting a Procedure

  1. Switch the form back to Design View and access the Code Editor.
    On the main menu, click Insert -> Procedure...
  2. On the Insert Procedure dialog box, click the Name text box and type SolveRectangle
  3. In the Type section, click the Sub radio button
  4. In the Scope section, click the Private radio button
     
  5. Click OK
  6. Implement the procedure as follows:
     
    Private Sub SolveRectangle()
        ' Declare the necessary variables for the rectangle
        Dim dblLength, dblHeight As Double
        Dim dblPerimeter, dblArea As Double
        
        ' Retrieve the values of the length and height
        dblLength = txtRLength
        dblHeight = txtRHeight
        ' Calculate the perimeter and the area of the rectangle
        dblPerimeter = (dblLength + dblHeight) * 2
        dblArea = dblLength * dblHeight
        ' Prepare to display the result in the appropriate text boxes
        txtRPerimeter = dblPerimeter
        txtRArea = dblArea
    End Sub

Calling a Procedure

After creating a procedure, you can call it from another procedure, function, or control's event. To call a simple procedure such as the above ChangeColor, you can just write the name of the sub procedure. Here is an example where a sub procedure is called when a form is clicked.

Private Sub Detail_Click()
    ChangeColor
End Sub

Practical Learning: Calling a Procedure

  1. In the Object combo box, select cmdSqCalculate
  2. Call the SolveSquare procedure as follows:
     
    Private Sub cmdSqCalculate_Click()
        SquareSolution
    End Sub
  3. In the Object combo box, select cmdRCalculate and implement its Click event follows:
     
    Private Sub cmdRCalculate_Click()
        SolveRectangle
    End Sub
  4. Return to Microsoft Access and switch the form to Form View
  5. In the Side text box of the square, type 14.55 and click the right Calculate button
  6. Also text the rectangle with 18.25 for the length and 15.75 for the height and click its Calculate button:
     
  7. Save the form and return to the Code Editor

Functions


Introduction

A function is a procedure that takes care of a relatively small assignment on a side and returns a result. A function resembles a sub procedure in all respects except that a function returns a value.

Creating a Function

A function is created like a sub procedure with a few more rules. The creation of a function starts with the keyword Function and closes with End Function. Here is an example:

Function GetFullName()

End Function

The name of the function follows the same rules and suggestions we have reviewed for the sub procedures. Because a function should return a value, after the parentheses, you can type the As keyword followed by the type of data the function must return. Here is an example:

Function GetFullName() As String

End Function

When we studied variables, we saw that, instead of using the As DataType expression, you could use a particular character. This theory also applies to functions. To use it, on the right side of the name of the function, type the special character that represents the data type, followed by the parentheses of the function, and then omit the the As DataType expression. An example would be GetFullname$(). As with the variables, you must use the appropriate character for the function:

Character The function must return
$ a String type
% an Integer
! a Single type
# a Double
@ a Long

Here is an example:

Function GetFullName$()
        
End Function

The implementation of a function is done the same way as that of a sub procedure. Because a function is supposed to return a value, after performing whatever assignment you need in a function, you can assign the desired result to the name of the function before the closing of the function. Here is an example:

Function GetFullName() As String
    Dim strFirstName, strLastName As String
    strFirstName = txtFirstName
    strLastName = txtLastName
    GetFullName = strFirstName & " " & strLastName
End Function

Practical Learning: Creating a Function

  1. In the Code Editor, scroll down, click the first empty line, type Function CircleCircumference As Double and press Enter
  2. Notice that Visual Basic completed the code with the End Function line and positioned the cursor in the body of the function. Implement the function as follows:
     
    Function CircleCircumference() As Double
        Dim dblRadius As Double
        
        dblRadius = txtCircleRadius
        CircleCircumference = dblRadius * 2 * 3.14159
    End Function
  3. On the main menu, click Insert -> Procedure...
  4. Type CircleArea in the Name text box
  5. In the Type section, make sure the Function radio is selected (the default). In the Scope section, click the Private radio button and click OK.
  6. Implement the function as follows:
     
    Private Function CircleArea#()
        Dim dblRadius As Double
        dblRadius = txtCircleRadius
        CircleArea = dblRadius * dblRadius * 3.14159
    End Function

Calling a Function

To call a function, you have two main alternatives. If the function was implemented as simple as a sub procedure, you can just write its name in the event or the function that is calling it. If you want to use the return value of a function in an event or another function, assign the name of the function to the appropriate local variable. Here is an example:

Private Sub Detail_DblClick(Cancel As Integer)
    txtFullName = GetFullName
End Sub
 

Practical Learning: Calling a Function

  1. In the Object combo box, select cmdCCalculate and implement its Click event as follows:
     
    Private Sub cmdCCalculate_Click()
        txtCircleCircumference = CircleCircumference
        txtCircleArea = CircleArea
    End Sub
  2. Switch to Microsoft Access and switch the form to Form View
  3. Click the Circular tab and, in the top Radius text box, type 25.55
  4. Click the right calculate button (for the Circle)
  5. Switch the form back to Design View


Previous Copyright © 2005-2016, FunctionX Next