 |
Form and Control Design |
|
The Location of a Control on a Form |
|
Introduction |
|
In the previous lesson, we saw that a characteristic, also called a property, of a control is information used to describe or define an object. The description can be done visually or programmatically. Some of the visual description is done by designing the object; that is, by changing its aspects using the mouse, the keyboard, and the tools provided by Microsoft Excel and Microsoft Visual Basic. |
|
|
- Start Microsoft Excel and, on the Ribbon, click the Developer tab
- To launch the programming environment, in the Code section of the
Ribbon, click the Visual Basic button

- To create a form, on the main menu of Visual Basic, click Insert -> UserForm
- On the Toolbox, click the CommandButton and click somewhere on the form (no need for precision)
- On the Toolbox, click ComboBox and click the form away from the previously added CommandButton
|
Moving a Control |
When you add a control to the work area in Microsoft Excel or to a form in Microsoft Visual Basic, it assumes a position on its container. If you want, you can change that location by moving the control.
To move a control, click it and drag in the direction of your choice. To move a group of controls, first select them. Click it and drag the selection in the direction of your choice
When a control has been selected, as your mouse moves over it, its pointer displays a different cursor. One of these cursors can be used to move a control. This cursor is represented as a cross with four arrows:
 |
 |
To move a control, click its border and hold the mouse down, drag in the direction of your choice. When you get to the desired location, release the mouse.
|
Control Centering Towards the Middle of the Form |
You can also position one or more controls in the middle of the form. To do that, select the control, then, on the main menu of Visual Basic, click Format -> Center In Form -> Vertically.
|
Aligning Controls |
|
Horizontal Alignment |
When many controls are selected on a form, one of the controls has dark handles:
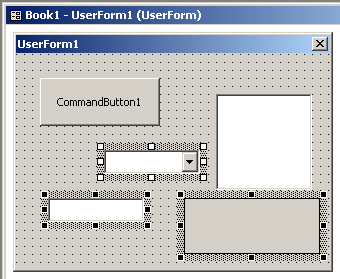
In our descriptions, the control with the dark handles will be referred to as the base control.
During form design, to better position the controls, you can use the main menu with the Format group. Microsoft Visual Basic also provides the UserForm toolbar to assist you. To display the UserForm toolbar, on the main menu of Microsoft Visual Basic, you can click View -> Toolbars -> UserForm.
If you have a certain control on the form and want to position it exactly at equal distance between the left and the right borders of the form, select the control, then, on the main menu of Microsoft Visual Basic, click Format -> Center in Form -> Horizontally. To get the same option, on the UserForm toolbar, click the arrow of the Center button and click Horizontally:

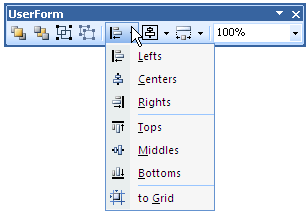
Horizontal alignment affects controls whose distance from the left border of the form must be the same. To perform this type of alignment, you can use the main menu where you would click Format -> Align, and select one of the following options:
- Lefts: All selected controls will have their left border coincide with the left border of the base control
- Centers: The middle handles of the selected controls will coincide with the middle handles of the base control
- Rights: All selected controls will have their right border coincide with the right border of the base control
To get the same options using the UserForm toolbar, click the arrow of the Align button and select the desired option: Lefts, Centers, or Rights:
|
Vertical Alignment |
Another option you have consists of moving controls up or down for better alignment. Once again you must first select the controls. Then, on the main menu, click Format -> Align, and click one of the following options:
- Tops: All selected controls will have their top border coincide with the top border of the base control but their left border would have the same distance with the left border of the parent
- Middles: The top handles of the selected controls will align vertically with the top handle of the base control
- Bottoms: All selected controls will have their bottom border coincide with the bottom border of the base control but their left border would have the same distance with the left border of the parent
To get the same options using the UserForm toolbar, click the arrow of the Align button and select the desired option: Tops, Middles, or Bottoms.
|
Horizontal Spacing and Alignment |
Suppose you have a group of horizontally aligned controls as follows:

Obviously the controls on this form are not enjoying the most professional look. The Format group of the main menu allows you to specify a better horizontal alignment of controls with regards to each other. To use it, first select the controls. Then, on the main menu of Microsoft Visual Basic, click Format -> Horizontal Spacing, and click one of the following options:
- Make Equal: Microsoft Visual Basic will calculate the horizontal distances that separate each combination of two controls and find their average. This average is applied to the horizontal distance of each combination of two controls:

- Increase: Microsoft Visual Basic will move each control horizontally, except the base control (the control that has white handles) by one unit away from the base control. This will be done every time you click the Increase Horizontal Spacing button or the Format -> Horizontal Spacing -> Increase menu item

- Decrease: Microsoft Visual Basic will move each control horizontally, except the base control (the control that has white handles) by one unit towards the base control. This will be done every time you click the Decrease Horizontal Spacing button or the Format -> Horizontal Spacing -> Decrease menu item

- Remove: Microsoft Visual Basic will move all controls (horizontally), except for the left control, to the left so that the left border of a control touches the right border of the next control

|
Vertical Spacing and Alignment |
Suppose you have a group of horizontally aligned controls as follows:
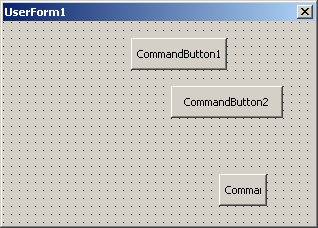
The controls on this form are not professionally positioned with regards to each other. Once again, the Format group of the main menu allow you to specify a better vertical alignment of controls relative to each other. To align them, on the main menu of Microsoft Visual Basic, click Format -> Vertical Spacing and click one of the following options:
- Make Equal: Microsoft Visual Basic will calculate the total vertical distances that separate each combination of two controls and find their average. This average is applied to the vertical distance of each combination of two controls
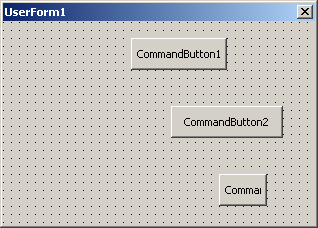
- Increase: Microsoft Visual Basic will move each control vertically, except the base control (the control that has darker handles) by one unit away from the base control. This will be done every time you click the Increase Horizontal Spacing button or the Format -> Horizontal Spacing -> Increase menu item
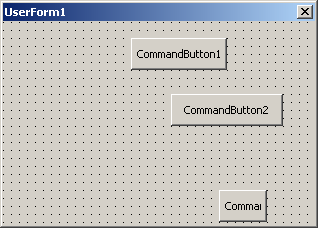
- Decrease: Microsoft Visual Basic will move each control, except the base control (the control that has darker handles) by one unit towards the base control. This will be done every time you click the Decrease Horizontal Spacing button or the Format -> Horizontal Spacing -> Decrease menu item
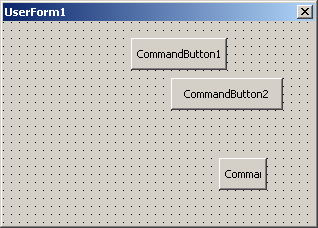
- Remove: Microsoft Visual Basic will move all controls vertically, except for the top control, to the top so that the top border of a control touches the bottom border of the next control towards the top
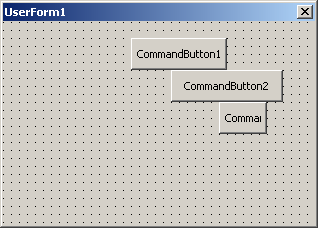
|
The Widths of Controls |
|
Introduction |
If you click a control’s button on the Toolbox and click a UserForm, the control assumes a default width. The width of a control is the distance from its left to its right borders.
To visual specify the width of a control, click it, position
the mouse on one of its left or right handle until the mouse cursor appears with
a horizontal bar with two arrows ![]() .
Then click and drag left or right in the direction of your choice. When you get
the desired with, release the mouse.
.
Then click and drag left or right in the direction of your choice. When you get
the desired with, release the mouse.
The distance from the left border to the right border of a control is referred to as its Width property. Therefore, to specify the width of a control with precision, click the control. In the Properties window, click Width and type the desired value. To programmatically specify the width of a control, access it using its name, type the period, followed by Width, the assignment operator, and the desired value.
If a control displays or contains text, such as the caption of a button, click the control. On the main menu of Microsoft Visual Basic, click Format and click Size to Fit.
|
Enlarging or Narrowing Controls |
Instead of one, you can also resize a group of controls at
the same time. To enlarge or shrink many controls, select them.
Position the mouse on the left or right handle of one of the selected controls to get the
desired cursor ![]() . Click and drag
left or right until you get the desired widths, then release the mouse.
. Click and drag
left or right until you get the desired widths, then release the mouse.
Consider the following form:
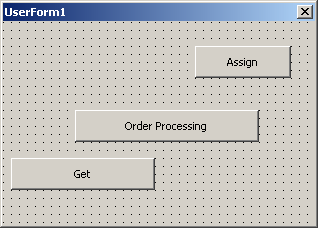
Imagine you would like each of these buttons to have just enough space to accommodate its caption. First select the controls that will be resized. To resize the controls, on the main menu of Microsoft Visual Basic, click Format and click Size to Fit. If you do, the controls will be resized based on the contents of their value:
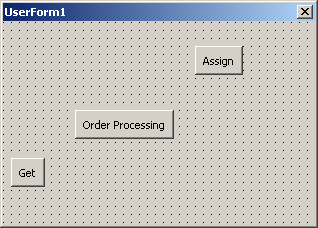
If all the controls are text boxes, their widths would be reduced to be able to hold a character.
Consider the following form:
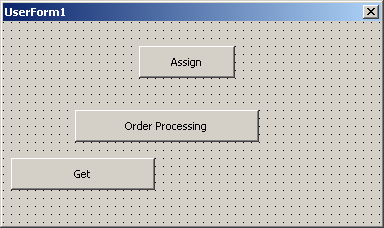
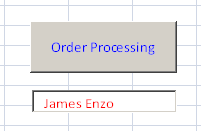
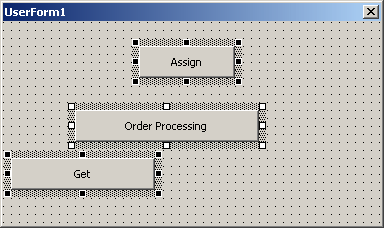
Imagine one of the controls has a certain width and you want to apply that width to the other controls. Select the controls but make as the base control the object that has the width you want. Here is an example where the button labeled Order Processing is selected as the base:
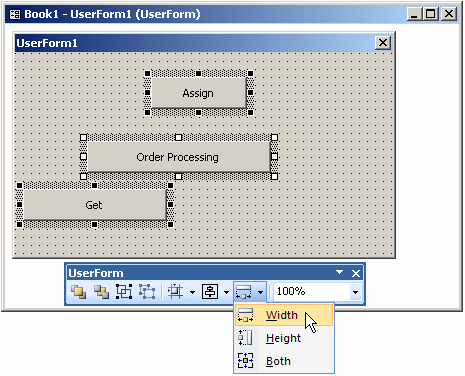
On the main menu, you can click Format -> Make Same Size -> Width. Alternatively, on the UserForm toolbar, you can click the arrow of the right button and click Width:
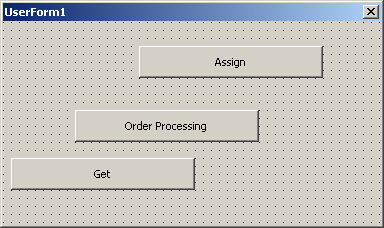
After doing this, the controls would be enlarged or narrowed based on the width of the control that was set as the base:
|
The Heights of Controls |
|
Introduction |
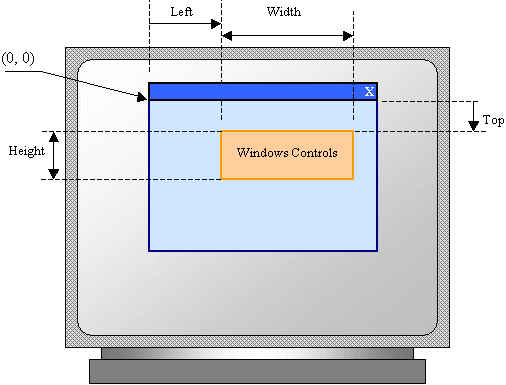
The height of a control is the distance from its top to its bottom borders. This can be illustrated as follows:
To visual specify the height of a control, click it, position
the mouse on one of its top or bottom handle until the mouse cursor appears with
a vertisal bar with two arrows ![]() .
Then click and drag up or down in the direction of your choice until you get the
desired height. Then release the mouse.
.
Then click and drag up or down in the direction of your choice until you get the
desired height. Then release the mouse.
To specify the width of a control with precision, click the control. In the Properties window, click Height and type the desired value. To programmatically specify the height of a control, access it using its name, type the period, followed by Height, followed by =, and the desired value.
If a control displays or contains text, such as the caption of a button, click the control. On the main menu of Microsoft Visual Basic, click Format and click Size to Fit.
To programmatically specify the height of a control, type its name, access its Height property and assign the desired value.
|
Shrinking or Heightening Various Controls |
You can resize many controls at the same time. To do this,
select the controls.
Position the mouse on the top or bottom handle of one of the selected controls to get the
desired cursor ![]() . Click and drag
up or down. All of the selected controls
would be resized.
. Click and drag
up or down. All of the selected controls
would be resized.
You can shrink or heighten many controls based on the height of one of the controls. To start, select the controls but use as base the control that has the height you would like to apply on the other controls. Here is an example where the button labeled Get is set as the base:
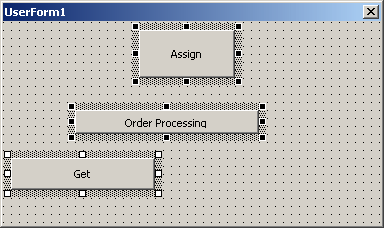
On the main menu, you can click Format -> Make Same Size -> Height. Or, on the UserForm toolbar, you can click the arrow of the right button and click Height.
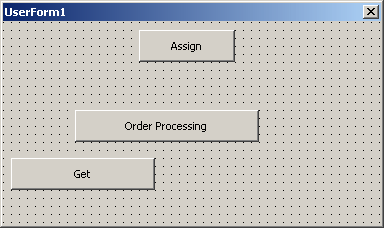
After doing this, the controls would get shrunk or tall based on the width of the control that was set as the base:
|
The Widths and Heights of Controls |
|
Resizing a Control |
Instead of separately setting the width or the height of a control or a group of controls, you can specify both pieces of information at the same time.
To visually specify both the width and the height of a control:
- Click and hold the mouse on a control. Drag in the direction of your choice
- Click the control to select it. Position the mouse on one of its borders
but not on the handles until the mouse cursor appears as a cross with four
arrows
 .
Click and drag in the direction of your choice
When you get to the desired position, release the mouse.
To resume, to resize a control, click it to select it. Position the mouse on a border, a handle, or a corner of the selected control. Use the appropriate mouse cursor:
| Cursor | Role |
| Moves the seized border in the North-West <-> South-East direction | |
| Shrinks or heightens the control | |
| Moves the seized border in the North-East <-> South-West direction | |
| Narrows or enlarges the control | |
| Changes both the width and height of a control |
|
Resizing the Controls |
Imagine you have added three controls to a form and the design appears as follows:
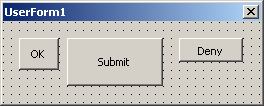
To visually resize various controls, first select them. Position the mouse on the border or corner of one of the selected controls until you get the cursor that would resize to the direction of your choice:
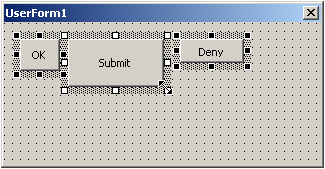
Click and drag in the direction of your choice:
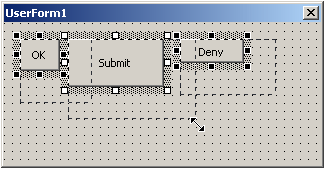
Once you get the desired size, release the mouse.
To precisely change the sizes of various controls at the same time, first select them. Then, in the Properties window, change the values of the Width and Height properties. The new value would be applied to all selected controls. Alternatively, Microsoft Visual Basic provides tools to automatically do this for you.
|
Control Maintenance |
|
Copying a Control |
If you had applied some design on a control and you want to replicate that design, you can copy the control. This is mostly a simple operation of copy n' paste. You can copy a control on the work area or on a form and paste it on the same container (you are not allowed to copy a control from the work area to a form and vice versa). You can also copy a control from one work area and paste it in another work area. You can copy a control from one form and paste it in another form.
When you copy and paste a control, there are some characteristics it would retain and some others it would loose. Normally, it would keep its aesthetic characteristics (such as the color) and its size but it will loose some others (such as its location and its programmatic characteristics such as its name.
To copy a control:
- Right-click the control and click Copy
- Click the control to select it and press Ctrl + C
To copy a group of controls, first select the controls:
- Right-click in the selection and click Copy
- Press Ctrl + C
To paste the copied controls, in the work area or on a form:
- Right-click the destination (work area or form) and click Paste
- Press Ctrl + V
|
Deleting Controls |
If you have added a control to the work area or a form but you don't need it anymore, you can remove it
from the container. You can also delete a group of controls in one step.
To remove a control from a work area or from a form:
- Click the control and press Delete
- Right-click the control and click Cut
To remove a group of controls, select them:
- Press Delete
- Right-click one of the selected controls and click Cut
|
Tab Ordering |
When using the controls of a form, you can press Tab to move from one control to another. For example, after entering a value in a text box of a form, if there is another text box on the right side, when you press Tab, the caret should move to that right control. If there is no control on the right side, the caret should move to the control under the one previously used. If the caret or focus is in the last bottom control on a form and you press Tab, the caret should move back to the first record. This follows the arranged sequence of the controls on the form. For this reason, the controls on a form should be aligned in the order of a logical sequence.
When you add a control to a form that already has other controls, it is sequentially positioned at the end of the existing controls. The sequence of controls navigation is set using the Tab Order dialog box. To access the Tab Order dialog box:
- Right-click the form and click Tab Order
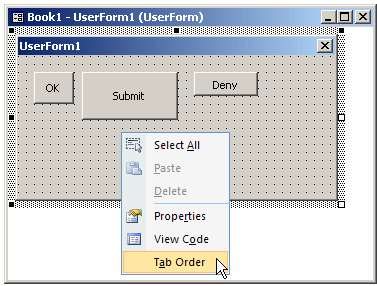
- On the main menu of Microsoft Visual Basic, click View -> Tab Order
|
Primary Characteristics of Windows Controls |
|
The Name of a Control |
Every object used in a computer must have a name. This allows you and the operating system to know at any time what object you are referring to. When you add a new control to the work area in Microsoft Excel or to a form in Microsoft Visual Basic, the object receives a default name. For example, the first CommandButton you add is named CommandButton1. If you add another button, it would be named CommandButton2, and so on. The default name assigned may not be indicative enough for the role a control is playing, especially when you use many controls on the same container. Therefore, you should assign your own custom names to the controls you use.
In the Properties window, the name of a control is represented with the (Name) field. To change the name of a control, click (Name) and type the desired name. There are rules you must follow when naming your controls. The name of a control:
- Must start with a letter
- After the first letter, can contain letters, digits, and underscores only
- Cannot contain space
Based on these rules, you can adapt your own.
|
|
- On the form, right-click CommandButton1 and click Properties
- In the Properties window, click (Name) and type cmdSubmit
- On the form, click the combo box
- In the Properties window, click (Name) and type cboSizes
|
Border Style |
Some controls display a border when they are drawn and some others don't. Some of these controls allow you to specify a type of border you want to show surrounding the control. This characteristic is controlled by the BorderStyle property.
|
The Text or Caption of a Control |
|
The Caption or Text of a Control |
Some controls are text-based, meaning they are meant to display or sometimes request text from the user. For such controls, this text is referred to as caption while it is simply called text for some other controls. This property is not available for all controls.
If a control displays text, it may have a property called Caption in the Properties window. After adding such a control to a work area or a form, its Caption field would display the same text as its name. At design time, to change the caption of the control, click its Caption field in the Properties window and type the desired value. For most controls, there are no strict rules to follow for this text. Therefore, it is your responsibility to type the right value. Some other controls have this property named Text. For such a control, when you add it to a work area or a form, its Text field in the Properties window may be empty. If you want, you can click the Text field and type the desired text.
The text provided in Caption or a Text field of a text-based control can only be set “as is†at design time. If you want the text to change while the application is running, you can format it. For example, such a control can display the current time or the name of the user who is logged in. These format attributes cannot be set at design time. To change the text of a text-based control at run time, either assign a simple string or provide a formatted string to the Caption or the Text property.
|
|
- On the form, click the button
- In the Properties window, click Caption and type Submit
- On the form, click the combo box
- In the Properties window, click Text field and type Large
|
The Alignment of the Text or Caption of a Control |
If a control is text-based, when you provide text to it or when you type text in it, by default, text is positioned to the left side of the control. This is appropriate if the value entered is a string (regular text). In some cases, such as numbers, you may prefer the value to be position in the center or on the right side of the control. This characteristic is referred to as the alignment of text. Once again, not all controls have this option.
The ability to control the alignment of text is done through the TextAlign property:
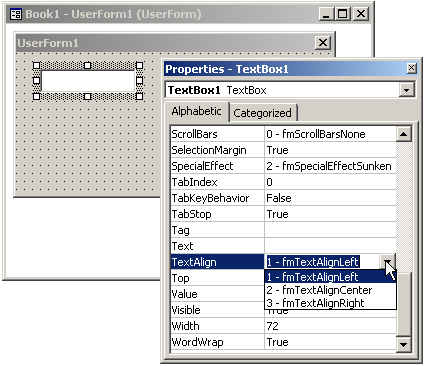
It provides three options:
| TextAlign | Result |
| 1 - frmTextAlignLeft | Text will be aligned to the left of the control |
| 2 - fmTextAlignCenter | Text will be position in the center of the control |
| 3 - fmTextAlignRight | Text will be aligned to the left of the control |
To programmatically specify the text alignment of a control that supports this characteristics, assign the desired option to this property. Here is an example:
TextBox1.TextAlign = fmTextAlignRight
|
The Font of Text of a Control |
The font specify what face, size, and style a control should
use to display its text. To specify or change the font of a control, click it to
select in. In the Properties window, click Font and click the browse button ![]() .
This would display the Font dialog box:
.
This would display the Font dialog box:
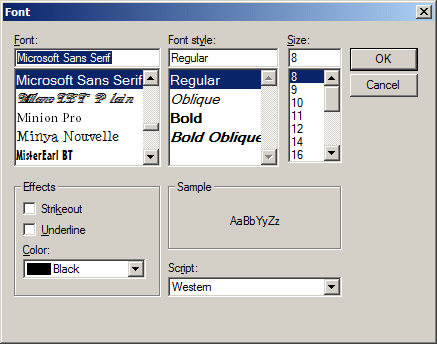
From this dialog box, you can select the font name, the style, the size, and the effect(s). Once you are ready, click OK.
