Home

Worksheets


Worksheets Fundamentals


Introduction

A worksheet is a document in Microsoft Excel. A worksheet is an object created inside a workbook. That is, a workbook is a series of worksheets that are treated as a group.


Practical LearningPractical Learning: Introducing Worksheets

  1. Start Microsoft Excel or a new document
  2. To save the document, press Ctrl + S
  3. Save it as ROSH1
  4. On the Ribbon, click Developer
  5. In the Code section, click the Visual Basic button Visual Basic
  6. To create a form, on the main menu of Microsoft Visual Basic, click Insert -> UserForm
  7. Right-click the form and click Properties
  8. Change its Caption to Red Oak High School - Management

Identifying a Worksheet

A worksheet is an object of type Worksheet. The various worksheets you will use are stored in a collection called Worksheets. Another name for the collection that contains the worksheets is called Sheets. In most cases, you can use either of these two collections. Each worksheet is an object of type Worksheet.

Referring to a Worksheet

In the previous lesson, we saw that, if you have only one workbook opened, to refer to it, you can pass an index of 1 to the Item property of the Workbooks collection to access its Workbook object. Here is an example:

Sub Exercise()
    Workbooks.Item(1)
End Sub

You can omit the Item name if you want and you would get the same result:

Sub Exercise()
    Workbooks(1)
End Sub

Because the worksheets of a document are part of the workbook that is opened, to support them, the Workbook class is equipped with a property named Worksheets or Sheets. Therefore, after identifying the workbook, use the period operator to access the Worksheets or the Sheets property. Here is an example:

Sub Exercise()
    Workbooks.Item(1).Sheets
End Sub

As mentioned already, the worksheets are stored in the Worksheets collection, which is actually a class. Each worksheet can be located based on an indexed property named Item. The Item property is a natural number that starts at 1. The most left worksheet has an index of 1. The second worksheet from left has an index of 2, and so on. To access a worksheet, type one of the Worksheets or Sheets collections, followed by the period operator, followed by Item() and, between the parentheses, type the index of the worksheet you want. For example, the following code will access the second worksheet from left:

Private Sub Exercise()
    Workbooks.Item(1).Sheets.Item(2)
End Sub

Just as we saw that you can omit the Item word on the Workbooks object, you can also omit it on the Worksheets or the Sheets object. This can be done as follows:

Sub Exercise()
    Workbooks.Item(1).Worksheets(2)
End Sub

Or as follows:

Sub Exercise()
    Workbooks(1).Worksheets(2)
End Sub

Each tab of a worksheet has a label known as its name. By default, the most left tab is labeled Sheet1. The second tab from left is labeled Sheet2. To refer to a worksheet using its label, call the Worksheets or the Sheets collection and pass the label of the tab you want, as a string. Here is an example that refers to the worksheet labeled Sheet3:

Sub Exercise()
    Workbooks.Item(1).Sheets.Item("Sheet3")
End Sub

On all the code we have written so far, we were getting a worksheet from the currently opened workbook. As mentioned already, by default, when Microsoft Excel starts, it creates a default workbook and gets a Workbooks.Item(1) reference. This means that you do not have to indicate that you are referring to the current workbook: it is already available. Consequently, in your code, you can omit Workbooks.Item(1) or Workbooks(1). Here is an example:

Sub Exercise()
    Sheets.Item("Sheet3")
End Sub

Getting a Reference to a Worksheet

In the above code segments, we assumed that you onlywant to perform an action on a worksheet and move on. Sometimes you may want to get a reference to a worksheet. To do this, declare a variable of type Worksheet. To initialize it, access the desired worksheet from the workbook using the Item property and assign it to the variable using the Set operator. Here is an example that gets a reference to the second worksheet of the currently opened workbook and stores that reference to a variable:

Sub Exercise()
    Dim Second As Worksheet
    
    Set Second = Workbooks.Item(1).Sheets.Item(2)
End Sub

Selecting a Worksheet

To select a worksheet, access the Sheets collection, pass the name of the desired worksheet as string, and call Select. Here is an example that selects a worksheet labeled Sheet1:

Private Sub Exercise()
    Sheets("Sheet1").Select
End Sub

The worksheet that is selected and that you are currently working on is called the active worksheet. It is identified as the ActiveSheet object (it is actually a property of the current document).

Worksheets Names 

To rename a worksheet, pass its index or its default name as a string to the Sheets (or the Worksheets) collection, then access the Name property of the collection and assign the desired name. Here is an example:

Private Sub Exercise()
    Sheets("Sheet1").Name = "Employees Records"
End Sub

This code will change the name of the Sheet1 worksheet to Employees Records.

As we saw earlier, you can refer to, or select, a worksheet, using its name. If you had renamed a worksheet, you can use that name to select it. Here is an example that selects a worksheet named Tuition Reimbursement:

Private Sub Exercise()
    Sheets("Tuition Reimbursement").Select
End Sub

Practical Learning Practical Learning: Naming Worksheets

  1. Design the form as follows:
     
    Renaming a Worksheet
    Control Name Caption
    Label   Rename:
    TextBox txtSheetOldName  
    Label   As
    TextBox txtNewName  
    CommandButton cmdRename Rename
  2. Double-click the button and implement its Click event as follows:
     
    Private Sub cmdRename_Click()
        Worksheets(txtSheetOldName.Text).Name = txtSheetNewName.Text
        txtSheetOldName.Text = ""
        txtSheetNewName.Text = ""
    End Sub
  3. To use the form, on the main menu of Visual Basic, click Run -> Run Sub/UserForm
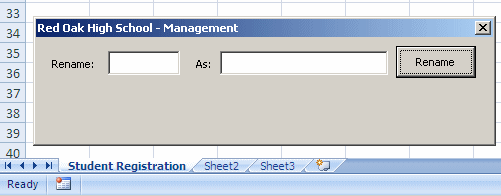
  4. In the Rename text box, type Sheet1
  5. In the As text box, type Student Registration
     
    Renaming a Worksheet
  6. Click Rename and notice that the To rename the first worksheet, double-click the Sheet1 tab to put it in edit mode
  7. In the Rename text box, type Sheet2
  8. In the As text box, type Emergency Information and click Rename
     
    Renaming a Worksheet
  9. Close the form and return to Microsoft Visual Basic


Working on Many Worksheets


Freezing a Cell or More Rows

You can use a column to freeze its cells. To freeze or unfreeze a cell, call the ActiveWindow object and access its FreezePanes property, which is Boolean. If you set it to True, the window is divided in four parts  based on the cell that either is currently selected or you will have indicated. Here is an example of using it:

Sub Freezing()
    ActiveWindow.FreezePanes = True
End Sub

Splitting the Interface

To split a worksheet, use the ActiveWindow object and access its Boolean Split property. To split, set this property to true:

Sub Splitting()
    ActiveWindow.Split = True
End Sub

To un-split, set this property to False. 

The Sequence of Worksheets

To move a worksheet, use the Move() method of the Worksheets or the Sheets collection. The syntax of this method is:

Worksheets(Index).Move(Before, After)

Both arguments are optional. If you don't specify any argument, Microsoft Visual Basic would create a new workbook with one worksheet using the index passed to the collection with a copy of that worksheet. Suppose you are (already) working on a workbook that contains a few worksheets named Sheet1, Sheet2, and Sheet3. If you call this method on a collection with the index set to one of these worksheets, Microsoft Excel would make a copy of that worksheet, create a new workbook with one worksheet that contains a copy of that worksheet. For example, the following code with create a new workbook that contains a copy of the Sheet2 of the current workbook:

Private Sub CommandButton1_Click()
    Sheets.Item("Sheet2").Move
End Sub

In this case, the name of the worksheet you are passing as argument must exist. Otherwise you would receive an error. Instead of using the name of the worksheet, you can pass the numeric index of the worksheet that you want to copy. For example, the following code will create a new workbook that contains one worksheet named Sheet3:

Private Sub CommandButton1_Click()
    Sheets.Item(3).Move
End Sub

If calling the Item property, make sure the index is valid, otherwise you would receive an error.

To actually move a worksheet, you must specify whether it would be positioned to the left or the right of an existing worksheet. To position a worksheet to the left of a worksheet, assign it the Before factor. To position a worksheet to the left of a worksheet, assign it the After argument. Consider the following code:

Private Sub cmdMove_Click()
    Worksheets("Sheet3").Move After:=Worksheets("Sheet1")
End Sub

This code will move the worksheet named Sheet3 to the right of a worksheet named Sheet1.

Adding New Worksheets

To create a new worksheet, you can specify whether you want it to precede or succeed an existing worksheet. To support creating a new worksheet, call the Add() method of the Worksheets or the Sheets collection. Its syntax is:

Workbook.Sheets.Add(Before, After, Count, Type)

All of these arguments are optional. This means that you can call this method as follows:

Private Sub cmdNewWorksheet_Click()
    Sheets.Add
End Sub

If you call the method like that, a new worksheet would be created and added to the left side of the active worksheet.

If you want to create a new worksheet on the left side of any worksheet you want, you can first select that worksheet and call the Add() method. For example, suppose you have three worksheets named Sheet1, Sheet2, and Sheet3 from left to right and you want to insert a new worksheet between Sheet2 and Sheet3, you can use code as follows:

Private Sub cmdNewWorksheet_Click()
    Sheets("Sheet2").Select
    Sheets.Add
End Sub

To be more precise, you can specify whether the new worksheet will be positioned to the left or to the right of another worksheet used as reference.

Practical Learning Practical Learning: Creating Worksheets

  1. Change the design of the form as follows:
     
    Creating a New Worksheet
    Control Name Caption
    Label   Create a new worksheet named:
    TextBox txtNewWorksheet  
    CommandButton cmdNewWorksheet  
  2. Double-click the Create button and implement its Click event as follows:
     
    Private Sub cmdNewWorksheet_Click()
        Worksheets.Add Before:=Worksheets("Sheet3")
        Worksheets(Worksheets.Count - 1).Name = txtNewWorksheet.Text
        txtNewWorksheet.Text = ""
    End Sub
  3. To test the code, on the Standard toolbar of Microsoft Visual Basic, click the Run Sub/UserForma button
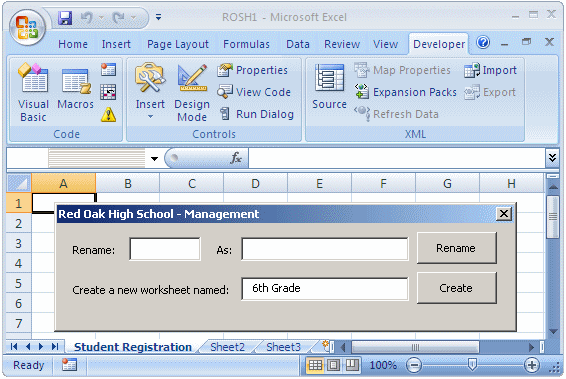
  4. Click the Create A New Worksheet Named text box and type 6th Grade
     
    Creating a New Worksheet
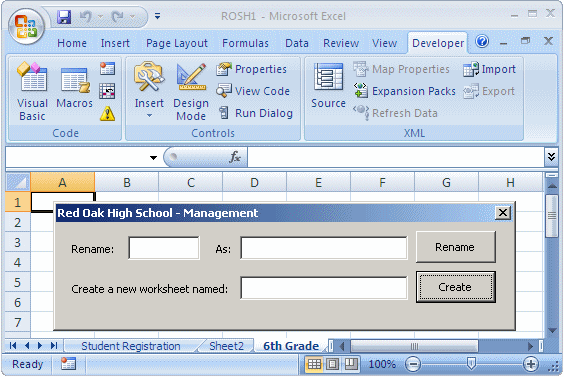
  5. Click Create
     
    Creating a New Worksheet
  6. In the same way, create new worksheets named 5th Grade, 4th Grade, 3rd Grade, 2nd Grade, and 1st Grade
  7. Close the form

Removing Worksheets

To remove a worksheet, call the Delete() method of its collection. When calling this method, pass the name of the worksheet you want to remove to the collection.

Practical Learning Practical Learning: Deleting Worksheets

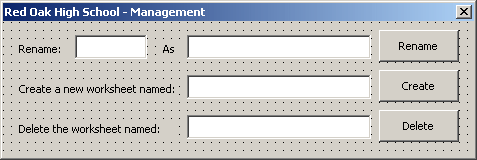
  1. Change the design of the form as follows:
     
    Form Design
    Control Name Caption
    Label   Delete the worksheet named:
    TextBox txtRemoveSheet  
    CommandButton cmdDelete Delete
  2. Double-click the Create button and implement its Click event as follows:
     
    Private Sub cmdRemoveSheet_Click()
        Worksheets("Sheet3").Delete
        txtRemoveSheet.Text = ""
    End Sub
  3. To test the code, on the Standard toolbar of Microsoft Visual Basic, click the Run Sub/UserForm button
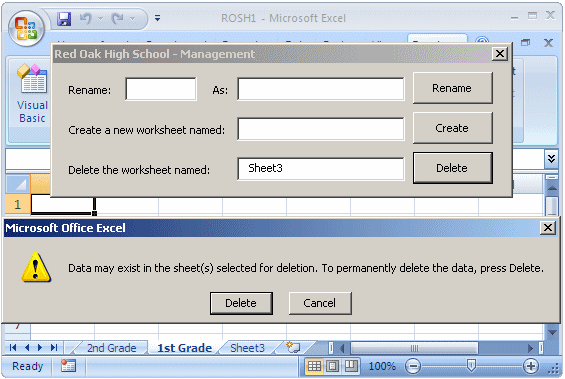
  4. Click the Delete The Worksheet Named text box, type Sheet3
     
    Deleting a Worksheet
  5.  Click Delete
     
    Deleting a Worksheet
  6. After reading the warning, click Delete
  7. In the same way, delete the worksheet named Sheet2
  8. Close the form
  9. Save the document

Accessing a Worksheet

To access a worksheet, the Worksheet class is equipped with a method named Activate. Its syntax is:

Worksheet.Activate()

This method takes no argument. To call it, get a reference to the worksheet you want to access and call the Activate() method. You can also do this with less code by applying the index directly to the Worksheets collection. Here is an example:

Private Sub cmdSelectWorkbook_Click()
    Worksheets(2).Activate
End Sub

Practical LearningPractical Learning: Introducing File Processing

  1. To create a new workbook, press Ctrl + N
  2. Double-click Sheet1, type Switchboard
  3. Double-click Sheet2 and type Employees
  4. Double-click Sheet3 and type Customers
  5. Click the next sheet tab (the Insert Worksheet)
  6. Double-click the new sheet tab and type Cars
  7. Click the next sheet tab (the Insert Worksheet)
  8. Double-click the new sheet tab and type Rental Rates
  9. Click the Switchboard tab
  10. Press and hold Shift
  11. Click the Rental Rates tab
  12. Release Shift
     
    Selecting Tab Sheets
  13. Click Cell B2 and type Bethesda Car Rental
  14. Click the Enter button Enter
  15. Click the Employees sheet tab
  16. Click Cell B6 and type Employee #
  17. Create a few employees
  18. Click the Customers sheet tab
  19. Click Cell B6 and type Driver's Lic. #
  20. Create a few customers
  21. Click the Cars sheet tab
  22. Click Cell B6 and type Tag Number
  23. Create a few cars
  24. On the Ribbon, click Developer
  25. In the Code section of the Ribbon, click Visual Basic Visual Basic
  26. On the main menu of Microsoft Visual Basic, click Insert -> UserForm
  27. If the Properties window is not available, on the main menu, click View -> Properties Window.
    In the Properties window, click (Name) and type frmRentalOrder
  28. Click Caption and type Bethesda Car Rental - Order Processing - Rental Order
  29. Add a Command Button to the form and change its properties as follows:
    (Name): cmdEmployees
    Caption: Employees 
  30. Right-click Employees button and click View Code
  31. Implement the event as follows:
     
    Private Sub cmdEmployees_Click()
        Worksheets(2).Activate
    End Sub
  32. Display the form again
  33. Add another Command Button and change its characteristics as follows:
    (Name): cmdCustomers
    Caption: Customers
  34. Double-click the Customers button and implement the event as follows:
     
    Private Sub cmdCustomers_Click()
        Worksheets(3).Activate
    End Sub
  35. Return to the form
  36. Add another Command Button and change its characteristics as follows:
    (Name): cmdCars
    Caption: Cars
  37. Double-click the Cars button and implement the event as follows:
     
    Private Sub txtCars_Click()
        Worksheets(4).Activate
    End Sub
  38. Show the form one more time
  39. Add another Command Button and change its characteristics as follows:
    (Name): cmdRentalRates
    Caption: Rental Rates
  40. Double-click the new button and implement its Click event as follows:
     
    Private Sub cmdRentalRates_Click()
        Worksheets(5).Activate
    End Sub
  41. On the Standard toolbar, click the Run Sub/UserForm button
  42. Click each button and notice that the corresponding worksheet displays
  43. Close the form
  44. Close Microsoft Visual Basic
  45. Close Microsoft Excel
  46. If asked whether you want to save, click No


Previous Copyright © 2009-2016, FunctionX, Inc. Next