
Techniques of Data Manipulations
 |
Techniques of Data Manipulations |
Computer science is filled with various languages, for different purposes. The database industry is just one field of the computer world. As such, it enjoys its share of issues, such as what could be the best approach to create, use, and manage a database. A big issue of the database environment is how different database environments can communicate. Although this problem has not been completely solved, at least most database systems use a common language. The Structured Query Language, known as SQL, is a universal language used on various computer systems for database purposes. The SQL is a standard language. Transact-SQL is Microsoft's implementation of SQL. Transact-SQL is the language used internally by Microsoft SQL Server.
|
|
|
The Structured Query Language |
|
PRINT Something |
|
Like every language, SQL ships with some words used to carry its various operations. If you want to display something in plain text as a result of a statement, in the upper section, type PRINT followed by what to display. Therefore, PRINT uses the following syntax: PRINT WhatToPrint The item to display can be anything that is allowed and it is provided on the right side of PRINT. If it is a normal (called a constant) number, simply type it on the right side of PRINT. Here is an example:
The item to display can also be an operation or the result of an operation as we will learn in this lesson. If you want to display a character, a word, or a sentence, include it between single-quotes. You can also display an expression as a combination of number(s) and sentences as we will learn later. After creating an expression, to execute it, you can press F5. |
|
SELECT, Anything |
|
The SELECT keyword, the most widely used word of databases, can be used, among other things, to display a value. The SELECT keyword uses the following syntax: SELECT What Based on this, to use it, where it is needed, type SELECT followed by a number, a word, a string, or an expression. The item to display follows the same rules as PRINT. Here is an example: SELECT 402 Here is another example: SELECT 'Transact-SQL is the SQL implemented in MS SQL Server' This would produce |
|
SELECT This AS That |
|
In the above introductions, we used either PRINT or SELECT to display something in the Query Window. One of their differences is that PRINT is primarily used to display a simple result in the lower section. As we will learn in other lessons, SELECT is used to select one or more values and/or perform other, more elaborate, operations. One of the characteristics of SELECT is that it can segment its result in different sections. Each section is represented separately. To create various sections using SELECT, separate them with a comma. Here is an example: 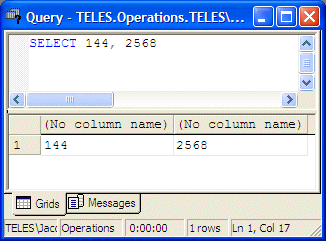 SELECT represents each value in a section called a column. Each column is represented with a name also called a caption. By default, the caption displays as "(No column name)". If you want to use your own caption, on the right side of an expression, type the AS keyword followed by the desired caption in single quotes. Here is an example: SELECT 26 As 'Age' If you create different sections, separated by a comma, you can followed each with AS and a caption. Here is an example: SELECT 'James Knight' As FullName, 20.48 AS Salary This would produce: 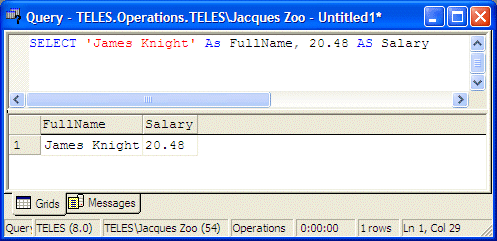 |
|
SQL Database Creation |
|
To create a database, you use the CREATE DATABASE instruction using the following syntax: CREATE DATABASE DatabaseName SQL is not case-sensitive. This means that CREATE, create, and Create mean the same thing. It is a tradition to write SQL's own words in uppercase. This helps to distinguish SQL instructions with the words you use for your database. |
|
Deleting a Database in the Console Manager |
|
If you have created a database but don't need it anymore, you can delete it. To delete a database using SQL, you use the DROP DATABASE instruction followed by the name of the database. The syntax used is: DROP DATABASE DatabaseName Before deleting a database in SQL, you must make sure the database is not being used or accessed. On this tutorial, we assume that you are only learning, which means you can control whether your database is being accessed or who is accessing your database. To make sure your database is not busy, you can check the Enterprise Manage and make sure the database you want to delete is not selected. |
|
SQL Variables |
|
Introduction |
|
The values we have used so far are referred to as constant because we certainly knew them in advance and didn't change them in our statements. If you intend to use a certain category of number over and over again, you can reserve a section of memory. This allows you to put a number in that area of memory, easily change the number with another, over an over. For example, you can store the names of employees one after another in the same area of memory as needed. To manage this exchange of memory, Transact-SQL uses an internal program called an interpreter. To use the same area of memory to store and remove values as needed, the interpreter needs two primary pieces of information: a name and the desired amount of space in memory capable of storing the value. |
|
Declaring Variables |
|
A variable is an area of memory used to store values that can be used in a program. Before using a variable, you must inform the interpreter. This is also referred to as declaring a variable. To declare a variable, use the DECLARE keyword using the following formula: DECLARE Options The DECLARE keyword lets the interpreter know that you are making a declaration. The DECLARE keyword is followed by a name for the variable. In Transact-SQL, the name of a variable starts with the @ sign. The name of a variable allows you to identify the area of memory where the value of the variable is stored. While other languages like C/C++, Pascal, Java, C#, etc impose strict rules to names, Transact-SQL is extremely flexible. A name can be made of digits only. Here is an example: DECLARE @264 Such a name made of digits can create some confusion with a normal number. A name can also be made of one or more words. |
|
To avoid confusion, here are the rules we will use for our variables:
To declare a variable, as we will see in the next section, after giving a name to a variable, you must also specify the amount of memory that the variable would need. The amount of memory is also called a data type. Therefore, the declaration of a variable uses the following formula: DECLARE @Variable DataType You can also declare more than one variable. To do that, separate them with a comma. The formula would be: DECLARE @Variable1 DataType, @Variable2 DataType, @Variable1 DataType Unlike most other languages like C#, C/C++ or Pascal, if you declare many variables that use the same data type, the name of each variable must be followed by its own data type. |
|
Initializing a Variable |
After declaring a variable, the interpreter reserves a space in memory for it but the space doesn't necessarily hold a recognizable value. This means that, at this time, the variable is null. One way you can change this is to give a value to the variable. This is referred as initializing the variable. Remember that a variable's name starts with @ and whenever you need to refer to the variable, you must make sure you include the @ sign. To initialize a variable, in the necessary section, type the SELECT or the SET keyword followed by the name of the variable, followed by the = sign, followed by an appropriate value. The formula used is: SELECT @VariableName = DesiredValue or SET @VariableName = DesiredValue Once a variable has been initialized, you can make its value available or display it to the user. This time, you can type the name of the variable to the right side of PRINT or SELECT. |
|
SQL Data Types |
|
After setting the name of a variable, you must specify the amount of memory that the variable will need to store its value. Since there are various kinds of information a database can deal with, SQL Server provides a set of categories called data types. Therefore, you must specify the data type that is necessary for a particular column. A database deals with various types of data, appropriate or not for certain fields. This means that you should take care of jobs behind the scenes as much as you can. One way you can do this is by controlling the amount of information that can be entered in a particular field. As various columns can hold different types of data, so can the same data type control its own mechanism of internal data entry. The length of data means different things to different fields. Columns that carry the same data type can have different lengths. |
|
A Boolean value is a piece of information stated as being true or false, On or Off, Yes or No, 1 or 0. To declare a variable that holds a Boolean value, you can use the BIT or bit keyword. After declaring a Boolean variable, you can initialize it with 0 or another value. If the variable is initialized with 0, it receives the Boolean value of False. If it is initialized with any other number, it receives a True value. Here is an example of a Boolean variable: 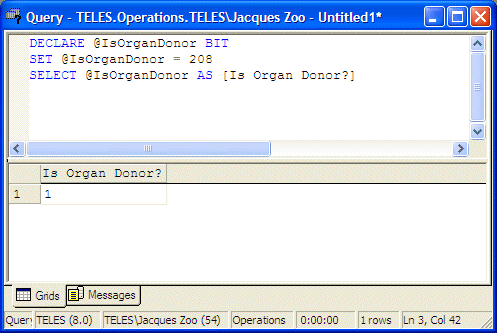
|
|
Integer Variables |
|
An integer, also called a natural number, or a whole number, is a number that can start with a + or a - sign and is made of digits. Between the digits, no character other than a digit is allowed. When the number starts with +, such as +44 or +8025, such a number is referred to as positive and you should omit the starting + sign. This means that the number should be written as 44 or 8025. Any number that starts with + or simply a digit is considered as greater than 0 or positive. A positive integer is also referred to (in the programming world) as unsigned. On the other hand, a number that starts with a - symbol is referred to as negative. If a variable would hold natural numbers in the range of -2,147,483,648 to 2,147,483,647, you can declare it with the int keyword as data type. Here is an example:
This would produce: 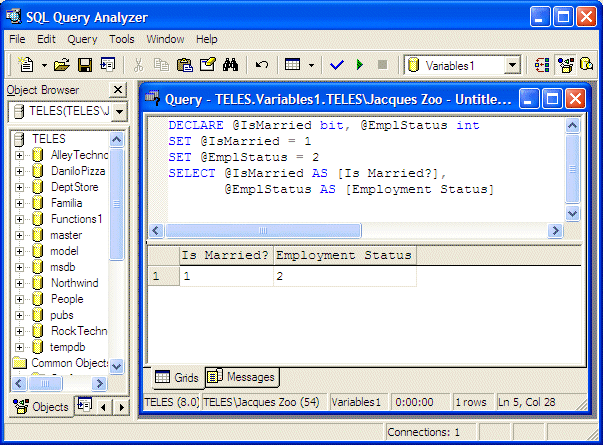 The length of an integer is the number of bytes its field can hold. For an int type, that would be 4 bytes. If you except to use very small numbers such as student's ages, or the number of pages of a brochure or newspaper, apply the tinyint data type to such a field. A variable with the tinyint data type can hold positive numbers that range from 0 to 255. The smallint data type follows the same rules and principles as the int data type except that it is used to store smaller numbers that would range between -32,768 and 32,767. The bigint data type follows the same rules and principles as the int data type except that its field can hold numbers from -9,223,372,036,854,775,808 to 9,223,372,036,854,775,807 The binary data type is used for a variable that would hold hexadecimal numbers. Examples of hexadecimal numbers are 0x7238, 0xFA36, or 0xAA48D. Use the binary data type if all values of the variable would have the exact same length (or quantity). If you anticipate that some entries would be different than others, then use the alternative varbinary data type. The varbinary type also is used for hexadecimal numbers but allows dissimilar entries, as long as all entries are hexadecimals. |
|
Decimal Variables |
|
A decimal number is a number that can have a period (or the character used as the decimal separator as set in the Control Panel) between the digits. An example would be 12.125 or 44.80. Like an integer, a decimal number can start with a + or just a digit, which would make it a positive number. A decimal number can also start with a - symbol, which would make it a negative number. If the number represents a fraction, a period between the digits specifies what portion of 1 was cut. If you anticipate such a number for a field, specify its data type as numeric or decimal (either decimal or numeric would produce the same effect in SQL Server). Here is an example:
A floating-point number is a fractional number, like the decimal type. Floating-point numbers can be used if you would allow the database engine to apply an approximation to the actual number that a field is supposed to carry. To declare such a variable, use the float or the real keyword. A precision is the number of digits used to display a numeric value. For example, the number 42005 has a precision of 5, while 226 has a precision value of 3. If the data type is specified as an integer (the int and its variants) or a floating-point number (float and real), the precision is fixed by the database and you can just accept the value set by SQL Server. For a decimal number (decimal or numeric data types), SQL Server allows you to specify the amount of precision you want. The value must be an integer between 1 and 38 (28 if you are using SQL Server 7). A decimal number is a number that has a fractional section. Examples are 12.05 or 1450.4227. The scale of a number if the number of digits on the right side of the period (or the character set as the separator for decimal numbers for your language, as specified in Control Panel). The scale is used only for numbers that have a decimal part, which includes currency (money and smallmoney) and decimals (numeric and decimal). If a variable is declared with the decimal or numeric data type, you can specify the amount of scale you want. The value must be an integer between 0 and 18. Here is an example:
|
|
Currency Variables |
|
If a variable would hold monetary values, you can declare it with the money keyword. A variable with a money data type can hold positive or negative values from -922,337,203,685,477.5808 to +922,337,203,685,477.5807. Here is an example: DECLARE @YearlyIncome Money SET @YearlyIncome = 20800.12 SELECT @YearlyIncome While the money data type can be used for a variable that would hold large quantities of currency values, the smallmoney data type can be applied for a variable whose value cannot be lower than -214,748.3648 nor higher than 214,748.3647. The precision and scale of a money or smallmoney variable are fixed by SQL Server. The scale is fixed to 4. |
DECLARE @EmplStatus int,
        @IsMarried bit,
        @WeeklyHours Decimal(6,2),
        @HourlySalary SmallMoney,
        @WeeklySalary SmallMoney
SET @IsMarried = 1
SET @EmplStatus = 2
SET @WeeklyHours = 36.50
SET @HourlySalary = 15.72
SET @WeeklySalary = @WeeklyHours * @HourlySalary
SELECT @EmplStatus AS [Empl Status],
       @IsMarried AS [Married?],
       @WeeklyHours AS Hours,
       @HourlySalary AS Hourly,
       @WeeklySalary AS Weekly
|
|
Date and Time Variables |
|
A datetime data type is used for a column whose data would consist of date and/or time values. The entries must be valid date or time values but SQL Server allows a lot of flexibility, even to display a date in a non-traditional format. The date value of a datetime field can be comprised between January 1st, 1753 and December 31, 9999. The smalldatetime is an alternative to the datetime data type. It follows the same rules and principles as the datetime data type except that a date value must be comprised between January 1st, 1900 and June 6, 2079. To initialize a date or time-based variable, include the desired but recognizable value in single-quotes. Here is an example: |
DECLARE @DateHired DateTime,
        @EmplStatus int,
        @IsMarried bit,
        @WeeklyHours Decimal(6,2),
        @HourlySalary SmallMoney,
        @WeeklySalary SmallMoney
SET @DateHired = '12/05/1998'
SET @IsMarried = 1
SET @EmplStatus = 2
SET @WeeklyHours = 36.50
SET @HourlySalary = 15.72
SET @WeeklySalary = @WeeklyHours * @HourlySalary
SELECT @DateHired AS [Date Hired],
       @EmplStatus AS [Empl Status],
       @IsMarried AS [Married?],
       @WeeklyHours AS Hours,
       @HourlySalary AS Hourly,
       @WeeklySalary AS Weekly
|
|
Character Variables |
|
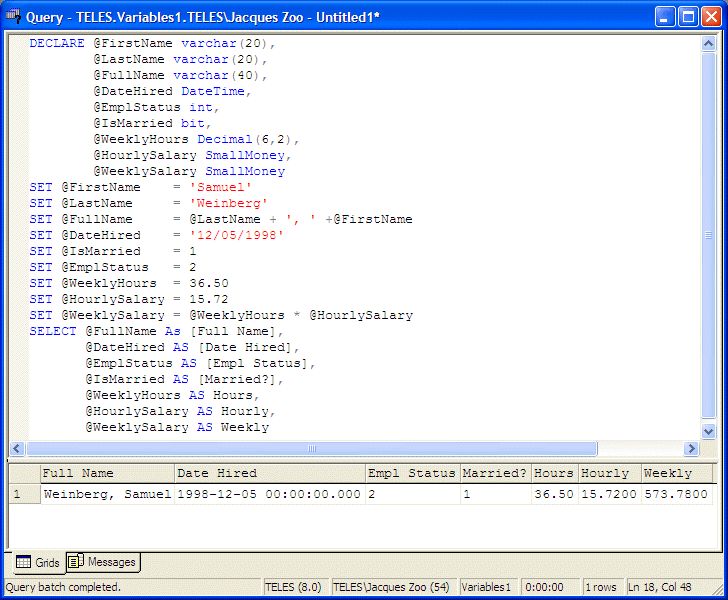
A field of characters can consist of any kinds of alphabetical symbols in any combination, readable or not. If you want a variable to hold a fixed number of characters, such as the book shelf numbers of a library, declare it with the char data type. In the computer world, a string is a character or a combination of characters that are considered "as is" with regards to the scenario in which they are used. If a variable will hold strings of different lengths, declare it with the varchar data type. The maximum length of text that a field of varchar type can hold is equivalent to 8 kilobytes. In some circumstances, you will need to change or specify the number of characters used in a varchar variable. Although a First Name and a Book Title variables should use the varchar type, both variables would not have the same length of entries. As it happens, people hardly have a first name that is beyond 20 characters and many book titles go beyond 32 characters. In this case, both variables would use the same data type but different lengths. To specify the maximum number of characters that can be stored in the variable, on the right side of varchar, type an opening and a closing parentheses. Inside of the parentheses, type the desired number. Here is an example: DECLARE @Welcome varchar(50) SET @Welcome = 'Welcome to the world of Transact-SQL' PRINT @Welcome The text data type can be applied to a field whose data would consist of ASCII characters. As opposed to a varchar type of field, a text type of field can hold text that is longer than 8 kilobytes. The nchar, nvarchar, and ntext types follow the same rules as the char, varchar, and text respectively, except that they can be applied to variables that would hold international characters, that is, characters of languages other than US English. This is done following the rules of Unicode formats. |
DECLARE @FirstName varchar(20),
        @LastName varchar(20),
        @FullName varchar(40),
        @DateHired DateTime,
        @EmplStatus int,
        @IsMarried bit,
        @WeeklyHours Decimal(6,2),
        @HourlySalary SmallMoney,
        @WeeklySalary SmallMoney
SET @FirstName    = 'Samuel'
SET @LastName     = 'Weinberg'
SET @FullName     = @LastName + ', ' +@FirstName
SET @DateHired    = '12/05/1998'
SET @IsMarried    = 1
SET @EmplStatus   = 2
SET @WeeklyHours  = 36.50
SET @HourlySalary = 15.72
SET @WeeklySalary = @WeeklyHours * @HourlySalary
SELECT @FullName As [Full Name],
       @DateHired AS [Date Hired],
       @EmplStatus AS [Empl Status],
       @IsMarried AS [Married?],
       @WeeklyHours AS Hours,
       @HourlySalary AS Hourly,
       @WeeklySalary AS Weekly
|
|
Data Entry |
|
Introduction |
|
In the previous lesson, we reviewed different ways to present data to the user. We only displayed data that the user could not change, or at least if the user changed data, the change would not be kept. This is useful if the user is supposed to only view records. In most cases that involve databases, you will need to provide the users with the ability to update existing data or to create new records. This is the basis of data entry. |
|
Table Data Entry |
|
As you are probably aware already, columns are used to organize data by categories. Each column has a series of fields under the column header. One of the actual purposes of a table is to display data that is available for each field under a particular column. Data entry consists of providing the necessary values of the fields of a table. Data is entered into a field and every time this is done, the database creates a row of data. This row is called a record. Therefore, entering data also self-creates rows. Except for any unknown reason I can't think of, you will never have to create rows of a table. They are created automatically as the user is entering data. There are four main ways you can perform data entry for a Microsoft SQL Server table:
|
|
Data Entry Using the Enterprise Manager |
|
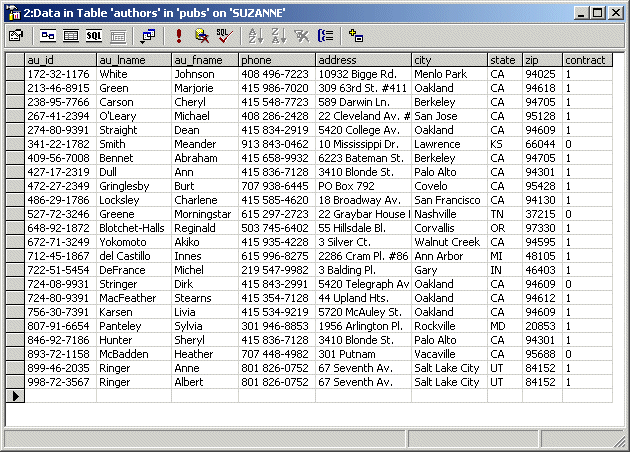
Probably the easiest and fastest way to enter data into a table is by using the Enterprise Manager. Of course, you must first open the desired table from an available database. In the MMC, after selecting the database and the Tables node, to open a table for data entry, right-click it, position your mouse on Open Table, and click Return All Rows. If the table does not contain data, it would appear with one empty row. If some records were entered already, their rows would show and the table would provide an empty row at the end, expecting a new record: |
|
To perform data entry on a table, a user would click in a field. Each column has a title, called a caption, on top. This gray section on top is called a column header. In SQL Server, it displays the actual name of the column. When using external and friendlier applications, you will find out that the caption can be different from the actual name of a column. The user refers to the column header to know what kind of data should/must go in a field under a particular column. This is why you should design your columns meticulously. After identifying a column, a user can type a value. Except for text-based columns, a field can accept or reject a value if the value does not conform to the data type that was set for the column. This means that in some circumstances, you may have to provide some or more explicit information to the user. While performing data entry, the user may skip some fields if the information is not available. The user can skip only columns that allow NULL values. If a column was configured as NOT accepting NULL values, the user must enter something in the field, otherwise he would receive an error and the table would not allow going further. |
|
Data Entry Using the DataGrid Control |
|
If you have used tables in SQL Server, Microsoft Access, Paradox, and other database environments, you probably know that their tables automatically save data as the user changes records and moves through cells. Although it is one of the most regularly used objects of databases in Microsoft Visual .NET, the DataGrid control doesn't inherently provide this functionality, but for a good reason. By default, the DataGrid control is not meant for databases only. When a DataGrid control displays data, it allows a user to enter new data but doesn't save it. Data entered in a DataGrid is extremely easy to save. This is simply taken care of by calling the Update method of your data adapter. |
|
|
|
|
Data Entry Using Windows Controls |
|
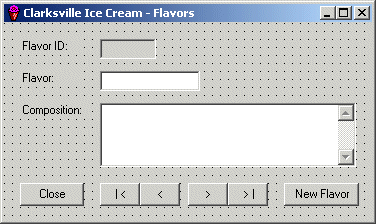
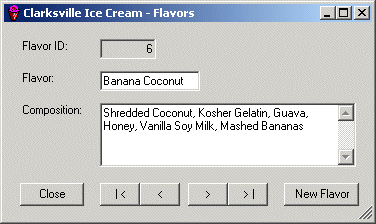
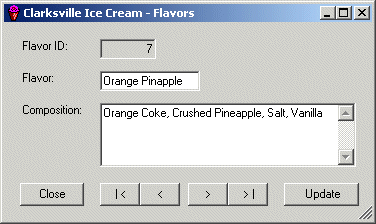
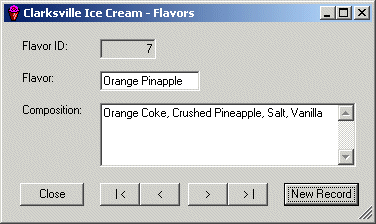
In the previous lesson, we created an order entry form but any new record entered in it would not be saved. This is because, when new information has been added to controls of a form, their data set must be updated. In the same way, if a user changes existing data of a control, the control that manages the data set must be notified and updated. |
|
|
private void Flavors_Load(object sender, System.EventArgs e)
{
	this.sqlDataAdapter1.Fill(this.dsFlavors1);
}

private void btnClose_Click(object sender, System.EventArgs e)
{
	Close();
}

private void btnFirst_Click(object sender, System.EventArgs e)
{
	this.BindingContext[this.dsFlavors1, "Flavors"].Position = 0;
	this.sqlDataAdapter1.Update(this.dsFlavors1);
}

private void btnPrevious_Click(object sender, System.EventArgs e)
{
	this.BindingContext[this.dsFlavors1, "Flavors"].Position =
		this.BindingContext[this.dsFlavors1, "Flavors"].Position - 1;
	this.sqlDataAdapter1.Update(this.dsFlavors1);
}

private void btnNext_Click(object sender, System.EventArgs e)
{
	this.BindingContext[this.dsFlavors1, "Flavors"].Position =
		this.BindingContext[this.dsFlavors1, "Flavors"].Position + 1;
	this.sqlDataAdapter1.Update(this.dsFlavors1);
}

private void btnLast_Click(object sender, System.EventArgs e)
{
	this.BindingContext[this.dsFlavors1, "Flavors"].Position =
		this.BindingContext[this.dsFlavors1, "Flavors"].Count - 1;
	this.sqlDataAdapter1.Update(this.dsFlavors1);
}

private void btnNewFlavor_Click(object sender, System.EventArgs e)
{
	// We will use the same button to create a new record and update it
	// Find out what the current state of the button is
	if( this.btnNewFlavor.Text.Equals("New Flavor") )
	{
		// Since the user clicked the New Record button, prepare to create a new record
		// We are using exception handling in case something goes wrong
		try
		{
			this.BindingContext[this.dsFlavors1, "Flavors"].EndCurrentEdit();
			this.BindingContext[this.dsFlavors1, "Flavors"].AddNew();

			// Since the fields are now empty, give focus to the first control that can be edited
			this.txtFlavor.Focus();

			// Since the user is currently creating a new record, change the caption of the button
			// This will remind the user to click the button otherwise the record would not be saved
			this.btnNewFlavor.Text = "Update";
		}// Did something go wrong?
		catch(System.Exception Ex)
		{
			MessageBox.Show(Ex.Message);
		}
	}
	else // Since the user is ready with a new record, acknowledge it
	{
		// Update the whole data set
		this.sqlDataAdapter1.Update(this.dsFlavors1);
		// Behave as if we were moving to the last record
		btnLast_Click(sender, e);
		// Since the new record has been added, change the caption of the New Record button
		this.btnNewFlavor.Text = "New Record";
	}
}
|
 |
 |
 |
|
SQL Data Entry |
|
Introduction |
|
In the SQL, data entry is performed using the INSERT combined with the VALUES keywords. The primary statement uses the following syntax: INSERT TableName VALUES(Column1, Column2, Column_n) Alternatively, or to be more precise, you can specify that you are entering data in the table using the INTO keyword between the INSERT keyword and the TableName factor. This is done with the following syntax: INSERT INTO TableName VALUES(Column1, Column2, Column_n) The TableName factor must be a valid name of an existing table in the database you are using. If the name is wrong, the SQL would simply consider that the table you are referring to doesn't exist. Consequently, you would receive an error. The VALUES keyword indicates that you are ready to list the values of the columns. The values of the columns must be included in parentheses. If the column is a BIT data type, you must specify one of its values as 0 or 1. If the column is a numeric type, you should pay attention to the number you type. If the column was configured to receive an integer (int, bigint, smallint), you should provide a valid natural number without the decimal separator. If the column is for a decimal number (float, real, decimal, numeric), you can type the value with its character separator (the period for US English). If the column was created for a date data type, make sure you provide a valid date. If the data type of a column is a string type, you should include its entry between single quotes. For example, a shelf number can be specified as 'HHR-604' and a middle initial can be given as 'D'. |
|
Adjacent Data entry |
|
The most common technique of performing data entry requires that you know the sequence of fields of the table in which you want to enter data. With this subsequent list in mind, enter the value of each field in its correct position. During data entry on adjacent fields, if you don't have a value for a numeric field, you should type 0 as its value. For a string field whose data you don't have and cannot provide, type two single-quotes '' to specify an empty field. Here is one example: INSERT Country VALUES('Sweden',449964,8875053,'Stockholm','se')
Here is another example: INSERT Country VALUES ( 'Angola', 1246700, 10593171, 'Luanda', 'ao' )Here is another example: INSERT INTO Country VALUES ( 'Mongolia', 1565000, 2694432, 'Ulaanbaator','mn' ) Here is another examples: INSERT INTO Country
VALUES('Trinidad and Tobago', NULL, 1163724, 'Port-of-Spain','')
Here is one more example:
INSERT INTO Country VALUES('Spain', NULL, NULL, 'Madrid', '')
|
|
Random Data Entry |
|
The adjacent data entry we have been performing requires that you know the position of each field. The SQL provides an alternative that allows you to perform data entry using the name of a field instead of its position. This allows you to provide the values of fields in any order you desire. We have just seen a few examples where the values of some of the fields are not available during data entry. Instead of remembering to type 0 or NULL for such fields or leaving empty quotes for a field, you can use their names to specify the fields whose data you want to provide. To perform data entry at random, you must provide a list of the fields of the table in the order of your choice. You can either use all columns or provide a list of the same columns but in your own order. In the same way, you don't have to provide data for all fields, just those you want, in the order you want. |
Here is an example:
INSERT Country(CountryName, Capital,InternetCode,Population,Area)
VALUES('Taiwan', 'Taipei', 'tw', 22548009, 35980)
|
Here is another example:
INSERT Country(InternetCode, CountryName, Capital, Area) VALUES( 'mx', 'Mexico', 'Mexico', 1972550) |
Here is another example:
INSERT Country(
             Population, CountryName, InternetCode, Capital)
VALUES(
                 NULL,	    'Cape Verde',       '',             'Praia')
|
Here is one more example:
INSERT Country(CountryName, Capital)
VALUES('Tunisia', 'Tunis')
|
|
Data Import |
|
Another technique used to perform data entry consists of importing already existing data from another database or from any other recognizable data file. Microsoft SQL Server provides various techniques and means of importing data into Microsoft SQL Server. The easiest type of data that can be imported into SQL Server, and which is available on almost all database environments is the text file. Almost any database application you can think of can import a text file but data from that file must be formatted in an acceptable format. For example, the information stored in the file must define the columns as distinguishable by a character that serves as a separator. This separator can be the single-quote, the double-quote, or any valid character. SQL Server is able to recognize the double-quote as a valid separator of columns. Data between the quotes is considered as belonging to a distinct field. Besides this information, the database would need to separate information from two different columns. Again, a valid character must be used. Most databases, including SQL Server, recognize the comma as such a character. The last piece of information the file must provide is to distinguish each record from another. This is easily taken car of by the end of line of a record. This is also recognized as the carriage return. These directives can help you manually create a text file that can be imported into SQL Server. In practicality, if you want to import data that resides on another database, you can ask that application to create the source of data. Most applications can do that for and format it so another application can easily use such data. That is the case for the data we will use in the next exercise: it is data that resided on a Microsoft Access database and was prepared to be imported in SQL Server. After importing data, you should verify and possibly format it to customize its fields. |
|
|
||
| Previous | Copyright © 2004-2010 FunctionX, Inc. | Next |
|
|
||