A Windows application primarily appears as a rectangular object that occupies a portion of the screen. This type of object is under the management of the operating system: Microsoft Windows. Based on this, for an application to become useful, it must be opened. An application must have an entry point. On a C++/CLI application, this entry point is a function called main. On a Win32 application, the entry point of a program is a function called WinMain and it is defined in the windows.h library. This function is declared as: int WinMain(HINSTANCE hInstance,
HINSTANCE hPrevInstance,
LPSTR lpCmdLine,
int nCmdShow);
In some versions of Microsoft Visual C++, this function is sometimes defined as _tWinMain.
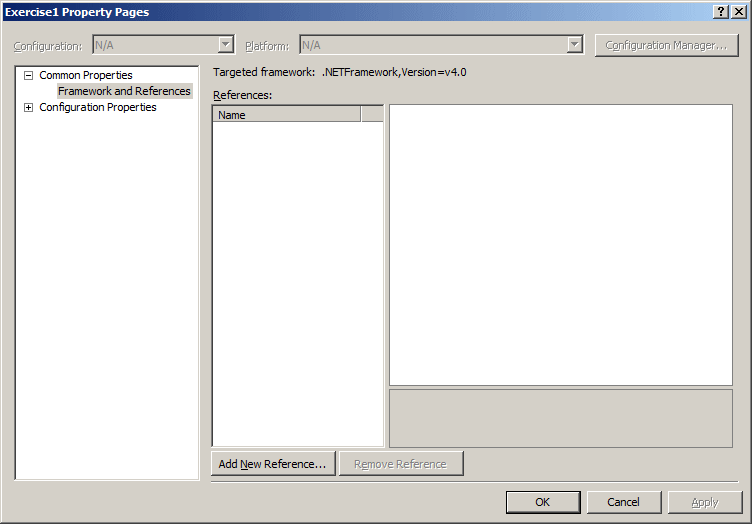
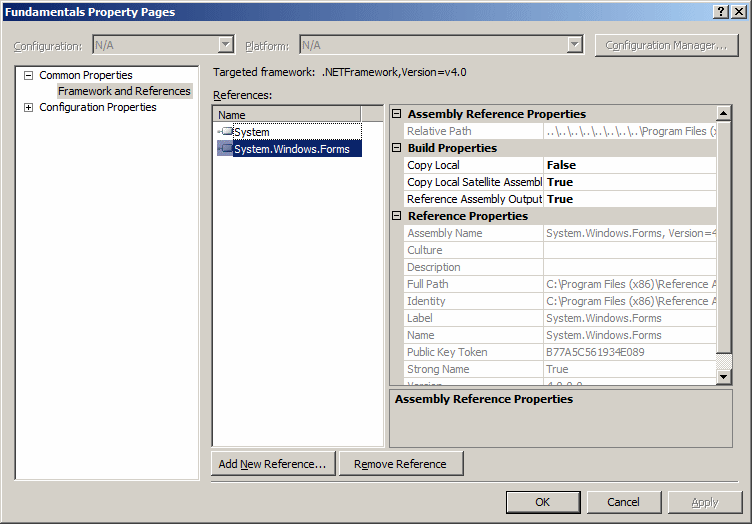
The earliest implementations of the C and C++ language from Microsoft used to be called Microsoft C/C++. When graphical programming started to be considered, Microsoft released Microsoft Visual C++ 1.0 which allowed performing application programming for the Microsoft Windows family of operating systems. With the releases of Microsoft Windows 3.X versions, the operating system was using a library referred to as Win16 that contained all necessary functions and objects used to create graphical user interface (GUI) applications. This library made it a little easier to "talk" to the operating system and create fairly good looking applications. After a while, Microsoft released Microsoft Windows 95 followed by Windows 98. The operating system library was also updated to Win32. Win32 was (in fact is) just a library. Like most or all other libraries, it is not a programming language. It is a documentation that allows programmers to know how they can use the library to create applications that can run on a Microsoft Windows-lead computer. This means that, to use it, programmers needed a language such as C, C++, or Pascal, etc, to actually create the desired applications. Win32 was written in C. Since using Win32 requires a good level of understanding and work, Microsoft released a customized version of the Win32 library to make it easier to comprehend. The library is called Microsoft Foundation Class Library (MFC). Because Win32 was written in C and MFC was written for C/C++ developers, programmers of other languages would not understand it. To accommodate others, in fact to make Windows programming accessible to everybody, Microsoft created Microsoft Visual Basic as a true graphical programming environment. Visual Basic used a different and simpler language, called Basic as its foundation. The first consequence was that Visual Basic didn't inherently "understand" Win32. To allow Visual Basic programmers to use what was available from Win32, its programmers had to import the needed functions. This resulted in Visual C++ programmers using one library and Visual Basic programmers using another; this being only one of many problems. With the growth of the Internet, the client/server applications, demanding databases, and communication software, etc, Microsoft decided to create a new library that can be understood and used by many different languages. The library was called the .NET Framework. This was meant to accomplish the goal of both Visual C++ and Visual Basic using the same library. Another goal was to have programmers of different languages work on the same project without having each one learning the other's language. While on the subject, Microsoft also developed other languages such as C#, J#, or JScript and other programming environments that use these languages, such as Visual C# or Visual J# to also be part of this family that share the .NET Framework library. A library called .NET Framework combines the new classes, functions, and constants that can be used to create applications to run for a Microsoft Windows computer. This library allows you to create graphical, databases, XML-based, web services, and web-based applications. Once an application has been created and is satisfactorily functional, it can be distributed to people who can use it. To make this possible, the .NET Framework is implemented in two systems: the class library and the common language runtime (CLR). The .NET Framework class library is a collection of fully functional object-oriented classes in the tradition of C++ covering all possible areas of application programming including Windows controls, file processing, XML, communication, web, databases, etc. This library is created to be used by various computer languages or programming environments. To take advantage of what this library offers, you must use a computer language that is adapted to "understand" this library. One of the languages that understand it is commonly referred to as C++/CLI. That's the language we will use for our lessons. After an application has been created, it must be compiled so it can be used as necessary. Another goal of the .NET Framework is to make it possible for a library or service created from one language to be used in an application created using another language. To make this possible, code must be compiled so that an external engine, and not the environment used to create code, can compile, manage, and execute it. That's the role of the common language runtime (CLR). The CLR takes care of code execution, memory cleanup, thread management, security, etc. Such code is referred to as managed code. Code that is not compiled into the CLR is referred to as unmanaged code. The primary objects used in a .NET Framework application are stored in the System.dll assembly. You can manually or visually include this library in your project. To include it manually, you would type the following: #using <System.dll> To include it visually, on the main menu of Microsoft Visual C++, you can click Project -> References... In the Property Pages, click Add New Reference... In the Add Reference dialog box, select System from the .NET property page: 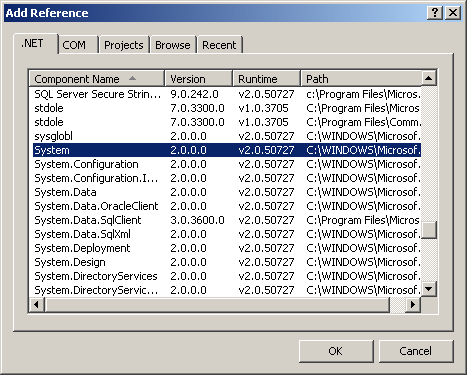 The primary objects, such as data types, strings, arrays, etc, used in an application are part of the System namespace implemented in the System.dll library. To use the System namespace in your application, you can manually include it as follows: using namespace System; If you create a Windows Forms Application, the System.dll assembly and the System namespace would automatically be added to your project.
Because many programs had earlier been written using the MFC library, Microsoft decided to continue publishing it and the MFC is still part of Microsoft Visual C++ 2010. This resulted in many libraries being included in Microsoft Visual C++. These lessons will address only the .NET side of Microsoft Visual C++ 2010. In other words, our lessons deal only with the way the .NET Framework is implemented in Microsoft Visual C++ 2010. These lessons assume that you have installed either Microsoft Visual Studio 2010 Professional or Ultimate, or Microsoft Visual C++ 2010 Express. You can download Microsoft Visual C++ 2010 Express free from the Microsoft web site. Additionally, you should have Microsoft SQL Server 2008. If you don't have it, you can download an evaluation edition from the Microsoft web site.
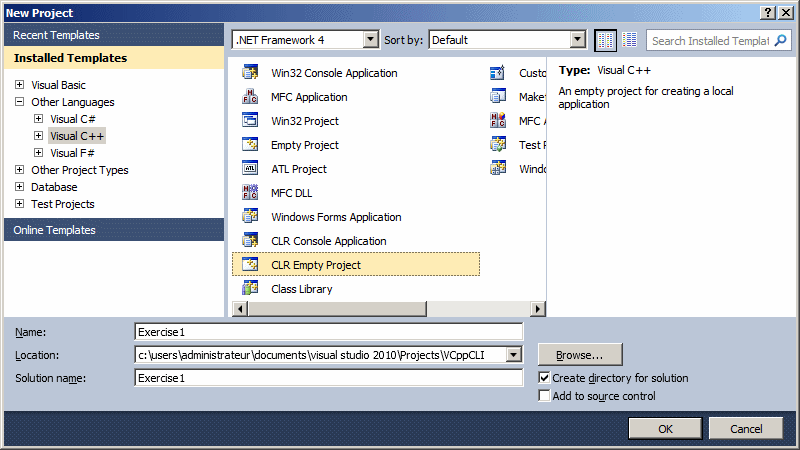
These lessons assume that you already know the C++/CLI language, but only the language. We assume that you have no prior knowledge of graphical application programming. In our lessons, we will create Windows applications, the type referred to as graphical user interface (GUI). To create a Microsoft Visual C++/CLI project:
Any of these actions opens the New Project dialog box. You can then select Visual C++, select the type of project, give it a name, specify its directory, and click OK.
After (eventually) creating a program, you must prepare it to show you a result. This is done by compiling the project. To compile and execute a Microsoft Visual C++ project in one step, on the main menu, you can click Debug -> Start Without Debugging. Although there are other techniques or details in compiling (or debugging) and executing a project, for now, this is the only technique we will use until further notice.
As opposed to creating a new project, you can open a project that either you or someone else created. To open an existing project:
With Microsoft Visual Studio, you can add one project to another, instead of starting one anew. To add a project to an existing one:
Any of these actions would display the Add New Project dialog box. You can then select the type of project In the middle list, give a name to the project, and click OK. In the same way, you can add as many projects as you judge necessary to your solution. When a solution possesses more than one project, the first node in the Solution Explorer becomes Solution 'ProjectName' (X Projects). The ProjectName represents the name of the first project and X represents the current number of projects. When you are using more than one project in the same solution, one of the projects must be set as the startup. The project that is set as the startup has its name in bold characters in the Solution Explorer. You can change and use any project of your choice as the startup. To do this, in the Solution Explorer, you can right-click the desired project and click Set As StartUp Project. When a solution possesses more than one project, you can build any project of your choice and ignore the others. To build one particular project, you can right-click it in the Solution Explorer and click Build.
Application programming primarily consists of populating it with objects called Windows controls. These controls are what the users of your application use to interact with the computer. As the application developer, one of your jobs will consist of selecting the necessary objects, adding them to your application, and then configuring their behavior. There are various ways you can get an object into your application. One of the techniques consists of programmatically adding a control by writing code. Another technique consists of visually selecting a control. To create your applications, there are two settings you will be using. If a control is displaying on the screen and you are designing it, this is referred to as Design Time. This means that you have the ability to manipulate the control. You can visually set the control's appearance, its location, its size, and other necessary or available characteristics. The design view is usually the most used and the easiest because you can glance at a control, have a realistic display of the control and configure its properties. The visual design is the technique that allows you to visually add a control and manipulate its display. This is the most common, the most regularly used, and the easiest technique. The other technique you will be using to control a window is with code, writing the program. This is done by typing commands or instructions using the keyboard. This is considered, or referred to, as Run Time. This is the way you can control an object's behavior while the user is interacting with the computer and your program.
There are two main ways you will manipulate an object of your application, visually or using code. In the next lessons, we will explore details of visually designing a control. As you should have found out from learning C++/CLI, code of an application is ASCII text-based, written in plain English and readable to human eyes. For a Visual C++ application, you can use any text editor to write your code but one of Visual Studio's main strengths is the code editor that it has always brought. It is very intuitive. The Code Editor is a window specially designed for code writing.
To display the code editor, if you created an empty project, you can click Project on the main menu and select one of the options that would lead either to a blank text file or a a file that contains primary code. The Code Editor is divided in 4 sections: 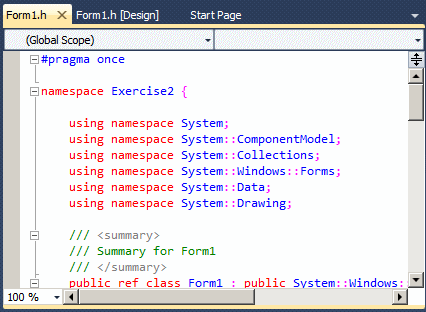
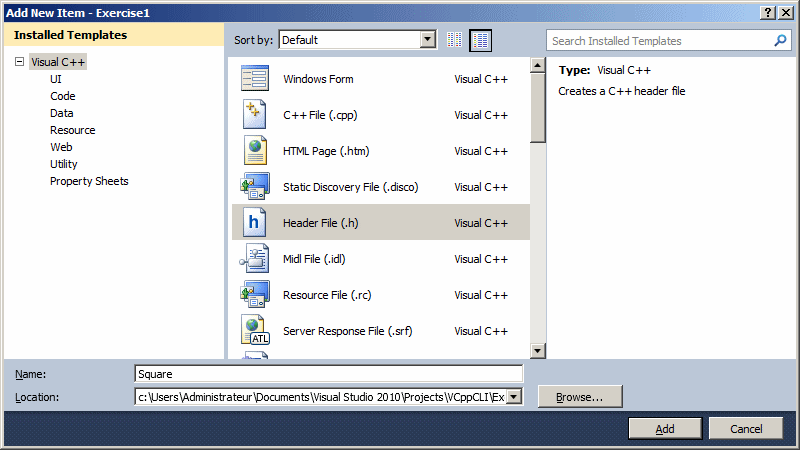
The top section of the Code Editor displays tabs of property pages. Each tab represents a file. To add a new file to the project, on the main menu, click Project -> Add New Item... Once in the Add New Item dialog box, in the Templates section, click the type of file you want to create, type a name in the Name text box, and press Enter. After the file has been created, it is represented by a tab in the top section of the Code Editor. In the same way, you can add as many files as you judge them necessary. Because there can be different types of files, each has an extension that allows you to know the type of file the tab is holding. To access one of these files, you can click its corresponding tab. By default, the tabs display in the order their files were created or added to the project, from left to right. If you don't like that arrangement, click and drag its tab either left or right beyond the next tab:
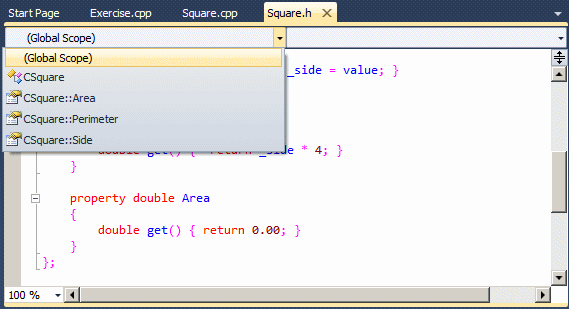
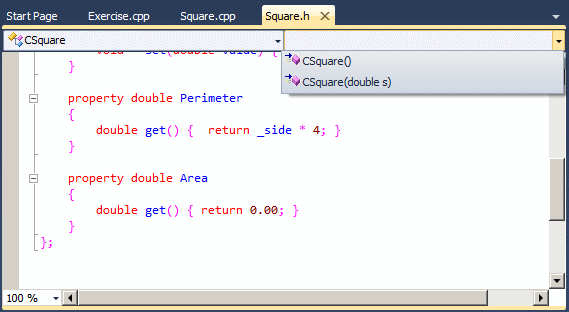
The top-left section of the Code Editor displays a combo box named Scopes. The content of the Types combo box depends on the type of file specified in the tab. If the select tab represents a header file, the Types combo box has an item titled (Global Scope). The Types combo box also holds a list of the names of the classes and the properties, if any, defined in the file. You can display the list if you click the arrow of the combo box:
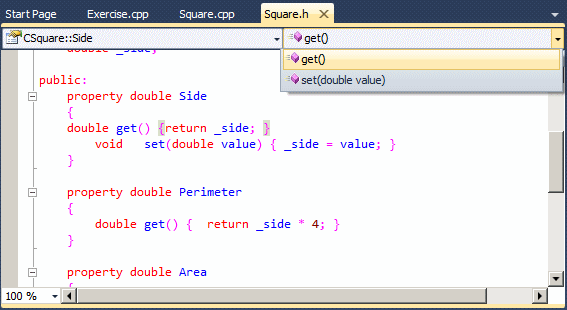
If the selected tab represents a source file, the Types combo box has an item labeled (Global Scope). The combo box also holds a list of the classes and structures that are used in the current project. The top-right section of the Code Editor displays another combo box. The content of that right combo box depends on the item that is currently selected in the left combo box
Once you see an item in the right combo box, if you click it, the Code Editor jumps to that member in the file and selects that member in the Code Editor.
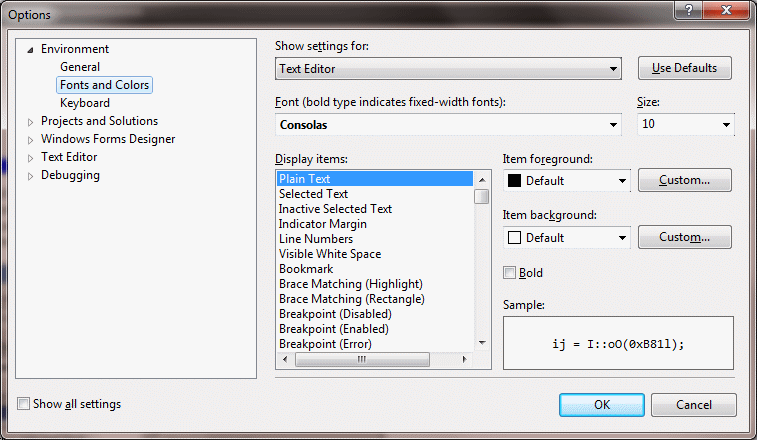
Code is written in a wide area with a white background. This is the area you use the keyboard to insert code with common readable characters. The Code Editor uses some colors to differentiate categories of words or lines of text. The colors used are highly customizable. To change the colors, on the main menu, you can click Tools -> Options... In the Options dialog box, in the Environment section, click Fonts and Colors. To set the color of a category, in the Display Items section, click the category. In the Item Foreground combo box, select the desired color. If you want the words of the category to have a colored background, click the arrow of the Item Background combo box and select one: In both cases, the combo boxes display a fixed list of colors. If you want more colors, you can click a Custom button to display the Color dialog box that allows you to "create" a color. When code of a file is long, it can be tiresome to scroll up and down. The Microsoft Visual Studio's Code Editor allows you to create sections that allow the code to behave like the tree arrangement of the left pane of Windows Explorer. This means that you can expand or collapse section of code. The Code Editor supports this feature automatically by adding + buttons at the beginning of the lines of sections that can be expanded or collapsed. This is the case for namespaces, classes, methods, interfaces, properties, etc. The end of an expandable section displays a - button to the beginning of the line. Besides the default sections that the Code Editor is intuitively aware of, you can create your own region. A region must have a beginning and an end. To specify the start of a section, type #pragma region. You can optionally add a label to the right of #pragma region to name the region. After creating a region with #pragma region, the Code Editor adds a + button to its left. To expand a region, you can click its + button. This changes it into a - button. To collapse the region, click the - button. If you don't specify the end of the region, the code from #pragma region to the end of the file would be considered as belonging to the to the region. Therefore, you should specify the end of the region you created. To mark the end of the region, in the desired line, type #pragma endregion. Here is an example of a region: #pragma once
using namespace System;
public ref class CSquare
{
public:
CSquare();
CSquare(double s);
private:
double _side;
public:
property double Side
{
double get() {return _side; }
void set(double value) { _side = value; }
}
#pragma region Formulas to Calculate a Square's Perimeter and Area
property double Perimeter
{
double get() { return _side * 4; }
}
property double Area
{
double get() { return _side * _side; }
}
#pragma endregion
};
The Code Editor can help you specify the beginning and end of a region. |
|
|||||||||||||||||||||||||||||||||||||||||||||||||||||
|
|
||||||||||||||||||||||||||||||||||||||||||||||||||||||

