|
After creating the accessory objects of a database, you can
get the application to perform the actual transactions. For a car rental
company, we will create the object used to process the regular rental
transactions.
|
 Practical Learning: Introducing the Application Practical Learning: Introducing the Application
|
|
- In the Microsoft SQL Server Management Studio, if necessary, expand the
Databases, the bcr, and the Tables node.
To create a new table, right the Tables node under bcr and click New
Table...
- Set the first column name to OrderProcessingID
- Set its Data Type to int
- In the lower section, expand Identity Specification and set the (Is
Identify) field to Yes
- On the Table Designer toolbar, click the Set Primary Key button
- Complete the table with the following columns
| Column Name |
Data Type |
Allow Nulls |
| OrderProcessingID |
int |
|
| OrderDate |
varchar(50) |
|
| OrderTime |
varchar(50) |
|
| EmployeeID |
int |
Uncheck |
| CustomerID |
int |
Uncheck
|
| CarID |
int
|
Uncheck
|
| CarCondition |
varchar(20)
|
|
| TankLevel |
varchar(50)
|
|
| StartDate |
varchar(50)
|
Uncheck
|
| EndDate |
varchar(50)
|
|
| NumberOfDays |
varchar(50)
|
|
| RateApplied |
varchar(50)
|
|
| SubTotal |
varchar(50)
|
|
| TaxRate |
varchar(50)
|
|
| TaxAmount |
varchar(50)
|
|
| RentTotal |
varchar(50)
|
|
| Notes |
varchar(255)
|
|
- Save the table as OrderProcessing
- Right-click the table and click Relationships...
- Click Add
- Click Tables and Columns Specification and click its ellipsis button
- Under Primary Key Table, select Employees and, under Employees, select
EmployeeID
- Under OrderProcessing, select EmployeeID
- Click OK
- Click Add again
- Click the ellipsis button of Tables and Columns Specification
- Under Primary Key Table, select Customers and, under Employees, select
CustomerID
- Under OrderProcessing, select CustomerID
- Click OK
- Click Add
- Click the ellipsis button of Tables and Columns Specification
- Under Primary Key Table, select Cars and, under Cars, select CarID
- Click OK
- Click Close
- Close the table
- When asked whether you want to save it, click Yes and Yes
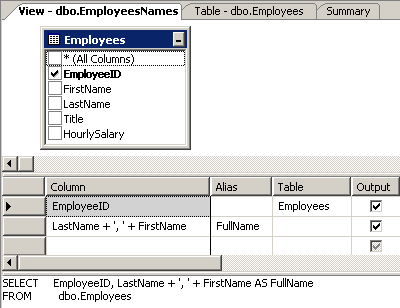
- To create a view, in the Object Explorer under bcr, right-click Views and
click New View...
- In the Add Table dialog box, click Employees
- Click Add and click Close
- In the Diagram pane (the top section), click the check box of EmployeeID
- In the SQL pane, on the right side of SELECT EmployeeID, add
LastName + ', ' +
FirstName AS FullName
- Save the view as EmployeesNames

- Close it
- In Microsoft Visual Studio, if necessary, open the bcr1 application
created in the first section.
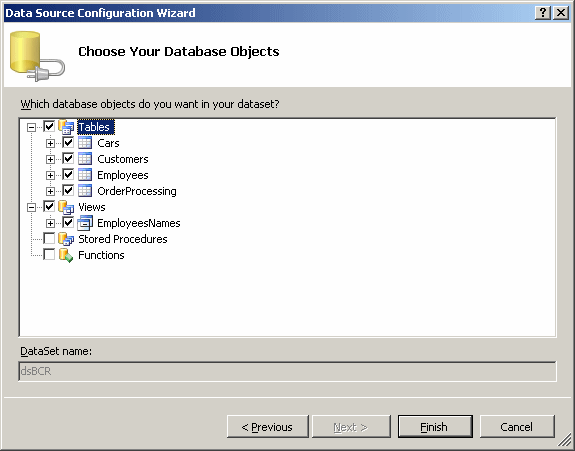
In the Data Source window, right-click dsBCR and click Configure DataSet
With Wizard...
- Expand the Tables node and click the check box of OrderProcessing
- Expand the Views node and click the check box of EmployeesNames

- Click Finish
- To create a new form, on the main menu, click Project -> Add New
Item...
- In the Templates list, click Windows Form and set the name to OrderProcessing
- Click Add
- Enlarge and heighten the form
- In the Data Sources window, click OrderProcessing and click the arrow of
its combo box
- Select Details
- From the Data Sources window, drag OrderProcessing and drop it on the form
- While the controls are still selected, move them to the left side of the
form (to create an empty space in the middle and on the right side of the
form)
- Once again, from the Data Sources window, drag Employees and drop it on
the form
- While the DataGridView control is still selected on the form, press Delete
to remove it from the form
- Once again, from the Data Sources window, drag Customers and drop it in an
empty area of the form
- While the DataGridView control is still selected on the form, press Delete
to remove it from the form
- Once again, from the Data Sources window, drag Cars and drop it on the
form
- While the new controls are still selected on the form, press Delete to
remove them from the form
- Once again, from the Data Sources window, drag EmployeesNames and drop it
on the form
- While the DataGridView control is still selected on the form, press Delete
to remove it
- Delete the text boxes of OrderDate, OrderTime,
EmployeeID, CustomerID, CarID, CarCondition, TankLevel, StartDate, and
EndDate:
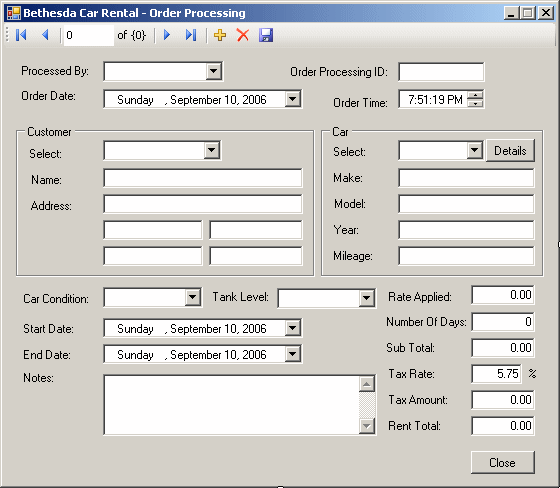
- Design the form as follows (you will add new controls
to replace those that were deleted):
 |
| Control |
Text |
Name |
Additional Properties |
| Label |
Processed By: |
|
|
| ComboBox |
|
cboEmployeeID |
|
| Label |
Order Processing ID: |
|
|
| TextBox |
|
|
|
| Label |
Order Date: |
|
|
| DateTimePicker |
|
dtpOrderDate |
|
| Label
|
Order Time:
|
|
|
| DateTimePicker
|
|
dtpOrderTime |
Format: Time
ShowUpDown: True |
| GroupBox |
Customer |
|
|
| Label |
Select: |
|
|
| ComboBox |
cboCustomerID |
|
|
| Label |
Name: |
|
|
| TextBox |
|
txtCustomerName |
|
| Label |
Address: |
|
|
| TextBox |
|
txtCustomerAddress |
|
| TextBox |
|
txtCustomerCity |
|
| TextBox |
|
txtCustomerState |
|
| TextBox |
|
txtCustomerZIPCode |
|
| TextBox |
|
txtCustomerCountry |
|
| GroupBox |
Car |
|
|
| Label |
Select: |
|
|
| ComboBox |
cboCarID |
|
|
| Button |
Details |
btnCarDetails |
|
| Label |
Make: |
|
|
| TextBox |
|
txtCarMake |
|
| Label |
Model: |
|
|
| TextBox |
|
txtCarModel |
|
| Label |
Year: |
|
|
| TextBox |
|
txtCarYear |
|
| Label |
Mileage: |
|
|
| TextBox |
|
txtCarMileage |
|
| Label |
Car Condition: |
|
|
| ComboBox |
|
cboCarConditions |
Items:
Excellent
Good
Driveable
Needs Repair |
| Label |
Tank Level: |
|
|
| ComboBox |
|
cboTankLevels |
Items:
Empty
1/4 Empty
Half
3/4 Full
Full Tank |
| Label |
Start Date: |
|
|
| DateTimePicker |
|
dtpStartRent |
|
| Label |
End Time: |
|
|
| DateTimePicker |
|
dtpEndRent |
|
| Label |
Notes: |
|
|
| TextBox |
|
|
Multiline: True
ScrollBars: Vertical |
| Label |
Rate Applied: |
|
|
| TextBox |
|
|
Text: 0.00
TextAlign: Right |
| Label |
Number Of Days: |
|
|
| TextBox |
|
|
Text: 0
TextAlign: Right |
| Label |
Sub Total: |
|
|
| TextBox |
|
|
Text: 0.00
TextAlign: Right |
| Label |
Tax Rate: |
|
|
| TextBox |
|
|
Text: 5.75
TextAlign: Right |
| Label |
Tax Amount: |
|
|
| TextBox |
|
|
Text: 0.00
TextAlign: Right |
| Label |
Rent Total: |
|
|
| TextBox |
|
|
Text: 0.00
TextAlign: Right |
| Button |
Close |
btnClose |
|
|
- Click each control that was added and change
its data bindings
- On the form, double-click the Details button in the Cars section
- In the top section of the file, under the #pragma once line, type #include
"CarDetails.h"
- Scroll to the bottom of the file and implement the event as follows:
System::Void btnCarDetails_Click(System::Object^  sender,
				System::EventArgs^  e)
{
    if( cboCarID->Text->Equals(L"") )
	MessageBox::Show(L"No car is currently selected");
    else
    {
	 CarDetails ^ frmCarDetails = gcnew CarDetails;
	 String ^ strCar =
		String::Concat(L"SELECT * FROM Cars WHERE TagNumber = '",
					 cboCarID->Text, L"'");
	 System::Data::SqlClient::SqlConnection ^ conCar =
		gcnew System::Data::SqlClient::SqlConnection(
	L"Data Source=(local);Database=bcr1;Integrated Security=yes");
	 System::Data::SqlClient::SqlCommand ^ cmdCar =
		gcnew System::Data::SqlClient::SqlCommand(strCar, conCar);
	 conCar->Open();

System::Data::SqlClient::SqlDataReader ^ rdrCar = cmdCar->ExecuteReader();

	 while( rdrCar->Read())
	 {
		 frmCarDetails->txtTagNumber->Text = rdrCar->GetString(1);
		 frmCarDetails->txtMake->Text = rdrCar->GetString(2);
		 frmCarDetails->txtModel->Text = rdrCar->GetString(3);
	frmCarDetails->txtYear->Text = rdrCar->GetInt32(4).ToString();
	frmCarDetails->txtMileage->Text = rdrCar->GetInt32(5).ToString();
	 frmCarDetails->cboCategory->Text = rdrCar->GetString(6);
	 frmCarDetails->txtPictureName->Text = rdrCar->GetString(7);
	 frmCarDetails->chkK7Player->Checked = rdrCar->GetBoolean(8);
	 frmCarDetails->chkDVDPlayer->Checked = rdrCar->GetBoolean(9);
	 frmCarDetails->chkCDPlayer->Checked = rdrCar->GetBoolean(10);
	 frmCarDetails->chkAvailable->Checked = rdrCar->GetBoolean(11);
 		 frmCarDetails->pctCar->Image =
		Image::FromFile(frmCarDetails->txtPictureName->Text);
	 }


         frmCarDetails->btnPicture->Visible = true;
         frmCarDetails->btnSubmit->Visible = true;
	 frmCarDetails->ShowDialog();
	 conCar->Close();
    }
}
|
- Return to the
OrderProcessing
form, click the text box on the right side of Number Of Days
- In the Properties window, click the Events box and generate the event of
the Leave field
- Define it as follows:
System::Void NumberOfDaysTextBox_Leave(System::Object^  sender,
					System::EventArgs^  e)
{
    int numberOfDays;
    double rateApplied, subTotal;

    try {
	 rateApplied = double::Parse(this->RateAppliedTextBox->Text);
    }
    catch(FormatException ^)
    {
	 MessageBox::Show(L"Invalid value for the rate applied");
    }

    try {
	 numberOfDays = int::Parse(this->NumberOfDaysTextBox->Text);
    }
    catch(FormatException ^)
    {
	 MessageBox::Show(L"Invalid value for the number of days");
    }

    subTotal = rateApplied * numberOfDays;
    this->SubTotalTextBox->Text = subTotal.ToString(L"F");
}
|
- Return to the
OrderProcessing
form, click the text box on the right side of Tax Rate
- In the Events section of the Properties window, generate the event of the
Leave field
- Define it as follows:
System::Void TaxRateTextBox_Leave(System::Object^  sender,
				  System::EventArgs^  e)
{
    double subTotal, taxRate, taxAmount, rentTotal;

    try {
	 subTotal = double::Parse(this->SubTotalTextBox->Text);
    }
    catch(FormatException ^)
    {
	 MessageBox::Show(L"Invalid value for sub-total");
    }

    try {
	 taxRate = double::Parse(TaxRateTextBox->Text);
    }
    catch(FormatException ^)
    {
	 MessageBox::Show(L"Invalid value for the tax rate");
    }

    taxAmount = subTotal * taxRate / 100;
    rentTotal = subTotal + taxAmount;

    this->TaxAmountTextBox->Text = taxAmount.ToString(L"F");
    this->RentTotalTextBox->Text = rentTotal.ToString(L"F");
}
|
- Double-click the Close button and implement its even as follows:
private void btnClose_Click(object sender, EventArgs e)
{
     Close();
}
|
- Access the first form
- Add a button to it and set its properties as follows:
Text: OrderProcessing
(Name): btnOrderProcessing
- Double-click the Customers button
- In the top section of the file, under the #pragma once line, type
#include "OrderProcessing.h"
- Scroll to the bottom of the file and implement the even as follows:
System::Void btnOrderProcessing_Click(System::Object^  sender,
					System::EventArgs^  e)
{
	 Order1 ^ frmOrder1 = gcnew Order1;
	 frmOrder1->ShowDialog();
}
|
- Execute the application to test it
- Display the OrderProcessing form
- To process an order, click the + button and complete the form

- After completing the form, click the Save button
- Close the form(s)
|
|

