|
 Practical Learning: Introducing Built-In List Classes Practical Learning: Introducing Built-In List Classes
|
|
- Start Microsoft Visual Studio and create a new Windows Application named CollegeParkAutoParts5
- To create a dialog box, on the main menu, click Project -> Add New
Item...
- Click Windows Form
- Set the name to MakeEditor and click Add
- Design the form as follows:
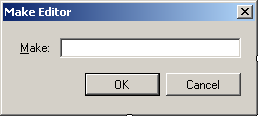 |
| Control |
Text |
Name |
Other Properties |
| Label |
&Make: |
|
|
| TextBox |
|
txtMake |
Modifiers: Public |
| Button |
OK |
btnOK |
DialogResult: OK |
| Button |
Cancel |
btnCancel |
DialogResult: Cancel |
|
| Form Property |
Value |
| FormBorderStyle |
FixedDialog |
| Text |
Make Editor |
| StartPosition |
CenterScreen |
| AcceptButton |
btnOK |
| CancelButton |
btnCancel |
| MaximizeBox |
False |
| MinimizeBox |
False |
| ShowInTaskbar |
False |
- To create a dialog box, on the main menu, click Project -> Add New
Item...
- Click Windows Form.
- Set the name to ModelEditor and click Add
- Design the form as follows:
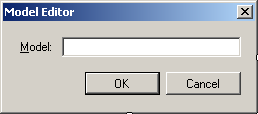 |
| Control |
Text |
Name |
Other Properties |
| Label |
&Model: |
|
|
| TextBox |
|
txtModel |
Modifiers: Public |
| Button |
OK |
btnOK |
DialogResult: OK |
| Button |
Cancel |
btnCancel |
DialogResult: Cancel |
|
| Form Property |
Value |
| FormBorderStyle |
FixedDialog |
| Text |
Model Editor |
| StartPosition |
CenterScreen |
| AcceptButton |
btnOK |
| CancelButton |
btnCancel |
| MaximizeBox |
False |
| MinimizeBox |
False |
| ShowInTaskbar |
False |
- To create a dialog box, in the Solution Explorer, right-click
CollegeParkAutoParts2 -> Add New Item
- Click Windows Form
- Set the name to CategoryEditor and click Add
- Design the form as follows:
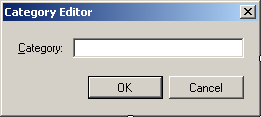 |
| Control |
Text |
Name |
Other Properties |
| Label |
&Category: |
|
|
| TextBox |
|
txtCategory |
Modifiers: Public |
| Button |
OK |
btnOK |
DialogResult: OK |
| Button |
Cancel |
btnCancel |
DialogResult: Cancel |
|
| Form Property |
Value |
| FormBorderStyle |
FixedDialog |
| Text |
Category Editor |
| StartPosition |
CenterScreen |
| AcceptButton |
btnOK |
| CancelButton |
btnCancel |
| MaximizeBox |
False |
| MinimizeBox |
False |
| ShowInTaskbar |
False |
- On the main menu, click Project -> Add New Item...
- Click Windows Form
- Set the Name to NewStoreItem and click Add
- Design the form as follows:
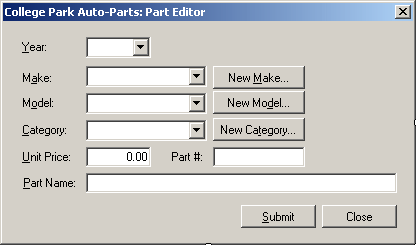 |
| Control |
Text |
Name |
Other Properties |
| Label |
&Year: |
|
|
| TextBox |
|
txtItemNumber |
|
| Label |
&Make: |
|
|
| ComboBox |
|
cbxMakes |
|
| Button |
New C&ategory... |
btnNewMake |
|
| Label |
M&odel: |
|
|
| ComboBox |
|
cbxModels |
|
| Button |
New Mo &del... |
btnNewModel |
|
| Label |
&Category: |
|
|
| ComboBox |
|
cbxCategories |
|
| Button |
New Ca&tegory |
btnNewCategory |
|
| Label |
&Unit Price: |
|
|
| TextBox |
0.00 |
txtUnitPrice |
TextAlign: Right |
| Label |
Part #: |
|
|
| TextBox |
|
txtPartNumber |
|
| Label |
&Part Name: |
|
|
| TextBox |
|
txtPartName |
|
| Button |
Submit |
btnSubmit |
|
| Button |
Close |
btnClose |
DialogResult: Cancel |
|
| Form Property |
Value |
| FormBorderStyle |
FixedDialog |
| Text |
College Park Auto -Parts: Part Editor |
| StartPosition |
CenterScreen |
| MaximizeBox |
False |
| MinimizeBox |
False |
| ShowInTaskbar |
False |
- Double-click the New Make button
- In the top section of the file, include the header files for the
MakeEditor, the ModelEditor, and the CategoryEditor forms:
#pragma once

#include "MakeEditor.h"
#include "ModelEditor.h"
#include "CategoryEditor.h"

using namespace System;
|
- Implement it as follows:
System::Void btnNewMake_Click(System::Object^  sender, System::EventArgs^  e)
{
    MakeEditor ^ editor = gcnew MakeEditor;

    if (editor->ShowDialog() == System::Windows::Forms::DialogResult::OK)
    {
        if (editor->txtMake->Text->Length > 0)
        {
            String ^ strMake = editor->txtMake->Text;

            // Make sure the category is not yet in the list
            if (cbxMakes->Items->Contains(strMake))
                MessageBox::Show(strMake + L" is already in the list");
            else
            {
                // Since this is a new category, add it to the combo box
                cbxMakes->Items->Add(strMake);
            }

            cbxMakes->Text = strMake;
        }
    }
}
|
- Return to the Part Editor dialog box and double-click the New Model
button
- Implement the event as follows:
System::Void btnNewModel_Click(System::Object^  sender, System::EventArgs^  e)
{
    ModelEditor ^ editor = gcnew ModelEditor;

    if (editor->ShowDialog() == System::Windows::Forms::DialogResult::OK)
    {
        if (editor->txtModel->Text->Length > 0)
        {
            String ^ strModel = editor->txtModel->Text;

            // Make sure the category is not yet in the list
            if (cbxModels->Items->Contains(strModel))
                MessageBox::Show(strModel + L" is already in the list");
            else
            {
                // Since this is a new category, add it to the combo box
                cbxModels->Items->Add(strModel);
            }

            cbxModels->Text = strModel;
        }
    }
}
|
- Return to the Part Editor dialog box and double-click the New Category button
- Implement the event as follows:
System::Void btnNewCategory_Click(System::Object^  sender,
				System::EventArgs^  e)
{
    CategoryEditor ^ editor = gcnew CategoryEditor;

    if (editor->ShowDialog() == System::Windows::Forms::DialogResult::OK)
    {
        if (editor->txtCategory->Text->Length > 0)
        {
            String ^ strCategory = editor->txtCategory->Text;

            // Make sure the category is not yet in the list
            if (cbxCategories->Items->Contains(strCategory))
                MessageBox::Show(strCategory + L" is already in the list");
            else
            {
                // Since this is a new category, add it to the combo box
                cbxCategories->Items->Add(strCategory);
            }

            cbxCategories->Text = strCategory;
        }
    }
}
|
- Save the file and close the form
- On the main menu, click View -> Other Windows -> Resource View.
In the Resource View, expand everything
- To create an icon, in the Resource View, right-click the Icon folder and
click Insert Icon
- Click IDI_ICON1 and, in the Properties window, change the following
values:
Filename: cpap1.ico
ID: IDI_CPAP1
- Design the 16x16 size icon as follows:
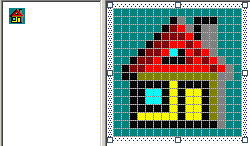
- Save the file and close the icon window
- In the Resource View, right-click the Icon folder and click Insert Icon
- Click IDI_ICON2 and, in the Properties window, change the following
values:
Filename: cpap2.ico
ID: IDI_CPAP2
- Design the 16x16, 16 colors version of the icon as follows:
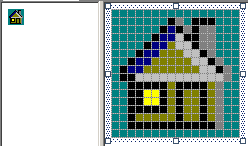
- Save the file and close the icon window
- In the Resource View, right-click the Icon folder and click Insert Icon
- Click IDI_ICON1 and, in the Properties window, change the following
values:
Filename: year1.ico
ID: IDI_YEAR1
- Design the 16x16, 16 colors version of the icon as follows:
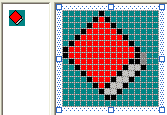
- Save the file and close the icon window
- In the Resource View, right-click the Icon folder and click Insert Icon
- Click IDI_ICON1 and, in the Properties window, change the following
values:
Filename: year2.ico
ID: IDI_YEAR2
- Design the 16x16, 16 colors version of the icon as follows:
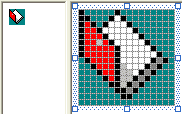
- Save the file and close the icon window
- In the Resource View, right-click the Icon folder and click Insert Icon
- Click IDI_ICON1 and, in the Properties window, change the following
values:
Filename: make1.ico
ID: IDI_MAKE1
- Design the 16x16, 16 colors version of the icon as follows:
- Save the file and close the icon window
- In the Resource View, right-click the Icon folder and click Insert Icon
- Click IDI_ICON1 and, in the Properties window, change the following
values:
Filename: make2.ico
ID: IDI_MAKE2
- Design the 16x16, 16 colors version of the icon as follows:
- Save the file and close the icon window
- In the Resource View, right-click the Icon folder and click Insert Icon
- Click IDI_ICON1 and, in the Properties window, change the following
values:
Filename: model1.ico
ID: IDI_MODEL1
- Design the 16x16, 16 colors version of the icon as follows:
- Save the file and close the icon window
- In the Resource View, right-click the Icon folder and click Insert Icon
- Click IDI_ICON1 and, in the Properties window, change the following
values:
Filename: model2.ico
ID: IDI_MODEL2
- Design the 16x16, 16 colors version of the icon as follows:
- Save the file and close the icon window
- In the Resource View, right-click the Icon folder and click Insert Icon
- Click IDI_ICON1 and, in the Properties window, change the following
values:
Filename: category1.ico
ID: IDI_CATEGORY1
-
Set the Name to and click Add
- Right-click the white area and click Delete Image Type
- Design the 16x16, 16 colors version of the icon as follows:
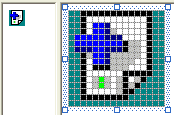
- Save the file and close the icon window
- In the Solution Explorer, right- click the Debug folder -> Add -> New Item...
- In the Templates list, make sure Icon File is selected.
Set the Name to category2 and click Add
- Right-click the white area and click Delete Image Type
- Design the 16x16, 16 colors version of the icon as follows:
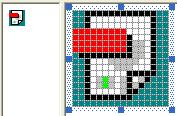
- Save the file and close the icon window
- In the Solution Explorer, double-click Form1.h
-
From the Components section of the Toolbox, click ImageList and click the form
- In the Properties window, click (Name) and type AutoPartsImages
- Click the ellipsis button of the Images field
- In the Image Collection Editor, click Add
- Locate the folder that contains the icons you created and display it in the
Look In combo box
- Select cpap1.ico and click Open
- In the same way, add the other pictures in the following order: cpap2.ico,
year1.ico, year2.ico, make1.ico, make2.ico, model1.ico, model2.ico,
category1.ico, and category1.ico
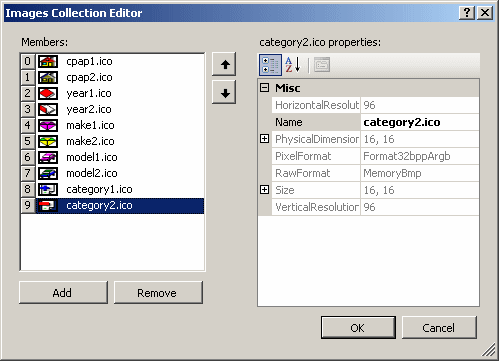
- Click OK
- Design the form as follows:
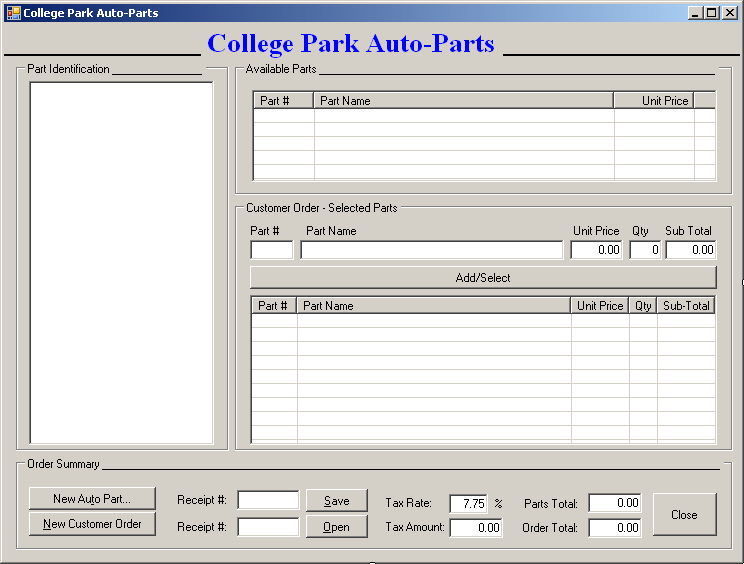 |
| Control |
Text |
Name |
Other Properties |
| Label |
 |
College Park Auto-Parts |
|
Font: Times New Roman, 20.25pt, style=Bold
ForeColor: Blue |
| Panel |
 |
|
|
Height: 2 |
| GroupBox |
 |
Part Identification |
|
|
| TreeView |
 |
|
tvwAutoParts |
ImageList: imgAutoParts |
| GroupBox |
 |
Available Parts |
|
|
| ListView |
 |
|
lvwAutoParts |
FullRowSelect: True
GridLines: True
View: Details |
| Columns |
|
(Name) |
Text |
TextAlign |
Width |
| colPartNumber |
Part # |
|
|
| colPartName |
Part Name |
|
300 |
| colUnitPrice |
Unit Price |
Right |
80 |
| GroupBox |
 |
Customer Order - Selected Parts |
|
|
| Label |
 |
Part # |
|
|
| Label |
 |
Part Name |
|
|
| Label |
 |
Unit Price |
|
|
| Label |
 |
Qty |
|
|
| Label |
 |
Sub Total |
|
|
| TextBox |
 |
|
txtPartNumber |
|
| TextBox |
 |
|
txtPartName |
|
| TextBox |
 |
0.00 |
txtUnitPrice |
TextAlign: Right |
| TextBox |
 |
0 |
txtQuantity |
TextAlign: Right |
| TextBox |
 |
0.00 |
txtSubTotal |
TextAlign: Right |
| Button |
 |
Add/Select |
btnAdd |
|
| ListView |
 |
|
lvwSelectedParts |
FullRowSelect: True
GridLines: True
View: Details |
| Columns |
|
(Name) |
Text |
TextAlign |
Width |
| colPartNumberSelected |
Part # |
|
45 |
| colPartNameSelected |
Part Name |
|
274 |
| colUnitPriceSelected |
Unit Price |
Right |
58 |
| colQuantitySelected |
Qty |
Right |
28 |
| colSubTotalSelected |
Sub-Total |
Right |
58 |
| GroupBox |
 |
Order Summary |
|
|
| Button |
 |
New Au&to Part... |
btnNewAutoPart |
|
| Label |
 |
Receipt #: |
|
|
| TextBox |
 |
|
txtSave |
|
| Button |
 |
Save |
btnSave |
|
| Label |
 |
Tax Rate: |
|
|
| TextBox |
 |
7.75 |
txtTaxRate |
TextAlign: Right |
| Label |
 |
% |
|
|
| Label |
 |
Parts Total: |
|
|
| TextBox |
 |
0.00 |
txtPartsTotal |
TextAlign: Right |
| Button |
 |
&New Customer Order |
btnNewCustomerOrder |
|
| Label |
 |
Receipt #: |
|
|
| TextBox |
 |
|
txtOpen |
|
| Button |
 |
Save |
btnOpen |
|
| Label |
 |
Tax Amount: |
|
|
| TextBox |
 |
0.00 |
txtTaxAmount |
TextAlign: Right |
| Label |
 |
Order Total: |
|
|
| TextBox |
 |
0.00 |
txtOrderTotal |
TextAlign: Right |
| Button |
 |
Close |
btnClose |
|
|
-
Click the Available Parts list view
-
In the Properties window, click the Events button and, in the Events section,
double-click DoubleClick
-
Implement the event as follows:
System::Void lvwAutoParts_DoubleClick(System::Object^  sender,
					System::EventArgs^  e)
{
    ListViewItem^ lviAutoPart = lvwAutoParts->SelectedItems[0];

    if( (lvwAutoParts->SelectedItems->Count == 0) ||
        (lvwAutoParts->SelectedItems->Count > 1) )
                return;

    txtPartNumber->Text = lviAutoPart->Text;
    txtPartName->Text = lviAutoPart->SubItems[1]->Text;
    txtUnitPrice->Text = lviAutoPart->SubItems[2]->Text;

    txtQuantity->Text = L"1";
    txtSubTotal->Text = lviAutoPart->SubItems[2]->Text;

    txtQuantity->Focus();
}
|
-
Return to the Central form
-
Click the Unit Price text box and, in the Events section of the Properties
window, double-click Leave
-
Implement the event as follows:
System::Void txtUnitPrice_Leave(System::Object^  sender,
				System::EventArgs^  e)
{
    double UnitPrice = 0.00;
    int Quantity = 0;
    double SubTotal = 0.00;

    try {
        UnitPrice = double::Parse(txtUnitPrice->Text);
    }
    catch(FormatException ^)
    {
        MessageBox::Show(L"Invalid Unit Price!");
    }

    try {
		Quantity = int::Parse(txtQuantity->Text);
	}
    catch(FormatException ^)
    {
        MessageBox::Show(L"Invalid Quandtity!");
    }

    SubTotal = UnitPrice * Quantity;
    txtSubTotal->Text = SubTotal.ToString(L"F");
}

void CalculateOrder()
{
    // Calculate the current total order and update the order
    double PartsTotal = 0.00;
    double TaxRate = 0.00;
    double TaxAmount = 0.00;
    double OrderTotal = 0.00;

    for each( ListViewItem ^ lvi in lvwSelectedParts->Items)
    {
        ListViewItem::ListViewSubItem ^ SubItem = lvi->SubItems[4];
        PartsTotal += double::Parse(SubItem->Text);
    }

    try
    {
        TaxRate = double::Parse(txtTaxRate->Text) / 100;
    }
    catch(FormatException ^)
    {
        MessageBox::Show(L"Invalid Tax Rate");
    }

    TaxAmount = PartsTotal * TaxRate;
    OrderTotal = PartsTotal + TaxAmount;

    txtPartsTotal->Text = PartsTotal.ToString(L"F");
    txtTaxAmount->Text = TaxAmount.ToString(L"F");
    txtOrderTotal->Text = OrderTotal.ToString(L"F");
}
|
-
Return to the Form1 form and click the Qty text box
-
In the Events section of the Properties, click Leave, then click the arrow of
its combo box and select txtUnitPrice_Leave
-
Return to the Form1 form
-
Click the Available Parts list view (the list view in the bottom-right section of
the form)
-
In the Events section of the Properties window, double-click DoubleClick
-
Implement the event as follows:
System::Void lvwSelectedParts_DoubleClick(System::Object^  sender,
					System::EventArgs^  e)
{
    ListViewItem^ lviSelectedPart = lvwSelectedParts->SelectedItems[0];

    if( (lvwSelectedParts->SelectedItems->Count == 0) ||
        (lvwSelectedParts->SelectedItems->Count > 1) )
        return;

    txtPartNumber->Text = lviSelectedPart->Text;
    txtPartName->Text = lviSelectedPart->SubItems[1]->Text;
    txtUnitPrice->Text = lviSelectedPart->SubItems[2]->Text;
    txtQuantity->Text = lviSelectedPart->SubItems[3]->Text;
    txtSubTotal->Text = lviSelectedPart->SubItems[4]->Text;

    lvwSelectedParts->Items->Remove(lviSelectedPart);
    CalculateOrder();
}
|
-
In the Solution Explorer, right-click CollegeParkAutoParts5 -> Add -> Class...
-
Click C++ Class and click Add
-
Set the name to CPartDescription and press Enter
-
To create a class that can hold a structured item of a list, change the header
file
as follows:
#pragma once

using namespace System;

[Serializable]
public ref class CPartDescription
{
private:
    // These members will be used to define a car part
    long ID;
    int yr;
    String ^ mk;
    String ^ mdl;
    String ^ cat;
    String ^ name;
    double price;

public:
    CPartDescription(void);
    CPartDescription(long code, int year, String ^ make,
                     String ^ model, String ^ type,
                     String ^ desc, double UPrice);

    property long PartNumber
    {
        long get()
	{
	    return ID;
	}

        void set(long value)
	{
	    ID = value;
	}
    }

    property int Year
    {
        int get()
	{
	    return yr;
	}

        void set(int value)
	{
	    yr = value;
	}
    }

    property String ^ Make
    {
        String ^ get()
	{
	    return mk;
	}

        void set(String ^ value)
	{
	    mk = value;
	}
    }

    property String ^ Model
    {
        String ^ get()
	{
	    return mdl;
	}

        void set(String ^ value)
	{
	    mdl = value;
	}
    }

    property String ^ Category
    {
        String ^ get()
	{
		return cat;
	}

        void set(String ^ value)
	{
		cat = value;
	}
    }

    property String ^ PartName
    {
        String ^ get()
	{
		return name;
	}

        void set(String ^ value)
	{
		name = value;
	}
    }

    property double UnitPrice
    {
        double get()
	{
		return (price < 0) ? 0.00 : price;
	}

        void set(double value)
	{
		price = value;
	}
    }

    virtual String ^ CPartDescription::ToString() override;
};
|
-
Change the source file as follows:
#include "StdAfx.h"
#include "PartDescription.h"

CPartDescription::CPartDescription(void)
    : ID(0),
      yr(1960),
      mk(L""),
      mdl(L""),
      name(L"Unknown"),
      price(0.00)
{
}

CPartDescription::CPartDescription(long code, int year, String ^ make,
                                  String ^ model, String ^ type,
                                  String ^ desc, double UPrice)
    : ID(code),
      yr(year),
      mk(make),
      mdl(model),
      cat(type),
      name(desc),
      price(UPrice)
{
}

String ^ CPartDescription::ToString()
{
    return this->PartNumber + L" " +
           this->Year.ToString() + L" " +
           this->Make + L" " +
           this->Model + L" " +
           this->Category + L" " +
           this->PartName + L" " +
           this->UnitPrice;
}
|
-
In the Solution Explorer, right-click CollegeParkAutoParts3 -> Add -> Class...
-
Click C++ Class and click Add
-
Set the name to CPartsOrdered and press Enter
-
To create another class independent for a list, change the header file as follows:
#pragma once

using namespace System;

[Serializable]
public ref class CPartsOrdered
{
public:
    CPartsOrdered(void);

    long PartNumber;
    String ^ PartName;
    double UnitPrice;
    int Quantity;
    double SubTotal;
};
|
- Save all
After declaring an ArrayList or a List variable, it is empty.
As objects are added to it, the list grows. The list can grow tremendously as
you wish. The number of items of the list is managed through the memory it
occupies and this memory grows as needed. The number of items that the memory
allocated is currently using is represented by the Capacity
property. Here is an example of accessing the ArrayList.Capacity
property:
void CExercise::StartForm(Object ^ sender, EventArgs ^ e)
{
    lstNames = gcnew ArrayList;
    Text = L"List Capacity: " + lstNames->Capacity.ToString();
}
This would produce:

The capacity of a list will usually be the least of your concerns.
If for some reason, you want to intervene and control the
number of items that your list can contain, you can manipulate
the Capacity property. For example, you can assign it a constant to set
the maximum value that the list can contain. Instead of specifying the capacity
after the list has been created, when declaring the list variable, you can
specify its maximum capacity. To support this, both the ArrayList and the
List
classes are equipped with an additional constructor as follows:
public:
    ArrayList(int capacity);

public:
    List(int capacity);
Once again, you will hardly have any
reason to use the Capacity property: the compiler knows what to do with
it.
One of the reason for creating a list is to be able to add
values to it, edit its values, retrieve a value, or delete values from it. These
are the default operations. You can still limit these operations as you judge
them unnecessary. For example, you may create a list and then initialize it with
the values that you want the list to only have. If you do not want to have the
user adding values to it, you can create the list as read-only. To do this, you
can call the ArrayList::ReadOnly() method. It is overloaded with two
versions as follows:
public:
    static ArrayList^ ReadOnly(ArrayList^ list);
public:
    static IList^ ReadOnly(IList^ list);
Some operations cannot
be performed on a read-only list. To perform such operations, you can first find
out whether an ArrayList list is read-only. This is done by checking its IsReadOnly
property.
The primary operation performed on a list is to create one
or more values. To do this, you have various alternatives. Both the ArrayList and the List classes
are equipped with an
Add() method. The syntax of the System::Collections::ArrayList::Add()
method is: public:
virtual int Add(Object^ value);
The syntax of the System::Collections::Generic::List::Add()
method is:
public:
    virtual void Add(T item) sealed;
The argument of the method is the value to add to the list.
If the method succeeds with the addition, it returns the position where the
value was added in the list. Here are example for an ArrayList variable:
void CExercise::StartForm(Object ^ sender, EventArgs ^ e)
{
    Text = L"Employees Records";

    lstNames = gcnew ArrayList;

    lstNames->Add(L"Christine Kingston");
    lstNames->Add(L"Hermine Paulson");
    lstNames->Add(L"William Harrison");
    lstNames->Add(L"Ursula Morales");
    lstNames->Add(L"Evan Lancos");
}
If
the method fails to add the value and if you are using the ArrayList
class, the compiler would throw an error. One of the errors that
could result from the ArrayList's failure of this operation would be based on the fact that
either a new value cannot be added to the list because the list is read-only, or
the list was already full prior to adding the new value. Normally, a list can be
full only if you had specified the maximum number of items it can contain using
the ArrayList::Capacity property. As mentioned above, the list can be made
read-only by passing its variable to the ArrayList::ReadOnly() method.
Instead of adding one values at a time, you can first create
a list of values and add that whole list at once. To support this operation,
both the ArrayList and the List classes are equipped with a method
named AddRange.
The syntax of the ArrayList::AddRange() method is:
public:
    virtual void AddRange(ICollection^ c);
The syntax of the List::AddRange() method is:
public:
    void AddRange(IEnumerable<T>^ collection);
The ArrayList::AddRange() method takes as argument a
list created from a class that implements the ICollection interface. Here
is an example:
void CExercise::StartForm(Object ^ sender, EventArgs ^ e)
{
	Text = L"Employees Records";

    ComboBox ^ cbx = gcnew ComboBox();
    cbx->Items->Add(L"Paul Bertrand Yamaguchi");
    cbx->Items->Add(L"Helene Mukoko");
    cbx->Items->Add(L"John Hancock");
    cbx->Items->Add(L"Gertrude Monay");

    lstNames = gcnew ArrayList;
    lstNames->AddRange(cbx->Items);
}
The List::AddRange() method takes as argument a list
created from a class that implements the generic IEnumerable interface.
|
 Practical
Learning: Adding Items to an ArrayList List
|
|
- In the Solution Explorer, right-click NewStoreItem and click View Code
- Include the System::IO and the System::Runtime::Serialization::Formatters::Binary
namespace:
#pragma once

#include "MakeEditor.h"
#include "ModelEditor.h"
#include "CategoryEditor.h"

using namespace System;
using namespace System::ComponentModel;
using namespace System::Collections;
using namespace System::Windows::Forms;
using namespace System::Data;
using namespace System::Drawing;
using namespace System::IO;
using namespace System::Runtime::Serialization::Formatters::Binary;

namespace CollegeParkAutoParts5 {
|
- Declare a List<PartDescription> handle named lstAutoParts:
public ref class NewStoreItem : public System::Windows::Forms::Form
{
    List<PartDescription> ^ lstAutoParts;

public:
    NewStoreItem(void)
|
- Display the New Store Item form and double-click the Submit button
- Implement the event as follows:
System::Void btnSubmit_Click(System::Object^  sender, System::EventArgs^  e)
{
    FileStream ^ stmAutoParts = nullptr;
    BinaryFormatter ^ bfmAutoParts = gcnew BinaryFormatter;

    // If this directory doesn't exist, create it
    Directory::CreateDirectory(L"C:\\College Park Auto Parts");
    // This is the file that holds the list of items
    String ^ Filename = L"C:\\College Park Auto Parts\\Parts.prs";

    // Create a random number that will be used to identify the item
    Random ^ rnd = gcnew Random;
    txtPartNumber->Text = rnd->Next(100000, 999999).ToString();

    // Make sure the user had selected a car year
    if (cbxYears->Text->Length == 0)
    {
        MessageBox::Show(L"You must specify the year");
        cbxYears->Focus();
        return;
    }

    // Make sure the user had selected a car make
    if (cbxMakes->Text->Length == 0)
    {
		MessageBox::Show(L"You must specify the car name");
		cbxMakes->Focus();
		return;
	}

	// Make sure the user had selected a car model
	if (cbxModels->Text->Length == 0)
	{
		MessageBox::Show(L"You must specify the model of the car");
		cbxModels->Focus();
		return;
	}

	// Make sure the user had selected the part category
	if (cbxCategories->Text->Length == 0)
	{
		MessageBox::Show(L"You must specify the part's category");
		cbxCategories->Focus();
		return;
	}

	// Make sure the user had entered a name/description
	if (txtPartName->Text->Length == 0)
	{
		MessageBox::Show(L"You must enter the name (or a "
                         L"short description) for the part");
        txtPartName->Focus();
        return;
	}

	// Make sure the user had typed a price for the item
	if (txtUnitPrice->Text->Length == 0)
	{
		MessageBox::Show(L"You must enter the price of the item");
		txtUnitPrice->Focus();
		return;
	}

	// Before saving the new part, find out if there was
	// already a file that holds the list of parts
	// If that file exists, open it and store its parts
	// in our list of parts
	if( File::Exists(Filename))
	{
		stmAutoParts = gcnew FileStream(Filename,
                                        FileMode::Open,
                                        FileAccess::Read,
                                        FileShare::Read);

		try {
			// Retrieve the list of items from file
            lstAutoParts =
                    dynamic_cast<List<CPartDescription ^> ^>
			(bfmAutoParts->Deserialize(stmAutoParts));
	}
	finally
	{
		stmAutoParts->Close();
	}
    }

    // Create the part
    CPartDescription ^ part = gcnew CPartDescription;
    part->PartNumber = long::Parse(txtPartNumber->Text);
    part->Year = int::Parse(cbxYears->Text);
    part->Make = cbxMakes->Text;
    part->Model = cbxModels->Text;
    part->Category = cbxCategories->Text;
    part->PartName = txtPartName->Text;
    part->UnitPrice = double::Parse(txtUnitPrice->Text);

    // Call the Add method of our collection class to add the part
    lstAutoParts->Add(part);

    // Save the list
    stmAutoParts = gcnew FileStream(Filename,
                                    FileMode::Create,
                                    FileAccess::Write,
                                    FileShare::Write);

    try {
        bfmAutoParts->Serialize(stmAutoParts, lstAutoParts);

        // After saving the item, reset the form
        cbxYears->Text = L"";
        cbxMakes->Text = L"";
        cbxModels->Text = L"";
        cbxCategories->Text = L"";
        txtPartName->Text = L"";
        txtUnitPrice->Text = L"0.00";
        txtPartNumber->Text = rnd->Next(100000, 999999).ToString();
    }
    finally
    {
	stmAutoParts->Close();
    }
}
|
- In the Solution Explorer, right-click Form1.h and click View Code
- Add the following namespaces in the top section of the file:
#pragma once

#include "PartsOrdered.h"

namespace CollegeParkAutoParts5 {

	using namespace System;
	using namespace System::ComponentModel;
	using namespace System::Collections;
	using namespace System::Collections::Generic;
	using namespace System::Windows::Forms;
	using namespace System::Data;
	using namespace System::Drawing;
	using namespace System::IO;
	using namespace System::Runtime::Serialization::Formatters::Binary;

	/// <summary>
|
- Return to the Form1 form and double-click the Save Customer Order button
- Implement its event as follows:
System::Void btnSave_Click(System::Object^  sender, System::EventArgs^  e)
{
    BinaryFormatter ^ bfmCustomerOrder = gcnew BinaryFormatter;

    // We will store our files in the following folder
    String ^ strDirectory = L"C:\\College Park Auto Parts\\Receipts";
    DirectoryInfo ^ dirInfo = gcnew DirectoryInfo(strDirectory);

    String ^ strFilename = strDirectory+ L"\\" + txtSave->Text+ L".cap";

    List<CPartsOrdered ^> ^ lstOrderedParts = nullptr;

    if (lvwSelectedParts->Items->Count == 0)
        return;
    else
    {
        lstOrderedParts = gcnew List<CPartsOrdered ^>;

        for (int i = 0; i < lvwSelectedParts->Items->Count; i++)
        {
            CPartsOrdered ^ part = gcnew CPartsOrdered;

            part->PartNumber = long::Parse(lvwSelectedParts->Items[i]->Text);
            part->PartName = lvwSelectedParts->Items[i]->SubItems[1]->Text;
            part->UnitPrice =
		double::Parse(lvwSelectedParts->Items[i]->SubItems[2]->Text);
            part->Quantity =
		int::Parse(lvwSelectedParts->Items[i]->SubItems[3]->Text);
            part->SubTotal =
		double::Parse(lvwSelectedParts->Items[i]->SubItems[4]->Text);
            lstOrderedParts->Add(part);
        }

        FileStream ^ stmCustomerOrder =
		gcnew FileStream(strFilename, FileMode::Create);

        try
        {
            bfmCustomerOrder->Serialize(stmCustomerOrder, lstOrderedParts);
        }
        finally
        {
            stmCustomerOrder->Close();
        }
    }
}
|
- Save all
|
The Number of Items in the List
|
|
When using a list, at any time, you should be able to know
the number of items that the list contains. This information is provided by the ArrayList::Count
or the List::Count property.
The Capacity and the Count
properties have this in common: the value of each
increases as the list grows and the same value decreases if the list shrinks. It
is important to know that there are various
differences between the capacity of a list and the number of items it contains. Capacity
is a read/write property. This means that you can assign a
value to the capacity to fix the number of items that the list can contain. You
can also retrieve the value of the Capacity. The Count property is read-only
because it is used by the compiler to count the current number of values of the
list and this counting is performed without your intervention.
Once a list is ready, you can perform different types of
operations on it. Besides adding items, one of the most regular operations
performed on a list consists of locating and retrieving its values. You have
various options.
To give you access to each member of their list, both the ArrayList
and the List classes are equipped with the default Item property.
The Item property is an indexer. The first value of the list has an index
of 0. The second has an index of 1, and so on.
To retrieve a single value based on its position, you can apply
the square brackets of arrays to the variable. Here is an example:
#pragma once

#include <windows.h>

#using <System.dll>
#using <System.Drawing.dll>
#using <System.Windows.Forms.dll>

using namespace System;
using namespace System::Drawing;
using namespace System::Collections;
using namespace System::Windows::Forms;

public ref class CExercise : public Form
{
private:
    ArrayList ^ lstNames;
    ListBox ^ lbxNames;

    void InitializeComponent();
    void StartForm(Object ^ sender, EventArgs ^ e);

public:
    CExercise();
};

CExercise::CExercise()
{
    InitializeComponent();
}

void CExercise::InitializeComponent()
{
    Text = L"Employees";
    StartPosition = FormStartPosition::CenterScreen;
    Load += gcnew EventHandler(this, &CExercise::StartForm);

    lbxNames = gcnew ListBox();
    lbxNames->Location = Point(12, 12);
    Controls->Add(lbxNames);
}

void CExercise::StartForm(Object ^ sender, EventArgs ^ e)
{
    lstNames = gcnew ArrayList;

    lstNames->Add(L"Christine Kingston");
    lstNames->Add(L"Hermine Paulson");
    lstNames->Add(L"William Harrison");
    lstNames->Add(L"Ursula Morales");
    lstNames->Add(L"Evan Lancos");

    for (int i = 0; i < 5; i++)
        lbxNames->Items->Add(lstNames[i]);
}

int APIENTRY WinMain(HINSTANCE hInstance, HINSTANCE hPrevInstance,
					 LPSTR lpCmdLine, int nCmdShow)
{
    Application::Run(gcnew CExercise());
    return 0;
}

Another issue to keep in mind is that the ArrayList[]
indexer returns an Object value. Therefore, you may have to cast this value to your type
of value to get it right.
Besides using the index to access a value from the list, the
ArrayList
and the List classes implement the IEnumerable::GetEnumerator() method. For this reason,
you can use the for each loop to access each member of the collection.
Here is an example:
void CExercise::StartForm(Object ^ sender, EventArgs ^ e)
{
    lstNames = gcnew ArrayList;

    lstNames->Add(L"Christine Kingston");
    lstNames->Add(L"Hermine Paulson");
    lstNames->Add(L"William Harrison");
    lstNames->Add(L"Ursula Morales");
    lstNames->Add(L"Evan Lancos");

    for each( String ^ str in lstNames)
        lbxNames->Items->Add(str);
}
You can use the Item property to change a value in
the list. Because the Item property is used to access an existing value
from the list, the value must have been created. If you try setting the value of
a non existing item, the compiler would throw an ArgumentOutOfRangeException
Exception. Here is an example:
void CExercise::StartForm(Object ^ sender, EventArgs ^ e)
{
    lstNames = gcnew ArrayList;

    lstNames[0] = L"Paul Bertrand Yamaguchi";
}
Notice that at the time the 0 item is accessed, it has not
previous been created. This would produce:
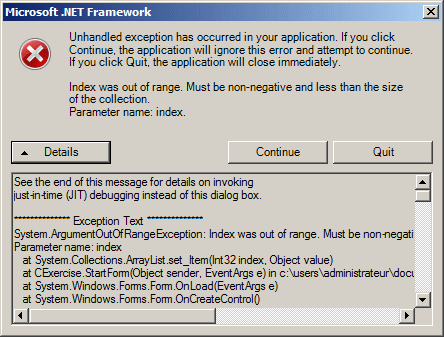
A review of the Details section shows:
************** Exception Text **************
System.ArgumentOutOfRangeException: Index was out of range.
Must be non-negative and less than the size of the collection.
Parameter name: index
   at System.Collections.ArrayList.set_Item(Int32 index, Object value)
   at CExercise.StartForm(Object sender, EventArgs e) in
	c:\users\administrateur\documents\visual studio 2008\projects
    	\vccli\exercise1\exercise1\exercise.cpp:line 47
This means that you can use the Item property only to change
the value of a previous created item.
|
 Practical
Learning: Enumerating a List Practical
Learning: Enumerating a List
|
|
-
Display the New Store Item form and double-click the Makes combo box
-
Implement its SelectedIndexChanged event as follows:
System::Void cbxMakes_SelectedIndexChanged(System::Object^  sender,
		                           System::EventArgs^  e)
{
    cbxModels->Text = L"";
    cbxModels->Items->Clear();

    for each(CPartDescription ^ part in lstAutoParts)
        if (part->Make == cbxMakes->Text)
            if (!cbxModels->Items->Contains(part->Model))
                cbxModels->Items->Add(part->Model);
}
|
-
In the Solution Explorer, right-click Form1.h and click View Code
-
Change the top of the file as follows:
#pragma once

#include "PartsOrdered.h"
#include "PartDescription.h"
#include "NewStoreItem.h"

namespace CollegeParkAutoParts5 {

	using namespace System;
	using namespace System::ComponentModel;
	using namespace System::Collections;
	using namespace System::Collections::Generic;
	using namespace System::Windows::Forms;
	using namespace System::Data;
	using namespace System::Drawing;
	using namespace System::IO;
	using namespace System::Runtime::Serialization::Formatters::Binary;

	/// <summary>
	/// Summary for Form1
	///
/// WARNING: If you change the name of this class, you will need to change the
///         'Resource File Name' property for the managed resource compiler tool
///          associated with all .resx files this class depends on.  Otherwise,
///          the designers will not be able to interact properly with localized
///          resources associated with this form.
/// </summary>
	public ref class Form1 : public System::Windows::Forms::Form
	{
	private:
        int iFilename;
        List<CPartDescription ^> ^ lstAutoParts;
|
-
Display the Form1 form and double-click the Add/Select button
-
Implement the event as follows:
System::Void btnAdd_Click(System::Object^  sender, System::EventArgs^  e)
{
    if (txtPartNumber->Text->Length == 0)
    {
        MessageBox::Show(L"There is no part to be added to the order");
        return;
    }

    for each(CPartDescription ^ part in lstAutoParts)
    {
        if (part->PartNumber == long::Parse(txtPartNumber->Text))
        {
            ListViewItem ^ lviSelectedPart =
		gcnew ListViewItem(part->PartNumber.ToString());

            lviSelectedPart->SubItems->Add(part->PartName);
            lviSelectedPart->SubItems->Add(part->UnitPrice.ToString());
            lviSelectedPart->SubItems->Add(txtQuantity->Text);
            lviSelectedPart->SubItems->Add(txtSubTotal->Text);
            lvwSelectedParts->Items->Add(lviSelectedPart);
        }
    }

    CalculateOrder();
}
|
- Return to the Form1 form and double-click the Open button
- Implement its event as follows:
System::Void btnOpen_Click(System::Object^  sender, System::EventArgs^  e)
{
    List<CPartsOrdered ^> ^ lstReceipts = nullptr;
    BinaryFormatter ^ bfmReceipts = gcnew BinaryFormatter;
    FileStream ^ stmReceipts = nullptr;

    String ^ strDirectory = L"C:\\College Park Auto Parts\\Receipts";
    String ^ strFilename = L"";

    DirectoryInfo ^ dirReceipts = gcnew DirectoryInfo(strDirectory);
    array<FileInfo ^> ^ fleReceipts = dirReceipts->GetFiles();

    if (txtOpen->Text->Length == 0)
    {
        MessageBox::Show(L"You must enter a receipt number\n"
                         L"There is no receipt number to "
                         L"open a customer's order");
        txtOpen->Focus();
        return;
    }

    if (fleReceipts->Length == 0)
    {
        MessageBox::Show(L"There is no customer order to open");
        txtOpen->Focus();
        return;
    }
    else
    {
        lvwAutoParts->Items->Clear();
        lvwSelectedParts->Items->Clear();

        strFilename = strDirectory+ L"\\" + txtOpen->Text+ L".cap";

        if( File::Exists(strFilename))
        {
            try
            {
                stmReceipts = gcnew FileStream(strFilename, FileMode::Open);
                lstReceipts =
		    dynamic_cast<List<CPartsOrdered ^> ^>
			(bfmReceipts->Deserialize(stmReceipts));

                for each(CPartsOrdered ^ part in lstReceipts)
                {
                    ListViewItem ^ lviReceiptPart =
			gcnew ListViewItem(part->PartNumber.ToString());

                    lviReceiptPart->SubItems->Add(part->PartName);
                    lviReceiptPart->SubItems->Add(part->UnitPrice.ToString());
                    lviReceiptPart->SubItems->Add(part->Quantity.ToString());
                    lviReceiptPart->SubItems->Add(part->SubTotal.ToString());
                    lvwSelectedParts->Items->Add(lviReceiptPart);
                }
            }
            finally
            {
                stmReceipts->Close();
            }

            CalculateOrder();
            txtSave->Text = txtOpen->Text;
        }
        else
            MessageBox::Show
		(L"There is no customer order with that receipt number");
    }
}
|
- Save the file
|
Checking the Existence of an Item
|
|
Instead of the square brackets that allow you to retrieve a
value based on its position, you can look for a value based on its complete
definition. You have various options. You can first "build" an item
and ask the compiler to check whether any item in the list matches your
definition. To perform this search, depending on your class, you can call either
the ArrayList::Contains()
or the List::Contains() method. The syntax of the System::Collections::ArrayList::Contains()
method is:
public:
    virtual bool Contains(Object^ item);
The syntax of the System::Collections::Generic::List::Contains()
method is:
public:
    virtual bool Contains(T item) sealed;
The value to look for is passed as argument to the method.
The compiler would look for exactly the value, using its definition, in the list.
If any detail of the argument fails to match any value of the
list, the method would return false. If all characteristics of the argument
correspond to a value of the list, the method returns true. Here is an example:
#pragma once

#include <windows.h>

#using <System.dll>
#using <System.Drawing.dll>
#using <System.Windows.Forms.dll>

using namespace System;
using namespace System::Drawing;
using namespace System::Collections;
using namespace System::Windows::Forms;

public ref class CExercise : public Form
{
private:
    ArrayList ^ lstNames;
    ListBox   ^ lbxNames;
    Label     ^ lblLookFor;
    TextBox   ^ txtLookFor;
    Button    ^ btnLookFor;
    TextBox   ^ txtResult;

    void InitializeComponent();
    void Start(Object ^ sender, EventArgs ^ e);
    void btnLookForClick(Object ^ sender, EventArgs ^ e);

public:
    CExercise();
};

CExercise::CExercise()
{
    InitializeComponent();
}

void CExercise::InitializeComponent()
{
    Text = L"Employees Records";
    Size = Drawing::Size(340, 150);
    StartPosition = FormStartPosition::CenterScreen;
    Load += gcnew EventHandler(this, &CExercise::Start);

    lbxNames = gcnew ListBox();
    lbxNames->Location = Point(12, 12);
    Controls->Add(lbxNames);

    lblLookFor = gcnew Label;
    lblLookFor->Text = L"Look for:";
    lblLookFor->Location = Point(140, 14);
    lblLookFor->AutoSize = true;
    Controls->Add(lblLookFor);

    txtLookFor = gcnew TextBox;
    txtLookFor->Location = Point(220, 12);
    Controls->Add(txtLookFor);

    btnLookFor = gcnew Button;
    btnLookFor->Text = L"Result";
    btnLookFor->Location = Point(140, 36);
    btnLookFor->Click += gcnew EventHandler(this, &CExercise::btnLookForClick);
    Controls->Add(btnLookFor);

    txtResult = gcnew TextBox;
    txtResult->Location = Point(220, 38);
    Controls->Add(txtResult);
}

void CExercise::Start(Object ^ sender, EventArgs ^ e)
{
    lstNames = gcnew ArrayList;

    lstNames->Add(L"Christine Kingston");
    lstNames->Add(L"Hermine Paulson");
    lstNames->Add(L"William Harrison");
    lstNames->Add(L"Ursula Morales");
    lstNames->Add(L"Evan Lancos");

    for each(String ^ str in lstNames)
        lbxNames->Items->Add(str);
}

void CExercise::btnLookForClick(Object ^ sender, EventArgs ^ e)
{
    String ^ strFind = txtLookFor->Text;

    if (lstNames->Contains(strFind) == true)
        txtResult->Text = L"Found";
    else
        txtResult->Text = L"Not Found";
}

int APIENTRY WinMain(HINSTANCE hInstance, HINSTANCE hPrevInstance,
					 LPSTR lpCmdLine, int nCmdShow)
{
	Application::Run(gcnew CExercise());
	return 0;
}
|
 Practical
Learning: Checking the Existence of an Item Practical
Learning: Checking the Existence of an Item
|
|
- Display the New Store Item form and double-click an unoccupied area of its
body
- Implement the Load event as follows:
System::Void NewStoreItem_Load(System::Object^  sender, System::EventArgs^  e)
{
    // Since all values seem ready, prepare to process the item
    lstAutoParts = gcnew List<CPartDescription ^>;
    BinaryFormatter ^ bfmAutoParts = gcnew BinaryFormatter;

    for (int i = DateTime::Today.Year + 1; i >= 1960; i--)
        cbxYears->Items->Add(i.ToString());

    // Create a random number that will be used to identify the item
    Random ^ rnd = gcnew Random;
    txtPartNumber->Text = rnd->Next(100000, 999999).ToString();

    // This is the file that holds the list of parts
    String ^ Filename = L"C:\\College Park Auto Parts\\Parts.prs";

    if( File::Exists(Filename))
    {
        FileStream ^ stmAutoParts = gcnew FileStream(Filename,
                                                 FileMode::Open,
                                                 FileAccess::Read,
                                                 FileShare::Read);

        try
        {
            // Retrieve the list of items from file
            lstAutoParts =
		dynamic_cast<List<CPartDescription ^> ^>
		    (bfmAutoParts->Deserialize(stmAutoParts));

            // Display the car manufacturers in the Make combo box
            for (int i = 0; i < lstAutoParts->Count; i++)
            {
                CPartDescription ^ part =
		   safe_cast<CPartDescription ^>(lstAutoParts[i]);

                if (!cbxMakes->Items->Contains(part->Make))
                    cbxMakes->Items->Add(part->Make);
            }

            // Display the pats categories in the Category combo box
            for (int i = 0; i < lstAutoParts->Count; i++)
            {
                CPartDescription ^part =
		    safe_cast<CPartDescription ^>(lstAutoParts[i]);

                if (!cbxCategories->Items->Contains(part->Category))
                    cbxCategories->Items->Add(part->Category);
            }
        }
        finally
        {
            stmAutoParts->Close();
        }
    }
}
|
- Display the Form1 form and click the Part # text box
- In the Events section of the Properties window, double-click Leave and
implement the event as follows:
System::Void txtPartNumber_Leave(System::Object^  sender, System::EventArgs^  e)
{
    // We will allow the user to enter a part number
    // In the beginning, we assume that the user
    // had entered an invalid number
    bool found = false;
    // This will represent the part found, if any
    CPartDescription ^ PartFound = nullptr;

    // After the user had entered a part number,
    // check the whole list of parts
    for each(CPartDescription ^ part in lstAutoParts)
    {
        // If you find a part that holds the number the user had entered
        if( part->PartNumber == long::Parse(txtPartNumber->Text) )
        {
            // Mark that part
            PartFound = part;
            // And update the flag that specifies that the part has been found
            found = true;
        }
        // If the part number was not found, check the next
    } // If no part has that number, the found flag keeps marked as false

    // If a part with that number was found...
    if (found == true)
    {
        // Show the corresponding part name and unit price
        txtPartName->Text = PartFound->PartName;
        txtUnitPrice->Text = PartFound->UnitPrice.ToString(L"F");
        txtQuantity->Text = L"1";
        txtSubTotal->Text = PartFound->UnitPrice.ToString(L"F");
        // Give focus to the quantity in case the user was to increase it
        txtQuantity->Focus();
    }
    else
    {
        // Since no part with that number was found,
        // reset the text boxes
        txtPartName->Text = L"";
        txtUnitPrice->Text = L"0.00";
        txtQuantity->Text = L"0";
        txtSubTotal->Text = L"0.00";

        // Let the user know that the part number that
        // was entered is not in the list
        MessageBox::Show(L"There is no part with that number");
    }
}
|
- Return to the Form1 form and double-click the New Auto Part button
- Implement the event as follows:
void ShowAutoParts()
{
    tvwAutoParts->Nodes->Clear();
    TreeNode ^ nodRoot =
		tvwAutoParts->Nodes->Add(L"College Park Auto-Parts",
                                        L"College Park Auto-Parts", 0, 1);
    // Show the years nodes
    for (int years = DateTime::Today.Year + 1; years >= 1960; years--)
        nodRoot->Nodes->Add(years.ToString(), years.ToString(), 2, 3);

    tvwAutoParts->SelectedNode = nodRoot;
    // Expand the root node
    tvwAutoParts->ExpandAll();

    lstAutoParts = gcnew List<CPartDescription ^>;
    BinaryFormatter ^ bfmAutoParts = gcnew BinaryFormatter;

    // This is the file that holds the list of auto parts
    String ^ Filename = L"C:\\College Park Auto Parts\\Parts.prs";

    if( File::Exists(Filename))
    {
        FileStream ^ stmAutoParts = gcnew FileStream(Filename,
                                                     FileMode::Open,
                                                     FileAccess::Read,
                                                     FileShare::Read);
        try {
            // Retrieve the list of parts from file
            lstAutoParts =
		dynamic_cast<List<CPartDescription ^> ^>
		    (bfmAutoParts->Deserialize(stmAutoParts));

            // Show the makes nodes
            for each( TreeNode ^ nodYear in nodRoot->Nodes)
            {
                List<String ^> ^ lstMakes = gcnew List<String ^>;

                for each(CPartDescription ^ part in lstAutoParts)
                {
                    if (nodYear->Text == part->Year.ToString())
                    {
                        if (!lstMakes->Contains(part->Make))
                            lstMakes->Add(part->Make);
                    }
                }

                for each( String ^ strMake in lstMakes)
                    nodYear->Nodes->Add(strMake, strMake, 4, 5);
            }

            // Showing the models nodes
            for each( TreeNode ^ nodYear in nodRoot->Nodes)
            {
                for each( TreeNode ^ nodMake in nodYear->Nodes)
                {
                    List<String ^> ^ lstModels = gcnew List<String ^>;

                    for each(CPartDescription ^ part in lstAutoParts)
                    {
                        if ((nodYear->Text == part->Year.ToString()) &&
                             (nodMake->Text == part->Make))
                        {
                            if (!lstModels->Contains(part->Model))
                                lstModels->Add(part->Model);
                        }
                    }

                    for each( String ^ strModel in lstModels)
                        nodMake->Nodes->Add(strModel, strModel, 6, 7);
                }
            }

            // Showing the categories nodes
            for each( TreeNode ^ nodYear in nodRoot->Nodes)
            {
                for each( TreeNode ^ nodMake in nodYear->Nodes)
                {
                    for each( TreeNode ^ nodModel in nodMake->Nodes)
                    {
                        List<String ^> ^ lstCategories = gcnew List<String ^>;

                        for each(CPartDescription ^ part in lstAutoParts)
                        {
                            if ((nodYear->Text == part->Year.ToString()) &&
                                (nodMake->Text == part->Make) &&
                                (nodModel->Text == part->Model))
                            {
                                if (!lstCategories->Contains(part->Category))
                                    lstCategories->Add(part->Category);
                            }
                        }

                        for each( String ^ strCategory in lstCategories)
                            nodModel->Nodes->Add(strCategory, strCategory, 8, 9);
                    }
                }
            }
        }
        finally
        {
            stmAutoParts->Close();
        }
    }
}

System::Void btnNewAutoPart_Click(System::Object^  sender, System::EventArgs^  e)
{
    NewStoreItem ^ editor = gcnew NewStoreItem;

    if (editor->ShowDialog() == System::Windows::Forms::DialogResult::Cancel)
        ShowAutoParts();
}
|
- Display the Form1 form and double-click the New Customer Order button
- Implement the event as follows:
System::Void btnNewCustomerOrder_Click(System::Object^  sender,
					System::EventArgs^  e)
{
    // We will store our files in the following folder
    String ^ strDirectory = L"C:\\College Park Auto Parts\\Receipts";
    DirectoryInfo ^ dirInfo = Directory::CreateDirectory(strDirectory);

    // Get the list of files, if any, from our directory
    array<FileInfo ^> ^ fleList = dirInfo->GetFiles();

    // If there is no file in the directory,
    // then we will use 1000 as the first file name
    if (fleList->Length == 0)
    {
        iFilename = 1000;
    }
    else // If there was at least one file in the directory
    {
        // Get a reference to the last file
        FileInfo ^ fleLast = fleList[fleList->Length - 1];
        // Get the name of the last file without its extension
        String ^ fwe = Path::GetFileNameWithoutExtension(fleLast->FullName);
        // Increment the name of the file by 1
        iFilename = int::Parse(fwe) + 1;
    }

    txtSave->Text = iFilename.ToString();

    lvwAutoParts->Items->Clear();
    lvwSelectedParts->Items->Clear();
}
|
- Display the Form1 form and double-click an unoccupied area of its body
- Define a new method and implement the Load event as follows:
System::Void Form1_Load(System::Object^  sender, System::EventArgs^  e)
{
    ShowAutoParts();
    btnNewCustomerOrder_Click(sender, e);
}
|
-
Return to the Form1 form and click the tree view
-
In the Properties window, click the Events button and, in the Events section,
double-click NodeMouseClick
-
Implement the event as follows:
System::Void tvwAutoParts_NodeMouseClick(System::Object^  sender,
			 System::Windows::Forms::TreeNodeMouseClickEventArgs^  e)
{
    TreeNode ^ nodClicked = e->Node;

    if (nodClicked->Level == 4)
        lvwAutoParts->Items->Clear();

    try {
        for each(CPartDescription ^ part in lstAutoParts)
        {
            if ((part->Category == nodClicked->Text) &&
                (part->Model == nodClicked->Parent->Text) &&
                (part->Make == nodClicked->Parent->Parent->Text) &&
                (part->Year.ToString() ==
			nodClicked->Parent->Parent->Parent->Text))
            {
                ListViewItem ^ lviAutoPart =
			gcnew ListViewItem(part->PartNumber.ToString());

                lviAutoPart->SubItems->Add(part->PartName);
                lviAutoPart->SubItems->Add(part->UnitPrice.ToString(L"F"));
                lvwAutoParts->Items->Add(lviAutoPart);
            }
        }
    }
    catch (NullReferenceException ^)
    {
    }
}
|
-
Return to the Form1 form and double-click the Close button
-
Implement the event as follows:
System::Void btnClose_Click(System::Object^  sender, System::EventArgs^  e)
{
    Close();
}
|
- Execute the application
- Click the New Auto Part button and use the
Part Editor to create a few parts
(let the computer generate the part numbers)
- Close the Part Editor
- Create a few customer part orders and save them:
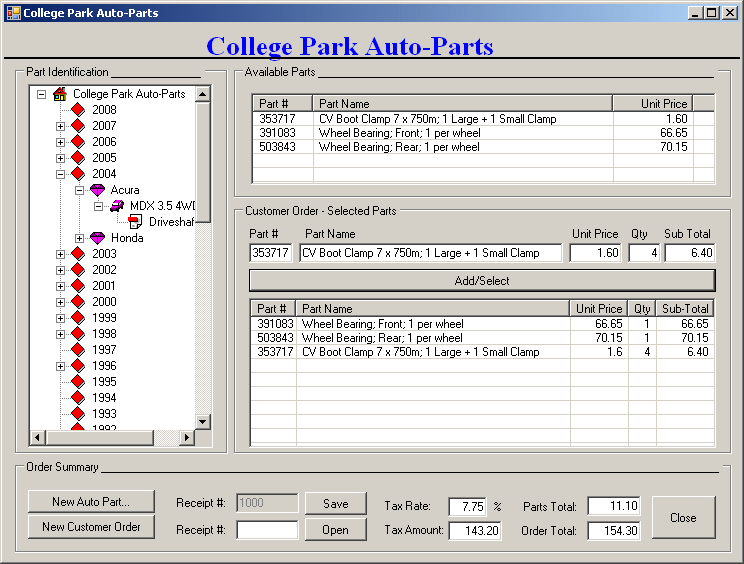
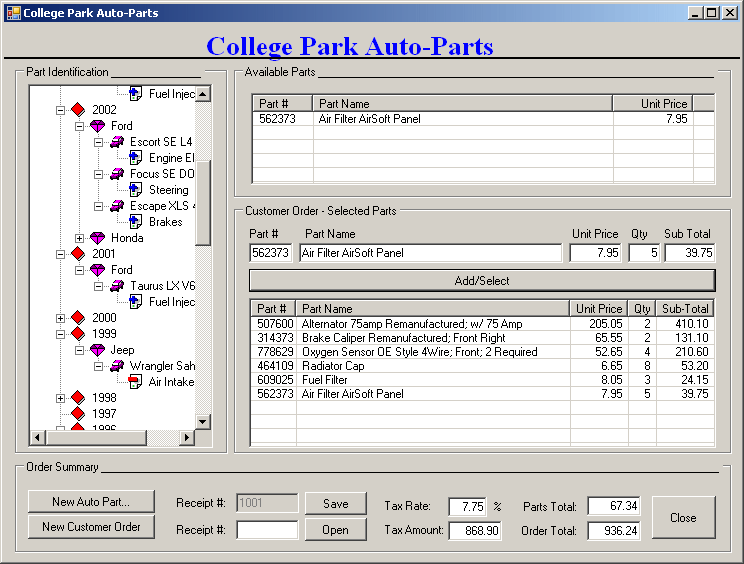
- Close the forms and return to your programming environment
- Execute the application again and open a previously saved order
- Close the forms and return to your programming environment
Another option to look for an item in a list consists of
calling the BinarySearch() method of either the ArrayList
or the List class. It is overloaded in three
versions and one of them uses the following syntax:
public:
    virtual int BinarySearch(Object^ value);
public:
    int BinarySearch(T item);
The value to look for is passed argument to the method. Here
is an example:
void CExercise::btnLookForClick(Object ^ sender, EventArgs ^ e)
{
    String ^ strFind = txtLookFor->Text;

    if( lstNames->BinarySearch(strFind) > 0 )
        txtResult->Text = L"Found";
    else
        txtResult->Text = L"Not Found";
}
To remove all items from a list at once, you can call the Clear()
method of either the ArrayList or the List class. Its syntax is:
public:
    virtual void Clear();
As opposed to adding a value to a list, you may want to
remove one. To perform this operation, you have various options. You can ask the
compiler to look for an item in the list and if, or once, the compiler finds it,
it would delete the value. To perform this type of deletion, you can call the Remove()
method of either the ArrayList
or the List class. Its syntax is:
public:
    virtual void Remove(Object^ obj);
public:
    virtual bool Remove(T item) sealed;
This method accepts as argument the value that you want to
delete from the list. To perform this operation, the list must not be read-only.
The Remove() method allows you to specify the exact
value you want to delete from a list. Another option you have consists of
deleting a value based on its position. This is done using the RemoveAt()
method whose syntax is:
public:
    virtual void RemoveAt(int index);
public:
    virtual void RemoveAt(int index) sealed;
With this method, the position of the item is passed as
argument. Here is an example:

#pragma once

#include <windows.h>

#using <System.dll>
#using <System.Drawing.dll>
#using <System.Windows.Forms.dll>

using namespace System;
using namespace System::Drawing;
using namespace System::Collections;
using namespace System::Windows::Forms;

public ref class CExercise : public Form
{
private:
    ArrayList ^ lstNames;
    ListBox   ^ lbxNames;
	Label     ^ lblLookFor;
	TextBox   ^ txtLookFor;
	Button    ^ btnLookFor;
	TextBox   ^ txtResult;
	Button    ^ btnRemove;

	void InitializeComponent();
	void Start(Object ^ sender, EventArgs ^ e);
	void btnLookForClick(Object ^ sender, EventArgs ^ e);
	void btnRemoveClick(Object ^ sender, EventArgs ^ e);

public:
    CExercise();
};

CExercise::CExercise()
{
	InitializeComponent();
}

void CExercise::InitializeComponent()
{
	Text = L"Employees Records";
	Size = Drawing::Size(340, 150);
	StartPosition = FormStartPosition::CenterScreen;
	Load += gcnew EventHandler(this, &CExercise::Start);

	lbxNames = gcnew ListBox();
    lbxNames->Location = Point(12, 12);
    Controls->Add(lbxNames);

	lblLookFor = gcnew Label;
	lblLookFor->Text = L"Look for:";
	lblLookFor->Location = Point(140, 14);
	lblLookFor->AutoSize = true;
	Controls->Add(lblLookFor);

	txtLookFor = gcnew TextBox;
	txtLookFor->Location = Point(220, 12);
	Controls->Add(txtLookFor);

	btnLookFor = gcnew Button;
	btnLookFor->Text = L"Result";
	btnLookFor->Location = Point(140, 36);
	btnLookFor->Click += gcnew EventHandler(this, &CExercise::btnLookForClick);
	Controls->Add(btnLookFor);

	txtResult = gcnew TextBox;
	txtResult->Location = Point(220, 38);
	Controls->Add(txtResult);

    btnRemove = gcnew Button;
	btnRemove->Text = "Remove 2nd";
	btnRemove->Location = Point(140, 66);
	btnRemove->Width = 100;
	btnRemove->Click += gcnew EventHandler(this, &CExercise::btnRemoveClick);
	Controls->Add(btnRemove);
}

void CExercise::Start(Object ^ sender, EventArgs ^ e)
{
    lstNames = gcnew ArrayList;

    lstNames->Add(L"Christine Kingston");
    lstNames->Add(L"Hermine Paulson");
    lstNames->Add(L"William Harrison");
    lstNames->Add(L"Ursula Morales");
    lstNames->Add(L"Evan Lancos");

    for each(String ^ str in lstNames)
        lbxNames->Items->Add(str);
}

void CExercise::btnLookForClick(Object ^ sender, EventArgs ^ e)
{
    String ^ strFind = txtLookFor->Text;

    if( lstNames->BinarySearch(strFind) > 0 )
        txtResult->Text = L"Found";
    else
        txtResult->Text = L"Not Found";
}

void CExercise::btnRemoveClick(Object ^ sender, EventArgs ^ e)
{
    if( lstNames->Count < 2 )
	return;

    lstNames->RemoveAt(1);
    lbxNames->Items->Clear();

    for each( String ^ str in lstNames)
        lbxNames->Items->Add(str);
}

int APIENTRY WinMain(HINSTANCE hInstance, HINSTANCE hPrevInstance,
					 LPSTR lpCmdLine, int nCmdShow)
{
	Application::Run(gcnew CExercise());
	return 0;
}

If the position is not valid because either it is lower or higher than
the current Count, the compiler would throw an ArgumentOutOfRangeException
exception.
- Create a Windows Application named MusicInstrumentStore3
- Follow the instructions from the previous lesson to design the forms
- Use the ArrayList class to create and manage the list of store items
- Configure the application so that, if the user double-clicks an object in
the Available Items list view:
- The Item Editor would open and display the information about
the item that was clicked
- The Create button would display a caption as Submit
- The Close button would display a caption as Cancel
- The user can then change any detail about the item and click
- If the user clicks Submit, the (same) item would be updated
in the database
- If the user clicks Cancel, the dialog box would be closed and
the item would not receive any change
- Configure the Available Items list view so that, if the user clicks an
item and presses Delete:
- A message box would ask the user, "Are you sure you want
to remove this item from the database?" and would display two
buttons: Yes and No
- If the user clicks Yes, the item would be removed from the
database
- If the user clicks No, nothing would happen
- Open the CollegeParkAutoParts5 application from this lesson
- Add a context menu for the Available Parts list view with the items:
Select, Edit..., and Delete
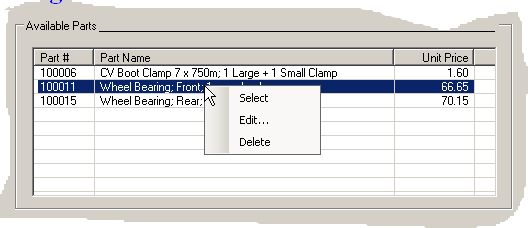
- Configure the context menu so that
- If the user clicks Select, the behavior would be the same as if the
user had double-clicked the item
- If the user clicks Edit..., the Part Editor dialog box would display
with the part in it. The user can then edit any part (year, make, model,
category, part name, or unit price) except the part number. Then the
user can save the changed part
- If the user clicks Delete, a message box would warn the user and ask
for confirmation with Yes/No answers. If the user clicks Yes, the part
would be deleted from the list of auto parts
- Configure the application so that the user can open an order, add new
parts to it, or delete parts from it, then save the order
- Extend the application so that the store can also sell items that are, or
are not, car-related, such as books, t-shirts, cleaning items, maintenance
items (steering oils, brake oils, etc), license plates, etc. Every item in
the store should have an item number. The user can enter that item number in
the Part # text box and press Tab or Enter. The corresponding item would
then be retrieved from the database and displayed on the form. If there is
no item with that number, a message box should let the user know
Download
|
|