 |
Windows Controls: The Combo Box |
|
|
Introduction to Combo Boxes |
|
|
|
A combo box is a list of items that the user can select
from. A combo box is usually made of a list of strings. A combo box saves
space by using just as much room as a text box control. To show that it is
holding a list, a combo box displays a down-pointing arrow on the right side
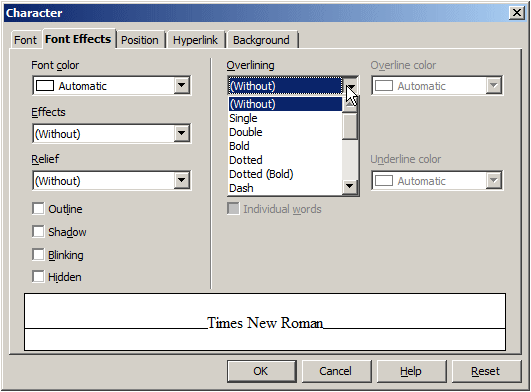
of its text box. In the following screenshot, the Font Effects property page
of the Character dialog box of OpenOffice.org presents the Font Color, the
Effects, the Relief, the Overlining, the Strikethrough, and the Underlining
combo boxes:
|

Because a combo box does not (permanently) display its
list, to show its content, the user can click the arrow button. Here is an
example:

|
 Practical Learning: Introducing Combo Boxes Practical Learning: Introducing Combo Boxes
|
|
- Start Microsoft Visual Studio
- To create a new application, on the main menu, click File -> New
Project...
- In the middle list, click Windows Forms Application
- Set the Name to ClarksvilleIceCream3
- From the Menus & Toolbars section of the Toolbox, click MenuStrip
and click the form
- Under the form, right-click menuStrip1 and click Insert Standard
Items
- In the Common Controls section of the Toolbox, click ToolTip
 and click the form
To support combo boxes, the .NET Framework provides a
class named ComboBox. At design time, to add a combo box to your
application, from the Common Controls section of the Toolbox, you can
click the ComboBox button
 and click the form or a container.
The ComboBox class is derived from the
ListControl class. To programmatically create a combo box, create a
handle to ComboBox, allocate memory for it using the gcnew
operator and add it to the Controls collection of its container.
Here is an example:
#include <windows.h>

#using <System.dll>
#using <System.Drawing.dll>
#using <System.Windows.Forms.dll>

using namespace System;
using namespace System::Drawing;
using namespace System::Windows::Forms;

public ref class CExercise : public Form
{
private:
    Label ^ lblTitle;
    ComboBox ^ cbxAcademicDisciplines;

public:
    CExercise()
    {
	InitializeComponent();
    }

private:
    void InitializeComponent()
    {
        lblTitle = gcnew Label;
        lblTitle->Text = "Academic Disciplines";
        lblTitle->Location =  Point(12, 12);
        lblTitle->AutoSize = true;
        Controls->Add(lblTitle);

        cbxAcademicDisciplines = gcnew ComboBox;
        cbxAcademicDisciplines->Location =  Point(12, 32);

        Controls->Add(cbxAcademicDisciplines);
    }
};

int APIENTRY WinMain(HINSTANCE hInstance,
		     HINSTANCE hPrevInstance,
		     LPSTR lpCmdLine,
		     int nCmdShow)
{
    Application::Run(gcnew CExercise);

    return 0;
}
This would produce:

|
 Practical Learning: Creating Combo Boxes Practical Learning: Creating Combo Boxes
|
|
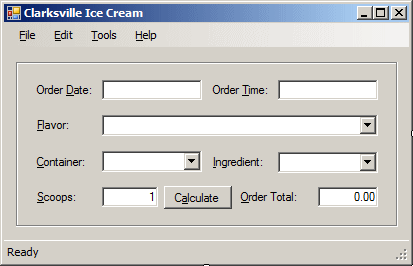
- Design the form as follows:
 |
| Control |
Name |
Text |
TextAlign |
ToolTip On ToolTip1 |
| GroupBox |
 |
grpIceCream |
|
|
|
| Label |
 |
|
Order &Date: |
|
|
| TextBox |
 |
txtOrderDate |
|
|
Enter a value for a date (MM/DD/YYYY) |
| Label |
 |
|
Order &Time: |
|
|
| TextBox |
 |
txtOrderTime |
|
|
Enter a value for a time (23:59) |
| Label |
 |
|
&Flavor: |
|
|
| ComboBox |
 |
cboFlavors |
|
|
Click the arrow to display a list, then select a
flavor from the list |
| Label |
 |
|
&Container: |
|
|
| ComboBox |
 |
cboContainers |
|
|
Click to display the list of containers and select
one |
| Label |
 |
|
&Ingredient: |
|
|
| ComboBox |
 |
cboIngredients |
|
|
Display the list of ingredients and select the
customer's choice |
| Label |
 |
|
&Scoops: |
|
|
| TextBox |
 |
txtScoops |
1 |
Right |
Enter the number of scoops (1, 2, or 3) to fill
the container |
| Button |
 |
btnCalculate |
C&alculate |
|
|
| Label |
 |
|
&Order Total: |
|
|
| TextBox |
 |
txtOrderTotal |
0.00 |
Right |
This displays the total amount of this order |
|
|
Characteristics of a Combo Box
|
|
Like all visual controls, a combo box shares all the
basic characteristics of other graphic control: the name, the location,
the size, the ability to be enabled or disabled, the ability to hide or
show it, the ability to dock or anchor, etc.
|
Creating the List of Items
|
|
Probably the most important aspect of a combo box is
the list of items it holds. Like all other list-based controls, the list
of a combo box is held by the Items property of the
ComboBox class. To visually create the list of items, you
can use the String Collection Editor.
The Items property of the ComboBox
class is created from the nested ObjectCollection class. To
programmatically create a list of items, you can (continuously) call the
ObjectCollection::Add() member function. Here is an example:
public ref class CExercise : public Form
{
private:
    Label ^ lblTitle;
    ComboBox ^ cbxAcademicDisciplines;

public:
    CExercise()
    {
	InitializeComponent();
    }

private:
    void InitializeComponent()
    {
        lblTitle = gcnew Label;
        lblTitle->Text = "Academic Disciplines";
        lblTitle->Location =  Point(12, 12);
        lblTitle->AutoSize = true;
        Controls->Add(lblTitle);

        cbxAcademicDisciplines = gcnew ComboBox;
        cbxAcademicDisciplines->Location =  Point(12, 32);
        cbxAcademicDisciplines->Items->Add("Natural sciences");
        cbxAcademicDisciplines->Items->Add("Mathematics and Computer sciences");
        cbxAcademicDisciplines->Items->Add("Social sciences");
        cbxAcademicDisciplines->Items->Add("Humanities");
        cbxAcademicDisciplines->Items->Add("Professions and Applied sciences");

        Controls->Add(cbxAcademicDisciplines);
    }
};
This would produce:

To add an array of items, you can call the
AddRange() member function. Here is an example:
void InitializeComponent()
{
    lblTitle = gcnew Label;
    lblTitle->Text = "Academic Disciplines";
    lblTitle->Location =  Point(12, 12);
    lblTitle->AutoSize = true;
    Controls->Add(lblTitle);

    cbxAcademicDisciplines = gcnew ComboBox;
    cbxAcademicDisciplines->Location =  Point(12, 32);

    array<String ^> ^ disciplines = gcnew array<String ^>(3);

    cbxAcademicDisciplines->Items->Add("Natural sciences");
    cbxAcademicDisciplines->Items->Add("Mathematics and Computer sciences");
    cbxAcademicDisciplines->Items->Add("Social sciences");
    cbxAcademicDisciplines->Items->Add("Humanities");
    cbxAcademicDisciplines->Items->Add("Professions and Applied sciences");

    disciplines[0] = "Business Administration";
    disciplines[1] = "Criminal Justice";
    disciplines[2] = "Art History";
    cbxAcademicDisciplines->Items->AddRange(disciplines);

    Controls->Add(cbxAcademicDisciplines);
}
To insert an item somewhere inside the list, you can
call the Insert() member function.
If you want the list of items to be sorted, you can
change the value of the Sorted property in the Properties window
from False (the default) to True. To sort a list
programmatically, you can assign a true value to the Sorted
property. You can un-sort the list by changing the value of the Sorted
property. This property works exactly like its equivalent in the ListBox
control.
|
 Practical Learning: Adding Items to a Combo Box Practical Learning: Adding Items to a Combo Box
|
|
- To create a list of items, on the form, right-click the Flavor
combo box (the combo box on the right side of the Flavor label) and
click Edit Items...
- In the String Collection Editor, type Other and
press Enter
- Complete the list with the following items:
Other
Vanilla
Cherry Coke
Butter Pecan
Chunky Butter
Chocolate
Chip
Caramel Au Lait
Cream of Cocoa
Chocolate Cookie
Organic Strawberry
Chocolate Brownies

- Click OK
- Click the Container combo box
- Under the Properties window, click Edit Items...
- Type the following values:
Cup
Bowl
Cone
Other
- Click OK
- Click the Ingredient combo box
- In the Properties window, on the right side of Items, click
(Collection) and click its browse button
- Type the following values:
None
M & M
Cookies
Peanuts
Mixed Nuts
- Click OK
- On the main menu, click File -> Close Solution
- When asked whether you want to save, click Save and click Save
- To start a new application, on the main menu, click File -> New
Project...
- In the middle list, click Windows Forms Application
- Set the Name to CPAP1
- Click OK
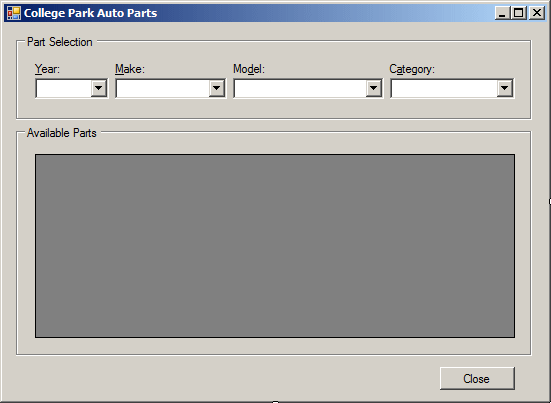
- Design the form as follows:
 |
| Control |
Text |
Name |
| GroupBox |
 |
Part Selection |
|
| Label |
 |
Year |
|
| Label |
 |
Make |
|
| Label |
 |
Model |
|
| Label |
 |
Category |
|
| ComboBox |
 |
|
cbxCarYears |
| ComboBox |
 |
|
cbxMakes |
| ComboBox |
 |
|
cbxModels |
| ComboBox |
 |
|
cbxCategories |
| GroupBox |
 |
Available Parts |
|
| DataGridView |
 |
|
dgvAvailableParts |
| Button |
 |
Close |
btnClose |
|
- To create a list of items using the Add() member function,
double-click an unoccupied area of the form and implement its Load
event as follows:
System::Void Form1_Load(System::Object^  sender, System::EventArgs^  e)
{
    for(int i = DateTime::Now.Year; i >= 1960; i--)
        cbxYears->Items->Add(i);
}
- To execute the application to test it, press F5
- Close the form and return to your programming environment
To select an item from the list, the user can click
it. To programmatically select an item, you can assign a string to the
Text property of a DropDown or a Simple
combo box. Probably the best way to select an item is to specify its
index. The items of a combo box are stored in a zero-based list. To select
an item, you can assign its position to the SelectedIndex property.
In the same way, to find out what item is selected, you can get the value
of the SelectedIndex property.
Instead of using the index of an item, to select an
item using its identity or name, you can use the SelectedItem
property. To select an item by its name, assign it to the SelectedItem
property.
|
 Practical Learning: Selecting an Item Practical Learning: Selecting an Item
|
|
- On the main menu, click Project -> Add Class...
- In the middle list, make sure C++ Class is selected. Click Add
- Set the name to CPartDescription
- Click Finish
- Change the header file as follows:
#pragma once
using namespace System;

public ref class CPartDescription
{
private:
    long ID;
    int yr;
    String ^ mk;
    String ^ mdl;
    String ^ cat;
    String ^ name;
    double price;

public:
    CPartDescription(void);
    CPartDescription(long code,
                     int year,
                     String ^ make,
                     String ^ model,
                     String ^ type,
                     String ^ desc,
                     double uPrice);

    property long PartNumber
    {
        long get() { return ID; }
        void set(long value) { ID = value; }
    }

    property int CarYear
    {
        int get() { return yr; }
        void set(int value) { yr = value; }
    }

    property String ^ Make
    {
        String ^ get() { return mk; }
        void set(String ^ value) { mk = value; }
    }

    property String ^ Model
    {
        String ^ get() { return mdl; }
        void set(String ^ value) { mdl = value; }
    }

    property String ^ Category
    {
        String ^ get() { return cat ; }
        void set(String ^ value) { cat = value; }
    }

    property String ^ PartName
    {
        String ^ get() { return name; }
        void set(String ^ value) { name = value; }
    }

    property double UnitPrice
    {
        double get() { return (price < 0) ? 0.00 : price; }
        void set(double value) { price = value; }
    }

    virtual String ^ ToString() override;
};
- Change the source file as follows:
#include "StdAfx.h"
#include "PartDescription.h"

CPartDescription::CPartDescription(void)
{
    ID = 0;
    yr = 1960;
    mk = "";
    mdl = "";
    cat = "";
    name = "";
    price = 0.00;
}

CPartDescription::CPartDescription(long code, int year, String ^ make,
				   String ^ model, String ^ type,
				   String ^ desc, double uPrice)
{
    ID    = code;
    yr    = year;
    mk    = make;
    mdl   = model;
    cat   = type;
    name  = desc;
    price = uPrice;
}

String ^ CPartDescription::ToString()
{
    return PartNumber + " " +
           CarYear.ToString() + " " +
           Make + " " +
           Model + " " +
           Category + " " +
           PartName + " " +
           UnitPrice;
}
- In the Class View, right-click CollectParkAutoParts1 -> Add ->
Class...
- In the middle list, make sure C++ Class is selected.
Click Add
- Set the name to CPartSelected
- Click Finish
- Change the header file as follows:
#pragma once
using namespace System;

public ref class CPartSelected
{
private:
    long ID;
    String ^ name;
    double price;

public:
    CPartSelected(void);
    CPartSelected(long code, String ^ desc, double uPrice);

    property long PartNumber
    {
        long get() { return ID; }
        void set(long value) { ID = value; }
    }

    property String ^ PartName
    {
        String ^ get() { return name; }
        void set(String ^ value) { name = value; }
    }

    property double UnitPrice
    {
        double get() { return (price < 0) ? 0.00 : price; }
        void set(double value) { price = value; }
    }

    virtual String ^ ToString() override;
};
- Change the source file as follows:
#include "StdAfx.h"
#include "PartSelected.h"

CPartSelected::CPartSelected(void)
{
    ID = 0;
    name = "Unknown";
    price = 0.00;
}

CPartSelected::CPartSelected(long code, String ^ desc, double uPrice)
{
    ID = code;
    name = desc;
    price = uPrice;
}

String ^ CPartSelected::ToString()
{
    return PartNumber + " " + PartName + " " + UnitPrice;
}
- Access the Form1.h header file and change the top of the file as
follows:
#pragma once

#include "PartDescription.h"
#include "PartSelected.h"

namespace CPAP1 {

    using namespace System;
    using namespace System::ComponentModel;
    using namespace System::Collections;
    using namespace System::Collections::Generic;
    using namespace System::Windows::Forms;
    using namespace System::Data;
    using namespace System::Drawing;

    /// <summary>
    /// Summary for Form1
    /// </summary>
    public ref class Form1 : public System::Windows::Forms::Form
    {
        List<CPartDescription ^> ^ lstParts;
        BindingSource ^ bsPartsSelected;
- Scroll down and change the Load event as follows:
System::Void Form1_Load(System::Object^  sender, System::EventArgs^  e)
{
    lstParts = gcnew List<CPartDescription ^>;
    bsPartsSelected = gcnew BindingSource;

	for(int i = DateTime::Now.Year; i >= 1960; i--)
        cbxYears->Items->Add(i);

	CPartDescription ^ part = nullptr;

    part = gcnew CPartDescription(447093, 2002, "Ford",
                "Escort SE L4 2.0", "Engine Electrical",
                "Alternator 75amp  Remanufactured; w/ 75 Amp",
                205.05);
    lstParts->Add(part);

    part = gcnew CPartDescription(203815, 2006, "Dodge",
                "Caravan SE L4 2.4", "Cooling System",
                "Radiator Cap", 6.65);
    lstParts->Add(part);

    part = gcnew CPartDescription(293047, 2000, "Toyota",
                "RAV4 2WD/4-DOOR", "Cooling System",
                "Thermostat Gasket", 4.95);
    lstParts->Add(part);

    part = gcnew CPartDescription(990468, 2002, "Honda",
                "Civic 1.7 EX 4DR", "Exhaust",
                "Bolt & Spring Kit (Manifold outlet, Muffler Inlet)",
                85.75);
    lstParts->Add(part);

    part = gcnew CPartDescription(304158, 1996, "Buick",
                "Regal Custom V6 3.8", "Fuel Injection",
                "Fuel Injector", 82.75);
    lstParts->Add(part);

    part = gcnew CPartDescription(807245, 2004, "Acura",
                "MDX 3.5 4WD", "Driveshaft & Axle",
                "CV Boot Clamp 7 x 750mm; 1 Large + 1 Small Clamp", 1.60);
    lstParts->Add(part);

    part = gcnew CPartDescription(203485, 2001, "Ford",
               "Taurus LX V6 3.0", "Fuel Injection",
                "Oxygen Sensor OE Style 4Wire; Front; 2 Required", 52.65);
    lstParts->Add(part);

    part = gcnew CPartDescription(248759, 1999, "Jeep",
                "Wrangler Sahara", "Air Intake",
                "Air Filter AirSoft Panel", 7.95);
    lstParts->Add(part);

     part = gcnew CPartDescription(202848, 1998, "Honda",
                "Accord 2.3 LX 4DR", "Air Intake",
                "Air Filter", 12.55);
    lstParts->Add(part);

    part = gcnew CPartDescription(932759, 2006, "Kia",
                "Rio 1.6DOHC16V 4-DR", "Cooling System",
                "Thermostat", 14.45);
    lstParts->Add(part);

    part = gcnew CPartDescription(304975, 2000, "Honda",
                "Civic 1.6 EX 4DR", "Suspension",
                "Ball Joint; Front Lower; 2 per car", 40.55);
    lstParts->Add(part);

    part = gcnew CPartDescription(208450, 2003, "Chevrolet",
                "Monte Carlo LS V6 3.4", "Fuel Injection",
                "Oxygen Sensor OE connector; Rear", 65.55);
    lstParts->Add(part);

    part = gcnew CPartDescription(209480, 2002, "Ford",
                "Focus SE DOHC L4 2.0", "Steering",
                "Steering Rack Remanufactured", 170.85);
    lstParts->Add(part);

    part = gcnew CPartDescription(203495, 2004, "Honda",
                "Civic 1.7 EX 4DR", "Climate Control",
                "A/C Clutch; OE compressor = Sanden", 184.95);
    lstParts->Add(part);

    part = gcnew CPartDescription(203480, 2007, "Toyota",
                "Corolla", "Air Intake",
                "Air Filter", 12.65);
    lstParts->Add(part);

    part = gcnew CPartDescription(109379, 2005, "Volvo",
                "S40 2.5L T5 AWD", "Fuel Delivery",
                "Fuel Filter; Early Design; Outer Diameter = 55mm", 30.95);
    lstParts->Add(part);

    part = gcnew CPartDescription(935794, 2002, "Ford",
                "Escape XLS 4WD", "Brake",
                "Brake Caliper Remanufactured; Front Right",
                65.55);
    lstParts->Add(part);

    part = gcnew CPartDescription(203485, 2006, "BMW",
                "325i", "Climate Control",
                "AC High Pressure Side Switch", 49.95);
    lstParts->Add(part);

    part = gcnew CPartDescription(204875, 1996, "Chevrolet",
                "Monte Carlo Z34 V6 3.4", "Fuel Delivery",
                "Fuel Filter", 8.05);
    lstParts->Add(part);

    part = gcnew CPartDescription(937485, 2007, "Toyota",
                "Camry V6", "Air Intake", "Air Filter", 12.95);
    lstParts->Add(part);

    part = gcnew CPartDescription(294759, 2001, "Ford",
                "Escape XLT 4WD", "Air Intake",
                "Air Filter Panel", 7.25);
    lstParts->Add(part);

    part = gcnew CPartDescription(297495, 2003, "Honda",
                "Civic 1.7 EX 4DR", "Brake",
                "Brake Caliper Reman; w/ ProAct Pads; Front Right",
                82.55);
    lstParts->Add(part);

    part = gcnew CPartDescription(794735, 2006, "BMW",
                "325i", "Climate Control",
                "Cabin Air/Pollen Filter; With Activated Carbon",
                28.05);
    lstParts->Add(part);

    part = gcnew CPartDescription(937485, 2007, "Toyota",
                "Corolla", "Body Electrical",
                "Halogen  SilverStar; 12V 65W; inner-high beam",
                22.85);
    lstParts->Add(part);

    part = gcnew CPartDescription(492745, 2005, "Ford",
                "Focus ZX3 L4 2.0", "Air Intake",
                "Fuel Injection Perf Kit", 342.95);
    lstParts->Add(part);

    part = gcnew CPartDescription(937005, 2004, "Acura",
                "MDX 3.5 4WD", "Driveshaft & Axle",
                "CV Boot Clamp 7 x 750mm; For Large End of Boot; inner boot", 1.60);
    lstParts->Add(part);

            part = gcnew CPartDescription(293749, 2004, "Acura",
                "MDX 3.5 4WD", "Driveshaft & Axle",
                "Axle Nut 24mm x 1;5; rear ", 2.35);
            lstParts->Add(part);

            part = gcnew CPartDescription(920495, 2006, "BMW",
                "325i", "Climate Control",
                "Adjustable Telescoping Mirror", 7.95);
            lstParts->Add(part);

            part = gcnew CPartDescription(204075, 2004, "Acura",
                "MDX 3.5 4WD", "Driveshaft & Axle",
                "Wheel Bearing; Rear; 1 per wheel",
                70.15);
            lstParts->Add(part);

            part = gcnew CPartDescription(979304, 2000, "Toyota",
                "RAV4 2WD/4-DOOR", "Cooling System",
                "Thermostat Housing", 20.95);
            lstParts->Add(part);

            part = gcnew CPartDescription(300456, 2004, "Acura",
                "MDX 3.5 4WD", "Driveshaft & Axle",
                "Wheel Bearing; Front; 1 per wheel", 66.65);
            lstParts->Add(part);

            part = gcnew CPartDescription(404860, 2001, "Ford",
                "Taurus LX V6 3.0", "Suspension",
                "Shock Absorber GR2; Rear; Wagon only",
                39.40);
            lstParts->Add(part);

            part = gcnew CPartDescription(585688, 2007, "Buick",
                "Lacrosse CXS V6 3.6", "Brake",
                "Climate Control", 10.65);
            lstParts->Add(part);

            part = gcnew CPartDescription(739759, 2001, "Ford",
                "Taurus LX V6 3.0", "Suspension",
                "Shock Absorber GasaJust; Rear; Wagon only", 30.95);
            lstParts->Add(part);

            part = gcnew CPartDescription(927495, 2005, "Volvo",
                "S40 2.5L T5 AWD", "Engine Mechanical",
                "Timing Belt Idler Pulley Original Equipment INA",
                65.55);
            lstParts->Add(part);

            part = gcnew CPartDescription(979374, 2000, "Toyota",
                "RAV4 2WD/4-DOOR", "Cooling System",
                "Thermostat Gasket", 4.95);
            lstParts->Add(part);

            part = gcnew CPartDescription(542347, 2007, "Buick",
                "Lacrosse CXS V6 3.6", "Brake",
                "Brake Pad Set ProACT Ceramic w/Shims; Front", 80.05);
            lstParts->Add(part);

            part = gcnew CPartDescription(683064, 2000, "Toyota",
                "RAV4 2WD/4-DOOR", "Cooling System",
                "Radiator Hose; Upper", 103.75);
            lstParts->Add(part);

            part = gcnew CPartDescription(248759, 1999, "Jeep",
                "Wrangler Sahara", "Air Intake",
                "Air Filter", 50.95);
            lstParts->Add(part);

            part = gcnew CPartDescription(973974, 2007, "Toyota",
                "Corolla", "Air Intake",
                "Air Mass Meter; W/o Housing; Meter/sensor only",
                134.95);
            lstParts->Add(part);

            part = gcnew CPartDescription(285800, 2001, "Ford",
                "Escape XLT 4WD", "Transmission", "AT Filter", 34.95);
            lstParts->Add(part);

            part = gcnew CPartDescription(207495, 2007, "Toyota",
                "Corolla", "Body Electrical",
                "Headlight Bulb; 12V 65W; inner-high beam", 9.35);
            lstParts->Add(part);

            part = gcnew CPartDescription(566676, 2000, "Toyota",
                "RAV4 2WD/4-DOOR", "Cooling System",
                "Auxiliary Fan Switch", 42.95);
            lstParts->Add(part);

            part = gcnew CPartDescription(304950, 2007, "Toyota",
                "Corolla", "Body Electrical",
                "Headlight Bulb; 12V 51W; outer", 7.85);
            lstParts->Add(part);

            part = gcnew CPartDescription(797394, 2000, "Toyota",
                "RAV4 2WD/4-DOOR", "Cooling System",
                "Water Flange Gasket", 0.85);
            lstParts->Add(part);

            part = gcnew CPartDescription(910203, 2007, "Buick",
                "Lacrosse CXS V6 3.6", "Suspension",
                "Strut Mount Inc; Sleeve; Rear Right", 80.85);
            lstParts->Add(part);

            part = gcnew CPartDescription(790794, 2000, "Toyota",
                "RAV4 2WD/4-DOOR", "Cooling System",
                "Radiator Hose; Lower", 9.45);
            lstParts->Add(part);

            part = gcnew CPartDescription(970394, 2007, "Buick",
                "Lacrosse CXS V6 3.6", "Suspension",
                "Coil Spring Insulator; Front Lower", 14.55);
            lstParts->Add(part);

            part = gcnew CPartDescription(290840, 2005, "Volvo",
                "S40 2.5L T5 AWD", "Engine Mechanical",
                "Rod Bearing Set 1 per Rod; Standard; Reqs. 5-per Engine",
                26.95);
            lstParts->Add(part);

            part = gcnew CPartDescription(209704, 2007, "Toyota",
                "Corolla", "Body Electrical",
                "Wiper Blade Excel+; Front Right", 7.25);
            lstParts->Add(part);

            part = gcnew CPartDescription(200368, 2000, "Toyota",
                "RAV4 2WD/4-DOOR", "Cooling System",
                "Radiator Drain Plug incl; gasket", 3.15);
            lstParts->Add(part);

            part = gcnew CPartDescription(200970, 2005, "Volvo",
                "S40 2.5L T5 AWD", "Engine Mechanical",
                "Reference Sensor; Flywheel Engine Speed", 62.05);
            lstParts->Add(part);

            part = gcnew CPartDescription(542347, 2007, "Buick",
                "Lacrosse CXS V6 3.6", "Air Intake",
                "Air Filter", 50.25);
            lstParts->Add(part);

            part = gcnew CPartDescription(927045, 2001, "Ford",
                "Escape XLT 4WD", "Air Intake",
                "Air Filter", 62.95);
            lstParts->Add(part);

            part = gcnew CPartDescription(990659, 2000, "Toyota",
                "RAV4 2WD/4-DOOR", "Cooling System",
                "Radiator OE Plastic tank", 136.85);
            lstParts->Add(part);

            part = gcnew CPartDescription(440574, 2007, "Buick",
                "Lacrosse CXS V6 3.6", "Suspension",
                "Strut Mount Inc; Sleeve; Rear Left", 80.80);
}
- Return to the form and double-click the Year combo box
- To display the list of car makes when the user selects a year,
implement the event as follows:
System::Void cbxYears_SelectedIndexChanged(System::Object^  sender, System::EventArgs^  e)
{
    cbxMakes->Text = "";
    cbxMakes->Items->Clear();
    cbxModels->Text = "";
    cbxModels->Items->Clear();
    cbxCategories->Text = "";
    cbxCategories->Items->Clear();

    for each(CPartDescription ^ part in lstParts)
        if( part->CarYear == int::Parse(cbxYears->Text) )
            if( cbxMakes->FindString(part->Make) == -1 )
                cbxMakes->Items->Add(part->Make);
}
- Return to the form and double-click the Make combo box
- To display the list of car models when the user has selected a
year and a make, implement the event as follows:
System::Void cbxMakes_SelectedIndexChanged(System::Object^  sender, System::EventArgs^  e)
{
    cbxModels->Text = "";
    cbxModels->Items->Clear();
    cbxCategories->Text = "";
    cbxCategories->Items->Clear();

    for each(CPartDescription ^ part in lstParts)
        if( (part->CarYear == int::Parse(cbxYears->Text)) &&
            (part->Make == cbxMakes->Text) )
            if( cbxModels->FindString(part->Model) == -1 )
                cbxModels->Items->Add(part->Model);
}
- Return to the form and double-click the Model combo box
- To display the list of categories after the user has selected the
year, the make, and the model, implement the event as follows:
System::Void cbxModels_SelectedIndexChanged(System::Object^  sender, System::EventArgs^  e)
{
	for each(CPartDescription ^ part in lstParts)
        if( (part->CarYear == int::Parse(cbxYears->Text)) &&
            (part->Make == cbxMakes->Text) &&
            (part->Model == cbxModels->Text) )
            if( cbxCategories->FindString(part->Category) == -1 )
                cbxCategories->Items->Add(part->Category);
}
- Return to the form and double-click the Category combo box
- To display the list of available parts, implement the event and
define a new member function as follows:
System::Void cbxCategories_SelectedIndexChanged(System::Object^  sender, System::EventArgs^  e)
{
    // Check each record in the list of parts
    for each(CPartDescription ^ part in lstParts)
    {
	// If/When you find a record that matches
	// the values of the combo boxes . . .
        if( (part->CarYear == int::Parse(cbxYears->Text)) &&
            (part->Make == cbxMakes->Text) &&
            (part->Model == cbxModels->Text) &&
            (part->Category == cbxCategories->Text) )
        {
	    // . . . get the values from that part and create a selected part
            CPartSelected ^ selected = gcnew CPartSelected(part->PartNumber,
						           part->PartName,
						           part->UnitPrice);
	    // Store that part in the binding source
            bsPartsSelected->Add(selected);
        }
    }

    // Empty the data grid view
    for(int i = 0; i < dgvAvailableParts->Rows->Count - 2; i++ )
        dgvAvailableParts->Rows->RemoveAt(i);

    // Display the selected item(s) in the data grid view
    dgvAvailableParts->DataSource = bsPartsSelected;
}
- Return to the form and double-click the Close button
- Implement the event as follows:
System::Void btnClose_Click(System::Object^  sender, System::EventArgs^  e)
{
    Close();
}
|
Finding a String in the Combo Box
|
|
Instead of simply selecting an item from a combo box,
the user may want to find out if a certain string exists in the
list. To support this operation, the ComboBox class is equipped
with a member function named FindString that is overloaded with two
versions. One of the syntaxes of this member function is:
public:
    int FindString(String^ s);
This member function takes as argument the string to
find in the combo box. If the item is found in the list, the member
function returns its position. If the list does not have that string, the
member function return -1. The above syntax of the member function would
look through the whole list. If you want the search to start at a specific
index, you can use the following version of the FindString() member
function:
public:
    int FindString(String^ s, int startIndex);
This version takes a string as the first argument.
Instead of start looking for it from the beginning of the list, this
member function starts at the index specified by the startIndex
value.
The FindString() member function performs its
operation without regards to case. This means that it would perform the
same search for BlindMan, Blindman, blindMan, or BLINDMAN and would
produce the same result for them. If you want the case of the characters
to be taken into consideration, use the FindStringExact() member
function that also is overloaded with two versions. The syntax of the
first version is:
public:
    int FindStringExact(String^ s);
This member function proceeds like the
FindString() member function by starting to look for the string
from the beginning of the list. If you want to specify from where to start
looking for the string, you should use the following version:
public:
    int FindStringExact(String^ s, int startIndex);
|
|


