|
As mentioned already, a text box
should be accompanied by a label that indicates what it is used for. To
support this relationship, the Label control provides various properties. An
accelerator character is a symbol of the label that provides easy access to
its text box. On the label, such a character is underlined. An example would
be First Name. The idea is that, if the user presses the Alt key in
combination with the label's underlined character, the text box it
accompanies would receive focus.
To create an accelerator key, choose one of the label's
characters and precede it with an ampersand character when setting its
caption. An example would be &First Name. If you want a label to display the
accelerator character instead of a plain ampersand, set the label's
UseMnemonic property to true, which is already its default value. If you
set it to true but need to display an ampersand, type two & characters where
the ampersand would be shown.
The UseMnemonic property of a label is only used
to indicate that the label would display an accelerator character and the &
symbol typed on the label creates that accelerator character. To indicate
which text box would receive focus when the accelerator character of the
label is invoked, you must make sure you establish an appropriate tab
sequence using the Tab Order menu item from the main menu or using the
combination of TabStop/TabIndex properties. Typically, the
label should have a Tab Order or TabIndex value that is just - 1 of
that of the control it serves.
|
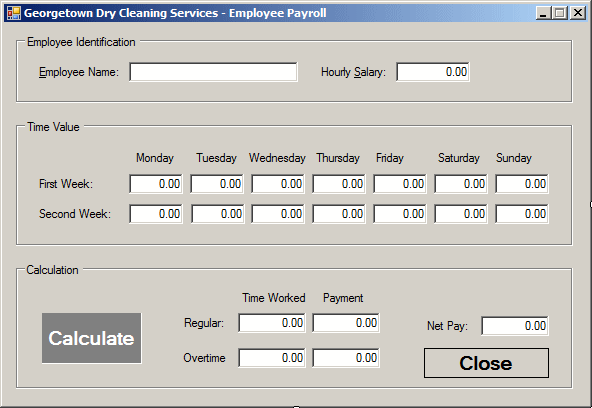
 Practical Learning: Auto-Completing a Text Box Practical Learning: Auto-Completing a Text Box
|
|
- On the form, click the txtEmployeeName text box
- In the Properties window, click AutoCompleteCustomSource and click
its ellipsis button
- In the String Collection Editor, enter the following names:
Micheline Hammond
Paul Bertrand Yamaguchi
Gertrude Monay
Ernestine Ngaleu
Andy Barang
Christophe Yuen
Jean Michel Kankan
- Click OK
- Click AutoCompleteSource, then click the arrow of its combo box and
select CustomSource
- Click AutoCompleteMode, then click the arrow of its combo box and
select SuggestAppend
- On the form, double-click the Calculate label
- Implement its event as follows:
System::Void lblCalculate_Click(System::Object^ sender, System::EventArgs^ e)
{
    double monday1 = 0.00, tuesday1 = 0.00, wednesday1 = 0.00,
           thursday1 = 0.00, friday1 = 0.00, saturday1 = 0.00,
           sunday1 = 0.00, monday2 = 0.00, tuesday2 = 0.00,
           wednesday2 = 0.00, thursday2 = 0.00,
    friday2 = 0.00, saturday2 = 0.00, sunday2 = 0.00;
    double totalHoursWeek1, totalHoursWeek2;

    double regHours1 = 0.00, regHours2 = 0.00,
           ovtHours1 = 0.00, ovtHours2 = 0.00;
    double regAmount1 = 0.00, regAmount2 = 0.00,
           ovtAmount1 = 0.00, ovtAmount2 = 0.00;
    double regularHours, overtimeHours;
    double regularAmount, overtimeAmount, totalEarnings;

    double hourlySalary = 0.00;

    // Retrieve the hourly salary
    hourlySalary = double::Parse(txtHourlySalary->Text);
    // Retrieve the value of each day worked
    monday1 = double::Parse(txtWeek1Monday->Text);
    tuesday1 = double::Parse(txtWeek1Tuesday->Text);
    wednesday1 = double::Parse(txtWeek1Wednesday->Text);
    thursday1 = double::Parse(txtWeek1Thursday->Text);
    friday1 = double::Parse(txtWeek1Friday->Text);
    saturday1 = double::Parse(txtWeek1Saturday->Text);
    sunday1 = double::Parse(txtWeek1Sunday->Text);

    monday2 = double::Parse(txtWeek2Monday->Text);
    tuesday2 = double::Parse(txtWeek2Tuesday->Text);
    wednesday2 = double::Parse(txtWeek2Wednesday->Text);
    thursday2 = double::Parse(txtWeek2Thursday->Text);
    friday2 = double::Parse(txtWeek2Friday->Text);
    saturday2 = double::Parse(txtWeek2Saturday->Text);
    sunday2 = double::Parse(txtWeek2Sunday->Text);

    // Calculate the total number of hours for each week
    totalHoursWeek1 = monday1 + tuesday1 + wednesday1 +
                      thursday1 + friday1 + saturday1 + sunday1;
    totalHoursWeek2 = monday2 + tuesday2 + wednesday2 +
                      thursday2 + friday2 + saturday2 + sunday2;

    // The overtime is paid time and half
    double ovtSalary = hourlySalary * 1.5;

    // If the employee worked under 40 hours, there is no overtime
         if (totalHoursWeek1 < 40)
         {
                regHours1 = totalHoursWeek1;
                regAmount1 = hourlySalary * regHours1;
                ovtHours1 = 0.00;
                ovtAmount1 = 0.00;
         } // If the employee worked over 40 hours, calculate the overtime
         else if (totalHoursWeek1 >= 40)
         {
                regHours1 = 40;
                regAmount1 = hourlySalary * 40;
                ovtHours1 = totalHoursWeek1 - 40;
                ovtAmount1 = ovtHours1 * ovtSalary;
         }

        if (totalHoursWeek2 < 40)
        {
                regHours2 = totalHoursWeek2;
                regAmount2 = hourlySalary * regHours2;
                ovtHours2 = 0.00;
                ovtAmount2 = 0.00;
        }
        else if (totalHoursWeek2 >= 40)
        {
                regHours2 = 40;
                regAmount2 = hourlySalary * 40;
                ovtHours2 = totalHoursWeek2 - 40;
                ovtAmount2 = ovtHours2 * ovtSalary;
        }

        regularHours = regHours1 + regHours2;
        overtimeHours = ovtHours1 + ovtHours2;
        regularAmount = regAmount1 + regAmount2;
        overtimeAmount = ovtAmount1 + ovtAmount2;
        totalEarnings = regularAmount + overtimeAmount;

        txtRegularTime->Text = regularHours.ToString("F");
        txtOvertime->Text = overtimeHours.ToString("F");
        txtRegularAmount->Text = regularAmount.ToString("F");
        txtOvertimeAmount->Text = overtimeAmount.ToString("F");

        txtNetPay->Text = totalEarnings.ToString("F");
}
- Return to the form and double-click the Close label
- Implement it as follows:
System::Void lblClose_Click(System::Object^  sender, System::EventArgs^  e)
{
	Close();
}
- Execute the application to see the result
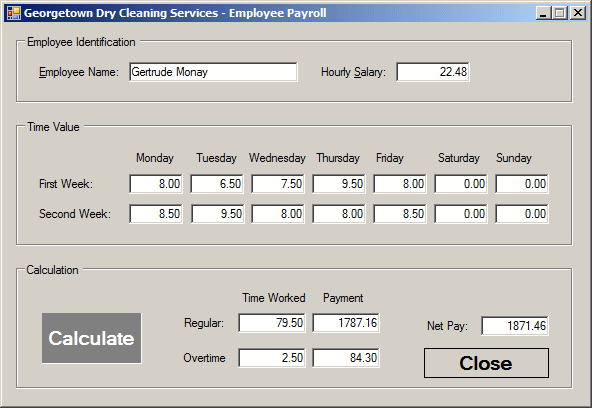
- Close the form and return to your programming environment
A text box can be configured to display only lowercase
characters, only uppercase characters, or a mix. This characteristic is
controlled by the CharacterCasing property, which is an enumerator
that holds the same name. The default value of this property is Normal,
which indicates that the control can use a mix of lowercase and uppercase
characters. If you set this property to Lower, all existing
characters, if any, in the control would be converted to lowercase and all
future characters typed in the control would be automatically converted to
lowercase. If you set this property to Upper, all existing
characters, if any, in the control would be converted to uppercase and all
future characters typed in the control would be automatically converted to
uppercase.
Text typed in a text box appears with its corresponding
characters unless you changed the effect of the CharacterCasing
property from its default Normal value. This allows the user to see,
and be able to read, the characters of the control. If you prefer to make
them un-readable, you can use the PasswordChar property. Although
this property is a char type of data, changing it actually
accomplishes two things:
- If you type a character in its field in the Properties window, for
example if you type *, any character typed in it would be un-readable
- Any character in the control would be replaced by the value of this
property. You can use any alphabetic character or digit to represent the
characters that would be typed but you must provide only one character.
|
Methods of Managing a
Text Box
|
|
The text box is based on the TextBox class whose
immediate parent is TextBoxBase. Like every .NET Framework class, it
has a constructor that can be used to dynamically create the control. The
TextBoxBase class provides other methods derived from the
control’s parent or from ancestor classes.
After creating a text box, it may be empty, the user can
start typing in it to fill it with text. You can programmatically assign it
a string to occupy it. Another way you can put or add text to the control is
to paste the content of the clipboard, using text from another control. The
syntax of the Paste() method is:
public:
    void Paste();
The selection of text from a text box control can be
performed either by you or by a user. To select part of the text, you can
specify the starting point using the SelectionStart property. After
the starting position, you can specify the number of characters to include
in the selection. This is done using the SelectionLength property.
The SelectionStart and the SelectionLength properties allow
you to programmatically select text. The user, on the other hand, also knows
how to select part of the text of the control. These operations can also be
performed using the Select() method. Its syntax is:
public:
    void Select(int start, int length);
Alternatively, the user may want to select the whole
content of the control. To programmatically select the whole text of a text
box control, call the SelectAll() method. Its syntax is:
public:
    void SelectAll();
After the text, in part or in whole, has been selected,
you or the user can manipulate it. For example, you can copy the selection
to the clipboard. This is done using the Copy() method. Its syntax
is:
public:
    void Copy();
To delete part of the text, the user can cut it. You can
programmatically do this using the Cut() method. Its syntax is:
public: void Cut();
To delete the whole contents of the text box, you can
call the Clear() method. Its syntax is:
public:
    void Clear();
Any operation performed on the text box can be undone
using the Undo() method whose syntax is:
public:
    void Undo();
|
|