 |
Serialization |
|
|
Object Serialization and De-Serialization |
|
|
|
Consider the following program:
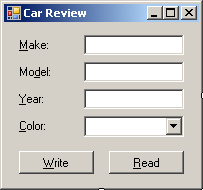
|
#using <System.dll>
#using <System.Drawing.dll>
#using <System.Windows.Forms.dll>

using namespace System;
using namespace System::IO;
using namespace System::Drawing;
using namespace System::Windows::Forms;

public ref class CExercise : public Form
{
private:
	Label    ^ lblMake;
	TextBox  ^ txtMake;
	Label    ^ lblModel;
	TextBox  ^ txtModel;
	Label    ^ lblYear;
	TextBox  ^ txtYear;
	Label    ^ lblColor;
	ComboBox ^ cbxColors;
	Button   ^ btnWrite;

public:
	CExercise()
	{
		Text = L"Car Review";
		Size = System::Drawing::Size(220, 170);

		lblMake = gcnew Label;
		lblMake->Location = Point(10, 14);
		lblMake->AutoSize = true;
		lblMake->Text = L"Make:";
		txtMake = gcnew TextBox;
		txtMake->Location = Point(80, 10);

		lblModel = gcnew Label;
		lblModel->Location = Point(10, 38);
		lblModel->AutoSize = true;
		lblModel->Text = L"Model:";
		txtModel = gcnew TextBox;
		txtModel->Location = Point(80, 34);

		lblYear = gcnew Label;
		lblYear->Location = Point(10, 62);
		lblYear->AutoSize = true;
		lblYear->Text = L"Year:";
		txtYear = gcnew TextBox;
		txtYear->Location = Point(80, 58);

	        lblColor = gcnew Label;
		lblColor->Location = Point(10, 84);
		lblColor->AutoSize = true;
		lblColor->Text = L"Year:";
		cbxColors = gcnew ComboBox;
		cbxColors->Location = Point(80, 82);
		cbxColors->Items->Add(L"Black");
		cbxColors->Items->Add(L"White");
		cbxColors->Items->Add(L"Gray");
		cbxColors->Items->Add(L"Silver");
		cbxColors->Items->Add(L"Blue");

		btnWrite = gcnew Button;
		btnWrite->Location = Point(10, 112);
		btnWrite->Text = L"Write";
		btnWrite->Click += gcnew EventHandler(this, &CExercise::btnWriteClick);

		Controls->Add(lblMake);
		Controls->Add(txtMake);
		Controls->Add(lblModel);
		Controls->Add(txtModel);
		Controls->Add(lblYear);
		Controls->Add(txtYear);
		Controls->Add(lblColor);
		Controls->Add(cbxColors);
		Controls->Add(btnWrite);
	}

	void btnWriteClick(Object ^ sender, EventArgs ^ e)
	{
		String ^ Make  = txtMake->Text;
		String ^ Model = txtModel->Text;
		int Year  = int::Parse(txtYear->Text);
		int Color = cbxColors->SelectedIndex;

		FileStream ^ stmCar = gcnew FileStream(L"Car1.car", FileMode::Create);
		BinaryWriter ^ bnwCar = gcnew BinaryWriter(stmCar);

		try
		{
			bnwCar->Write(Make);
			bnwCar->Write(Model);
			bnwCar->Write(Year);
			bnwCar->Write(Color);
		}
		finally
		{
			bnwCar->Close();
			stmCar->Close();
		}
	}
};

int main()
{
	Application::Run(gcnew CExercise);
	return 0;
}
Here is an example of running the program:
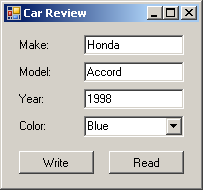
This is an example of the techniques used in file processing to save individual data of primitive types:

The values can be retrieved with the following code:
#using <System.dll>
#using <System.Drawing.dll>
#using <System.Windows.Forms.dll>

using namespace System;
using namespace System::IO;
using namespace System::Drawing;
using namespace System::Windows::Forms;

public ref class CExercise : public Form
{
private:
	Label    ^ lblMake;
	TextBox  ^ txtMake;
	Label    ^ lblModel;
	TextBox  ^ txtModel;
	Label    ^ lblYear;
	TextBox  ^ txtYear;
	Label    ^ lblColor;
	ComboBox ^ cbxColors;
	Button   ^ btnWrite;
	Button   ^ btnRead;

public:
	CExercise()
	{
		Text = L"Car Review";
		Size = System::Drawing::Size(220, 170);

		lblMake = gcnew Label;
		lblMake->Location = Point(10, 14);
		lblMake->AutoSize = true;
		lblMake->Text = L"Make:";
		txtMake = gcnew TextBox;
		txtMake->Location = Point(80, 10);

		lblModel = gcnew Label;
		lblModel->Location = Point(10, 38);
		lblModel->AutoSize = true;
		lblModel->Text = L"Model:";
		txtModel = gcnew TextBox;
		txtModel->Location = Point(80, 34);

		lblYear = gcnew Label;
		lblYear->Location = Point(10, 62);
		lblYear->AutoSize = true;
		lblYear->Text = L"Year:";
		txtYear = gcnew TextBox;
		txtYear->Location = Point(80, 58);

	        lblColor = gcnew Label;
		lblColor->Location = Point(10, 84);
		lblColor->AutoSize = true;
		lblColor->Text = L"Year:";
		cbxColors = gcnew ComboBox;
		cbxColors->Location = Point(80, 82);
		cbxColors->Items->Add(L"Black");
		cbxColors->Items->Add(L"White");
		cbxColors->Items->Add(L"Gray");
		cbxColors->Items->Add(L"Silver");
		cbxColors->Items->Add(L"Blue");

		btnWrite = gcnew Button;
		btnWrite->Location = Point(10, 112);
		btnWrite->Text = L"Write";
		btnWrite->Click += gcnew EventHandler(this, &CExercise::btnWriteClick);

		btnRead = gcnew Button;
		btnRead->Location = Point(120, 112);
		btnRead->Text = L"Read";
		btnRead->Click += gcnew EventHandler(this, &CExercise::btnReadClick);

		Controls->Add(lblMake);
		Controls->Add(txtMake);
		Controls->Add(lblModel);
		Controls->Add(txtModel);
		Controls->Add(lblYear);
		Controls->Add(txtYear);
		Controls->Add(lblColor);
		Controls->Add(cbxColors);
		Controls->Add(btnWrite);
		Controls->Add(btnRead);
	}

	void btnWriteClick(Object ^ sender, EventArgs ^ e)
	{
		String ^ Make  = txtMake->Text;
		String ^ Model = txtModel->Text;
		int Year  = int::Parse(txtYear->Text);
		int Color = cbxColors->SelectedIndex;

		FileStream ^ stmCar = gcnew FileStream(L"Car1.car", FileMode::Create);
		BinaryWriter ^ bnwCar = gcnew BinaryWriter(stmCar);

		try
		{
			bnwCar->Write(Make);
			bnwCar->Write(Model);
			bnwCar->Write(Year);
			bnwCar->Write(Color);
		}
		finally
		{
			bnwCar->Close();
			stmCar->Close();
		}
	}

	void btnReadClick(Object ^ sender, EventArgs ^ e)
        {
		FileStream ^ stmCar = gcnew FileStream(L"Car1.car", FileMode::Open);
		BinaryReader ^ bnrCar = gcnew BinaryReader(stmCar);

		try
		{
			txtMake->Text = bnrCar->ReadString();
			txtModel->Text = bnrCar->ReadString();
			txtYear->Text = bnrCar->ReadUInt32().ToString();
			cbxColors->SelectedIndex = bnrCar->ReadInt32();
		}
		finally
		{
			bnrCar->Close();
			stmCar->Close();
		}
	}
};

int main()
{
	Application::Run(gcnew CExercise);
	return 0;
}
In the same way, you can save the individual fields of
a class or you can retrieve the individual fields of a car:
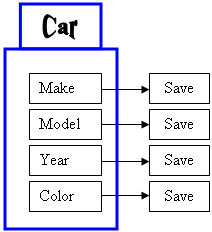
Here is an example:
Header File: Car.h
#pragma once
using namespace System;

ref class CCar
{
public:
    CCar(void);

    String ^ Make;
    String ^ Model;
    int Year;
    int Color;
};
Source File: Car.cpp
#include "Car.h"

CCar::CCar(void)
    : Make(L"Unknown"), Model(L"Unknown"), Year(1960), Color(0)
{
}
Source File: Exercise.cpp
#pragma once
#include "Car.h"

#using <System.dll>
#using <System.Drawing.dll>
#using <System.Windows.Forms.dll>

using namespace System;
using namespace System::IO;
using namespace System::Drawing;
using namespace System::Windows::Forms;

public ref class CExercise : public Form
{
private:
	Label    ^ lblMake;
	TextBox  ^ txtMake;
	Label    ^ lblModel;
	TextBox  ^ txtModel;
	Label    ^ lblYear;
	TextBox  ^ txtYear;
	Label    ^ lblColor;
	ComboBox ^ cbxColors;
	Button   ^ btnWrite;
	Button   ^ btnRead;

public:
	CExercise()
	{
		Text = L"Car Review";
		Size = System::Drawing::Size(220, 170);

		lblMake = gcnew Label;
		lblMake->Location = Point(10, 14);
		lblMake->AutoSize = true;
		lblMake->Text = L"Make:";
		txtMake = gcnew TextBox;
		txtMake->Location = Point(80, 10);

		lblModel = gcnew Label;
		lblModel->Location = Point(10, 38);
		lblModel->AutoSize = true;
		lblModel->Text = L"Model:";
		txtModel = gcnew TextBox;
		txtModel->Location = Point(80, 34);

		lblYear = gcnew Label;
		lblYear->Location = Point(10, 62);
		lblYear->AutoSize = true;
		lblYear->Text = L"Year:";
		txtYear = gcnew TextBox;
		txtYear->Location = Point(80, 58);

	        lblColor = gcnew Label;
		lblColor->Location = Point(10, 84);
		lblColor->AutoSize = true;
		lblColor->Text = L"Year:";
		cbxColors = gcnew ComboBox;
		cbxColors->Location = Point(80, 82);
		cbxColors->Items->Add(L"Black");
		cbxColors->Items->Add(L"White");
		cbxColors->Items->Add(L"Gray");
		cbxColors->Items->Add(L"Silver");
		cbxColors->Items->Add(L"Blue");

		btnWrite = gcnew Button;
		btnWrite->Location = Point(10, 112);
		btnWrite->Text = L"Write";
		btnWrite->Click += gcnew EventHandler(this, &CExercise::btnWriteClick);

		btnRead = gcnew Button;
		btnRead->Location = Point(120, 112);
		btnRead->Text = L"Read";
		btnRead->Click += gcnew EventHandler(this, &CExercise::btnReadClick);

		Controls->Add(lblMake);
		Controls->Add(txtMake);
		Controls->Add(lblModel);
		Controls->Add(txtModel);
		Controls->Add(lblYear);
		Controls->Add(txtYear);
		Controls->Add(lblColor);
		Controls->Add(cbxColors);
		Controls->Add(btnWrite);
		Controls->Add(btnRead);
	}

	void btnWriteClick(Object ^ sender, EventArgs ^ e)
	{
		CCar ^ vehicle = gcnew CCar;
		vehicle->Make  = txtMake->Text;
		vehicle->Model = txtModel->Text;
		vehicle->Year  = int::Parse(txtYear->Text);
		vehicle->Color = cbxColors->SelectedIndex;

		FileStream ^ stmCar = gcnew FileStream(L"Car2.car", FileMode::Create);
		BinaryWriter ^ bnwCar = gcnew BinaryWriter(stmCar);

		try
		{
			bnwCar->Write(vehicle->Make);
			bnwCar->Write(vehicle->Model);
			bnwCar->Write(vehicle->Year);
			bnwCar->Write(vehicle->Color);
		}
		finally
		{
			bnwCar->Close();
			stmCar->Close();
		}
	}

	void btnReadClick(Object ^ sender, EventArgs ^ e)
        {
		FileStream ^ stmCar = gcnew FileStream(L"Car2.car", FileMode::Open);
		BinaryReader ^ bnrCar = gcnew BinaryReader(stmCar);

		try
		{
			CCar ^ vehicle = gcnew CCar;
			vehicle->Make = bnrCar->ReadString();
			vehicle->Model = bnrCar->ReadString();
			vehicle->Year = bnrCar->ReadUInt32();
			vehicle->Color = bnrCar->ReadInt32();

			txtMake->Text = vehicle->Make;
			txtModel->Text = vehicle->Model;
			txtYear->Text = vehicle->Year.ToString();
			cbxColors->SelectedIndex = vehicle->Color;
		}
		finally
		{
			bnrCar->Close();
			stmCar->Close();
		}
	}
};

int main()
{
	Application::Run(gcnew CExercise);
	return 0;
}
When it comes to a class, the problem with saving individual
fields is that you could forget to save one of the fields. For example,
considering a CCar class, if you don't save the Make information of a CCar object
and retrieve or open the saved object on another computer, the receiving user
would miss some information and the car cannot be completely identifiable. An
alternative is to save the whole Car object.
Object serialization consists of saving a whole object as
one instead of its individual fields:
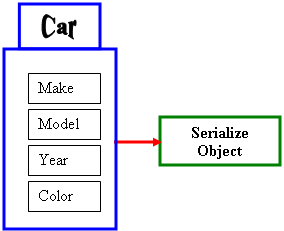
In other words, a variable declared from a class can be
saved to a stream and then the saved object can be retrieved later or on another
computer. The .NET Framework supports two types of object
serialization: binary and SOAP.
|
 Practical
Learning: Introducing Serialization Practical
Learning: Introducing Serialization
|
|
- Start Microsoft Visual Studio
- Create a Windows
Application named RealEstate1
- Design the form as follows:
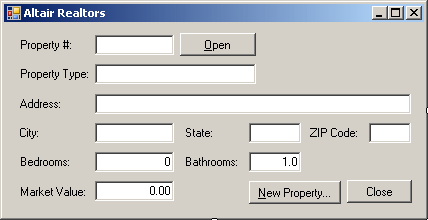 |
| Control |
Text |
Name |
| Label |
 |
Property #: |
|
| TextBox |
 |
|
txtPropertyNumber |
| Button |
 |
Open |
btnOpen |
| Label |
 |
Property Type: |
|
| TextBox |
 |
|
txtPropertyType |
| Label |
 |
Address: |
|
| TextBox |
 |
|
txtAddress |
| Label |
 |
City: |
|
| TextBox |
 |
|
txtCity |
| Label |
 |
State: |
|
| TextBox |
 |
|
txtState |
| Label |
 |
ZIP Code: |
|
| TextBox |
 |
|
txtZIPCode |
| Label |
 |
Bedrooms: |
|
| TextBox |
 |
0 |
txtBedrooms |
| Label |
 |
Bathrooms: |
|
| TextBox |
 |
1.0 |
txtBathrooms |
| Label |
 |
Market Value: |
|
| TextBox |
 |
0.00 |
txtMarketValue |
| Button |
 |
&New Property... |
btnNewProperty |
| Button |
 |
Close |
btnClose |
|
| Form |
| FormBorderStyle: |
FixedDialog |
| Text: |
Altair Realtors - Property Editor |
| StartPosition: |
CenterScreen |
- To create a new form, on the main menu, click Projects -> Add New
Item...
- In the Templates list, click Windows Form
- Set the Name to PropertyEditor and click Add
- Design the form as follows:
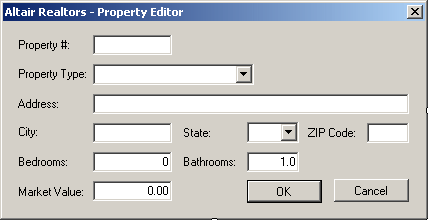 |
| Control |
Text |
Name |
Other Properties |
| Label |
 |
Property #: |
|
|
| TextBox |
 |
|
txtPropertyNumber |
Modifiers: Public |
| Label |
 |
Property Type: |
|
|
| ComboBox |
 |
|
cbxPropertyTypes |
Modifiers: Public
Items:
Unknown
Single Family
Townhouse
Condominium |
| Label |
 |
Address: |
|
|
| TextBox |
 |
|
txtAddress |
Modifiers: Public |
| Label |
 |
City: |
|
|
| TextBox |
 |
|
txtCity |
Modifiers: Public |
| Label |
 |
State: |
|
|
| ComboBox |
 |
|
cbxStates |
Modifiers: Public
Items:
DC
MD
PA
VA
WV |
| Label |
 |
ZIP Code: |
|
|
| TextBox |
 |
|
txtZIPCode |
Modifiers: Public |
| Label |
 |
Bedrooms: |
|
|
| TextBox |
 |
0 |
txtBedrooms |
Modifiers: Public |
| Label |
 |
Bathrooms: |
|
|
| TextBox |
 |
1.0 |
txtBathrooms |
Modifiers: Public |
| Label |
 |
Market Value: |
|
|
| TextBox |
 |
0.00 |
txtMarketValue |
Modifiers: Public |
| Button |
 |
OK |
btnOK |
DialogResult: OK |
| Button |
 |
Cancel |
btnCancel |
DialogResult: Cancel |
|
| Form |
| FormBorderStyle: |
FixedDialog |
| Text: |
Altair Realtors - Property Editor |
| StartPosition: |
CenterScreen |
| AcceptButton: |
btnOK |
| CancelButton: |
btnCancel |
| MaximizeBox: |
False |
| MinimizeBox: |
False |
| ShowInTaskBar: |
False |
- Save the form
Binary serialization works by processing an object rather
than streaming its individual member variables. This means that, to use it, you define an object and
initialize it, or "fill" it, with the necessary values and any
information you judge necessary. This creates a "state" of the object.
It is this state that you prepare to serialize. When you save the object, it is
converted into a stream.
To perform binary serialization, there are a few steps you
must follow. When creating the class whose objects would be serialized, start it
with the [Serializable] attribute. Here is an example:
#pragma once
using namespace System;

[Serializable]
ref class CCar
{
public:
    CCar(void);

    String ^ Make;
    String ^ Model;
    int Year;
    int Color;
};
Before serializing an object, you should reference the System::Runtime::Serialization::Formatters::Binary
namespace. The class responsible for binary serialization is called BinaryFormatter.
This class is equipped with two constructors. The default constructor is used to
simply create an object.
After declaring the variable, to actually serialize an
object, call the Serialize() method of the BinaryFormatter class.
The method is overloaded with two versions. One of the versions of this method
uses the following syntax:
public:
    virtual void Serialize(Stream ^ serializationStream,
			   Object ^ graph) sealed;
The first argument to this method must be an object of a Stream-based
class, such as a FileStream object. The second argument must be the object to serialize. This
means that, before calling this method, you should have built the object.
Here is an example:
#pragma once
#include "Car.h"

#using <System.dll>
#using <System.Drawing.dll>
#using <System.Windows.Forms.dll>

using namespace System;
using namespace System::IO;
using namespace System::Drawing;
using namespace System::Windows::Forms;
using namespace System::Runtime::Serialization::Formatters::Binary;

public ref class CExercise : public Form
{
private:
    Label    ^ lblMake;
    TextBox  ^ txtMake;
    Label    ^ lblModel;
    TextBox  ^ txtModel;
    Label    ^ lblYear;
    TextBox  ^ txtYear;
    Label    ^ lblColor;
    ComboBox ^ cbxColors;
    Button   ^ btnWrite;
    Button   ^ btnRead;

public:
    CExercise()
    {
	. . . No Change
    }

    void btnWriteClick(Object ^ sender, EventArgs ^ e)
    {
	CCar ^ vehicle = gcnew CCar;
        vehicle->Make  = txtMake->Text;
        vehicle->Model = txtModel->Text;
        vehicle->Year  = int::Parse(txtYear->Text);
	vehicle->Color = cbxColors->SelectedIndex;

	FileStream ^ stmCar = gcnew FileStream(L"Car3.car",
                                               FileMode::Create);
	BinaryFormatter ^ bfmCar = gcnew BinaryFormatter;
	bfmCar->Serialize(stmCar, vehicle);
    }
};

int main()
{
    Application::Run(gcnew CExercise);
    return 0;
}
|
 Practical
Learning: Serializing an Object Practical
Learning: Serializing an Object
|
|
- To create a new class, on the main menu, click Project ->
Add Class...
- Select C++ Class and click Add
- Set the Name to CRealEstateProperty and click Add
- Change the file as follows:
#pragma once
using namespace System;

[Serializable]
public ref class CRealEstateProperty
{
public:
    CRealEstateProperty(void);

    String ^ PropertyNumber;
    String ^ PropertyType;
    String ^ Address;
    String ^ City;
    String ^ State;
    int ZIPCode;
    short Bedrooms;
    float Bathrooms;
    double MarketValue;
};
|
- On the main menu, click Windows -> Form1.h [Design]
- On the form, double-click New Property...
- In the top section of the file, include the PropertyEditor.h header file,
the RealEstateProperty.h header file, the System::IO namespace, the
System::Runtime::Serialization::Formatters::Binary namespace:
#pragma once
#include "PropertyEditor.h"
#include "RealEstateProperty.h"

namespace RealEstate1 {

	using namespace System;
	using namespace System::ComponentModel;
	using namespace System::Collections;
	using namespace System::Windows::Forms;
	using namespace System::Data;
	using namespace System::Drawing;
	using namespace System::IO;
using namespace System::Runtime::Serialization::Formatters::Binary;
|
- Implement the event as follows:
System::Void btnNewProperty_Click(System::Object^  sender, System::EventArgs^  e)
{
    PropertyEditor ^ editor = gcnew PropertyEditor();
    DirectoryInfo ^ dirInfo =
    Directory::CreateDirectory(L"C:\\Altair Realtors\\Properties");

    Random ^ rnd = gcnew Random;
    int left = rnd->Next(100, 999);
    int right = rnd->Next(100, 999);
    editor->txtPropertyNumber->Text = left.ToString()+ L"-"
                                    + right.ToString();

    if (editor->ShowDialog() == System::Windows::Forms::DialogResult::OK)
    {
        CRealEstateProperty ^ prop = gcnew CRealEstateProperty;
        prop->PropertyNumber = editor->txtPropertyNumber->Text;
        prop->PropertyType = editor->cbxPropertyTypes->Text;
        prop->Address = editor->txtAddress->Text;
        prop->City = editor->txtCity->Text;
        prop->State = editor->cbxStates->Text;
        prop->ZIPCode = int::Parse(editor->txtZIPCode->Text);
		prop->Bedrooms = short::Parse(editor->txtBedrooms->Text);
		prop->Bathrooms = float::Parse(editor->txtBathrooms->Text);
        prop->MarketValue = double::Parse(editor->txtMarketValue->Text);

        String ^ strFilename = dirInfo->FullName+ L"\\" +
                    editor->txtPropertyNumber->Text+ L".prp";
        FileStream ^ stmProperty = gcnew FileStream(strFilename,
                    FileMode::Create, FileAccess::Write);
        BinaryFormatter ^ bfmProperty = gcnew BinaryFormatter;

        bfmProperty->Serialize(stmProperty, prop);
    }
}
|
-
Return to the form and double-click Close
- Implement the event as follows:
System::Void btnClose_Click(System::Object^  sender, System::EventArgs^  e)
{
    Close();
}
|
- Execute the application and continuously click the New Property button to
create the following properties (let the computer specify the property
number):
| Property Type |
Address |
City |
State |
ZIP Code |
Beds |
Baths |
Market Value |
| Single Family |
11604 Aldora Avenue |
Baltimore |
MD |
21205 |
5 |
3.5 |
325650 |
| Townhouse |
495 Parker House Terrace |
Gettysburg |
WV |
26201 |
3 |
2.5 |
225500 |
| Condominium |
5900 24th Street NW #812 |
Washington |
DC |
20008 |
1 |
1.0 |
388665 |
| Single Family |
6114 Costinha Avenue |
Martinsburg |
WV |
25401 |
4 |
3.5 |
325000 |
| Condominium |
10710 Desprello Street #10D |
Rockville |
MD |
20856 |
1 |
1.0 |
528445 |
- Close the form and return to your programming environment
As serialization is the process of storing an object to a
medium, the opposite, serialization is used to retrieve an object from a stream.
To support this, the BinaryFormatter class is equipped with the Deserialize()
method. Like Serialize(), the Deserialize() method is overloaded
with two versions. One of them uses the following syntax:
public:
    Object ^ Deserialize(Stream ^ serializationStream) sealed;
This method takes as argument a Stream-based object,
such as a FileStream variable, that indicates where the file is located. The Deserialize() method returns an Object
object. As a goal, you want the Deserialize() method to produce the type
of object that was saved so you can retrieve the values that the returned object
holds. Because the method returns an Object value, you must cast the returned
value to the type of your class.
Once the Deserialize() method has returned the desired
object, you can access its values. Here is an example:
#pragma once
#include "Car.h"

#using <System.dll>
#using <System.Drawing.dll>
#using <System.Windows.Forms.dll>

using namespace System;
using namespace System::IO;
using namespace System::Drawing;
using namespace System::Windows::Forms;
using namespace System::Runtime::Serialization::Formatters::Binary;

public ref class CExercise : public Form
{
private:
	Label    ^ lblMake;
	TextBox  ^ txtMake;
	Label    ^ lblModel;
	TextBox  ^ txtModel;
	Label    ^ lblYear;
	TextBox  ^ txtYear;
	Label    ^ lblColor;
	ComboBox ^ cbxColors;
	Button   ^ btnWrite;
	Button   ^ btnRead;

public:
	CExercise()
	{
		Text = L"Car Review";
		Size = System::Drawing::Size(220, 170);

		lblMake = gcnew Label;
		lblMake->Location = Point(10, 14);
		lblMake->AutoSize = true;
		lblMake->Text = L"Make:";
		txtMake = gcnew TextBox;
		txtMake->Location = Point(80, 10);

		lblModel = gcnew Label;
		lblModel->Location = Point(10, 38);
		lblModel->AutoSize = true;
		lblModel->Text = L"Model:";
		txtModel = gcnew TextBox;
		txtModel->Location = Point(80, 34);

		lblYear = gcnew Label;
		lblYear->Location = Point(10, 62);
		lblYear->AutoSize = true;
		lblYear->Text = L"Year:";
		txtYear = gcnew TextBox;
		txtYear->Location = Point(80, 58);

	    lblColor = gcnew Label;
		lblColor->Location = Point(10, 84);
		lblColor->AutoSize = true;
		lblColor->Text = L"Year:";
		cbxColors = gcnew ComboBox;
		cbxColors->Location = Point(80, 82);
		cbxColors->Items->Add(L"Black");
		cbxColors->Items->Add(L"White");
		cbxColors->Items->Add(L"Gray");
		cbxColors->Items->Add(L"Silver");
		cbxColors->Items->Add(L"Blue");

		btnWrite = gcnew Button;
		btnWrite->Location = Point(10, 112);
		btnWrite->Text = L"Write";
		btnWrite->Click += gcnew EventHandler(this, &CExercise::btnWriteClick);

		btnRead = gcnew Button;
		btnRead->Location = Point(120, 112);
		btnRead->Text = L"Read";
		btnRead->Click += gcnew EventHandler(this, &CExercise::btnReadClick);

		Controls->Add(lblMake);
		Controls->Add(txtMake);
		Controls->Add(lblModel);
		Controls->Add(txtModel);
		Controls->Add(lblYear);
		Controls->Add(txtYear);
		Controls->Add(lblColor);
		Controls->Add(cbxColors);
		Controls->Add(btnWrite);
		Controls->Add(btnRead);
	}

    void btnWriteClick(Object ^ sender, EventArgs ^ e)
    {
	CCar ^ vehicle = gcnew CCar;
        vehicle->Make  = txtMake->Text;
        vehicle->Model = txtModel->Text;
        vehicle->Year  = int::Parse(txtYear->Text);
	vehicle->Color = cbxColors->SelectedIndex;

	FileStream ^ stmCar = gcnew FileStream(L"Car3.car",
                                               FileMode::Create);
	BinaryFormatter ^ bfmCar = gcnew BinaryFormatter;
	bfmCar->Serialize(stmCar, vehicle);
    }

    void btnReadClick(Object ^ sender, EventArgs ^ e)
    {
	FileStream ^ stmCar = gcnew FileStream(L"Car3.car",
                                              FileMode::Open);
	BinaryFormatter ^ bfmCar = gcnew BinaryFormatter;
        CCar ^ vehicle = dynamic_cast<CCar ^>(bfmCar->Deserialize(stmCar));

        txtMake->Text = vehicle->Make;
        txtModel->Text = vehicle->Model;
        txtYear->Text = vehicle->Year.ToString();
        cbxColors->SelectedIndex = vehicle->Color;
    }
};

int main()
{
	Application::Run(gcnew CExercise);
	return 0;
}
|
 Practical
Learning: De-Serializing an Object Practical
Learning: De-Serializing an Object
|
|
- On the (first) form, double-click the Open button and implement its event as follows:
System::Void btnOpen_Click(System::Object^  sender, System::EventArgs^  e)
{
    DirectoryInfo ^ dirProperties =
		 gcnew DirectoryInfo(L"C:\\Altair Realtors\\Properties");
    array<FileInfo ^> ^ fleProperties = dirProperties->GetFiles();

    if (dirProperties->Exists == true)
    {
        bool found = false;
        CRealEstateProperty ^ prop = nullptr;

        for each( FileInfo ^ fle in fleProperties)
        {
            FileStream ^ stmProperty = gcnew FileStream(fle->FullName,
                                                    FileMode::Open,
						    FileAccess::Read);
            BinaryFormatter ^ bfmProperty = gcnew BinaryFormatter;
            prop = dynamic_cast<CRealEstateProperty ^>(bfmProperty->Deserialize(stmProperty));

            if (prop->PropertyNumber == txtPropertyNumber->Text)
            {
                found = true;
            }
        }

        if (found == true)
        {
            txtPropertyType->Text = prop->PropertyType;
            txtAddress->Text = prop->Address;
            txtCity->Text = prop->City;
            txtState->Text = prop->State;
            txtZIPCode->Text = prop->ZIPCode.ToString();
            txtBedrooms->Text = prop->Bedrooms.ToString();
            txtBathrooms->Text = prop->Bathrooms.ToString(L"F");
            txtMarketValue->Text = prop->MarketValue.ToString(L"F");
        }
        else
        {
            MessageBox::Show(L"There is no property with "
			    L"that number in our database");

            txtPropertyType->Text = L"Unknown";
            txtAddress->Text = L"";
            txtCity->Text = L"";
            txtState->Text = L"";
            txtZIPCode->Text = L"00000";
            txtBedrooms->Text = L"0";
            txtBathrooms->Text = L"0.00";
            txtMarketValue->Text = L"0.00";
        }
    }
}
-
Execute the application and try opening a previously saved property using its
number
-
Close the form and return to your programming environment
|
|