Home

XML-Based Applications:
College Park Auto-Parts


Application Design

To make our application intuitive, we will create a few objects as follows:

  1. New Make: This dialog box allows the user to create a new car make that will eventually be used to identify a part
  2. New Model: This dialog box is used to create a new car model
  3. New Part Category: In order to restrict the search of a part, the items of this store will be categorized. This dialog box is used to create the categories of items
  4. New Part: This is the main form used to create each part or item sold in the store. To create an item, the user must specify the year of the car, its model, and the type or category of the item. Then the user must create a name for the part; this can also be a short description. The user must also specify the price of the item. For inventory purposes, each item sold in the store must have a number. To make this easy, we will write our own code to automatically generate a number but the user can still change it.
    Once the item is ready, the user can click the Add Part button. This creates the item and stores it in the XML file used for general inventory
  5. Order Processing: This is the form used to select a part or an item requested by a customer

When designing this type of application, you should keep in mind to make it as user friendly as possible, which is what we did. Still, you are free to change our design to what suits you.


Practical Learning Practical Learning: Designing the Application

  1. To add a new form, on the main menu, click Project -> Add New Item...
  2. In the Templates list of the Add New Item dialog box, click Windows Forms (.NET)
  3. Set the Name to NewMake and press Enter
  4. Design the form as follows:
     
    College Park Auto-Parts: New Make Form - Form Design
    Control Name Text Other Properties
    Label   New Car Make:  
    TextBox txtNewMake   Modifiers: Public
    Button btnOK OK DialogResult: OK
    Button btnCancel Cancel DialogResult: Cancel
    Form   New Make AcceptButton: btnOK
    CancelButton: btnCancel
    FormBorderStyle: FixedDialog
    MaximizeBox: False
    MinimizeBox: False
    ShowInTaskbar: False
    StartPosition: CenterScreen
  5. To add a new form, on the main menu, click Project -> Add New Item...
  6. In the Templates list of the Add New Item dialog box, click Windows Forms (.NET)
  7. Set the Name to NewModel and press Enter
  8. Design the form as follows:
     
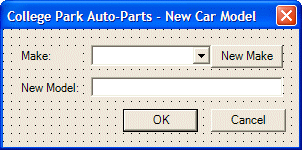
    College Park Auto-Parts: New Car Model - Form Design
    Control Name Text Other Properties
    Label   Make:  
    ComboBox cboMakes   DropDownStyle: DropDownList
    Button btnNewMake New Make  
    Label   Model:  
    TextBox txtNewModel    
    Button btnOK OK DialogResult: OK
    Button btnCancel Cancel DialogResult: Cancel
    Form   New Car Model AcceptButton: btnOK
    CancelButton: btnCancel
    FormBorderStyle: FixedDialog
    MaximizeBox: False
    MinimizeBox: False
    ShowInTaskbar: False
    StartPosition: CenterScreen
  9. Double-click the New Make button and implement its Click event as follows:
     
    #pragma once
    
    using namespace System;
    using namespace System::ComponentModel;
    using namespace System::Collections;
    using namespace System::Windows::Forms;
    using namespace System::Data;
    using namespace System::Drawing;
    using namespace System::Xml;
    
    #include "NewMake.h"
    
    namespace CPAP3
    {
    	/// <summary> 
    	/// Summary for NewModel
    	///
    	/// WARNING: If you change the name of this class, you will need to change the 
    	///          'Resource File Name' property for the managed resource compiler tool 
    	///          associated with all .resx files this class depends on.  Otherwise,
    	///          the designers will not be able to interact properly with localized
    	///          resources associated with this form.
    	/// </summary>
    	public __gc class NewModel : public System::Windows::Forms::Form
    	{
    	public: 
    		NewModel(void)
    		{
    			InitializeComponent();
    		}
            
    	. . . No Change
    
    		/// <summary>
    		/// Required method for Designer support - do not modify
    		/// the contents of this method with the code editor.
    		/// </summary>
    		void InitializeComponent(void)
    		{
    			. . . No Change
    		}		
    	private: System::Void btnNewMake_Click(System::Object *  sender, System::EventArgs *  e)
    			 {
    				 NewMake *frmNewMake = new NewMake;
    
    				 frmNewMake->ShowDialog();
    			 }
    
    };
    }
  10. To add a new form, on the main menu, click Project -> Add New Item...
  11. In the Templates list of the Add New Item dialog box, click Windows Forms (.NET)
  12. Set the Name to NewPartCategory and press Enter
  13. Design the form as follows:
     
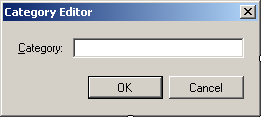
    Collge Park Auto-Parts: New Part Category - Form Design
    Control Name Text Other Properties
    Label   New Category:  
    TextBox txtNewCategory   Modifiers: Public
    Button btnOK OK DialogResult: OK
    Button btnCancel Cancel DialogResult: Cancel
    Form   New Make AcceptButton: btnOK
    CancelButton: btnCancel
    FormBorderStyle: FixedDialog
    MaximizeBox: False
    MinimizeBox: False
    ShowInTaskbar: False
    StartPosition: CenterScreen
  14. To add a new form, on the main menu, click Project -> Add New Item...
  15. In the Templates list of the Add New Item dialog box, click Windows Forms (.NET)
  16. Set the Name to NewPart and press Enter
  17. Design the form as follows:
     
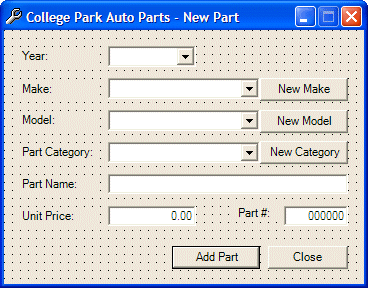
    New Part
    Control Name Text Other Properties
    Label   Year:  
    ComboBox cboYears   DropDownStyle: DropDownList
    Modifiers: Public
    Label   Make:  
    ComboBox cboMakes   DropDownStyle: DropDownList
    Modifiers: Public
    Button btnNewMake New Make  
    Label   Model:  
    ComboBox cboModels   DropDownStyle: DropDownList
    Modifiers: Public
    Button btnNewModel New Model  
    Label   Part Category:  
    ComboBox cboPartCategories   DropDownStyle: DropDownList
    Modifiers: Public
    Button btnNewCategory New Category  
    Label   Part Name:  
    TextBox txtPartName   Modifiers: Public
    Label   Unit Price:  
    TextBox txtUnitPrice 0.00 Modifiers: Public
    TextAlign: Right
    Label   Part #:  
    TextBox txtPartNumber 000000 Modifiers: Public
    TextAlign: Right
    Button btnAddPart Add Part  
    Button btnClose Close  
    Form     AcceptButton: btnAdd
    CancelButton: btnClose
    MaximizeBox: False
    StartPosition: CenterScreen
  18. Double-click an unoccupied area of the form to access its Load event and implement its as follows:
     
    System::Void NewPart_Load(System::Object *  sender, System::EventArgs *  e)
    {
    	  // Fill the Year combo box with years from 1960 to the coming year
    	 for(int i = DateTime::Now.Year+1; i >= 1960; i--)
    		 this->cboYears->Items->Add(i.ToString());
    
    	 // We will generate a random number for the item
    	 // To start, we will use the miliseconds as a seed
    	 DateTime tmeNow = DateTime::Now;
    	 int ms = tmeNow.Millisecond;
    
    	 // Now we can generate a random number between 100000 and 999999
    	 Random *rndNumber = new Random(ms);
    
    	 // Generate three randomg characters
    	 Char firstCharacter  = static_cast<Char>(rndNumber->Next(65, 90));
    	 Char secondCharacter = static_cast<Char>(rndNumber->Next(65, 90));
    	 Char thirdCharacter  = static_cast<Char>(rndNumber->Next(65, 90));
    	 // Generate a random number made of 4 digits
    	 int numberPart = rndNumber->Next(1000, 9999);
    	 
    	 // Exclude the digits 1 and 0 because they create confusion
    	 if( firstCharacter == 'I' || firstCharacter == 'O' )
    		 firstCharacter = 'A';
    	 if( secondCharacter == 'I' || secondCharacter == 'O' )
    		 secondCharacter = 'A';
    	 if( thirdCharacter == 'I' || thirdCharacter == 'O' )
    		 thirdCharacter = 'A';
    	 // Generate a random number between 1 and 3
    	 int rndCombination = rndNumber->Next(1, 4);
    	 String *strPartNumber = 0;
    
    	 // Create a part number using some algorithm
    	 if( rndCombination == 1 )
    		 strPartNumber = String::Concat(firstCharacter.ToString(),
    						secondCharacter.ToString(),
    						numberPart.ToString(),
    						thirdCharacter.ToString());
    	 else if( rndCombination == 2 )
    		 strPartNumber = String::Concat(firstCharacter.ToString(),
    						numberPart.ToString(),
    						secondCharacter.ToString(),
    						thirdCharacter.ToString());
    	 else if( rndCombination == 3 )
    		 strPartNumber = String::Concat(numberPart.ToString(),
    						firstCharacter.ToString(), 
    						secondCharacter.ToString(),
    						thirdCharacter.ToString());
    	 else
    		 strPartNumber = rndNumber->Next(100000, 999999).ToString();
    
    	 // Display the new number in the Part # text box
    	 this->txtPartNumber->Text = strPartNumber;
    
    	 // Disable the OK button to indicate that the part is not ready
    	 this->btnAddPart->Enabled = false;
    }
  19. Return to the New Part form and double-click the New Make button
  20. Return to the New Part form and double-click the New Model button
  21. Return to the New Part form and double-click the New Category button
  22. Return to the New Part form and double-click the Close button
  23. Implement the Click events as follows:
     
    #pragma once
    
    #include "NewMake.h"
    #include "NewModel.h"
    #include "NewPartCategory.h"
    
    using namespace System;
    using namespace System::ComponentModel;
    using namespace System::Collections;
    using namespace System::Windows::Forms;
    using namespace System::Data;
    using namespace System::Drawing;
    using namespace System::Xml;
    
    namespace CPAP3
    {
    	
    	. . . No Change
    
    		/// <summary>
    		/// Required method for Designer support - do not modify
    		/// the contents of this method with the code editor.
    		/// </summary>
    		void InitializeComponent(void)
    		{
    			
    			. . . No Change
    
    		}		
    private: System::Void btnNewMake_Click(System::Object *  sender, System::EventArgs *  e)
    		{
    			NewMake *frmNewMake = new NewMake;
    
    			frmNewMake->ShowDialog();
    		}
    
    private: System::Void btnNewModel_Click(System::Object *  sender, System::EventArgs *  e)
    		 {
    			 NewModel *frmNewModel = new NewModel;
    
    			 frmNewModel->ShowDialog();
    		 }
    
    private: System::Void btnNewCategory_Click(System::Object *  sender, System::EventArgs *  e)
    		 {
    			 NewPartCategory *frmCat = new NewPartCategory;
    
    			 frmCat->ShowDialog();
    		 }
    
    private: System::Void btnClose_Click(System::Object *  sender, System::EventArgs *  e)
    		 {
    			 Close();
    		 }
    };
    }
  24. To add a new form, on the main menu, click Project -> Add New Item...
  25. In the Templates list of the Add New Item dialog box, click Windows Forms (.NET)
  26. Set the Name to OrderProcessing and press Enter
  27. Design the form as follows:
     
    College Park Auto Parts - Order Processing - Form Design
    Control Name Text Other Properties
    GroupBox   Part Selection  
    Label   Year:  
    Label      
    ComboBox cboYears   DropDownStyle: DropDownList
    Label   Make:  
    ComboBox cboModels   DropDownStyle: DropDownList
    Label   Model:  
    ComboBox cboMakes   DropDownStyle: DropDownList
    Label   Category:  
    ComboBox cboCategories   DropDownStyle: DropDownList
    Label   Available Parts  
    ListView lvwAvailableParts   FullRowSelect: True
    GridLines: True
    Columns:
    Text TextAlign Width
    Part # Center 60
    Part Name Left 220
    Unit Price Right 60
    GroupBox   Setup  
    Button btnNewPart New Part  
    Button btnClose Close  
    GroupBox   Customer Order  
    Label   Part #  
    Label   Part Name  
    Label   Unit Price  
    Label   Qty  
    Label   Sub Total  
    Label   Keep Remove  
    TextBox txtPartNumber1    
    TextBox txtPartName1    
    TextBox txtUnitPrice1 0.00 TextAlign: Right
    TextBox txtQuantity1 0 TextAlign: Right
    TextBox txtSubTotal1 0.00 TextAlign: Right
    CheckBox chkKeepRemove1    
    TextBox txtPartNumber2    
    TextBox txtPartName2    
    TextBox txtUnitPrice2 0.00 TextAlign: Right
    TextBox txtQuantity2 0 TextAlign: Right
    TextBox txtSubTotal2 0.00 TextAlign: Right
    CheckBox chkKeepRemove2    
    TextBox txtPartNumber3    
    TextBox txtPartName3    
    TextBox txtUnitPrice3 0.00 TextAlign: Right
    TextBox txtQuantity3 0 TextAlign: Right
    TextBox txtSubTotal3 0.00 TextAlign: Right
    CheckBox chkKeepRemove3    
    TextBox txtPartNumber4    
    TextBox txtPartName4    
    TextBox txtUnitPrice4 0.00 TextAlign: Right
    TextBox txtQuantity4 0 TextAlign: Right
    TextBox txtSubTotal4 0.00 TextAlign: Right
    CheckBox chkKeepRemove4    
    TextBox txtPartNumber5    
    TextBox txtPartName5    
    TextBox txtUnitPrice5 0.00 TextAlign: Right
    TextBox txtQuantity5 0 TextAlign: Right
    TextBox txtSubTotal5 0.00 TextAlign: Right
    CheckBox chkKeepRemove5    
    TextBox txtPartNumber6    
    TextBox txtPartName6    
    TextBox txtUnitPrice6 0.00 TextAlign: Right
    TextBox txtQuantity6 0 TextAlign: Right
    TextBox txtSubTotal6 0.00 TextAlign: Right
    CheckBox chkKeepRemove6    
    Label   Order saved in  
    DateTimePicker dtpFilename   Format: Custom
    CustomFormat: ddMMMyyyy
    Button btnSave Save  
    Label   Total Order:  
    TextBox txtTotalOrder 0.00 TextAlign: Right
  28. Double an unoccupied area of the form outside of any group box to generate the form's Load event
  29. Implement the Load event as follows:
     
    System::Void OrderProcessing_Load(System::Object *  sender, System::EventArgs *  e)
    {
    	 // Fill the Year combo box with years from 1960 to the coming year
    	 for(int i = DateTime::Now.Year+1; i >= 1960; i--)
    		 this->cboYears->Items->Add(i.ToString());
    }
  30. Return to the form and double-click the New Part button
  31. In the top section of the file, under the #pragma line, type:
     
    #pragma once
    
    #include "NewPart.h"
    
    using namespace System;
    using namespace System::ComponentModel;
    using namespace System::Collections;
    using namespace System::Windows::Forms;
    using namespace System::Data;
    using namespace System::Drawing;
    using namespace System::IO;
    using namespace System::Xml;
  32. Implement its Click event as follows:
     
    System::Void btnNewPart_Click(System::Object *  sender, System::EventArgs *  e)
    {
    	 NewPart *frmPart = new NewPart();
    
    	 frmPart->ShowDialog();
    }
  33. Return to the form. Double-click the Close button and implement its Click event as follows:
     
    System::Void btnClose_Click(System::Object *  sender, System::EventArgs *  e)
    {
    	 Close();
    }
  34. Display the first or main form (Form1.h [Design]) and design it as follows 
     
    Collge Park Auto-Parts: Switchboard Form Design
    Control Name Text
    Button btnOrderProcessing Order Processing
    Button btnNewPart New Part
    Button btnClose Close
  35. Double-click the Order Processing button
  36. Return to the form and double-click the New Part button
  37. Return to the form and double-click the Close button
  38. Implement the Click events as follows:
     
    #pragma once
    
    #include "OrderProcessing.h"
    #include "NewPart.h"
    
    namespace CPAP3b
    {
    	using namespace System;
    	using namespace System::ComponentModel;
    	using namespace System::Collections;
    	using namespace System::Windows::Forms;
    	using namespace System::Data;
    	using namespace System::Drawing;
    
    		
    	. . . No Change
    		
    			
    	private: System::Void btnOrderProcessing_Click(System::Object *  sender, System::EventArgs *  e)
    			 {
    				 OrderProcessing *frmOrder = new OrderProcessing();
    
    				 frmOrder->ShowDialog();
    			 }
    
    	private: System::Void btnNewPart_Click(System::Object *  sender, System::EventArgs *  e)
    			 {
    				 NewPart *frmPart = new NewPart();
    
    				 frmPart->ShowDialog();
    			 }
    
    	private: System::Void btnClose_Click(System::Object *  sender, System::EventArgs *  e)
    			 {
    				 Close();
    			 }
    
    	};
    }
  39. Execute the application to test it
 

Previous Copyright © 2004-2016, FunctionX, Inc. Next