|
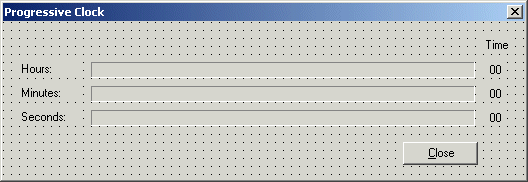
The dialog box on this exercise displays three
progress bars: one holds the value of the current hour, another holds the
value of the minutes in the current hour, the last displays the seconds of
the current minute. We also use a label on the right side of each progress
bar to display its corresponding value. |
|
To start this application, you can use a form. Then add the necessary controls to it as we will design
shortly. Although the hour holds 24 values while the minutes and the
seconds hold 60 values each, we will use the same dimensions (especially
the same width) for all progress controls. Because a progress control has
no mechanism or message to trigger the change of its position, we will use
a timer to handle such a message.
|
|
Practical Learning: Starting the Exercise |
|
- Start a new Visual C++ Projects .NET as a Windows Forms Application.
Name it ProgressClock
- Change the Form properties as follows:
FormBorderStyle: FixedDialog
MaximizeBox: False
MaximizeBox: False
Text: Progressive Clock
- Add three Label controls to the left section of the dialog box with
Text from top down as
Hours:, Minutes:, and Seconds: respectively
You will design the dialog box as follows:

- From the Toolbox, click ProgressBar and click on the right side of the Hours label
- Change its properties as follows:
Name to pgrHours
Maximum: 23
Step: 1
- From the Toolbox, click ProgressBar
and click on the right side of the Minutes label
Change its properties as follows:
Name to pgrMinutes
Maximum: 59
Step: 1
- From the Toolbox, click ProgressBar
and click on the right side of the Seconds label
Change its properties as follows:
Name to pgrSeconds
Maximum: 59
Step: 1
- Add a Label control to the right side of the Hours progress bar.
Change its properties as follows:
Name: lblHours
Text: 00
TextAlign: MiddleCenter
- Add a Label control to the right side of the Minutes progress bar.
Change its properties as follows:
Name: lblMinutes
Text: 00
TextAlign: MiddleCenter
- Add a Label control to the right side of the Minutes progress bar.
Change its properties as follows:
Name: lblSeconds
Text: 00
TextAlign: MiddleCenter
- From the Toolbox, add a Timer control to the form
- Double-click the Time to generate its Tick() event and implement it as follows:
private: System::Void timer1_Tick_1(System::Object *  sender, System::EventArgs *  e)
		 {
			 DateTime curTime = DateTime::Now;
			 int H = curTime.Hour;
			 int M = curTime.Minute;
			 int S = curTime.Second;

			 pgrHours->Value = H;
			 pgrMinutes->Value = M;
			 pgrSeconds->Value = S;

			 lblHours->Text = H.ToString();
			 lblMinutes->Text = M.ToString();
			 lblSeconds->Text = S.ToString();
		 }
|
- Test the application
- After using it, close it and return to your programming environment.
|
|
|

