.NET Controls: The Open Dialog Box
 |
.NET Controls: The Open Dialog Box |
When creating an application, if it is a word processor, after opening the application, it may display a white empty area in which the user can start typing. If the user is working on a spreadsheet, he or she may start typing numbers and performing calculations. In the same way, a user who is facing a graphics application would start drawing in it. The object that a user would be using is called a document. After working on it for a while, there are some other automatic ideas that come in the mind of a user. One would lead to saving the document. Another would consist of printing it. All these routine operations should be available for the user to use them. This aspect of the application is taken care of by the person who created the application; this is because not every application allows a user to save or to point its documents. If you want these operations to be possible, you must (explicitly) provide them.
To support the various operations of saving a document, opening an existing document, printing a document, setting up printing, etc, Microsoft Windows provides a series of standard dialog boxes that are available almost regardless of the programming environment you are using to develop your application. These common dialog boxes are stored in DLLs that ship with the operating system but they may be provided in a raw format. For this reason, except if programming in Win32, the programming environment you use provides a customized and friendlier technique of adding these dialog boxes to your application. In the same way, the .NET Framework provides its own implementation of these ready-made dialog boxes in a manner that makes it easier to implement them. To use a standard Windows dialog box, from the Toolbox, click the button that corresponds to the dialog box you want to add and click anywhere on the form. The position of the control on the form has no importance because it is only a representative: it will not appear when the form is running. Once the desired dialog’s icon is on the form, place a button on the form or create a menu item that will be used to call the dialog box.
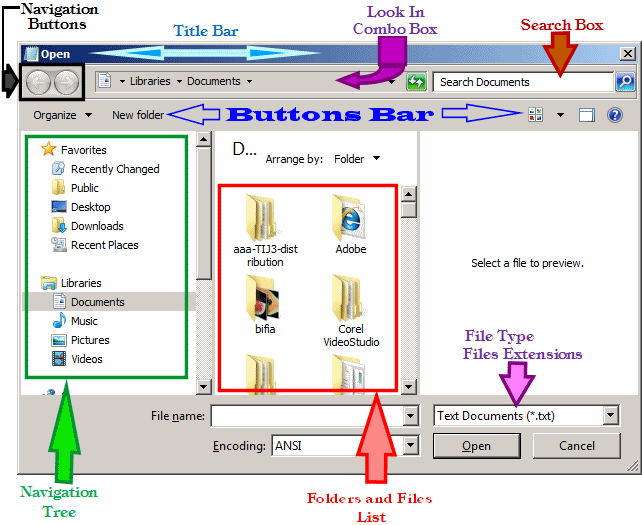
Besides saving files, another common operation performed by users consists of opening files. This refers to existing files since a file must primarily exist. To support this operation, Microsoft Windows provides a standard object: the Open File dialog box: 
To provide file opening support, the .NET Framework provides the OpenFileDialog class which is derived from the FileDialog class that in fact provides most of its functionality. The easiest way to use it is to click the OpenFileDialog button from the Toolbox and click the form. You can click anywhere on the form because the OpenFileDialog object would not be seen at run time. After placing it on the form, you can use the Properties window to configure it. If you prefer to dynamically create an Open dialog box, declare a pointer to OpenFileDialog and use the new operator to allocate memory using its default constructor. Here is an example:
#pragma once
#using <mscorlib.dll>
#using <System.dll>
#using <System.Windows.Forms.dll>

using namespace System;
using namespace System::Windows::Forms;

public __gc class CExercise : public Form
{
	SaveFileDialog *sfd;
	OpenFileDialog *ofd;

public:
	CExercise(void)
	{
		InitializeComponent();

		sfd = new SaveFileDialog();
		ofd = new OpenFileDialog;

		sfd->Filter = S"HTML Files (*.htm)|*.htm|"
	                  S"Active Server Pages (*.asp)|*.asp|"
	                  S"Apache Files (*.php)|*.php|"
	                  S"Perl Script (*.pl)|*.pl|"
	                  S"All Files|";
		sfd->FilterIndex = 3;
		sfd->DefaultExt  = S"htm";
	}

private:
	void InitializeComponent()
	{
		this->Text = S"File Processing";
	}
};
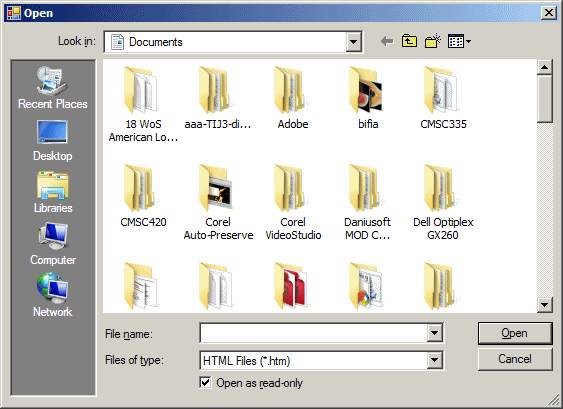
One of the most important properties of an Open dialog box is the file it presents to the user. This is represented by the FileName property. If you want a default file to be specified when the dialog box comes up, you can specify this in the FileName property of the Properties window. If you need to use this property, you should make sure the file can be found. If the file is located in the same folder as the application, you can provide just its name. If the file is located somewhere else in the hard drive, you should provide its complete path. Most of the time, you will not be concerned with this property if you are creating an application that will allow the users to open any files of their choice. Once a file is located, it can be accessed using the OpenFileDialog.FileName property. To make your application more effective, you should know what types of files your application can open. This is taken care of by specifying a list of extensions for the application. To control the types of files that your application can open, specify their extensions using the Filter Property. The Filter string is created exactly like that of a SaveFileDialog control as we saw earlier. Like the SaveFileDialog control, the default extension is the one the dialog box would first filter during file opening. If you want the Open dialog box to easily recognize a default type of file when the dialog box opens, you can specify the extension's type using the DefaultExt property. You can also use the FilterIndex we saw earlier to indicate the default index of the Files of Type combo box. For convenience, or for security reasons, Open dialog boxes of applications are sometimes asked to first look for files in a specific location when the Open File dialog box comes up. This default folder is specified using the InitialDirectory property. The essence of using the Open dialog box is to be able to open a file. This job is handled by the ShowDialog() method. After opening the dialog box, if the user selects a file and clicks OK or presses Enter, the file is opened. Most of the time, users are interested in opening one file to view or manipulate. It is also possible for a user to want to select various files and open them at the same time. When the user clicks OK after using the Open dialog box, before taking the next step, you may need to find out whether the user selected various files. To get this information, you can check the value of the OpenFileDialog.Multiselect Boolean property. If the user had selected various files, this property produces a true result. If the user selected only one file, this property renders a false result. The result of this checking process allows you either to agree to open the files or to take some action of your choice. After a file has been opened, the user may want to alter it. For example, if it is a text document, the user may want to add and/or delete some words. In some cases, you may want the user to be able to open a file but not to be able to modify it. To provide this restriction, you can set the document as read-only. In some other cases, you may want to let the user decide on Me. If you want to give this option to the user, you can start by displaying a read-only check box on the dialog box. To support this, the OpenFileDialog class is equipped with the ShowReadOnly property. If you set it to true, the dialog box would be equipped with an Open As Read-Only check box in its lower section:  By default, the Open As Read-Only check box is cleared when the dialog box comes up. The user has the option of keeping it that way or checking it when opening a file. The OpenFileDialog class provides the ReadOnlyChecked property to accompany the read-only option. If you want to display a check mark in the Open As Read-Only check box, you can set the ReadOnlyChecked property to true. On the other hand, when the user selects a file to open, you can check the value of the ReadOnlyChecked property. If it is true, this indicates that the user had clicked the Open As Read-Only check box. |
|
|
private: System::Void mnuFileOpen_Click(System::Object *  sender, System::EventArgs *  e)
{
	 if( this->openFileDialog1->ShowDialog() == DialogResult::OK )
	 {
MessageBox::Show(String::Concat(S"The Open button was clicked or the Enter key was pressed",
			                                         S"\nThe ",
				                         this->openFileDialog1->FileName,
					         S" file would have been opened."));
	 }
	 else
		 MessageBox::Show(S"The Cancel button was clicked or Esc was pressed");
}
|


|
|
||
| Home | Copyright © 2004-2012, FunctionX | |
|
|
||