|
A Form is a rectangular object used to host other controls
that allow a person to interact with the computer.
There are two main ways you get a form to your application.
If you create a Windows ( Forms) Application, the wizard generates and displays a starting form for you.
Otherwise, you can explicitly adding a form to your
application.
|
|
Characteristics of a Form |
|
|
Like any regular window, the top section of a form is made of a long
section called the title
bar. On the left part of the title bar, the form displays a small
picture called an icon or the system icon. Microsoft Visual Studio provides a
default icon for all forms. If you want to use a different icon, you can supply
it to the form. You can use an icon stored in a medium such as a hard disc, a
floppy disc, a CD or CD, etc. When you install Microsoft Visual Studio, it also
install many icons by default in C:\Program Files\Microsoft Visual Studio .Net
2003\Common7\Graphics\Icons. The icons are divided in various categories for
convenience.
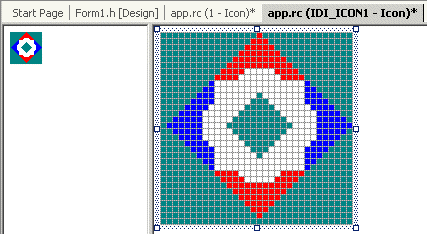
If you don't have or can't find an icon that fits your
needs, you can design a new one. To do that, on the main menu, you can click
Project -> Add Resource... From the Add Resource dialog box, you can click
Icon and click New. Here is an example of a designed icon
|

An icon is usually used as a combination of a 32x32 pixel and a 16x16
pixel. To design the other icon, you don't have to create a new file. You
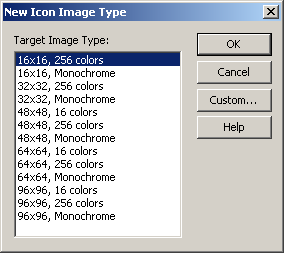
can display the New Icon Image Type dialog box by clicking Image
-> New Image Type... from the main menu. On the New Icon Image Type, make sure the
first 16x16, 16 colors item is selected:

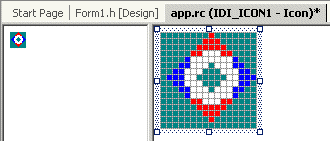
Here is an example of the 16x16 pixel version of the above icon:

After design the icon, you must save it. This is automatically
done for you.
Once the icon is ready, you can set it as the icon of
the form. To use an icon either from a medium or one that you designed, while the form
is selected, on the Properties window, you can click the Icon field and then
click its ellipsis button  .
This would launch the Open dialog box from where you can locate an icon and open
it: .
This would launch the Open dialog box from where you can locate an icon and open
it:

|
|
To change the icon programmatically, you can declare a pointer to
the Icon class of the System::Drawing namespace and initialize it with
the name of an icon file using the new operator. After initializing the icon,
assign it to the form's Icon property. Here is an example:
SimpleForm::SimpleForm()
{
	// Declare a pointer to the Icon class and use its constructor
	// to specify the name of the icon
	// (The Icon class is defined in the Drawing namespace)
	Drawing::Icon *IC = new Drawing::Icon("Designer.ico");
	// Let this form know that you have an icon and assign it
	// to the Icon property of this form
	this->Icon = IC;
}
|
|
|
On the right side of the system icon, there is a word or a
group of words called the caption. By default, the caption displays the name of
the form. If you want to change the caption, while the form is selected, in the
Properties window, click the Text field and type anything you want. After typing
the text, you can press Enter to display it on the form.
At design time, the caption is
made of text that you type "as is". At run time, you can change the
caption to display a more complex text that could be a changing time, the result
of a calculation, etc. |
|
On the right side of the caption, there are three
small buttons called the system buttons, made of the Minimize  ,
Maximize ,
Maximize  ,
and Close buttons ,
and Close buttons  .
The Minimize .
The Minimize  and the Maximize
  buttons are each controlled by a Boolean property. Therefore, to disable
either one of the them, set its MinimizeBox or MaximizeBox
property to False. If you set one of them to False while the
other is True, the one set to False would appear disabled.
If you set both to False, both would be hidden and only the Close
  button would appear.
To change a system button programmatically, call the
desired button's property and assign it a true or false value.
Notice that, in the Properties window, the values are set as False
or True. In C++, the Boolean properties are set as true or false
(all lowercase). Of course, you can type-define them to anything else you
like.
Here is an
example that makes sure the user cannot maximize the form:
SimpleForm::SimpleForm()
{
	this->Text = S"A Simple Form";
	Size = Drawing::Size(280, 420);
	Drawing::Icon *IC = new Drawing::Icon("Designer.ico");
	this->Icon = IC;

	this->MinimizeBox = true;
	this->MaximizeBox = false;
}
|

In the same way, to hide both the Maximize and the
Minimize buttons programmatically, you change their values as follows:
SimpleForm::SimpleForm()
{
	this->Text = S"A Simple Form";
	Size = Drawing::Size(220, 320);
	Drawing::Icon *IC = new Drawing::Icon("Designer.ico");
	this->Icon = IC;

	this->MinimizeBox = false;
	this->MaximizeBox = false;
}
|
|
|
A form can be made to look like a regular rectangular host made of a system icon and the system buttons. Depending on
your goals, you can also make a form appear as a dialog box or a dockable
window. The borders of a form are controlled by the FormBorderStyle
property.
If you set both the MinimizeBox and the MaximizeBox
properties to False, we saw that the form would have only the
system Close button, but the form can still be resized. If you want the
form to behave like a dialog box that has only the system Close button and
cannot be resized, set its FormBorderStyle property to FixedDialog.
You can also do this programmatically as follows:
SimpleForm::SimpleForm()
{
	this->Text = S"A Simple Form";
	Size = Drawing::Size(220, 320);
	Drawing::Icon *IC = new Drawing::Icon("Designer.ico");
	this->Icon = IC;

	this->MinimizeBox = false;
	this->MaximizeBox = false;
	this->FormBorderStyle = FormBorderStyle::FixedDialog;
}
|
|
|
|


