|
A menu of a computer program is a list of actions that can be performed on that application. To be aware of these actions, the list must be presented to the user upon request.
A menu is considered a main menu, when it carries most of the actions the user can perform on a particular application. Such a menu is positioned on the top section of the form in which it is used. By design, although a main menu is positioned on a form, it actually belongs to the application.
A main menu is divided in categories of items and each category is represented by a word.
On the Visual Studio's IDE, the categories of menus are File, Edit, Project,
Window, etc. To use a menu, the user first clicks one of the words that displays on top. Upon clicking, the menu expands and displays a list of items that belong to that category.
There is no strict rule on how a menu is organized. There are only suggestions. For example, actions that are related to file processing, such as creating a new file, opening an existing file, saving a file, printing the open file, or closing the file usually stay under a category called File. In the same way, actions related to viewing documents can be listed under a View menu.
|
|
The main menu is implemented through the MainMenu class.
To create a main menu, on the Toolbox, you can click the MainMenu button
and click the form that will use the menu. After clicking the form, an
empty menu is initiated, waiting for you to add the necessary menu item.
To create a menu category that starts a list of items that belong to the menu object,
click the Type Here line and type the desired item then press Enter.
If you look at the main menu of Visual Studio, you would see that a letter on each menu is underlined. This letter allows the user to access the menu using a keyboard. For example, if the letter e is underline in a File menu as in File, the user can access the File by pressing the Alt then the E keys.
To create this functionality, choose a letter on the menu item and precede
it with the & character. For example, &File would produce File.
A shortcut is a key or a combination of keys that the user can press to perform an action that would also be performed using a menu item. When creating a menu,
to specify a shortcut, use the Shortcut field in the Properties
window. If you have used applications like Microsoft
Word or Adobe Photoshop, you may know that they don't show all of their
shortcuts on the menu. If you want to hide a shortcut, after specifying
it, in the Properties window, set the ShowShortcut property to False.
|
- Start a new Windows Forms Application (.NET) named Menus1
- Change the form's Text to Employees Related Issues
- On the Toolbox, click the MainMenu button and click on the form
- On the form, click Type Here, type &Staff and press
Enter
- On the form, click Staff and click the Type Here box under it
- Type &New Hire
- In the Properties window, click Shortcut. Click the arrow of the
Shortcut right field and select CtrlN
- On the form, click the Type Here line under New Hire and type &Records
- Using the Properties window, set the Shortcut to CtrlR
- On the form, click the item under Records and type Time &Sheet...
- Set its Shortcut to CtrlM
- Set its ShowShortcut property to False
- On the form, click Records and press Insert
- Type Searc&h...
- To add a separator, click the Type Here line under Time Sheet
- Type - and press Enter
- Click the empty item under the previously added separator line, type
E&xit and press Enter
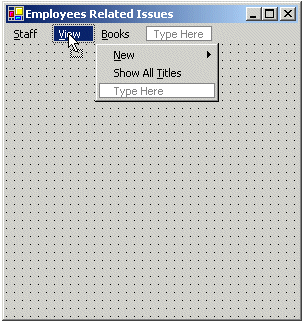
- To move the Search item, on the form , click and drag Search down:

- When it is positioned under Time Sheet item, release the mouse.
- To start a new menu category, click the Type Here box on the right side of Staff
- Type &Books and press Enter
- Click Books and click the empty item under it
- Type &New and press Enter
- Type Show All &Titles and press Enter
- To create a submenu, click New and click the Type Here box on its
right
- Type &Title and press Enter
- Type &Author and press Enter
- Type &Category and press Enter
- Click the Type Here box on the right side of Books. Type &View
and press Enter
- Click View and click the empty box under it
- Type &Toolbar and press Enter
- Type &Status Bar and press Enter
- Click Toolbar to select it
- To put a check mark on a menu item, on the Properties window, set the
Checked property to True
- Also, for the Status Bar item, set the Checked property to True
- To move the whole View menu category, click and drag View to the left:

- When it is positioned between Staff and Book, release the mouse
|
|
|


