Home

GDI+ Objects: Icons


Introduction

Like a bitmap, an icon is used to display graphics on window objects. While a bitmap can have any dimension the window needs, the size of an icon is limited. This is because icons assume different roles on an application.

Icons are used to represent folders in Windows Explorer and My Computer:

Windows Explorer or My Computer


Creating Icons

To create an icon, once again, you can use any application that has the capability. Normally, you can use Visual Studio .NET to create or design an icon. To do this, on the main menu of Visual Studio, you can click Project -> Resource… Then, in the Add Resource dialog box, you can select Icon and click New.

When you start designing an icon, you would be presented with a drawing area whose dimensions are 32 x 32 pixels. This is the size of the icon that displays as Large Icon. Here is an example from the New File dialog box Visual Studio .NET in the Templates list:

In some cases, you may allow the user to display smaller icons, which are 16x16 pixels:

To make this possible, you can associate a second icon to the 32x32 one. The application you use to design your icon should make it simple for you to add this second icon. To do this in Visual Studio, while the icon is displaying, on the main menu, you can click Image -> New Image Type... Select 16x16, 256 colors and click OK.

Whether you create only one or both versions of the icon, both are stored in a single file whose extension is .ico


Practical Learning Practical Learning: Creating Icons

  1. On the main menu, click Project -> Add Resource...
  2. In the Add Resource dialog box, double-click Icon
  3. On the Image Editor toolbar, click the Fill Tool Fill, and right-click the green area to make it white
  4. On the Image Editor toolbar, click the Line button Line
  5. In the Colors Palette, click the blue color
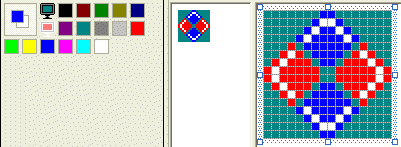
  6. In the empty drawing area, count 15 small boxes from the top left to the right. In the 16th box, click and drag right and down for an angle of 45˚ for 7 boxes. Release the mouse
  7. Click the next small box on the right side of the top blue box then drag left and down at 45˚ for 7 boxes:
     
    Icon Design
  8. Using the tools of Image Editor toolbar, complete the design as follows:
     
    Icon Design
  9. In the Colors Palette, click the picture that has the small monitor Icon Background Color
  10. In the Image Editor toolbar, click the Fill tool Fill and click a white area in the drawing area
     
  11. To design the 16x16 pixel version of the icon, right-click a white area in the drawing section and click New Image Type
  12. In the New Icon Image Type dialog box, click 16x16, 16 Colors if necessary and click OK
     
  13. Design the icon as follows:
     
  14. In the Resource View tab, click the IDI_ICON1 node
  15. In the Properties window, change the FileName to Diamong.icon
  16. Change the ID to IDI_DIAMOND

Using an Icon

To support icons, the GDI+ library provides the Icon class. To use an icon in your application, you can first declare a pointer to Icon using one of the class' constructors. If the icon is stored in a file, the simplest constructor to use it has the following syntax:

public: Icon(String *filename);

With this constructor, the name or path to the icon file is passed as argument. After creating the icon, if you want to use only one size version, you can use one the following constructors to declare the variable:

public: Icon(Icon *original, Size size);
public: Icon(Icon *original, int width, int height);

After initializing an Icon variable, if you want to get its dimensions, you can access its Width and its Height properties, or its Size property.

As mentioned already, there are various ways an icon can be used. For example, you can display it in a control by drawing it. To do this, you can call the Graphics::DrawIcon() method which is overloaded with two versions:

public: void DrawIcon(Icon *icon, Rectangle targetRect);
public: void DrawIcon(Icon *icon, int x, int y);

The first version allows you to specify the location and dimensions of the icon. The second version allows you to specify only the location of the icon.

Practical Learning Practical Learning: Using an Icon

  1. Display the form and double-click the middle of its body
  2. To display the icon in the title bar, implement the event as follows:
     
    private: System::Void Form1_Load(System::Object *  sender, System::EventArgs *  e)
    {
    	 Drawing::Icon *icoMain = new Drawing::Icon(S"Diamond.ico");
    
    	 this->Icon = icoMain;
    }
  3. Execute the application
     
    An icon
  4. Close the form and return to your programming environment
 

Home Copyright © 2004-2010 FunctionX, Inc.