
Fundamentals of Control Design
 |
Fundamentals of Control Design |
A Windows application primarily appears as a rectangular object that occupies a portion of the screen. This type of object is under the management of the operating system: Microsoft Windows. Based on the functionality of Microsoft Windows, for an application to become useful, it must be opened. An application must have an entry point. On a C/C++ application, this entry point is a function called main. On a Win32 application, this entry point is a function called WinMain. The C# language defines this entry point with a function called Main, as you should know already from your learning C# (some languages like Pascal or JScript .NET don't explicitly designate an entry point but they make it clear and the operating system knows where it is). The Main() method of C# can be defined as void or as returning an integer value.
When using the Main() method n Visual C#, you can create a console or a graphical user interface (GUI) application. By default, the studio is configured to create a console application. You can specify to the compiler the type of application you want to create. To indicate that you want to create a Windows application, you can open the properties of the application and specify the Output Type as Windows Application.
Windows Forms is a technique of creating computer applications based on the common language runtime (CLR). It offers a series of objects called Windows Controls or simply, controls. These controls are already created in the .NET Framework through various classes. Application programming consists of taking advantage of these controls and customizing them for a particular application. To exploit these controls and other features of the .NET Framework, there are various types of applications you can create, including graphical applications (Windows Application), web-based applications (ASP.NET Web Application), console applications (Console Application), etc. There are two broad categories of objects used in a Windows Forms application: the forms and the controls. The objects used in a Windows Forms application are stored in libraries also called assemblies. As normal libraries, these assemblies have the extension .dll (which stands for dynamic link library). In order to use one of these objects, you must know the name of the assembly in which it is stored. Then you must add a reference to that assembly in your application. To add a reference to an assembly, on the main menu, you can click Project -> Add Reference... You can also right-click the automatically created References node in Solution Explorer and click Add Reference... Any of these actions would display the Add Reference dialog box from where you can click the reference, click Select and click OK. If you don't see the reference you are looking for, you can locate it on another drive or directory using the Browse button.
A form is the most fundamental object used on an application. It is a rectangular object that uses part of the computer desktop to represent an application. A form is based on the Form class that is defined in the System.Windows.Forms namespace created in the System.Windows.Forms.dll assembly. Every GUI application you will create starts with a form. There are various techniques you can use to get a form in your application: you can programmatically and manually create a form, you can inherit a form from the Form class, you can create a form based on another form that either you or someone else created already, etc. The primary means of getting a form into an application consists of deriving one from the Form class.
The form is the object that gives presence to an application. Once you have created the (primary) form of your application, you can get it ready to display on the screen. This is taken care of by the Application class equipped to start an application, process its messages or other related issues, and stop the application. The Application class provides the overloaded Run() method that can be used to start a program. One of the versions of this method takes a form as argument. This form must be the first, main or primary form of your application; it will be the first to display when the application comes up.
Earlier, we saw how to derive a form from the Form class to add it to an application. Although effective, this technique ignores the "visual" in Visual C# and makes you work "in the dark". As opposed to that technique, you can visually add a form and other controls to your application, allowing you to specify where an object should be positioned. To visually add a form to a project, on the main menu, you can click Project -> Add Windows Form... In the Add New Item dialog box, enter the name of the form and click Open. To support the idea of rapid application development (RAD), the Visual Studio .NET IDE provides the necessary objects on the Toolbox, as we reviewed it in the previous lesson. To select an object to add to your application, you can click it on the Toolbox and click the area where it should be added to the form. You can also double-click the control.
To add a control to your application, you can select it from the Toolbox and click the desired area on the form. Once added, the control is positioned where your mouse landed. In the same way, you can add other controls as you judge them necessary for your application. Here is an example of a few controls added to a form: 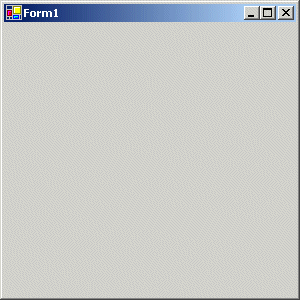 Alternatively, to add a control, you can also double-click it from the Toolbox and it would be added to the top-left section of the form. If you want to add a certain control many times, before selecting it on the Toolbox, press and hold Ctrl. Then click it in the Toolbox. This permanently selects the control. Every time you click the form, the control would be added. Once you have added the desired number of this control, on the Toolbox, click the Pointer button to dismiss the control.
When Microsoft Visual Studio is set up, it installs in the Toolbox the most regularly used controls. If you are working in an environment that creates only a particular group of applications and there are controls you hardly use, if you want, you can remove them from the list. To remove a control, right-click it and click Remove. Besides the objects in the Windows Forms section, other controls are left out but are still available. Some of the left out controls were created with the .NET Framework but are not installed by default because they are judged hardly used. To add one or more of these left out controls, right-click anywhere in the Toolbox and click Add/Remove Items... In the Customize Toolbox dialog box, click the .NET Framework Components tab, then click the check box of the desired control and click OK: 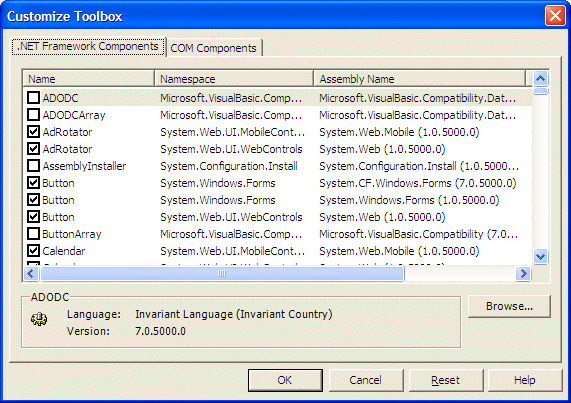 In addition to custom .NET controls, some other objects called ActiveX controls were used in previous versions of Visual Basic or Visual Studio and are available. To take care of compatibility issues, most previous ActiveX controls were reconfigured and adapted to be used in a .NET application. To add some of these left out controls, right-click anywhere in the Toolbox and click Add/Remove Items... In the Customize Toolbox dialog box, click the COM Components tab, select the desired control and click OK.
If you visually add a control to a form (at design time), in order to perform any type of configuration on the control, you must first select it. Sometimes you will need to select a group of controls. To select one control on the form, you can simply click it. A control that is selected indicates this by displaying 8 small squares, also called handles, around it. Between these handles, the control is surrounded by dotted rectangles. In the following picture, the selected rectangle displays 8 small squares around its shape: 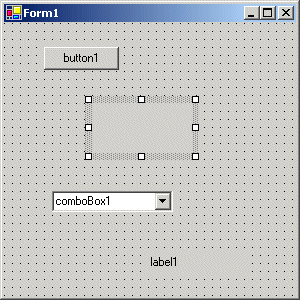 After selecting a control, you can manipulate it or change its characteristics, also called properties. To change some, if not most, of the characteristics of a control, you use the Properties window:  When a control is selected, the Properties window displays only its characteristics.
To select more than one control on the form, click the first. Press and hold either Shift or Ctrl. Then click each of the desired controls on the form. If you click a control that should not be selected, click it again. After selecting the group of controls, release either Shift or Ctrl that you were holding. When a group of controls is selected, the last selected control displays 8 handles too but its handles are dark while the others are white. In the following picture, three controls are selected and the last is the lowest: 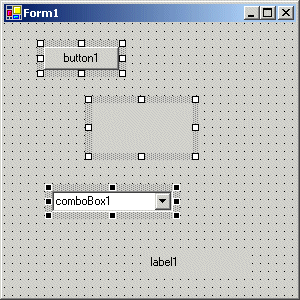 Another technique you can use to select various controls consists of clicking on an unoccupied area on the form, holding the mouse down, drawing a fake rectangle, and releasing the mouse:  Every control touched by the fake rectangle or included in it would be selected: 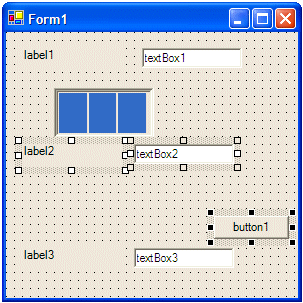 When various controls have been selected, the Properties window displays only the characteristics that are common to the selected controls.
If there is a control on your form but you don't need it, you can remove it from the application. To delete a control, first select it and then click or press Delete. You can also right-click a control and click Cut. To remove a group of controls, first select them, then click or press Delete or right-click the selection and click Cut.
The objects used in a Windows application are defined in various assemblies. To add one of these controls to your application, you must first know the name of its class. With this information, you can declare a variable of its class. For example, a command button is an object of type Button that is based on the Button class. The Button class is defined in the System.Windows.Forms namespace of the System.Windows.Forms.dll assembly. Based on this, to create a button, you can declare a Button variable as follows: using System;
using System.Windows.Forms;
class Program : Form
{
static void Main()
{
Button btnSubmit;
}
}
After, or when, declaring the variable, you can use the new operator to allocate memory for it: using System;
using System.Windows.Forms;
class Program : Form
{
static void Main()
{
Button btnSubmit;
btnSubmit = new Button();
}
}
This is also referred to as dynamically creating a control. After declaring the variable and allocating memory for it, the control is available but doesn't have a host, which makes it invisible. You can then call the Controls property of its parent to add the new control to its collection. The parent would then be responsible for hosting or carrying the new control. Here is an example: using System;
using System.Windows.Forms;
class Program : Form
{
static void Main()
{
Program frm;
Button btnSubmit;
frm= new Exercise();
btnSubmit = new Button();
frm.Controls.Add(btnSubmit);
}
}
If you declare and completely create a control in a particular method, the control would be available only in that method and cannot be accessed outside. To make such a control available to other controls or methods of the same class, you should declare it outside of a method. You can do this by declaring the variable in the form's class. Here is an example: using System;
using System.Windows.Forms;
class AppMainForm : Form
{
private Button btnSubmit;
static void Main()
{
}
}
After declaring the control, you can allocate its memory in the form's constructor or prior to using it. Here is an example: using System;
using System.Windows.Forms;
class AppMainForm : Form
{
private Button btnSubmit;
public AppMainForm()
{
btnSubmit = new Button();
this.Controls.Add(btnSubmit);
}
static void Main()
{
}
}
Because there can be many controls used in a program, instead of using the constructor to initialize them, Visual Studio standards recommends that you create a method called InitializeComponent to initialize the various objects used in your application. Then simply call that method from the constructor of your form.
If you are using a .NET Framework control, you must know the name of the class on which the control is based (and each control is based on a particular class). If you have examined the types of classes available but none implements the behavior you need, you can first locate one that is close to the behavior you need, then use it as a base to derive a new class. To derive a class from an existing control, you can use your knowledge of inheritance to derive a new class. Here is an example: public class Numeric : System.Windows.Forms.TextBox
{
}
If you want to perform some early initialization to customize your new control, you can declare a constructor. Here is an example: public class Numeric : System.Windows.Forms.TextBox
{
public Numeric() : base()
{
}
}
Besides the constructor, in your class, you can add the properties, methods, and/or events as you see fit. You can also use it to globally set a value for a property of the base class. Once the control is ready, you can dynamically use it like any other control. Here is an example:
|
|
|
|
||
| Previous | Copyright © 2004-2010 FunctionX, Inc. | Next |
|
|
||