Home

File-Based Applications:
Bethesda Car Rental


Introduction

Imagine you get a contract or an assignment to create an application used to process business transactions for a car rental company. In this case, we will call it Bethesda Car Rental. If you decide to use then .NET Framework to develop the application, you have various options. You can use file processing for a file-based database. You can proceed with XML to save company files in a format that can be accessed by different types of applications, including the World Wide Web. Or you can create a formal database using Microsoft SQL Server, Borland/Corel Paradox, or MS Access, etc. In this example, we will create our application using regular files.

This application assumes that you have some knowledge or a basic understanding of file processing and serialization as it is featured in the .NET Framework but we will be as clear as possible with this exercise and its different parts.


Practical Learning Practical Learning: Processing Cars 

  • Start Microsoft Visual C# or Visual Studio .NET and create a new Windows Application named BCR2

Employees

An employee will be anybody who works for this company, whether the person is part of the management or is one of those who process transactions. In a formal company, various pieces of information are provided for each employee. In our example, we will get only the strict minimum.


Practical Learning Practical Learning: Creating Employees

  1. To add a new form to the application, on the main menu, click Project -> Add Windows Form...
  2. Set the Name to Employees and press Enter
  3. From the Toolbox, add a ListView to the form
  4. While the new list view is still selected, in the Properties window, click the ellipsis button of the Columns field and create the columns as follows:
     
    (Name) Text Width
    colFirstName First Name 80
    colLastName Last Name 80
    colTitle Title 200
    colGender Gender 80
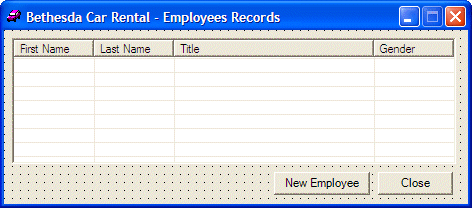
  5. Design the form as follows: 
     
     
    Control Text Name Other Properties
    ListView   lvwEmployees Anchor: Top, Bottom, Left, Right
    FullRowSelect: True
    GridLines: True
    View: Details
    Button New Employee btnNewEmployee  
    Button Close btnClose  
  6. To add another form to the application, on the main menu, click Project . Add Windows Forms...
  7. Set the Name to NewEmployee and press Enter
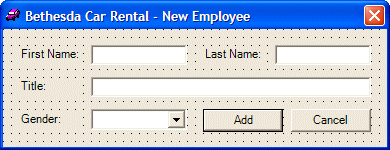
  8. Design the form as follows: 
     
     
    Control Text Name Properties
    Label First Name:    
    TextBox   txtFirstName Modifiers: public
    Label Last Name:    
    TextBox   txtLastName Modifiers: public
    Label Title:    
    TextBox   txtTitle Modifiers: public
    Label Gender:    
    ComboBox   cboGenders Modifiers: public
    Items: Female
    Male
    Unknown
    Button Add btnAdd DialogResult: OK
    Button Cancel btnCancel DialogResult: Cancel
    Form     AcceptButton: btnAdd
    CancelButton: btnClose
    FormBorderStyle: FixedDialog
    MaximizeBox: False
    MinimizeBox: False
    ShowInTaskbar: False
  9. To add a new class to the project, on the main menu, click Project . Add Class...
  10. Set the Class Name to Employee and click Open
  11. Change the Employee.cs file as follows:
     
    using System;
    
    namespace BCR2
    {
    	/// <summary>
    	/// Summary description for Employee.
    	/// </summary>
    		  
    	[Serializable]
    	public class Employee
    	{
    		public string FirstName;
    		public string LastName;
    		public string Title;
    		public string Gender;
    
    		public Employee()
    		{
    			FirstName = "Unknown";
    			LastName  = "Unknown";
    			Title     = "N/A";
    			Gender    = "Unknown";	
    		}
    
    		public Employee(string fname, string lname,
    				string title, string sex)
    		{
    			FirstName = fname;
    			LastName  = lname;
    			Title     = title;
    			Gender    = sex;
    		}
    	}
    }
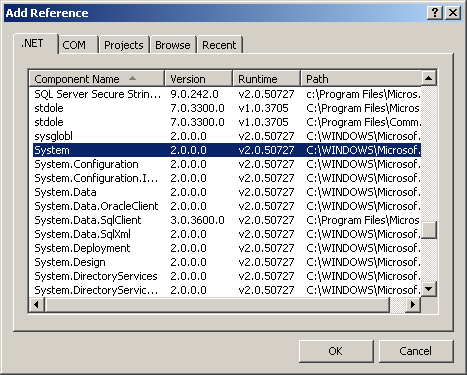
  12. In the Solution Explorer, right-click the References node and click Add Reference...
  13. In the .NET property page of the Add Reference dialog box, select System.Runtime.Serialization.Formatters.Soap and click Select
     
    Add Reference
  14. Click OK
  15. In the Class View, expand BCR2 and BCR2
  16. Right-click Employees -> Add -> Add Method...
  17. Set the Method Access to internal
  18. Set the Return Type to void
  19. Set the Method Name to ShowEmployees and click Finish 
  20. Return to the Employees form and double-click an empty area of its body to generate its Load event
  21. Return to the Employees form and double-click its New Employee button
  22. Return to the Employees form and double-click its Close button
  23. Change the file as follows:
     
    using System;
    using System.Drawing;
    using System.Collections;
    using System.ComponentModel;
    using System.Windows.Forms;
    using System.IO;
    using System.Runtime.Serialization.Formatters.Soap;
    
    namespace BCR2
    {
    	/// <summary>
    	/// Summary description for Employees.
    	/// </summary>
    	public class Employees : System.Windows.Forms.Form
    	{
    		private System.Windows.Forms.Button btnNewEmployee;
    		private System.Windows.Forms.Button btnClose;
    		private System.Windows.Forms.ColumnHeader colLastName;
    		private System.Windows.Forms.ColumnHeader colFirstName;
    		private System.Windows.Forms.ColumnHeader colTitle;
    		private System.Windows.Forms.ColumnHeader colGender;
    		private System.Windows.Forms.ListView lvwEmployees;
    		/// <summary>
    		/// Required designer variable.
    		/// </summary>
    		private System.ComponentModel.Container components = null;
    		ArrayList lstEmployees;
    
    		. . . No Change
    
    internal void ShowEmployees()
    {
    	SoapFormatter bcrSoap = new SoapFormatter();
    	String strFilename = "Employees.bcr";
    			 
    	if( File.Exists(strFilename) )
    	{
    FileStream bcrStream = new FileStream(strFilename, FileMode.Open, FileAccess.Read, FileShare.Read);
    		ArrayList  lstEmpl = (ArrayList)bcrSoap.Deserialize(bcrStream);
    		bcrStream.Close();
    
    		Employee empl;
    
    		lvwEmployees.Items.Clear();
    
    		for(int i = 0; i < lstEmpl.Count; i++)
    		{
    			empl = (Employee)lstEmpl[i];
    			ListViewItem lviEmployee = new ListViewItem(empl.FirstName);
    			lviEmployee.Font = new Font("Georgia", 8, FontStyle.Bold);
    		 
    			if( i % 2 == 0 )
    			{
    				lviEmployee.BackColor = Color.Blue;
    				lviEmployee.ForeColor = Color.White;
    			}
    			else
    			{
    				lviEmployee.BackColor = Color.LightBlue;
    				lviEmployee.ForeColor = Color.Blue;
    			}
    
    			lviEmployee.SubItems.Add(empl.LastName);
    			lviEmployee.SubItems.Add(empl.Title);
    			lviEmployee.SubItems.Add(empl.Gender);
    			lvwEmployees.Items.Add(lviEmployee);
    		}
    	}
    }
    
    private void Employees_Load(object sender, System.EventArgs e)
    {
    	lstEmployees = new ArrayList();
    	SoapFormatter bcrSoap = new SoapFormatter();
    	string strFilename = "Employees.bcr";
    			 
    	if( File.Exists(strFilename) )
    	{
    FileStream bcrStream = new FileStream(strFilename, FileMode.Open, FileAccess.Read, FileShare.Read);
    		lstEmployees = (ArrayList)bcrSoap.Deserialize(bcrStream);
    		bcrStream.Close();
    	}
    
    	ShowEmployees();
    }
    
    private void btnNewEmployee_Click(object sender, System.EventArgs e)
    {
    	NewEmployee dlgEmpl = new NewEmployee();
    
    	if( dlgEmpl.ShowDialog() == DialogResult.OK )
    	{
    		if( dlgEmpl.txtLastName.Text == "" )
    		{
    			MessageBox.Show("You must provide at least a last name to create a new employee");
    			return;
    		}
    		else
    		{
    			string strFilename = "Employees.bcr";
    			Employee empl = new Employee();
    
    			empl.FirstName = dlgEmpl.txtFirstName.Text;
    			empl.LastName  = dlgEmpl.txtLastName.Text;
    			empl.Title     = dlgEmpl.txtTitle.Text;
    			empl.Gender    = dlgEmpl.cboGenders.Text;
    
    			lstEmployees.Add(empl);
    	 
    FileStream bcrStream = new FileStream(strFilename, FileMode.OpenOrCreate, FileAccess.Write, FileShare.Write);
    			SoapFormatter bcrSoap = new SoapFormatter();
    			bcrSoap.Serialize(bcrStream, lstEmployees);
    			bcrStream.Close();
    					
    			ShowEmployees();
    		}
    	}
    }
    
    private void btnClose_Click(object sender, System.EventArgs e)
    {
    	Close();
    }
    }
    }
  24. In the Solution Explorer, right-click Form1 and click Rename
  25. Type Switchboard.cs and press Enter twice twice to display the first form
  26. Add a Button to the form and change its properties as follows:
    (Name): btnEmployees
    Text: Employees
  27. Double-click the Employees button to generate its Click event
  28. Implement the event as follows:
     
    private: System.Void btnEmployees_Click(System.Object *  sender, System.EventArgs *  e)
    {
    	 Employees frmEmpl = new Employees();
    
    	 frmEmpl.Show();
    }
  29. Execute the application
  30. Create a few employees as follows:
     
    First Name Last Name Title Gender
    Patricia Katts Store Manager  
    Henry Larson Sales Representative Male
    Gertrude Palau Sales Representative Female
    Helene Sandt Intern Female
    Melanie Karron Sales Representative Unknown
    Ernest Chisen Sales Manager Male
    Melissa Roberts Administrative Assistant Female
     
  31. Close the forms and return to your programming environment
 

Home Copyright © 2005-2016, FunctionX Next