|
With Mail Merge, creating envelopes is made easy by using
data from a created or existing data source.
If there is no existing source of data, you can create a new
data source. On the other hand, if you or someone else has already created a
data source, you can use its fields and insert them as information of envelopes.
Just like letters and labels, data you use when creating
envelopes can come from any source including a text, a spreadsheet, a database,
or a contact list. One feature you should configure is to add a return address.
|
 Practical Learning: Creating Envelops
|
|
-
Start Microsoft Word if necessary
-
If necessary, create a data
source
-
If you have already created a data source, on the Mail
Merge toolbar, click the Mail Merge Helper button.
If you are processing a Mail Merge yet, on the main menu, click Tools ->
Mail Merge...
-
From the Mail Merge Helper dialog, click Create ->
Envelopes...

-
When you receive the dialog, click New Main Document.
-
In the Data Source section, click Get Data -> Open
Data Source...
-
Locate the folder where the data source is located. In
this case, it might be the C:\My Documents\Sales Contacts folder.
-
From the list of files, select Valuable Car Customers
and click Open.

-
Click Set Up Main Document
-
In the Envelope Options dialog, accept the envelope size
10 and click OK.
-
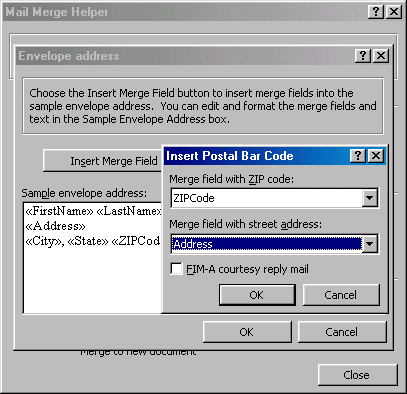
In the Envelope Address dialog, click Insert Merge Field
-> FirstName
-
Press Space.
-
Click Insert Merge Field -> LastName
-
Press Enter. Click Insert Merge Field -> Address
-
Press Enter.
-
Click Insert Merge Field -> City
-
Type , and press Space
-
Click Insert Merge Field -> State and press Space
-
Click Insert Merge Field -> ZIPCode
-
Press Ctrl + Home to position the cursor to the left of
FirstName
-
Click Insert Postal Bar Code...
-
Click Merge Field With ZIP Code combo box and select
ZIPCode
-
Click the Merge Field With Street Address combo box and
select Address

-
Click OK

-
Click OK.
-
Click Close.
-
To view the merged envelopes, on the Mail Merge toolbar,
click the View Merged Data button  . .
-
Navigate through different envelopes to see the result
|
|

