|
Fundamentals of Controls Methods |
|
|
|
A method is a procedure created as a member of a class.
Methods are used to access or manipulate the characteristics of an object or
a variable. There are mainly two categories of methods you will use in your
classes:
|
- If you are using a control such as one of those provided by the
Toolbox, you can call any of its public methods. The requirements of
such a method depend on the class being used
- If none of the existing methods can perform your desired task, you
can add a method to a class.
|
Control's Construction and Destruction
|
|
As you should know already, every class has a
fundamental method called a default constructor. Every control of the .NET
Framework is based on a class that has a default constructor and most of
those classes have only one constructor: the default. The default
constructor allows you to instantiate the class without necessarily
initializing it. To use it, you must know the name of the control you want
to use since each control bears the same name as its class. Here is an
example:
Imports System
Imports System.Drawing
Imports System.Windows.Forms

Module Exercise

    Public Class WinControls
        Inherits Form

        Private BtnReset As Button

        Dim components As System.ComponentModel.Container

        Public Sub New()
            InitializeComponent()
        End Sub

        Public Sub InitializeComponent()
            BtnReset = New Button()

        End Sub

        Public Shared Function Main() As Integer

            Application.Run(New WinControls())
            Return 0

        End Function

    End Class

End Module
If you are not planning to use a control straight from
the .NET Framework, you can also create your own class that is derived
from the class of the control, as we have mentioned in previous lessons.
As mentioned in the previous lesson, after
instantiating a control, it is available but the user cannot see. Each
control that acts as a parent of another control has a property called
Controls. This property, which is a ControlCollection type, is
equipped with an Add() method. If you want to display the new
control to the user, you should pass it to the Control.Controls.Add()
method. Here is an example:
Imports System
Imports System.Drawing
Imports System.Windows.Forms

Module Exercise

    Public Class WinControls
        Inherits Form

        Private BtnReset As Button

        Dim components As System.ComponentModel.Container

        Public Sub New()
            InitializeComponent()
        End Sub

        Public Sub InitializeComponent()
            BtnReset = New Button()

            Controls.Add(BtnReset)
        End Sub

        Public Shared Function Main() As Integer

            Application.Run(New WinControls())
            Return 0

        End Function

    End Class

End Module
This displays the control to the user.
After using a control, it must be destroyed. Another
detail of Windows controls is that they use or consume computer resources
during their lifetime. When the controls are not used anymore, such as
when their application closes, these resources should be freed and given
back to the operating system to make them available to other controls.
This task can be performed using the Dispose() method to the
Control class, which can then be overridden by its child controls. The
syntax of the Control.Dispose() method is:
Protected Overrides Sub Dispose(disposing As Boolean)
This method takes one argument, disposing, that
indicates how the resources would be released. If this argument is passed
with a False value, only the unmanaged resources would be released.
If it is passed as True, then both managed and unmanaged resources
would be released.
In the previous lesson, we saw that you could call the
Visible property to hide a visible control or to display a hidden
control. Besides the Visible property, you can also display a
control using the Show() method. Its syntax is:
Public Sub Show()
When you use this method, if the control is visible,
nothing would happen. If it were hidden, then it would be revealed. The
Show() method internally sets the Visible property to true. We
also saw that, to hide a control, you could set its Visible
property to False. In the same way, to hide a control, you call can
the Control.Hide() method. Its syntax is:
Public Sub Hide()
Keep in mind that hiding a control does not destroy
it.
Once a control is visible, the user can use it. Some
controls allow the user only to read their text or view what they display.
Some other controls allow the user to retrieve their value or to change
it. To perform such operations, the user must first give focus to the
control. The focus is a visual aspect that indicates that a control is
ready to receive input from the user. Various controls have different ways
of expressing that they have received focus.
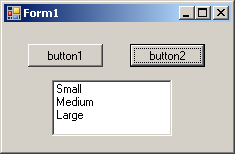
Button-based controls indicate that they have focus by
drawing a dotted rectangle around their caption. In the following picture,
the button on the right has focus:

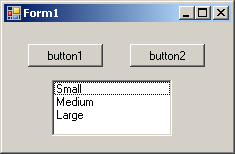
A text-based control indicates that it has focus by
displaying a blinking caret. A list-based control indicates that it has
focus when one of its items has a surrounding dotted rectangle:

To give focus to a control, the user can press a key
such as Tab. To programmatically give focus to a control, call the
Focus() method.
In the previous lesson, we saw how you could position
controls visually or manually. In some cases, you end up with one control
positioned on top of another. Of course the first remedy that comes in
mind would consist of moving one of the controls away from the other. This
would also imply sometimes that you would have to enlarge and/or heighten
the controls' container. There are situations that either you don't want
to resize the parent or you can't: your only solution is to have one
control on top of another. Fortunately, you can cope with this situation
by specifying, when needed, what control at what time should be displayed
to the user.
When one control is positioned on top of another, they
use a third axis whose origin, like that or the other axes, is on the
top-left corner of the parent. This third axis, also considered the
z-axis, is oriented so that it moves from the monitor towards the user.
The operating system is in charge of positioning and drawing the objects
on the screen. You as the programmer can direct the operating system as to
what object should be on top and what object should be behind. To support
these changes the Control class uses two methods that its appropriate
children derive also.
When a control A is positioned behind a control be,
this causes control be either partially or completely hidden. If you want
the control A to change its z-order and become on top of control B, you
can call its BringToFront() method. The syntax of this method is:
Public Sub BringToFront()
On the other hand, if a control B is positioned on top
of a control A, if you want control B to become positioned behind control
A, you can call control B's SendToBack() method. Its syntax is:
Public Sub SendToBack()
After the controls have been positioned, at any time,
when you access a control, if you want to know whether that control is the
most top object, you can call its GetTopLevel() method. Its syntax
is:
Protected Function GetTopLevel As Boolean
The Windows controls available from the .NET Framework
and that we will user in our lessons. They are equipped with various
methods ready to be used. Of course, no library can surely provide every
single type of method that every programmer would use. For this reason, it
will not be unusual that you need a method that is not available for a
control you are using. In the same way, when you create a Windows
Application that is based on a Form class, you will likely need a
method that is not defined in the Form class. In this case, you can
create your own and new method.
A method is created like a normal procedure. If you
want to add it to a form, you can open the Code Editor and write your
procedure outside of any existing procedure. Here is an example:
Imports System
Imports System.Drawing
Imports System.Windows.Forms

Module Exercise

    Public Class WinControls
        Inherits Form

        Private BtnReset As Button

        Dim components As System.ComponentModel.Container

        Public Sub New()
            InitializeComponent()
        End Sub

        Public Sub InitializeComponent()
            BtnReset = New Button()
            BtnReset.Text = "Reset"
            BtnReset.Location = New Point(20, 20)

            Controls.Add(BtnReset)
        End Sub

        Private Function CalculateRectangleArea(ByVal Recto As Rectangle) As Double
            Return Recto.Width * Recto.Height
        End Function

        Public Shared Function Main() As Integer

            Application.Run(New WinControls())
            Return 0

        End Function

    End Class

End Module
In the same way, if you derive a class from one of the
existing classes because you want to get a custom control from it, you can
declare a new method as you see fit and use it appropriately.
Probably the best way is to let the Code Editor insert
the new method based on your specifications. To do that, in the Class
View, first expand the name of the project. Then, right-click the name of
the class where you want to add a new method, position the mouse on Add,
and click Add Method. This would open the C# Method Wizard dialog box you
can fill out and click Finish. After the method's body has been defined
you
|
Microsoft Visual Basic Functions
|
|
Among all the languages of the .NET Framework and
Microsoft Visual Studio, Visual Basic has the largest and the most
impressive library of functions. There are so many of these functions, we
cannot review them here.