Introduction to Databases

Introduction to Databases
Fundamentals of Databases
Introduction
A database is primarily a group of computer files that each has a name and a location. There are different ways to create a database. To visually create a new database in Microsoft SQL Server Management Studio, in the Object Explorer, you can right-click the Databases node and click New Database... This would open the New Database dialog box.
 Practical Learning: Introducing Databases
The Name of a Database
Probably the most important requirement of creating a database is to give it a name. Transact-SQL is very flexible when it comes to names. In fact, it is very less restrictive than most other computer languages. Still, there are rules you must follow when naming a database:
Because of the flexibility of Transact-SQL, it can be difficult to maintain names in a database. Based on this, there are conventions we will use for our objects. In fact, we will adopt the rules used in C/C++, C#, Pascal, Java, and Visual Basic, etc. In our databases:
After creating an object whose name includes space, whenever you use that object, include its name between [ and ]. Examples are [Countries Statistics], [Global Survey], or [Date of Birth]. Even if you had created an object with a name that doesn't include space, when using that name, you can still include it in square brackets. Examples are [UnitedStations], [FullName], [DriversLicenseNumber], and [Country].
Practical Learning: Starting the Management Studio
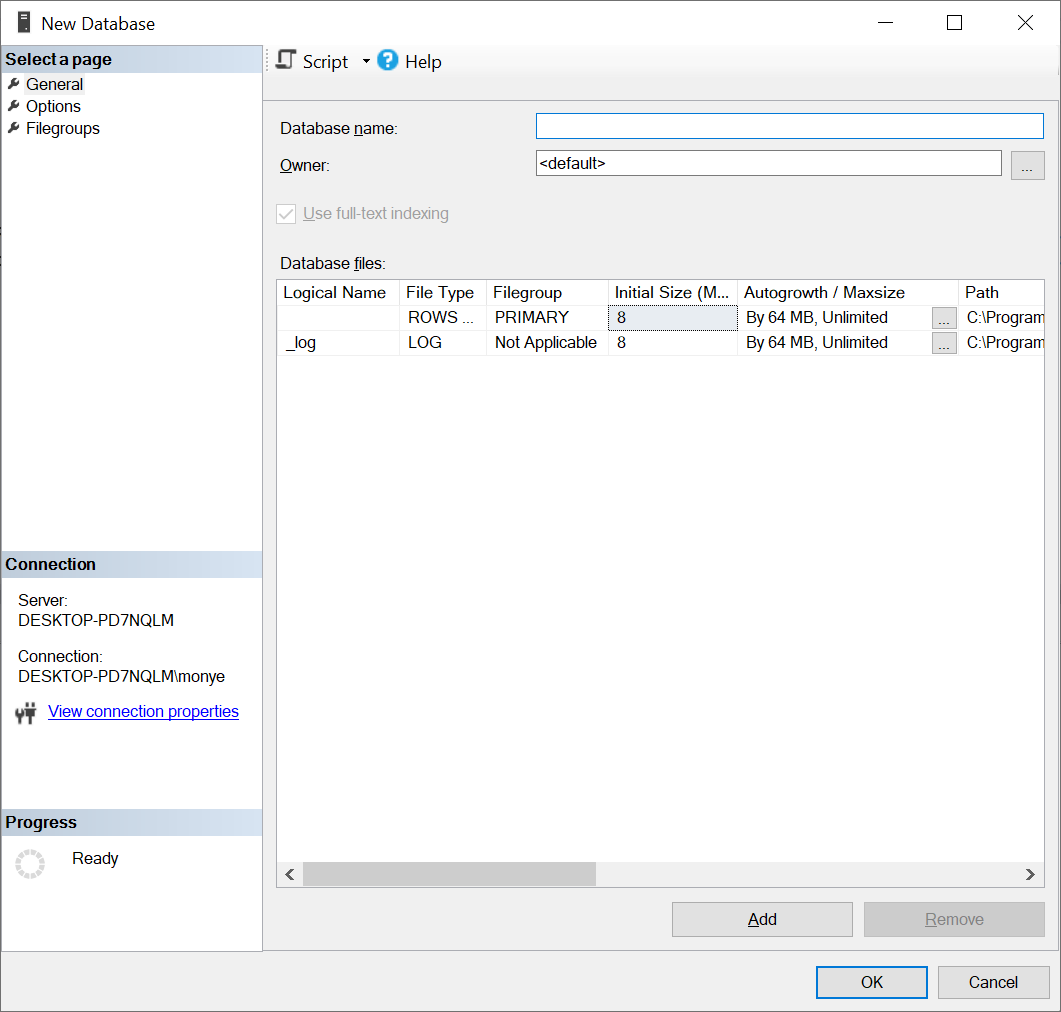
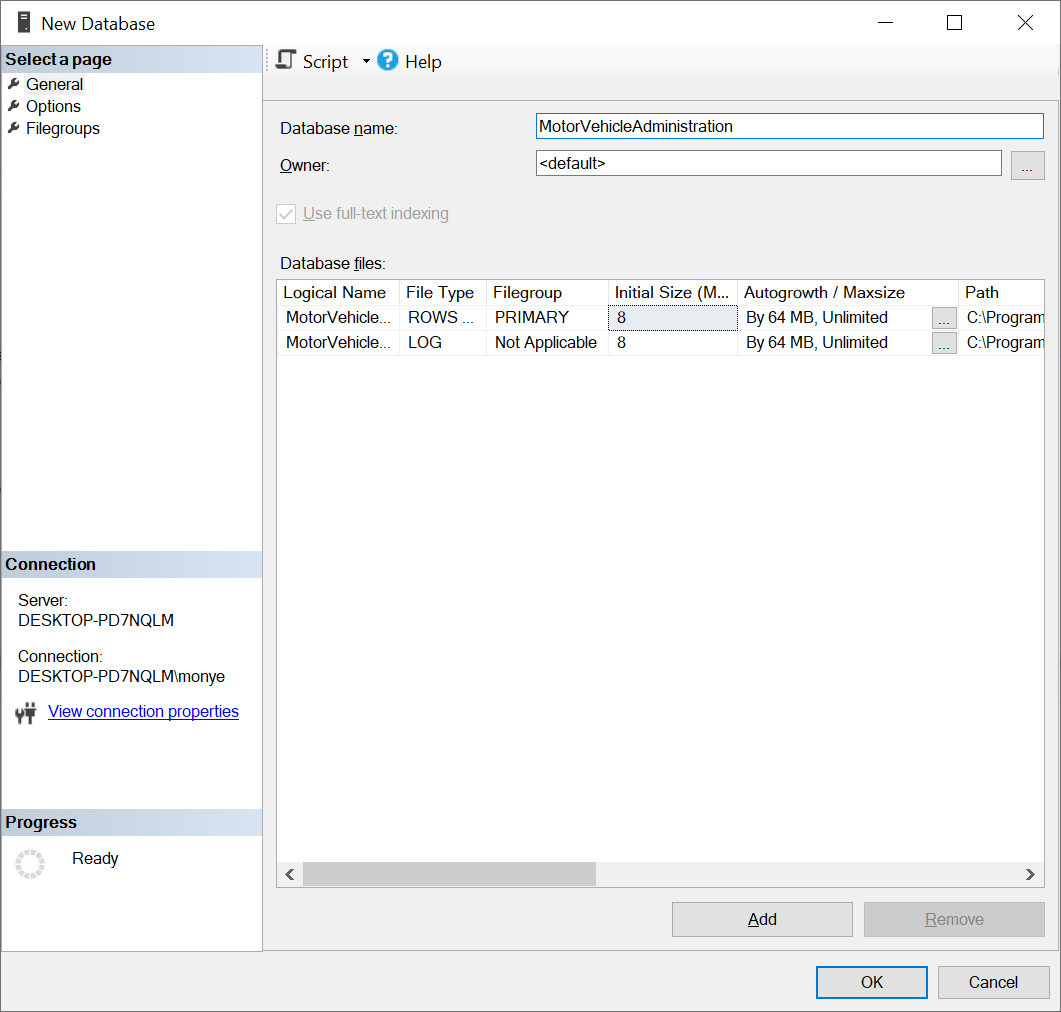
The Primary Size of a Database
When originally creating a database, you may or may not know how many lists, files, or objects the project would have. Still, you may know that the database must use a certain portion of memory, at least in the beginning to hold some values. The amount of space that a database is using is referred to as its size. If you use the New Database dialog box, after specifying the name of the database and clicking OK, the interpreter automatically specifies that the database would primarily use 2MB. This is enough for a starting database. Of course, you can either change this default later on or you can increase it when necessary.
If you want to specify a size different from the default, if you are using the New Database to create your database, in the Database Files section and under the Initial Size column, change the size as you wish.
Practical Learning: Setting the Database File Size
The Location of a Database
As you should be aware already from your experience on using computers, every computer file must have a path. The path is where the file is located in one of the drives of the computer.
By default, when you create a new database, Microsoft SQL Server assumes that it would be located at Drive:\Program Files\Microsoft SQL Server\MSSQL16.MSSQLSERVER\MSSQL\DATA\ folder. If you use the New Database dialog box of the SQL Server Management Studio, if you specify the name of the database and click OK, the interpreter automatically creates a new file, and appends the .MDF extension to the file: this is the (main) primary data file of your database.
If you don't want to use the default path, you can change it. If you are using the New Database dialog box, to change the path, under the Path header, select the current string. Replace it with an appropriate path of your choice.
Practical Learning: Checking the Location of the Data File

Default Databases
Introduction
When you install Microsoft SQL Server, it also installs 4 databases named master, model, msdb, and tempdb. These databases will be for internal use. This means that you should avoid directly using them, unless you know exactly what you are doing.
One of the databases installed with Microsoft SQL Server is named master. This database holds all the information about the server on which your Microsoft SQL Server is installed. For example, you know that, to perform any operation on the server, you must log in. The master database identifies any user who accesses the database, when, and how.
Besides identifying who accesses the system, the master database also keeps track of everything you do on the server, including creating and managing databases.
You should not play with the master database at the risk of corrupting the system. For example, if the master database is not functioning right, the system would not work.
Database Creation With Code
The primary command to create a database uses the following formula:
CREATE DATABASE DatabaseName
To assist you with writing code, you could use the Query Editor and/or the Template Explorer.
The CREATE DATABASE (remember that SQL is not case-sensitive) expression is required. The DatabaseName is the name that the new database will have. Although SQL is not case-sensitive, you should make it a habit to be aware of the cases you use to name your objects.
Every statement in SQL can be terminated with a semi-colon. Although this is a requirement in some implementations of SQL, in Transact-SQL, you can omit the semi-colon. Otherwise, the above formula would be:
CREATE DATABASE DatabaseName;
Here is an example:
CREATE DATABASE NationalCensus;
This formula is used if you don't want to provide any option. We saw previously that a database has one or more files and we saw where they are located by defauft. We also saw that you could specify the location of files if you want. To specify where the primary file of the database will be located, use the following formula:
CREATE DATABASE DatabaseName
ON PRIMARY
( NAME = LogicalName, FILENAME = Path )
The only three factors whose values need to be changed from this formula are the database name that we saw already, the logical name, and the path name. The logical name can be any one-word name but should be different from the database name. The path is the directory or location of the file. This path ends with a name for the file with the extension .mdf. The path should be complete and included in single-quotes. Here is an example:
CREATE DATABASE NationalCensus
ON PRIMARY
( NAME = DataRepository, FILENAME = 'C:\Exercises\NationalCensus.mdf')
GO
Besides the primary file, you may want to create and store a log file. To specify where the log file of the database would be located, you can use the following formula:
CREATE DATABASE DatabaseName
ON PRIMARY
( NAME = LogicalName, FILENAME = Path.mdf )
LOG ON
( NAME = LogicalName, FILENAME = Path.ldf )
Like the primary file, the log file must be named (with a logical name). The path ends with a file name whose extension is .ldf. Here is an example:
CREATE DATABASE NationalCensus
ON PRIMARY
( NAME = DataRepository, FILENAME = 'C:\Exercises\NationalCensus.mdf')
LOG ON
( NAME = DataLog, FILENAME = 'C:\Exercises\NationalCensus.ldf')
GO
Practical Learning: Creating a Database Using SQL
CREATE DATABASE RealEstate1
ON PRIMARY
( NAME = DataRepository, FILENAME = 'C:\Microsoft SQL Server Database Development\RealEstate1.mdf')
LOG ON
( NAME = DataLog, FILENAME = 'C:\Microsoft SQL Server Database Development\RealEstate1.ldf')
GO
Using Code Template
To specify more options with code, Microsoft SQL Server ships with various sample codes to let you start a new database.
The sample codes that Microsoft SQL Server provides are from the Template Explorer. To access the Template Explorer, on the main menu, you can click View -> Template Explorer.
Before creating a database, open a new Query Editor. Then:
After performing any of these actions, Microsoft SQL Server would generate sample code for you. You would then edit the code and execute it to create the database. From the previous lessons and sections, we have reviewed some characters such as the comments -- and some words or expressions such as GO, CREATE DATABASE, and SELECT. We will study the other words or expressions in future sections and lessons.
Practical Learning: Generating a Database from Code Template
USE master
GO

-- Drop the database if it already exists
IF  EXISTS (
	SELECT name
		FROM sys.databases
		WHERE name = N'RedOakHighSchool'
)
DROP DATABASE RedOakHighSchool
GO

CREATE DATABASE RedOakHighSchool
GO

USE RedOakHighSchool;
GO
A Database from Pasted Code
Instead of writing all the code for a database, you can find code that exists somewhere, then copy it, and paste it in a Query Editor.
Practical Learning: Copying and Pasting Database Code
Database Routines
While writing code in a Query Editor, you should always know what database you are working on, otherwise you may perform an action on the wrong database.
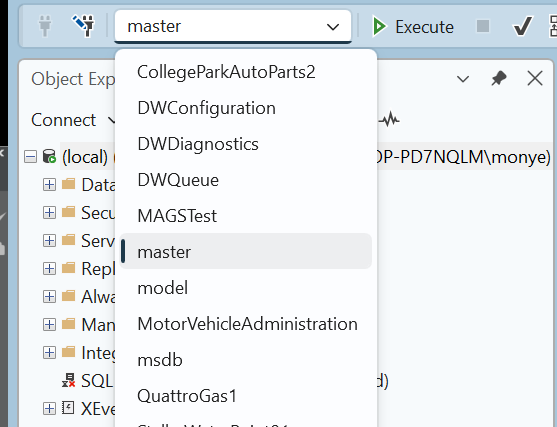
Before visually making a database the current, a Query Editor must be opened. To visually select a database and make it the current, in the SQL Designer toolbar, click the arrow of the Available Databases combo box and select the desired database:
To programmatically specify the current database, in a Query Editor or using the SQLCMD utility (including PowerShell) at the Command Prompt, type the USE keyword followed by the name of the database. The formula to use is:
USE DatabaseName;
Here is an example:
USE Exercise;
Refreshing the List of Databases
Some of the windows that display databases, like the SQL Server Management Studio, don't update their list immediately if an operation occurred outside their confinement. For example, if you create a database in a Query Editor, its name would not be updated in the Object Explorer. To view such external changes, you can refresh the window that holds the list.
In SQL Server Management Studio, to update a list, you can right-click its category in the Object Explorer and click Refresh. For example, to refresh the list of databases, in the Object Explorer, you can right-click the Databases node and click Refresh.
Backing Up a Database
Backing up a database consists of saving it as a file and keep it off (outside) the database server in case something could happen to the machine.
Introduction to Database Maintenance
Overview
If you have created a database but don't need it anymore, you can delete it. It is important to know, regardless of how you create a database, whether using SQL Server Management Studio, code in the Query Editor, or the Command Prompt, every database can be accessed by any of these tools and you can delete any of the databases using any of these tools.
As done with creating a database, every tool provides its own means.
SQL Server Management Studio
To delete a database in SQL Server Management Studio, in the Object Explorer, expand the Databases node, right-click the undesired database, and click Delete. A dialog box would prompt you to confirm your intention. If you still want to delete the database, you can click OK. If you change your mind, you can click Cancel.
The Version of Microsoft SQL Server
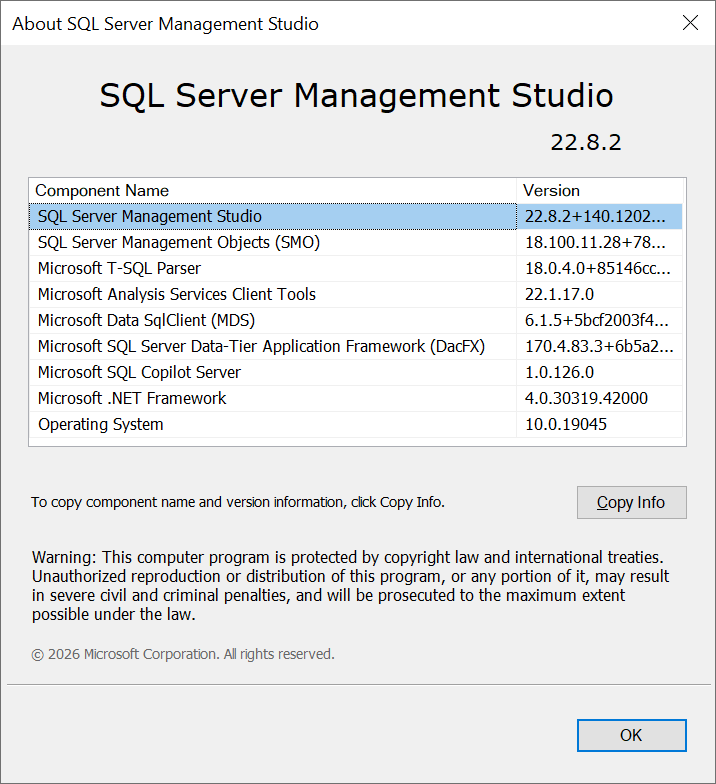
There are many versions of Microsoft SQL Server used by various people and different companies, including government agencies. As a result, come time to time, you want to know the version of Microsoft SQL Server you are using, whether on your local computer or where you work. To check your version of Microsoft SQL Server, on the main menu of Microsoft SQL Server Management Studio, click Help -> About:
Deleting a Database
Introduction
Deleting a database consists of removing it, permanently, from a computer. There are various reasons why you would like to delete a database. For example, a database could have become corrupted (too many false or useless values). A database could have become too outdated and needs a complete fresh update or do-over, in which case you want to completely replace it instead of simply replacing its values. A company or agency could have created a new version of a database and doesn't need the previous version to continue with the business. In some cases, as mentioned already, you may want to replace an existing database with a new one.
Visually Deleting a Database
To visually delete a database, in the Object Explorer of Microsoft SQL Server Management Studio, expand Databases node. Right-click the undesired databasse and click Delete. A Delete Object dialog box would display. In the bottom section of the Delete Object dialog box, click the Close Existing Connections check box
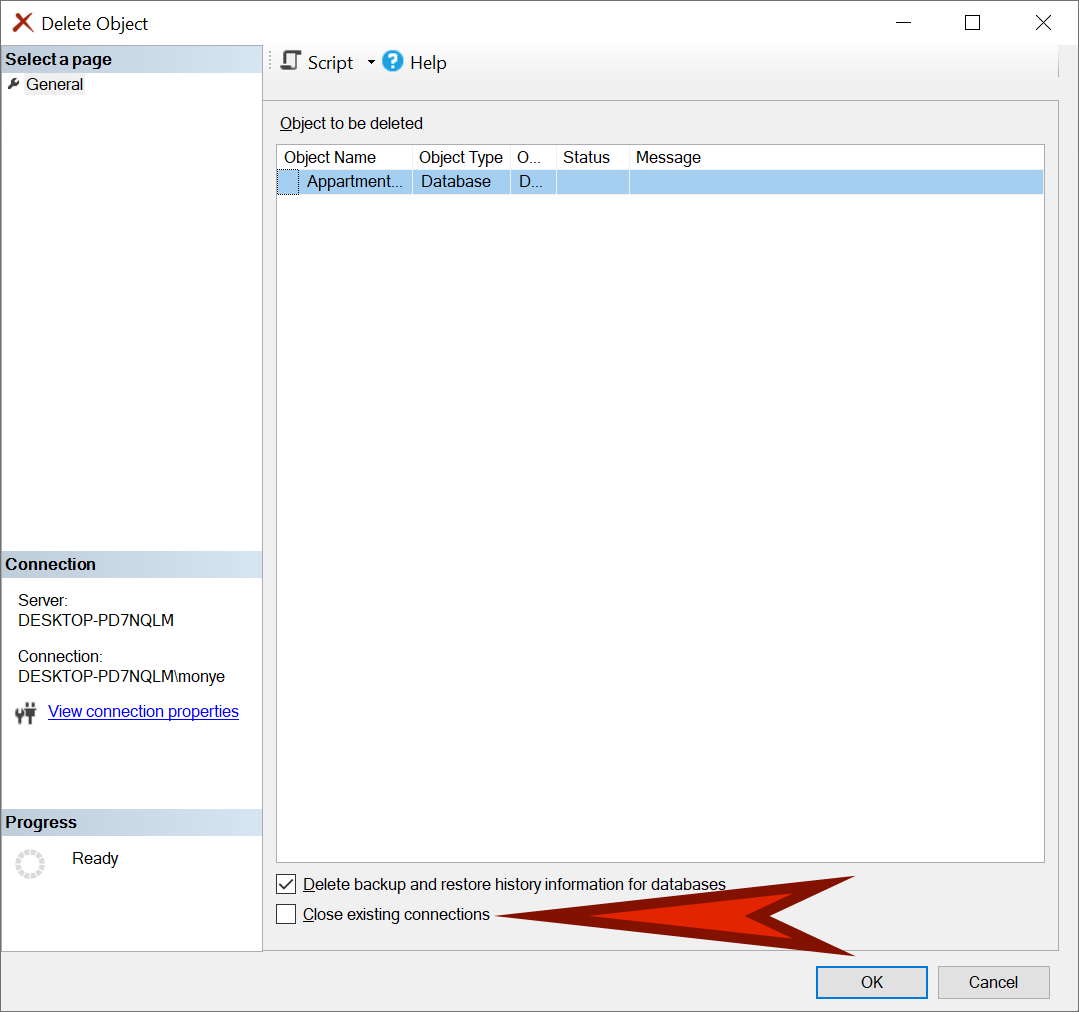
When you are ready, click OK.
Deleting a Database Using SQL
To delete a database in a Query Editor, use the DROP DATABASE expression followed by the name of the database. The formula used is:
DROP DATABASE DatabaseName;
Before deleting a database in SQL, you must make sure the database is not being used or accessed by someone else or by another object.
Schemas
Introduction to Namespaces
A namespace is a group of "things" where each thing has a unique name. This can be illustrated as follows:
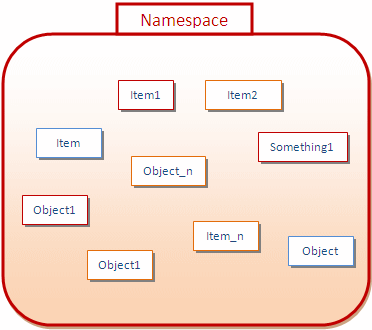
Notice that there are various types of objects within a namespace. For example, inside a company, each department has a unique name. Because two companies are independent, they can have departments that have the same name inside each company.
To organize its own items, a namespace can have other namespaces inside. That is, a namespace can have its own sub-namespaces, just like a company can have divisions.
Introduction to Schemas
As mentioned already, a namespace can have objects inside. To further control and manage the objects inside of a namespace, you can put them in sub-groups called schemas. Therefore, a schema (pronounced skima) is a group of objects within a namespace. This also means that, within a namespace, you can have as many schemas as you want. This can be illustrated as follows:
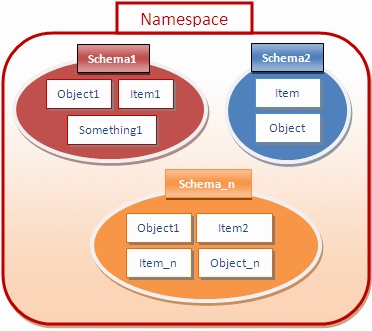
Notice that, just like a namespace can contain objects (schemas), a schema can contain objects also (the objects we will create throughout our lessons).
To manage the schemas in a namespace, you need a way to identify each schema. Based on this, each schema must have a name. In our illustration, one schema is named Schema1. Another schema is named Schema2. Yet another schema is named Schema_n.
A schema is an object that contains other objects. Before using it, you must create it or you can use an existing schema. There are two types of schemas you can use, those built-in and those you create. When Microsoft SQL Server is installed, it also creates a few schemas. One of the schemas is named sys. Another is called dbo.
The sys schema contains a list of some of the objects that exist in your database system. One of these objects is called databases (actually, it's a view). When you create a database, its name is entered in the databases list using the same name you gave it.
To access the schemas of a database, in the Object Explorer, expand the Databases node, expand the database that will hold or own the schema, and expand the Security node.
To visually create a schema, in the Object Explorer, expand the database:
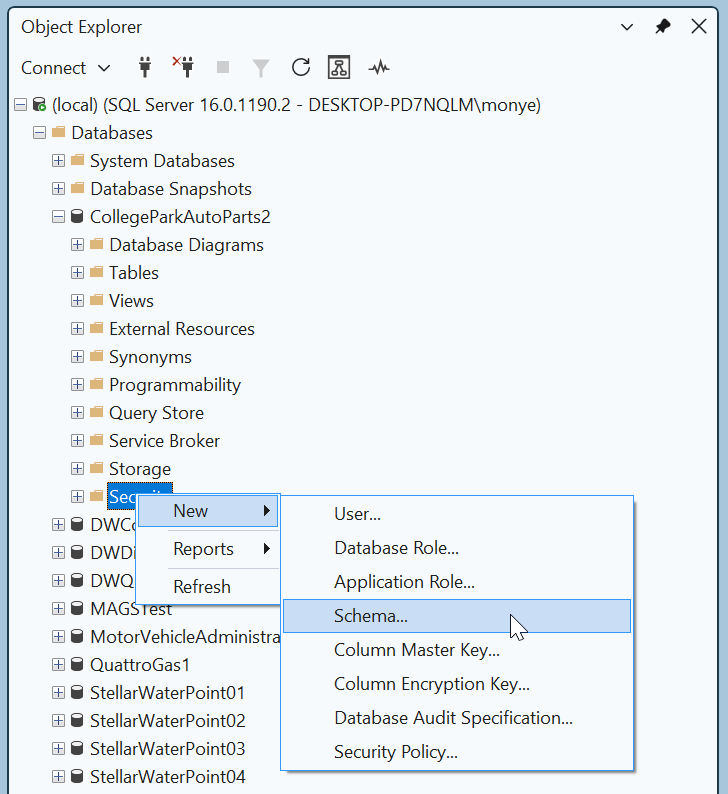
Any of these actions would open the Schema - New dialog box:
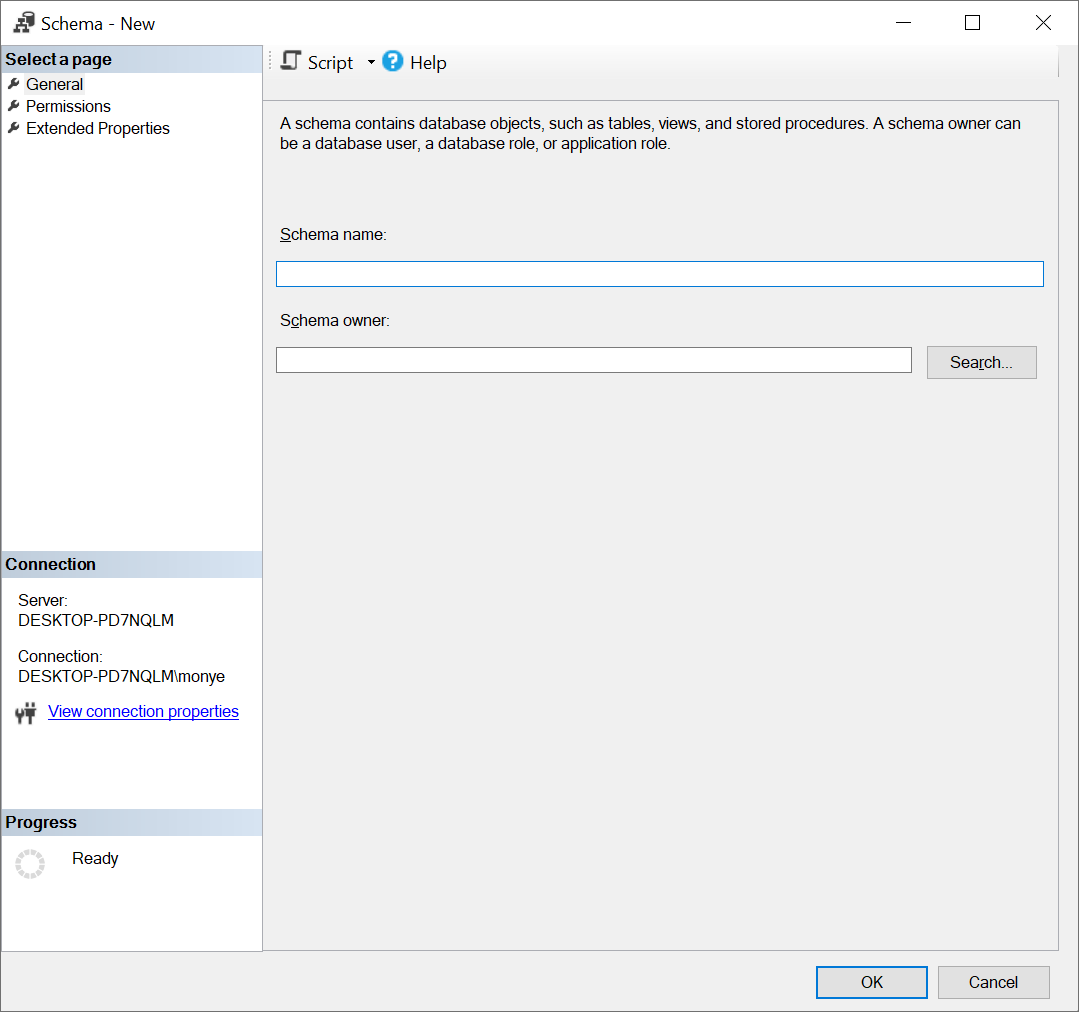
In the Schema Name text box, enter a one-word name. After providing a name, you can click OK.
The basic formula to create a schema is:
CREATE SCHEMA schema_name_clause [ <schema_element> [ ...n ] ]
Here is an example:
1> CREATE SCHEMA PrivateListing;
2> GO
1>
Accessing an Object From a Schema
Inside of a schema, two objects cannot have the same name, but an object in one schema can have the same name as an object in another schema. Based on this, if you are accessing an object within its schema, you can simply use its name, since that name would be unique. On the other hand, because of the implied possibility of dealing with objects with similar names in your server, when accessing an object outside of its schema, you must qualify it. To do this, you would type the name of the schema that contains the object you want to use, followed by the period operator, followed by the name of the object you want to use. From our illustration, to access the Something1 object that belongs to Schema1, you would type:
Schema1.Something1
When Microsoft SQL Server is installed, it creates a schema named dbo. This is probably the most common schema you will use. In fact, if you don't create a schema in a database, the dbo schema is the default and you can apply it to any object in your database.
Practical Learning: Ending the Lesson
DROP DATABASE RealEstate1;
GO
Other Techniques of Getting Databases
Introduction
One of the techniques used to get data into one or more tables consists of importing already existing data from another database or from any other recognizable data file. Microsoft SQL Server provides various techniques and means of getting or importing data.
Restoring a Database
Practical Learning: Restoring a Database
Copy and Paste
A script is a regular text-based file. In Microsoft SQL Server, the file should have the extension .sql. The script can have any type of code that the database engine can execute. That is, a Transact-SQL script can have any of the topics we will study throughout our lessons.
Using a script in Microsoft SQL Server is usually simple. Probably the easiest way to use a script is to open it as a file in the SQL Server Management Studio (you open the file like any other). Once it is opened, you can execute it. An alternative is to execute a file at the command prompt, in which case you can use either PowerShell or the DOS Command Prompt. To do this, at the prompt, use the following formula:
SQLCMD -i Filename
You start with the SQLCMD application and add the -i flag. This is followed by either only the name of the file or the complete path of the file. Of course, the file name must have the .sql extension.
Practical Learning: Executing a SQL Script
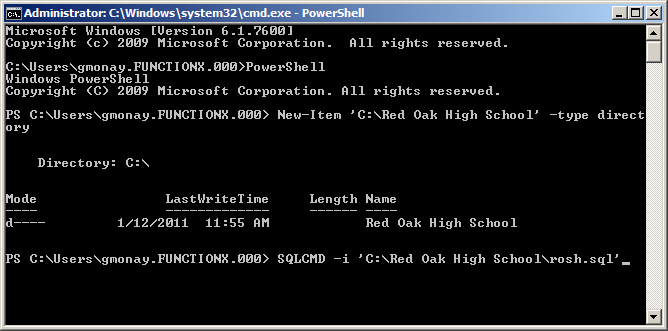
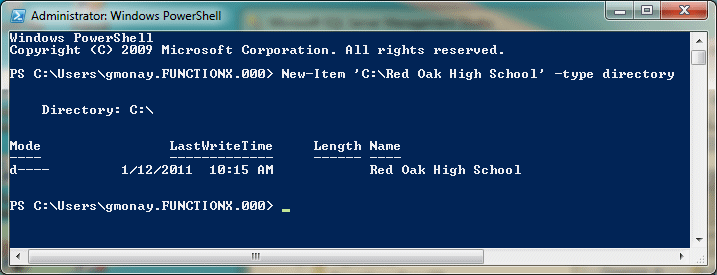
New-Item 'C:\Red Oak High School' -type directory
Importing a Spreadsheet
Spreadsheets are another type of file you can import in Microsoft SQL Server. A spreadsheet is organized as a table, with the necessary columns and rows. Although you can put anything in it, you should make sure the Microsoft SQL Server database engine would be able to identify the area where the actual records are (where the records start and where they end).
Importing a Text File
One of the types of data you can import into Microsoft SQL Server is a text file. Almost every database environment allows you to import a text file but data from that file must be formatted appropriately. For example, the information stored in the file must define the columns as distinguishable by a character that serves as a separator. This separator can be the single-quote, the double-quote, or any valid character. Data between the quotes is considered as belonging to a distinct field. Besides this information, the database would need to separate information from two different columns. Again, a valid character must be used. Most databases, including Microsoft SQL Server, recognize the comma as such a character. The last piece of information the file must provide is to distinguish each record from another. This is easily taken car of by the end of line of a record. This is also recognized as the carriage return.
These directives can help you manually create a text file that can be imported into Microsoft SQL Server. In practicality, if you want to import data that resides on another database, you can ask that application to create the source of data. Most applications can do that and format the records.
After importing data, you should verify and possibly format it to customize its fields.
Practical Learning: Introducing Data Entry
USE master;
GO
DROP DATABASE University1;
GO
CREATE DATABASE University2;
GO
USE University2;
GO
CREATE SCHEMA Academics;
GO
CREATE TABLE Academics.StudentsGradeScale
(
	LetterGrade char
);
GO
Practical Learning: Introducing Data Navigation
Practical Learning: Creating a Record
Practical Learning: Changing a Column's Type
ALTER TABLE Academics.StudentsGradeScale
ALTER COLUMN LetterGrade nvarchar(5);
GO

ALTER TABLE Academics.StudentsGradeScale
ADD Descriptor nvarchar(20);
GO
| Letter Grade | Descriptor |
| A | Excellent |
| A- | Excellent |
| B+ | Good |
| B | Good |
| B- | Good |
| C+ | Satisfactory |
| C | Satisfactory |
| C- | Satisfactory |
| D+ | Satisfactory |
| D | Satisfactory |
| F | Unsatisfactor |

Practical Learning: Adding Numeric Values

| Letter Grade | MinimumPercent | MaximumPercent | Descriptor |
| A | 95 | 100 | Excellent |
| A- | 90 | 94 | Excellent |
| B+ | 85 | 89 | Good |
| B | 80 | 84 | Good |
| B- | 75 | 79 | Good |
| C+ | 70 | 74 | Satisfactory |
| C | 65 | 69 | Satisfactory |
| C- | 60 | 64 | Satisfactory |
| D+ | 55 | 59 | Satisfactory |
| D | 50 | 54 | Satisfactory |
| F | 0 | 49 | Unsatisfactor |
Practical Learning: Adding Decimal Values
| Letter Grade | Min Range | Max Range | Min % | Max % | Descriptor |
| A | 4 | 95 | 100 | Excellent | |
| A- | 3.67 | 3.99 | 90 | 94 | Excellent |
| B+ | 3.33 | 3.66 | 85 | 89 | Good |
| B | 3 | 3.32 | 80 | 84 | Good |
| B- | 2.67 | 2.99 | 75 | 79 | Good |
| C+ | 2.33 | 2.66 | 70 | 74 | Satisfactory |
| C | 2 | 2.32 | 65 | 69 | Satisfactory |
| C- | 1.67 | 1.99 | 60 | 64 | Satisfactory |
| D+ | 1.33 | 1.66 | 55 | 59 | Satisfactory |
| D | 1 | 1.32 | 50 | 54 | Satisfactory |
| F | 0 | .99 | 0 | 49 | Unsatisfactory |
Practical Learning: Using Real Values
| Commission Rate |
| 1.4 |
| .54 |
| .28 |
| .1875 |
| .09 |
| .0075 |
Practical Learning: Adding Currency Values
| Mininimum Transaction | Maximum Transaction | Commission Base | Commission Rate |
| 0 | 2499 | 26.25 | 1.4 |
| 2500 | 5999 | 45 | 0.54 |
| 6000 | 19999 | 60 | 0.28 |
| 20000 | 49999 | 75 | 0.1875 |
| 50000 | 499999 | 131.25 | 0.09 |
| 500000 | 206.25 | 0.0075 |
Importing a Microsoft Access Database
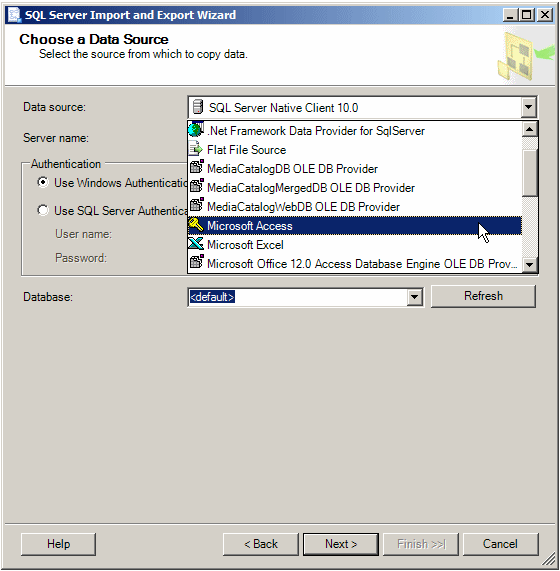
It is possible to import a Microsoft Access database but it is easier if the file is in the .mdb format.
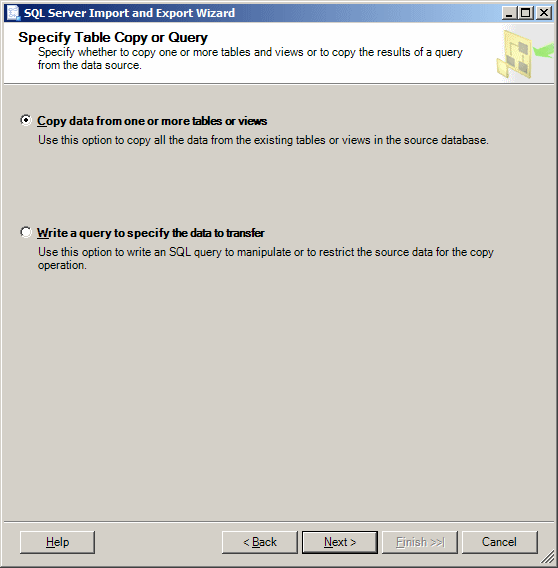
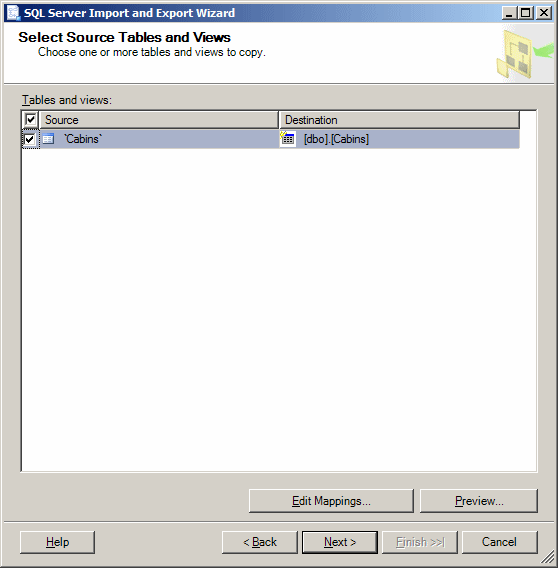
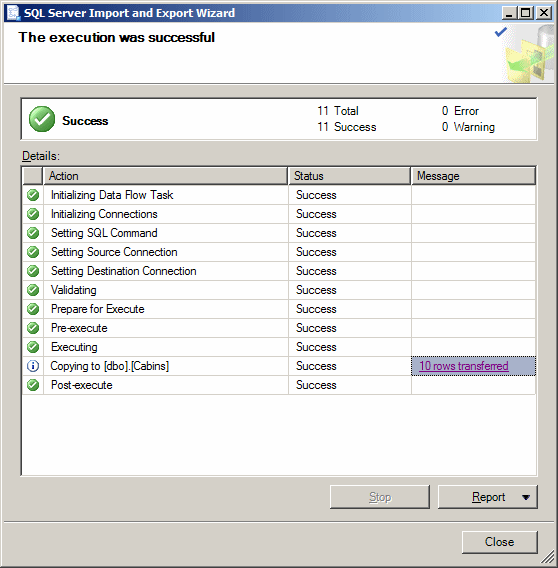
Practical Learning: Importing a Microsoft Access Database
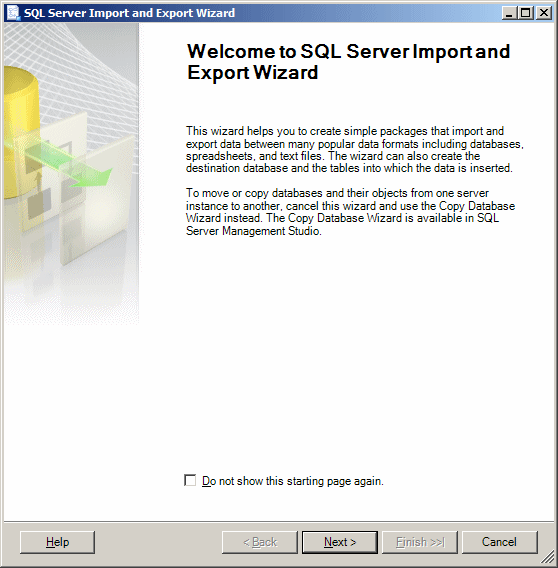
Practical Learning: Importing a Microsoft Excel Spreadsheet
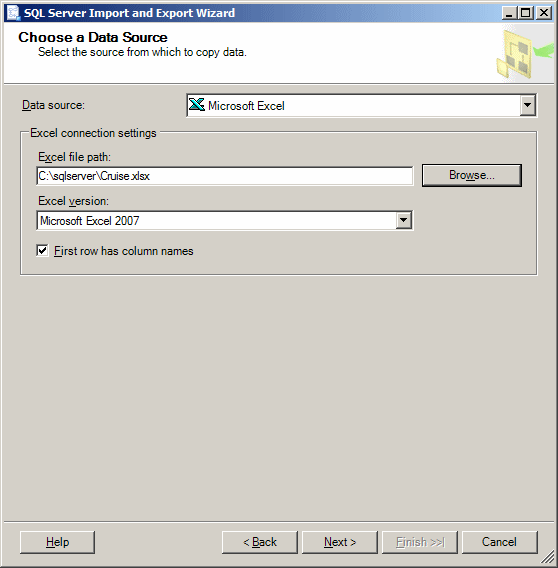
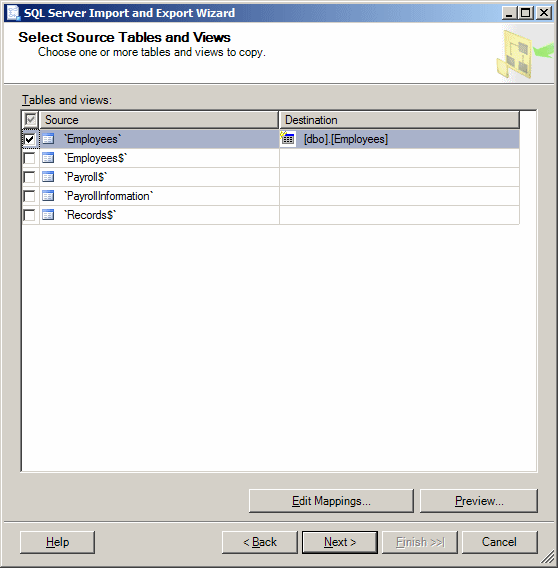
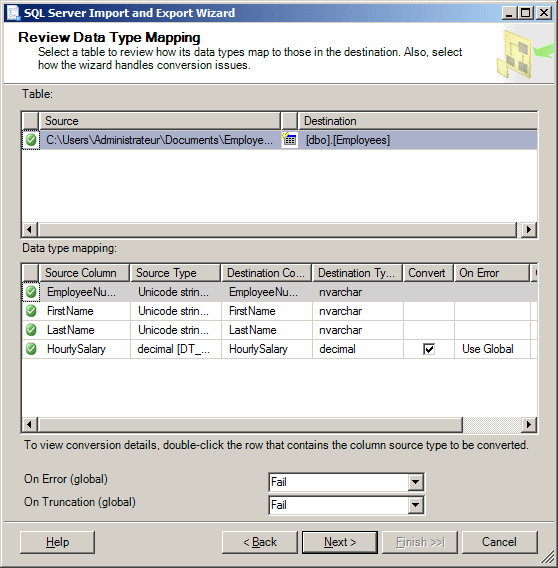
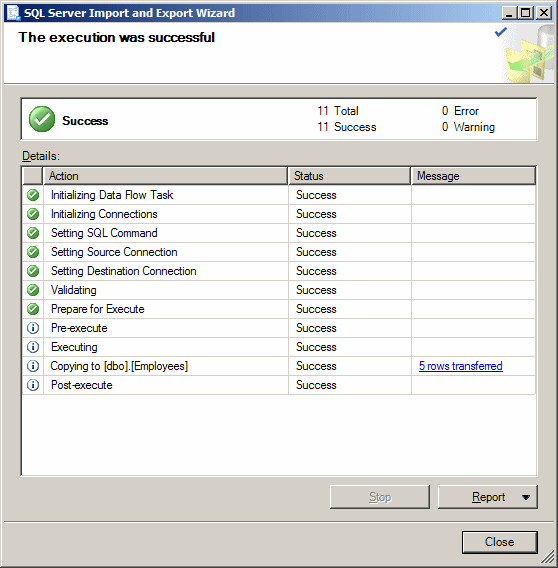
To import a text file that contains records:
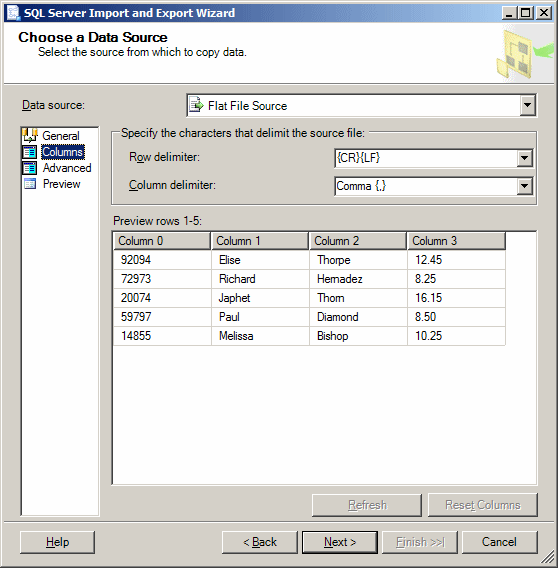
| Name | DataType | OutputColumnWidth |
| EmployeeNumber | Unicode string [DT_WSTR] | 20 |
| FirstName | Unicode string [DT_WSTR] | 20 |
| LastName | Unicode string [DT_WSTR] | 20 |
| HourlySalary | decimal [DT_DECIMA] |
|
|
|||
| Previous | Copyright © 2008-2026, FunctionX | Last Update: Friday 07 August 2026, 15:20 | Next |
|
|
|||