Introduction to the Tables of a Database

Introduction to the Tables of a Database
Tables Fundamentals
Introduction
A computer database is an application that contains one or more lists. A list is a series of values. In a formal database, a list is called a table. In some documents, a table is called an entity. In some other documents, a table is referrred to as a relation.
Microsoft SQL Server provides various means and tools to create tables. First of all, a table must belong to a database. This means that you must first choose the database that will own the table.
Visually Creating a Table
Before creating a table, in the Object Explorer, expand the Databases node and expand the database to which the table will belong. Right-click the Tables node, position the mouse on New, and click Table...
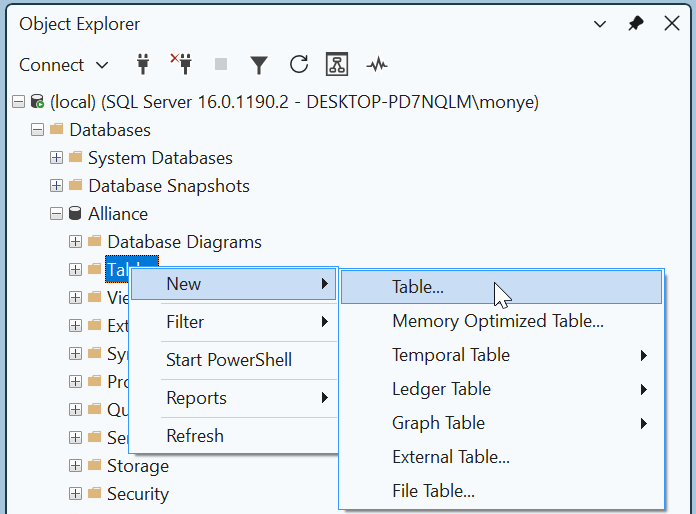
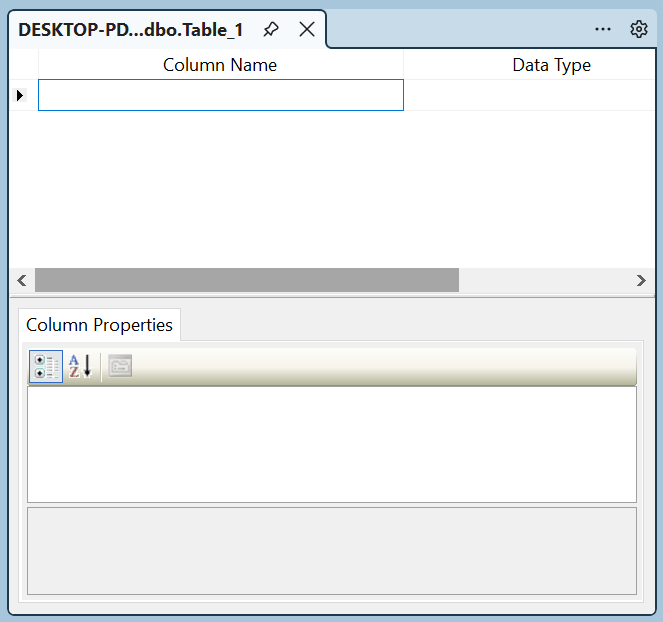
This would display a Table window:
 |
In our lessons, if you right-click the Tables node in the Object Explorer and click New Table..., the window that displays will be called the Table window. |
 |
To assist you with creating a table, the structured query language, SQL, provides an operation or a command, in its Data Definition Language (DDL). The command is CREATE TABLE and it is used in a formula that starts as follows: CREATE TABLE table-name . . . The CREATE TABLE expression is required. table-name specifies the name of the new table. |
Temporary Tables
After creating a table, it becomes part of its database and you can use that table over and over again. In some cases, you may want to create a table to test something and you would not need to use that table the next time you connect to the server. Such a table is referred to as a temporary table.
To create a temporary table, use the pound sign, #, after CREATE TABLE. Once the table has been created, it would be available as long as you are using the same connection to the server. If you close Microsoft SQL Server, the table would be automatically deleted.
Using Sample Code
To assist you with creating a table, Microsoft SQL Server can generate sample code for you. You can then simply modify or customize it. First display or open an empty Query Editor. To display the Template Explorer, on the main menu, click View -> Template Explorer. In the Templates Browser, expand the Table node. Under Table, drag Create Table and drop it in the Query Editor. Sample code would be generated for you.
Primary Characteristics of a Table
When creating a table, you must give it a name. If you are visually creating a table, if you decide to close it, you would be asked whether you want to save it. If you click Yes, you would be asked to give it a name.
The name of a table:
Besides these rules, you can make up yours. To avoid confusion, here are the rules we will use to name our tables:
You should avoid using the following reserved words of Transact-SQL when naming anything in your databases, including tables:
| add | all | alter | and | any |
| as | asc | authorization | backup | begin |
| between | break | browse | bulk | by |
| cascade | case | catch | char | check |
| checkpoint | close | clustered | coalesce | collate |
| column | commit | compute | constraint | contains |
| containstable | continue | convert | create | cross |
| current | current_date | current_time | current_timestamp | current_user |
| cursor | database | dbcc | deallocate | declare |
| default | delete | deny | desc | disk |
| distinct | distributed | double | drop | dump |
| else | end | errlvl | escape | except |
| exec | execute | exists | exit | external |
| fetch | file | fillfactor | float | for |
| foreign | freetext | freetexttable | from | full |
| function | geography | geometry | go | goto |
| grant | group | having | holdlock | identity |
| identity_insert | identitycol | if | in | index |
| inner | insert | int | intersect | into |
| is | join | key | kill | left |
| like | lineno | load | merge | money |
| national | nchar | nocheck | nonclustered | not |
| numeric | null | nullif | of | off |
| offsets | on | open | opendatasource | openquery |
| openrowset | openxml | option | or | order |
| outer | output | over | percent | pivot |
| plan | precision | primary | proc | |
| procedure | public | raiserror | read | readtext |
| reconfigure | references | replication | restore | restrict |
| return | revert | revoke | right | |
| rollback | rowcount | rowguidcol | rule | save |
| schema | securityaudit | select | semantickeyphrasetable | semanticsimilaritydetailstable |
| semanticsimilaritytable | session_user | set | setuser | |
| shutdown | some | SQLVariant | statistics | |
| system_user | table | tablesample | text | textsize |
| then | to | top | tran | |
| transaction | trigger | true | truncate | try |
| try_convert | tsequal | union | unique | unpivot |
| update | updatetext | use | user | values |
| varbinary | varchar | varying | view | waitfor |
| when | where | while | with | within group |
| writetext |
The Schema of a Table
As mentioned already, a schema is an object that contains other objects, such as tables. In fact, every table in Microsoft SQL Server must belong to a schema. When you are creating a table, you have the option of specifying or not indicating its schema. If you don't specify a schema, the default dbo schema would own it.
To visually specify the schema that will contain a table, in the Properties window, click Schema, then click the arrow of its combo box and select the desired schema:
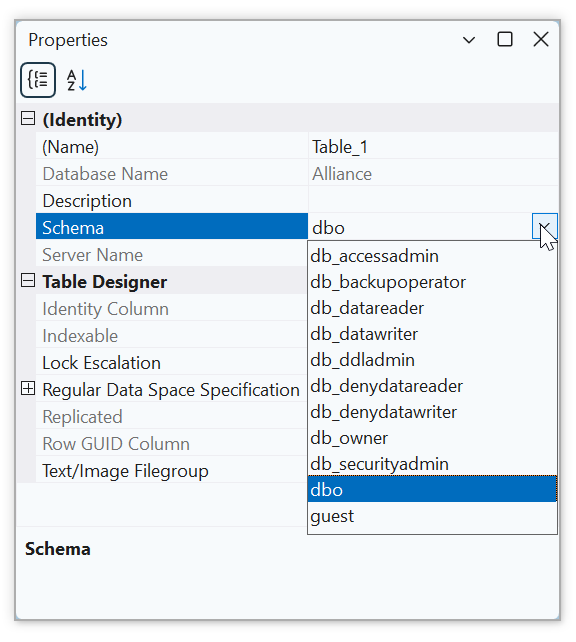
To specify the schema of a table using code, precede its name with the name of the schema followed by a period. The formula to use is:
CREATE TABLE schema-name.table-name...
An example would be:
CREATE SCHEMA Registration;
GO
CREATE TABLE Registration.Students . . .
Remember that if you don't specify a particular schema, the default dbo schema takes ownership of the table.
After creating a table, you can change its schema. To do this visually, open the table in Design view. In the Properties window, click the arrow of the Schema combo box and select the desired schema. You will receive a message box (based on the permissions):
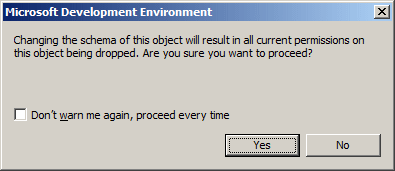
If you still want to change the schema, click Yes.
Tables Maintenance
Introduction
Table maintenance consists of reviewing or changing some of its aspects. This includes reviewing the list of tables of a database, renaming a table, or deleting it.
Viewing the Properties of a Table
Like every other object of a database or of the computer, a table possesses some characteristics that are proper to it. To view these characteristics, in the Object Explorer, right-click the table and click Properties.
Most operations require that you open a table before using it. There are various ways a table displays, depending on how you want to examine it:
|
|
In our lessons, if you right-click a table in the Object Explorer and click Design, the window that displays will be referred to as the Design View of a table. |
Modifying the Design of a Table
Probably the most routine operation you will perform on a table is to change its design. This is usually easily done after you have opened the table in Design view. You can then change what you want. After making the change(s), you must save the table. Depending on how your database is configured, you may receive an error as "Saving changes is not permitted...":
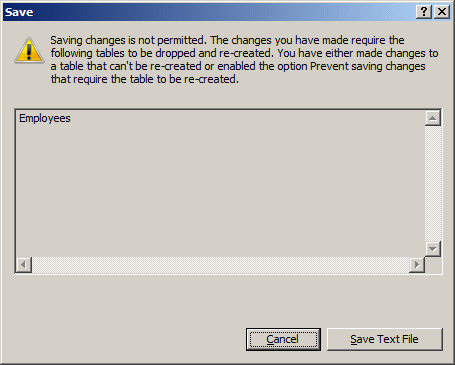
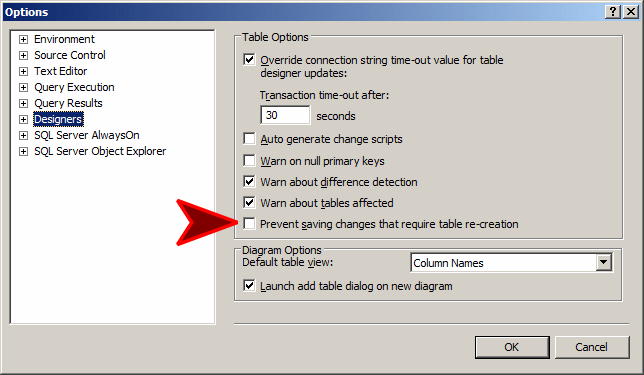
To avoid this error and make it possible to modify tables, on the main menu of SQL Server Management Studio, click Tools -> Options... In the left tree list of the Options dialog box, click Designers. In the Table Options, clear the Prevent Saving Changes That Require Table Re-Creation check box:
Tables Review
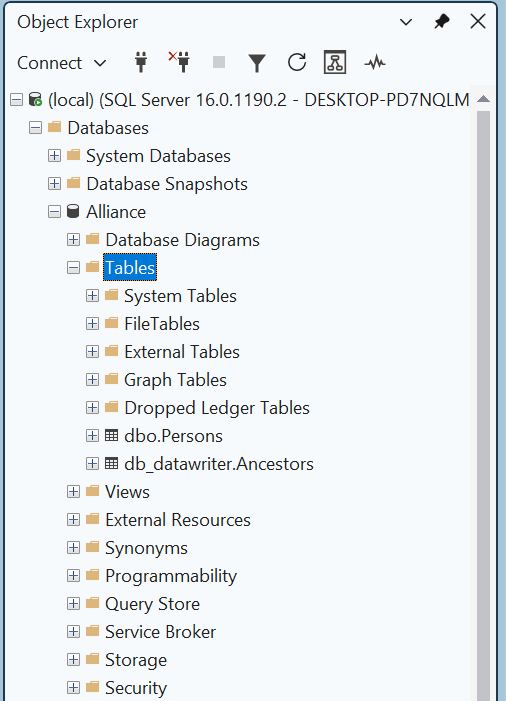
To see the list of tables of a database in the Object Explorer, you can click the Tables node:
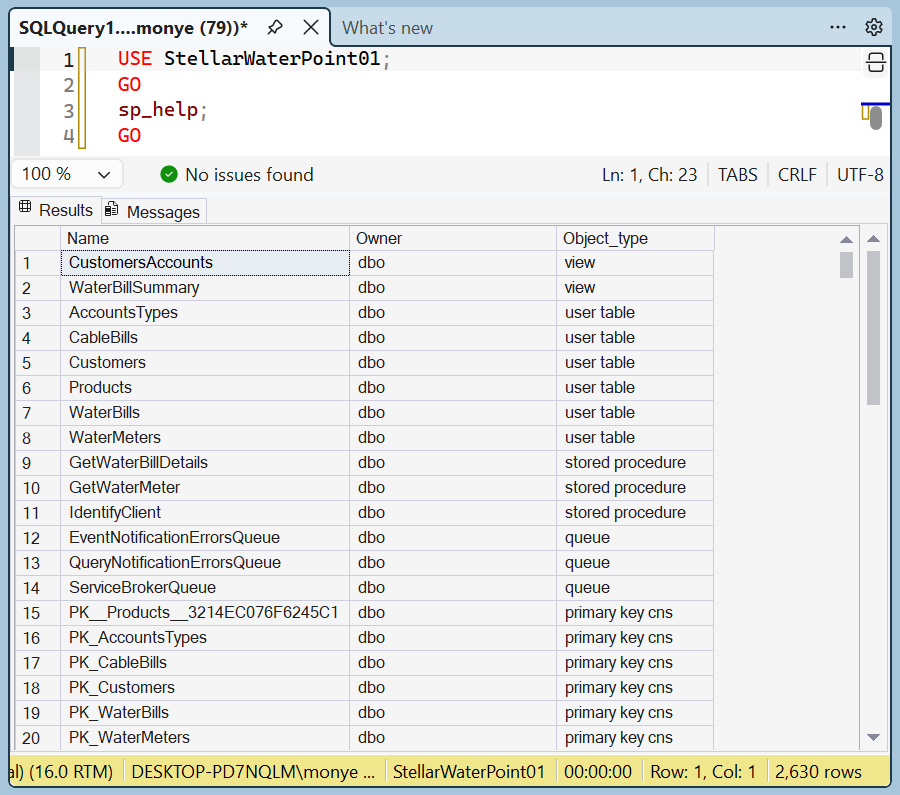
To see the list of tables of a database using SQL, in a Query Editor, specify the database (using a USE statement). On the next line, type sp_help and execute it. Here is an example:
Renaming a Table
|
If you find out that the name of a table is not appropriate, you can change it:
|
 |
If you have an undesired table in a database, you can remove it:
DROP TABLE table-nameThe DROP TABLE expression is required and it is followed by the name of the undesired table. When you execute the statement, you will not receive a warning before the table is deleted
You can also use sample code that Microsoft SQL Server can generate for you. First display an empty Query Editor. Also display the Templates Explorer and expand the Table node. Under Table, drag Drop Table and drop it in the empty Query Editor. Sample code would be generated for you. You can then simply modify it and execute the statement.
Referring to a Table
In your database development assignments, you will write expressions that involve the names of tables. In those expressions, you will need to specify a particular table you want to use. There are three main ways you can do this. To refer to, or to indicate, a table:
Columns Fundamentals
Introduction
As mentioned already, a table is a list of values. Because the values are presented in a vertical arangement, the vertical arangement is also called a column. A table can contain many columns. In reality, the columns provide a way to better organize the table. Here is an example:
| Name | Age | Gender | Relationship |
| Judie | 18 | Female | Sister |
| Ernest | 24 | Male | Cousin |
| Bill | 52 | Unknown | Uncle |
| David | 36 | Male | Brother |
| Hermine | 12 | Unknown | Niece |
Because a column is a characteristic of a table, it is also called an attribute.
Visually Creating a Column
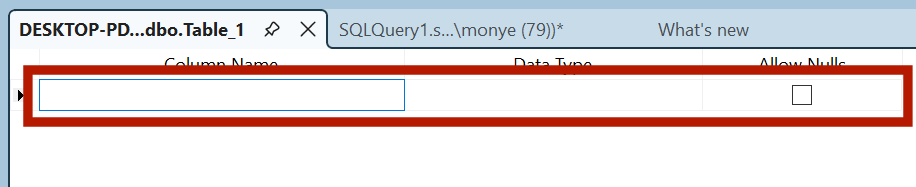
You can create a column when designing a table or using code. To visually create a column, while the table is displaying in Design View, specify the characteristics of the column using the section on the right side of the right-pointing row header:
Creating a Column Using Code
We saw that the primary formula to create a table was:
CREATE TABLE table-name
After specifying the name of the table, you must list the columns of the table. The list of columns starts with an opening parenthesis "(" and ends with a closing parenthesis ")". Each column must be separated from the next with a comma. You can include all columns on the same line if possible as follows:
CREATE TABLE [schema-name.]table-name(Column1, Column2, Column3)
Alternatively, to make your statement easier to read, you should create each column on its own line as follows:
CREATE TABLE [schema-name.]table-name(
Column1,
Column2,
Column3);
You can also indent the columns definitions:
CREATE TABLE [schema-name.]Country
(
    Column1,
    Column2,
    Column3
);
There are two primary pieces of information you must specify for each column: its name and its type. Therefore, the syntax of creating a column is:
ColumnName type options
We also saw that you could use sample code to create a table. This allows you to have more control over the various columns you want the table to have. To do this, open an empty Query Editor and display the Templates Explorer. Expand the Table node. Under Table, drag Create Table, Add Column, or Drop Column, and drop it in the Query Editor. If you use dropped Add Column or Drop Column, you can delete the undesired sections of the code and isolate only the part that handles table creation. Here is an example:
--==========================================================================
-- Add column template
--
-- This template creates a table, then it adds a new column to the table.
--==========================================================================
USE <database, sysname, AdventureWorks>
GO

CREATE TABLE <schema_name, sysname, dbo>.<table_name, sysname, sample_table>
(
	column1 int,
	column2 char(10)
)
GO
Like everything in a database, a column must be identified; that is, a column must have a name. If you are visually creating a table, to specify the name of a column, use a cell under Column Name.
The name of a column:
After respecting these rules, you can add your own rules. In our lessons, here are the rules we will use to name our columns:
You should avoid using Transact-SQL reserved words when naming the columns of your tables.
There are some other words you should avoid. If you really want to use one of those words, include the name in double-quotes, such as "Address", or between square brackets: [ and ]. An example would be [Address]. In reality, you can include any column name in double-quotes or in [].
Columns Review
Introduction
To see the structure of a table in the SQL Server Management Studio, in the Object Explorer, you can expand it:
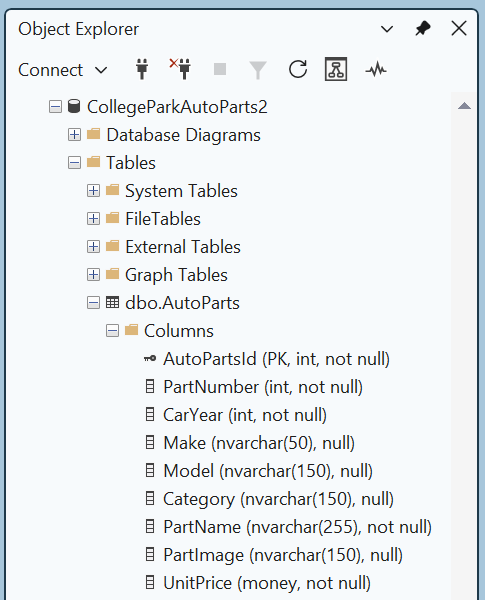
To view the columns of a table using SQL code, in a Query Editor, type sp_columns followed by the name of the table the columns belong to. Then execute the code. Here is an example:
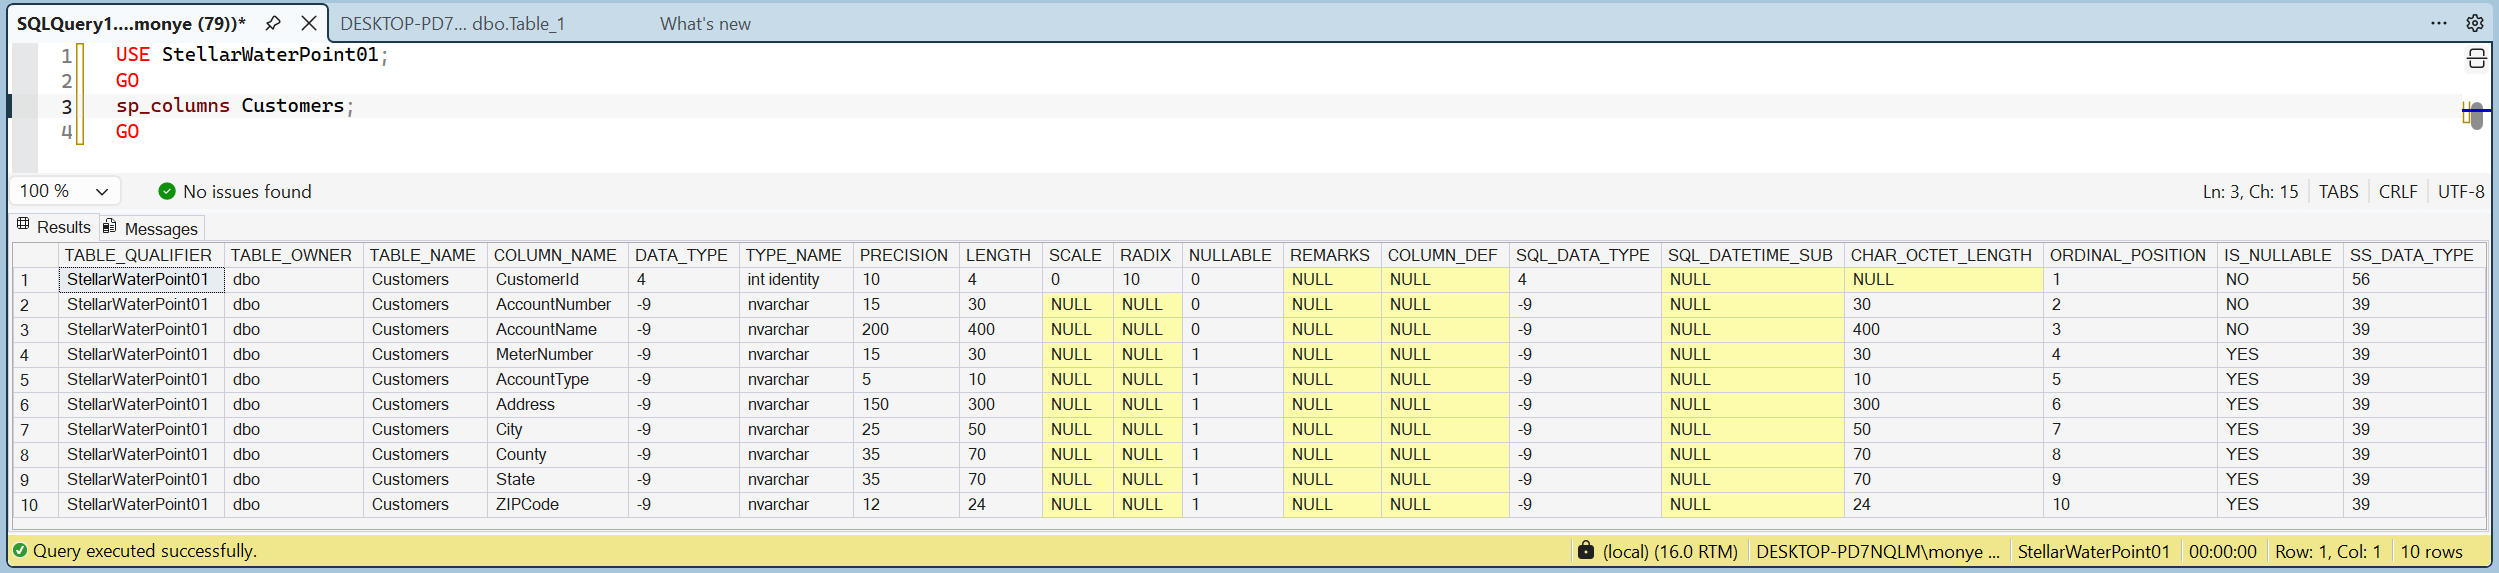
The bottom section displays the list of columns in the COLUMN_NAME column and other characteristics on the right columns.
The Properties of a Column
A column on a table controls the kind of data that is appropriate for that particular column. The characteristics that identify or describe such a table are defined as its properties. Two primary properties are particularly important and they are required for each column: the name and the data type. Besides these, some other properties can be used to further control the behavior of a field.
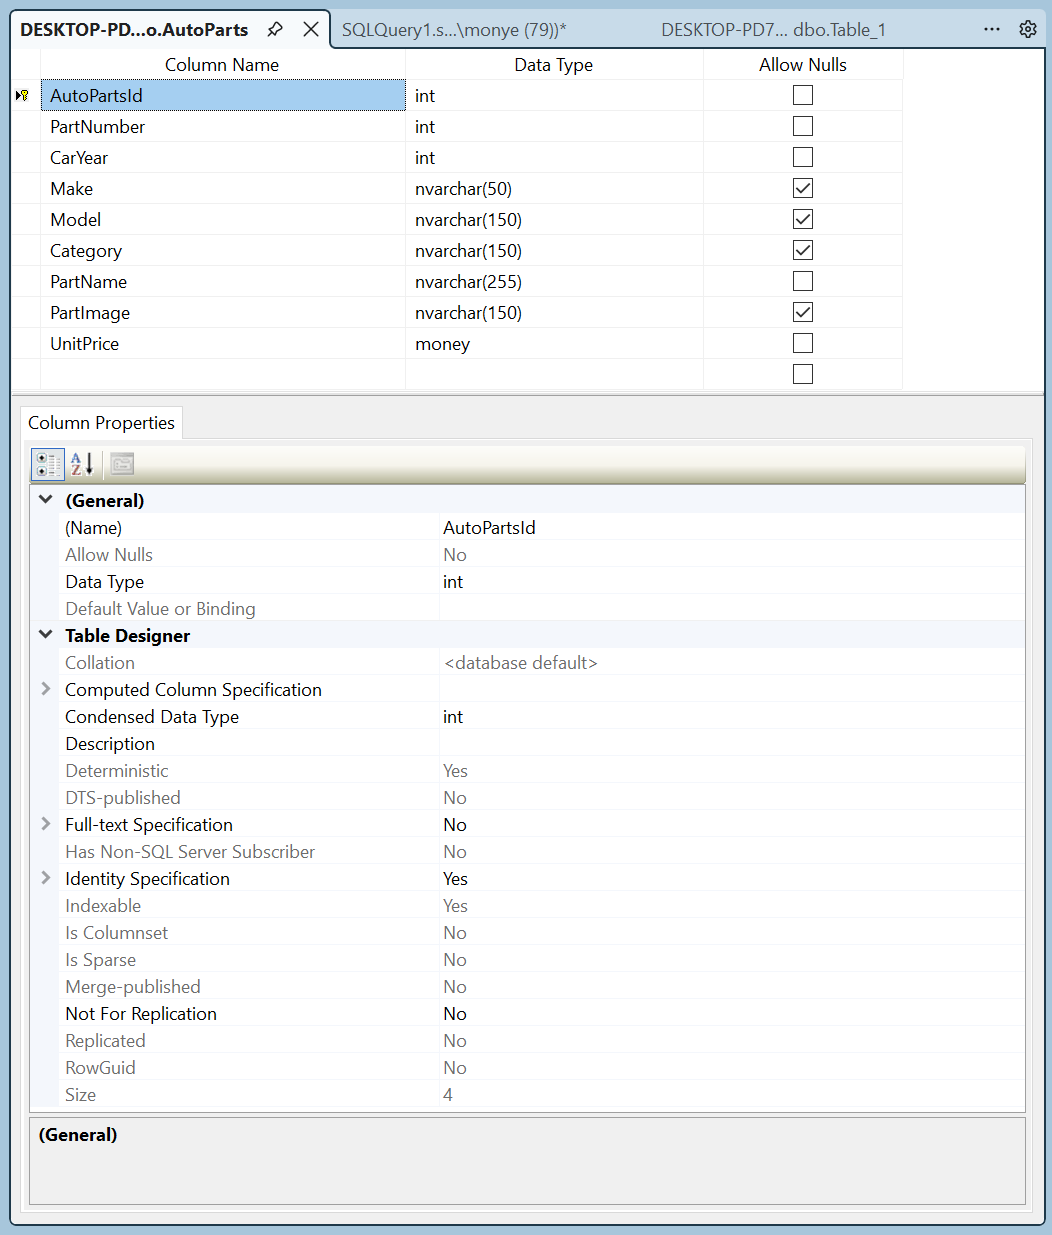
Besides the name and data type, you can control the columns of a table using the Columns property sheet in the lower section of the table in Design View. These properties sometimes depend on the data type of the column. Therefore, to specify the properties of a column, you must first select it in the upper section of the table. This selection can be done by just clicking either the name or the data type. Then you can click the first field in the lower section, select the desired property and type the necessary value:
As an alternative to using the Design View of a table, to see the characteristics of a column, in the Object Explorer, expand the database and the Tables node. Expand the Columns node:
Any of these actions would display the Column Properties dialog box:
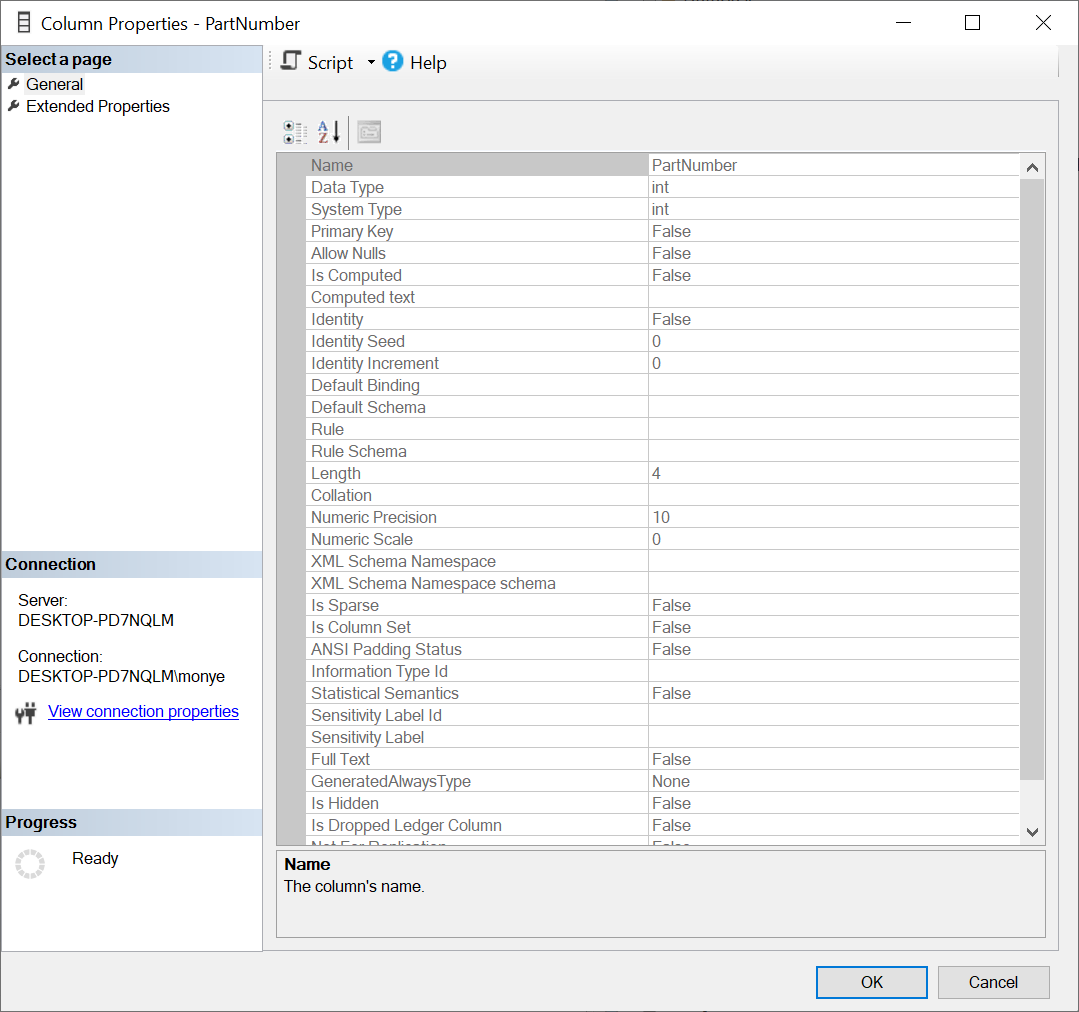
Another way to see the properites of a column is by calling the COLUMNPROPERTY() function. Its syntax is:
COLUMNPROPERTY(id, column, property) RETURNS int/bit;
The COLUMNPROPERTY() function takes three argument and all are required. The function produces a value that depends on the type of information you want. It can produce an integer or a Boolean (bit) value.
The first argument is the integral identifier of the table that holds the column. The second argument is the name of the column. The third section specifies the type of information you want. For example, to know the maximum number of characters that a character-based column allows, you can pass the third section as PRECISION (case-insensitive).
Description
Common and enabled for all fields, the description is used for a sentence that describes the column. You can type anything on that field.
Because different human languages use different mechanisms in their alphabetic characters, this can affect the way some operations are performed on data, you can ask the database to apply a certain language mechanism to the field by changing the Collation property. Otherwise, you should accept the default specified by the table.
To specify the collation of a column when creating in, type COLLATE, followed by the desired collation code. Here is an example:
CREATE TABLE Customers(
    FullName nvarchar(50) COLLATE SQL_Latin1_General_CP1_CI_AS
);
Columns Maintenance
Introduction
Column maintenance consists of reviewing or changing any of its aspects. This includes reviewing the structure of columns of a table, renaming a column, deleting a column, changing the data type or the nullity of a column, etc. When making a change on a column, you are also said to alter the table. One of the operations involved with modifying a column consists of changing its data type. To support this operation, the SQL starts with the following formula: ALTER TABLE table-name When using this statement, the ALTER TABLE expression is required and it is followed by the name of the table. |
 |
Adding a New Column
After a table has already been created, you can still add a new column to it.
To visually add a new column in SQL Server Management Studio, in the Object Explorer:
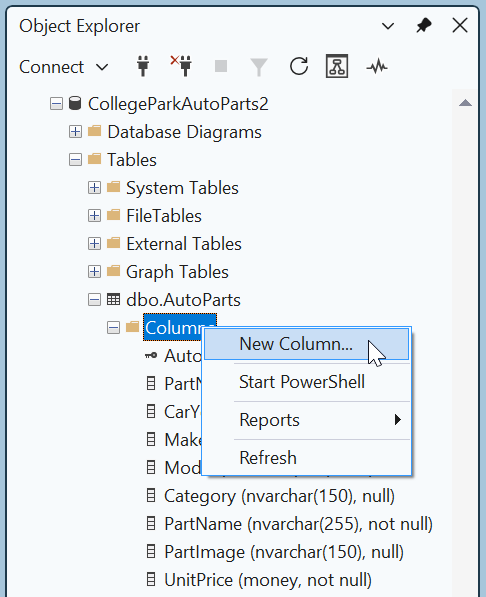
In both cases, in the empty bottom field, enter the necessary information. In SQL, the basic formula to add a new column to a table is:
ALTER TABLE table-name
ADD ColumnName Properties
ColumnName is required. In fact, on the right side of the ADD word, define the column by its name and using all the options we reviewed for columns. Here is an example:
ALTER TABLE StaffMembers
ADD Gender nchar;
GO
When this code executes, a new column named Gender of type nchar will be added to a table named StaffMembers in the current database.
You can also use sample code to add a new column to a table. First display an empty Query Editor and display the Templates Explorer. Expand the Table node. Under Table, drag Add Column and drop it in the Query Editor. Delete the undesired sections of code and keep only the part that deals with adding a column. Here is an example:
--==========================================================================
-- Add column template
--
-- This template creates a table, then it adds a new column to the table.
--==========================================================================
USE <database, sysname, AdventureWorks>
GO

-- Add a new column to the table
ALTER TABLE <schema_name, sysname, dbo>.<table_name, sysname, sample_table>
	ADD <new_column_name, sysname, column3>
	    <new_column_data-type,, datetime>
	    <new_column_nullability,, NULL>
GO
Inserting a New Column
To visually insert a new column between two existing ones, right-click the column that will succeed it and click Insert Column:
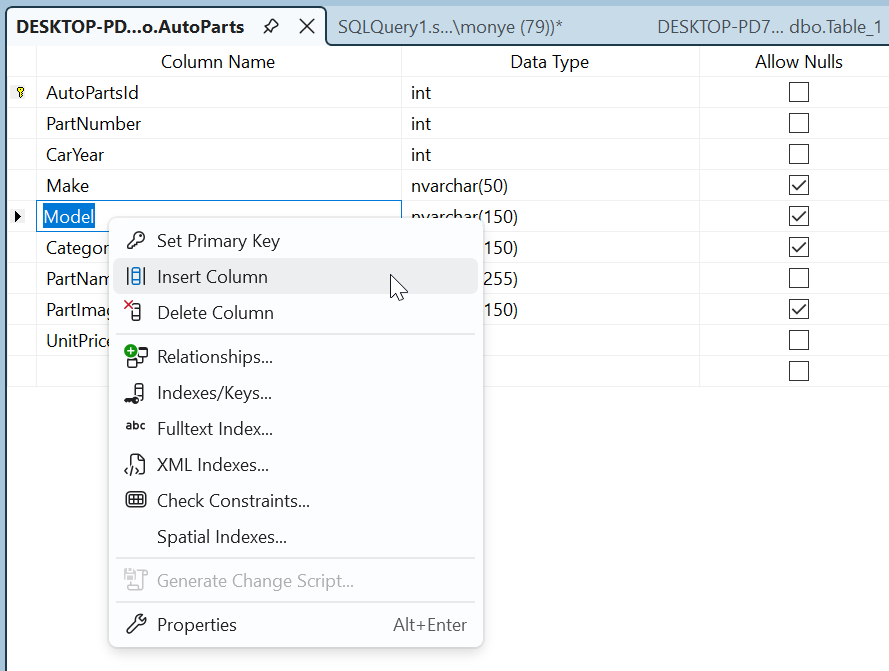
This would create a new empty field. Type the desired name and specify the other options.
Renaming a Column
If you find out that the name of a column is not appropriate, you can change it.
To visually rename a column, in the Object Explorer:
In Microsoft SQL Server Managemen Studio, to change the name of a column, first open an empty Query Editor. In a Query Editor, use the following formula of sp_rename:
sp_rename 'table-name.ColumnName', 'NewColumnName', N'COLUMN'
Then execute the statement. sp_rename and 'COLUMN' are required. table-name is the name of the table that the column belongs to. ColumnName is the current name of the column. NewColumnName is the desired name you want to give to the column. Here is an example:
sp_rename N'StaffMembers.FullName', N'EmployeeName', N'COLUMN';
GO
When this code executes, the interpreter will look for a column named FullName in the StaffMembers table of the current or selected database. If it finds that column in the table, then it renames it EmployeeName.
Changing the Data Type of a Column
To visually change the data type of a column, open the table in Design View, locate the column under Column Name, and change its type under Data Type.
The formula to programmatically change the data type of a column is:
ALTER TABLE table-name
ALTER COLUMN ColumnName Newdata-type
Here is an example:
CREATE SCHEMA HumanResources;
GO
CREATE TABLE HumanResources.Genders
(
    Gender char
);
GO
ALTER TABLE HumanResources.Genders
ALTER COLUMN Gender tinyint;
GO
Deleting a Column
If you have an undesired column that you don't want anymore in a table, you can remove it:
ALTER TABLE table-name
DROP COLUMN ColumnName
On the right side of the ALTER TABLE expression, type the name of the table. On the right side of the DROP COLUMN expression, enter the name of the undesired column. Here is an example:
ALTER TABLE StaffMembers
DROP COLUMN CurrentResidence;
GO
When this code executes, the interpreter will look for a column named CurrentResidence in a table StaffMembers of the current or selected database. If it finds that column, it will remove it from the table.
Microsoft SQL Server can also generate sample code you can use to delete a column from a table. Before doing this, first display an empty Query Editor and display the Templates Explorer. Expand the Table node. In the Table section, drag Drop Column and drop it in the Query Editor. Delete the undesired sections of code and keep only the part that deals with adding a column. Here is an example:
--============================================
-- Drop column template
--
-- This template creates a table, then it
-- drops one of the columns of the table.
--============================================
USE <database, sysname, AdventureWorks>
GO

-- Drop a column from the table
ALTER TABLE <schema_name, sysname, dbo>.<table_name, sysname, sample_table>
	DROP COLUMN <new_column_name, sysname, column3>
GO
|
|
|||
| Previous | Copyright © 2000-2026, FunctionX | Last Update: Wednesday 05 August 2026, 12:53 | Next |
|
|
|||