Home

Introduction to Data Sheets

Creating a Database

The Database Wizard

Many techniques allow you to create a database, the fastest of which consists of using one of the provided examples. Microsoft Access 97 shipped with 22 sample databases while Microsoft Access 2000 ships with 10. Furthermore, the 97 version allowed to provide sample data into the database. This is not available with the 2000 release. The databases that ship with Microsoft Access can help you in two main ways: they provide a fast means of creating a database and you can learn from their structure.

Data Wizard

To create a database using one of the samples, there is a little detail to follow depending on whether you had launched the program already or not. If Microsoft Access is not running, you can start it. When the first dialog box comes up, you can click the second radio button: Access Database Wizard, Pages, And Projects and click OK. If the program is already on your screen, on the menu bar, click File -> New Database…

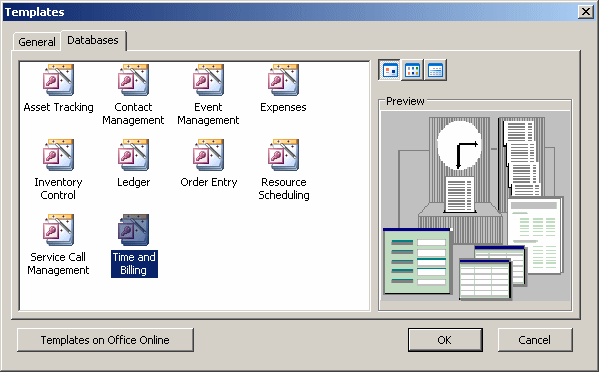
The New dialog box displays two property pages labeled General and Databases. If you want to create a database based on one of the samples, you can click the Databases property page. A list of the sample databases appears. You can then choose one and click OK.

When creating a database using one of the samples, depending on the sample you selected, the Database Wizard will display a few objects and suggest some fields for your database. Some fields are already associated with the objects and some other fields can be added. You can examine them, then add some fields you think are important for your database. You will also have the option of selecting a design layout. Some of the sample databases have been configured to require information about the company you are creating the database for..

 
Notes
An application is said to be running if it is displaying on your screen.
Notes
If you have both Microsoft Access 97 and Microsoft Access 2000 installed on your computer, the New dialog box would display 3 property pages.

Practical Learning: Creating a Database Using a Sample
  1. Start Microsoft Access if necessary
  2. To create a new database from a template, on the right side, click Create A New File
  3. Under Templates, click On my computer...
  4. In the Templates dialog box, click the Databases tab and click Time and Billing
     
    Templates: Time and Billing
  5. Click OK
  6. Delete the content of the File Name text box of the File New Database dialog box and type Rockville Techno and click Create
  7. When the first page of the wizard comes up, click Next
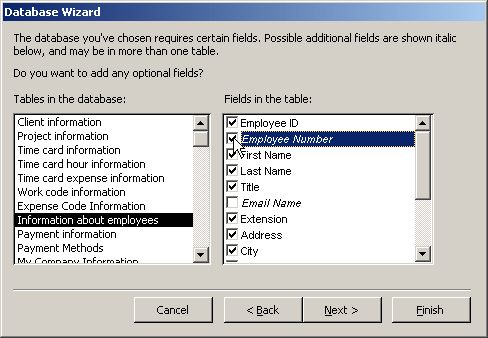
  8. For this exercise, on the Tables In The Database list box, click Information About Employees:
  9. On the Fields In The Table list, click the Employee Number check box
     
    Database Wizard
  10. Click the check box of Email Name
  11. Scroll down and click the Home Phone check box
  12. Click Next
  13. For the style of the screen display, choose International to preview one of the samples and click Next
  14. For the style of the printed report, click Bold to preview that display
  15. Click Formal and click Next
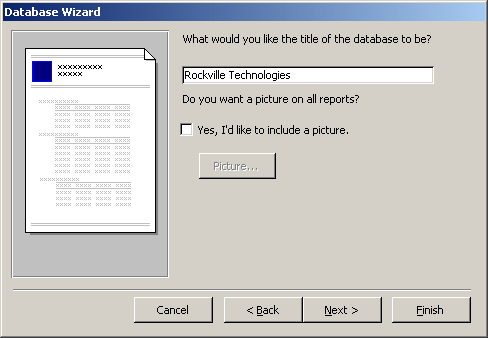
  16. For the title of the database, type Rockville Technologies
     
    Database Wizard: Setting the Title of a Database
  17. Click Next
  18. Then click Finish
    While the Database Wizard is creating a database for you, dialog boxes will be flashing from time to time. If you don't have a printer, a nasty dialog box will be giving an error. If this happens, click OK all the time. In this case, after this lesson, use the Add Printer wizard from the Printers window to install a "fake" printer. One way or another, Microsoft Access needs a printer for the reports
  19. When asked to provide information about your customer, click OK
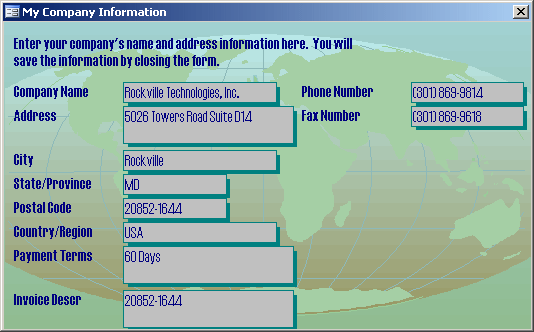
  20. In the Company Name text box, type Rockville Technologies, Inc. and press Enter
  21. In the Address text box, type 5026 Towers Road Suite D14 and press Enter
  22. In the City text box, type Rockville and press Enter
  23. In the State field, type Maryland and press Tab
  24. In the Postal Code field, type 20852-1644 and press Tab
  25. In the Country field, type USA and press Tab
  26. In the Payment Terms, type 60 Days
  27. Click the Invoice Description field and type For more information on our company, visit us at http://www.rockvilletechnologies.com
  28. Press Tab
  29. In the Phone Number field, type (301) 869-9814 and press Tab
  30. In the Fax Number field, type (301) 869-9618
     
    Rockville Techno: Company Information
  31. After entering the necessary data for your customer, to close the company's form, click its system Close button
  32. Notice that the database opens with the switchboard.
    To close the switchboard, click its system Close button
  33. On the lower left corner of MS Access, click the bar of the Database window and, on the menu that appears, click Restore

Database Properties

Your screen may be made of a large box at this time: this is the Switchboard, and it is a form. A special window you will be using most regularly is called the Database Window. Whenever it is minimized or hidden, you can display it by pressing F11 (unless it has been configured to (almost) never display).

Whether you work alone or in a group, communication and documentation are important. Your database project has its own properties that you can

use to find out some details about your file, to enter some notes about the project, or to give directives to other people who have access to the database. 

Practical Learning: Using Microsoft Access

  1. The Rockville Technologies database should still be opened
    To display the Database Window, press F11
  2. On the main menu, click File and observe the menu items under File
  3. While the File menu is still selected, move the mouse to Tools and click Startup… 
  4. The Startup dialog box allows you to set some settings that the current database will follow when it starts.
    In the Application Title, type Rockville Technologies, Inc.
  5. Click the arrow of the Display Form/Page combo box and select (None). In case you wonder why (None) is between parenthesis, this is done so that if there are other things in the list, None would always be on top of the list. That way, it would not be between two other objects (forms and Data Access Pages) on the list.
  6. Click the browse button of the Application Icon text box
  7. On the Icon Browser dialog box, locate the folder that holds the resources for our lessons
  8. Click the Rockville Techno icon and click OK
  9. Accept all the other defaults:
     
  10. Click OK
  11. Notice that, on the title bar, the database is now using another icon than the default one
  12. On the main menu, click Tools -> Options…
  13. The Options dialog box allows you to control some settings that are related to Microsoft Access.
    For example, click the General tab
  14. Change the content of the Default Database Folder text box to the Exercises folder you will be using throughout our lessons
  15. Increase the Recently Used File List combo box to 8
     
  16. Click OK
  17. As mentioned already, each toolbar on the database has a particular name. To find out the name of the current toolbar, right-click any button on it
  18. Notice that the Database name has a check box. This means that toolbar is displaying at this time. In this case, this toolbar is called the Database Toolbar
  19. On the menu bar, click File -> Database Properties
  20. Once more, from the menu bar, click File -> Database Properties
  21. From the Properties dialog, click the General tab. Examine the various sections. Notice the size of the current database
  22. Click the Summary tab
  23. Make sure the Title is set to Rockville Techno
    Click the Subject text box and type Business Regular Activities 
  24. Click the Author text box and type Lucien Durand
  25. Click the Manager text box and type Christine Lotts
  26. Click the Company text box and type Rockville Technologies, Inc.
  27. Click the Category text box and type Business
  28. Click the Keyword text box and type business, clients, projects, transactions
  29. Click the Comments text box and type: This software product is used by the company to conduct its regular business activities and related transactions. For more information, contact Lucien Durand or Christine Lotts. Refer to the Address Book for their phone number, extension, and E-Mail Address.
  30. Click the Hyperlink Base text box and type http://www.rockvilletechnologies.com
     
  31. Click the Statistics, Contents, and Custom property pages and review their contents.
    The Statistics tab gives you statistics about your database and its summary access.
    The Contents tab shows a list of the components that are part of your database.
    The Custom tab shows, and allows you to customize, the field names associated with your database.
  32. When you have finished working with the database Properties, click OK (if you click Cancel, any change(s) you have made will be discarded/ignored)


Note
The Startup dialog box allows you to customize settings of your database such as what form or page should display when the database starts, etc.


Note
The Options dialog controls most settings related to Microsoft Access as a software product.


Previous Copyright © 2002-2016, FunctionX, Inc. Next