 |
Tables Fundamentals |
|
The Table Wizard
 |
Microsoft Access is filled with wizards which are step-by-step dialog boxes that allow you to create objects or fields on a database. Like the Database Wizard, Microsoft Access provides the Table Wizard used to easily create a table. It allows you to add fields that are necessary for a particular table. The fields have been configured in the general sense so you can use them in your database. Of course you can modify any field that was created using |
the wizard.
To use the Table Wizard, on the main menu, you can click Insert -> Table. Alternatively, on the Database Window, when in the Tables section, you can click the New button. These two actions would display the New Table dialog box from where you would select Table Wizard.
If you are using Microsoft Access 2000 and later, from the Tables section of the Database Window, you can double-click Create Table By Using
Wizard

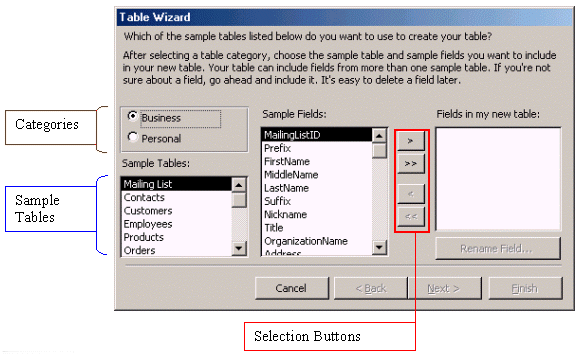
In the Table Wizard, the tables are organized in two
primary categories: Business and Personal. To select one of those categories,
you can click its radio button. Each main category is made of various sample tables. To select a sample table, you can click its name in the
Sample Tables list. In the middle, the Sample Fields list, the fields associated with the selected sample table are displaying. From that list, you
can select the desired field(s). Once a field has been selected, it displays in the
Fields In My New Table list. You can then select a different table to mix fields from as many tables as desired. The 4 buttons between the
Sample Fields list and the Fields In My New Table list allow you to add or subtract fields. To help with selection and de-selection, the wizard provides four buttons:
|
| Button |
Role |
 |
Used to select one field |
 |
Used to select all fields from the sample table |
 |
Used to deselect one field |
 |
Used to deselect all fields |
|
During field selection, if you select a field, its corresponding name appears in the right list. If you select a field of the same name more than once, for example, if you select Address twice, the 2nd
Address would be called Address1. Sometimes that will be what you want, and sometimes it will be by mistake. If you make a mistake when selecting fields, you can double-click the unwanted field in the
Fields In My New Table list and that field will be removed.
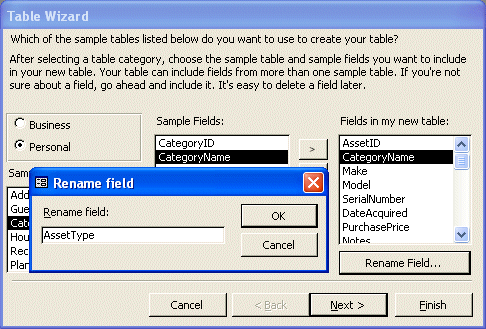
After making your choices, you can keep the names provided by Microsoft Access into your table, or you can rename any field to suit your needs. To rename a field, first select it in the
Fields In My New Table list. Then, click the Rename Field button. In the Rename Field dialog box, type the desired name and click
OK:

If you try providing a name for a field that already exists, you would receive an error:

 Practical Learning: Using the Table Wizard
- The Rockville Techno database should still be opened
In the Database Window, click the Tables button
- Double-click Create Table By Using Wizard. (If you are using MS Access 97, from the Tables tab, click New and double-click Table Wizard). The Table Wizard starts
- Click the Business radio button if necessary
In the Sample Tables list box, scroll down and click Assets
- In the Sample Fields, click AssetID and click the Select One Field button

- From the Sample Fields, double-click Make, Model,
ModelNumber, SerialNumber, DateAcquired, and PurchasePrice
- In the Sample Tables, scroll up and click Mailing List
- In the Sample Fields, scroll down and double-click Notes
- In the Fields In My New Table list, click ModelNumber to select it and click the Remove One Field button

- Click the Personal radio button
- In the Sample Tables, click Categories
- In the Fields In My New Table list, click AssetID to select it
- From the Sample Fields, double-click CategoryName
- In the Fields In My New Table list, click CategoryName to select it and click the
Rename Field… button
- In the Rename Field, change the Field Name to AssetType

- Click OK
- Click Next
- Change the name of the table to CompanyAssets
- Click Next twice and click Finish
- To close the CompanyAssets table, click its system Close button

|
Data is entered in a table by typing it into cells. Some fields can be configured to accept some
types of data and reject others. Some other fields would allow anything. This depends on how the database fields were setup.
A table's cell holds one particular unit of data. All cells on the same (vertical) column belong to the same category of information. The horizontal range of cells is called a record; and all cells on this range belong to the same record. |
 |
|
After typing data into a cell, you can press Enter or Tab to move the cursor to the next cell. In many circumstances you will also be able to move to the next cell by pressing the right arrow key. Sometimes you can move to the next record even if the current record is not completed. In this case, you could press the down arrow key.
There are three kinds of fields or cells the user will face: a field in which the user can type data, a field that displays a list
such as a combo box the user has to select from, and a field that does not receive input from the user. The latter is usually set for an AutoNumber data type: the database itself keeps track of the numbers. If you as the user have to select from a list, click the field that holds the list and select from the combo box. There are two kinds of combo boxes, those that accept new entries from the user and those that allow only a selection from a preset list. The classic field allows the user to just type the appropriate data in a field.
After setting the data in a particular field, you can click another cell and type the desired data. The easiest way is to press the right arrow key to move to the next field or the left arrow to move to the previous
field; pressing Enter would work as well.
Data on the same row represents a record. Data on the same column represents a category. After typing data, if you press Enter at the end of a record, the cursor would move to the beginning of the next record. At anytime, you can press the up arrow key to move to the same category field of the previous record. If you press the down arrow key, the same category of the next record would receive focus.
|
 Practical Learning: Table's Data Entry
|
- The Rockville Techno database should still be opened
On the Database window, while in the Tables section, double-click the CompanyAssets table to display it
- Click the first empty field under AssetType and type Printer
- Press Enter and type HP
- Press Tab and type LaserJet 4200dtn
- Click the empty box under Date Acquired and type 10/08/2002 or
10/08/02 depending on how your computer is setup (we will discuss this
during Database Maintenance but for now, if your computer is configured for a two-digit year, enter only the right two digit of the year)
- Complete the table as follows:
|
AssetType |
Make |
Model |
Date Acquired |
Purchase Price |
Notes |
|
Printer |
HP |
LaserJet 4200dtn |
10/08/2002 |
1950.95 |
B/W Printer |
|
Computer |
IBM |
NetVista M42 |
10/08/2002 |
1035.00 |
|
|
Laptop |
Gateway |
200XL |
12/05/2002 |
2095.95 |
Business Notebook |
|
Printer |
Xerox |
Phaser 8200 |
10/22/2002 |
1250.55 |
Color Printer |
|
Digital Camera |
Olympus |
C-50 |
11/06/2002 |
450.75 |
|
|
Computer |
IBM |
ThinkCentre S50 |
10/08/2002 |
1055.55 |
|
- Close the CompanyAssets table
- On the Database window, right-click the Payment Methods
table and click Open
- Complete it as follows:
|
Payment Method ID |
Payment Method |
Credit Card? |
| 1 |
Check |
No |
| 2 |
Cash |
No |
| 3 |
Money Order |
0 |
| 4 |
Visa |
1 |
| 5 |
Master Card |
-1 |
| 6 |
American Express |
58 |
- Notice that the 0 value changes into No and any other number changes
into Yes
- To close the Payment Methods table, click its system Close button

- On the Database window, double-click the Employees table to open it
- Click the first empty field under Last Name, type Phillips and press Enter
- Perform data entry, skipping other fields
- Close the table after performing data entry
|
|
The primary function of the table is to provide a
means of storing and arranging information of a database. Nevertheless, you can print data of a table, especially if either you do not have appropriate reports available or you are in a hurry. You can print data on a table whether the table is opened or not.
To print a closed table, locate it in the Database Window. Then right-click the desired table and click Print. |
 |
|
Once a table is opened in Datasheet View, on the Table Datasheet toolbar, you can click the Print button. This will send all the records of the table to the printer for printing.
If you want to control the printing process, instead of using the Print button, on the main menu, you can click File -> Print... To print data of all fields on the table, you can click OK. If you want to print only certain records, unfortunately, Microsoft Access does not allow you to select rows at
random: you can only select a range of records. To print a range of records, while a record at one end has focus, you can press and hold Shift. Then click the gray box at the end of the range.
|
 Practical Learning: Printing Tables
|
- To reopen the Payment Methods table, on the Database Window, while in the Tables section, double-click Payment Methods
- To print data from the table, on the Table Datasheet toolbar, click the
Print button

- To close the current table, click its system Close button

- To print the list of the company’s assets, on the Database Window, click the CompanyAssets table to select it (you don't have to open it)
- On the main menu, click File -> Print… (if you are using MS Access
2000, you may need to double-click the File menu to display the whole
list, which includes Print...)
- Make sure a printer is selected in the Name combo box
Click the Properties button
- Based on your printer, select the Landscape radio button (usually in the Orientation section of a Paper tab) and click OK
- On the Print dialog box, click OK
(If you had opened a table, you can close it now)
- Open the Employees table
- To print only the names of employees, click David. Press and hold Shift. Then click Network Administrator
- On the main menu, click File -> Print…
- On the Print dialog box, click the Selected Record(s) radio button and click OK
- After using the table, close it
|


![]() Practical Learning: Using the Table Wizard
Practical Learning: Using the Table Wizard

![]() Practical Learning: Table's Data Entry
Practical Learning: Table's Data Entry
![]() Practical Learning: Printing Tables
Practical Learning: Printing Tables