 |
Queries Fundamentals |
|
The Query Wizard
A query is a request you present to the database, and the database displays its response to you. The whole purpose of creating a query lies on how you formulate that request. There are three main ways you create a query in Microsoft Access:
- The Query Wizard offers the simplest approach where in a step by step process you define the purpose of the query and the database will display its answer
- The best way to build a query is by using the Design View
- Once you get familiar with queries, you will find out that a query is just a group of words called a statement you formulate. This means you can write that statement manually. This approach is the most complex because you need to know the structure of a query statement, but it provides more control than the other two techniques.
The simplest way to create a query is by using the Query Wizard. The wizard presents the tables that are part of the database and you select which fields you need.
Such a query is called a Select Query.
Data used on a query can originate from a table, another query, or a combination of tables and/or queries. The first page of the Simple Query Wizard expects you to choose the origin of the query, starting with the table or the query name. For example, you can use a table of employees, then, you choose the necessary data that you want to filter for your query. You can use this query to retrieve the employees' data by their employee number, their last name, the date they were hired, their salary, their marital status, their E-Mail address, or the city or state they live in.
To use the Query Wizard, on the Database Window, you can click the Queries button and then double-click Create Query By Using Wizard. Alternatively, you can first display the New Query dialog from where you would choose Simple Query Wizard. To display the New Query dialog box:
- On the toolbar of the Database window, while in the Queries section, you can click the New button
- On the main menu, you can click Insert -> Query
- On the Database Toolbar, you can click the arrow of the New Object button and click Query
When building a query in the first page of the Simple Query Wizard , you must first specify the object (a table or another query) that will provide data. Then select items using the same types of buttons we reviewed for the Table Wizard.
 Practical Learning: Creating a Query Using The Wizard
- The Rockville Techno database should still be opened
On the Database Window, click the Queries button
- To create a query, from the Database window, double-click the Create Query By Using Wizard button
(If you are using MS Access 97, click New, click Simple Query Wizard, and click OK)
- From the Tables/Queries combo box, select Table: CompanyAssets
- From the Available Fields list box, double-click AssetType, Make,
Model, DateAcquired, and PurchasePrice
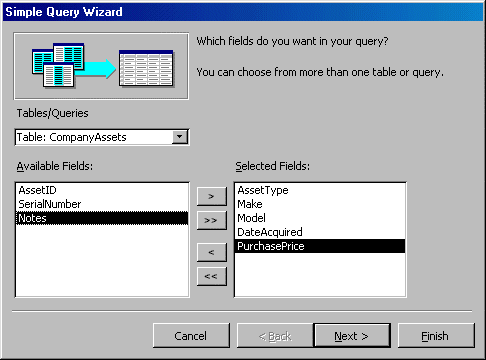
- Click Next twice
- Give the title AssetsInventrory and make sure the Open The Query To View Information radio button is selected
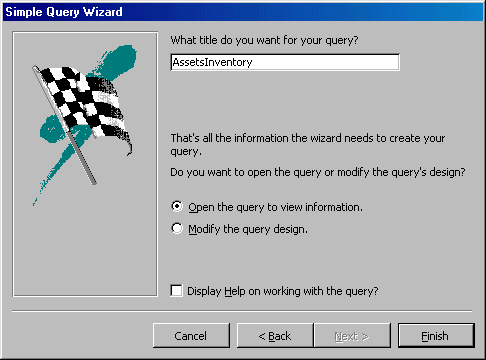
- Click Finish
|

|
A query uses the same approach to present its data, like a table: it is made of columns and rows whose intersections
are cells. Although the main purpose of a query is to prepare data either for analysis or isolate some fields to make them available to other database objects, as done on a table, data can be entered in a query.
|
|
Data entry on a query is the same as done on a table: data is entered into cells. The Enter, Tab and arrow keys are used with the same functionality. Like the table, the query provides navigation buttons on its lower section, allowing you to move to the first, the previous, the next, the last or any record in the range of those available.
|
 Practical Learning: Performing Data Entry on a Query
|
- While the AssetsInventory query is still opened, click the first empty field under the AssetType column
- Type Computer and press Enter
- Complete the query as follows:
|
AssetType |
Make |
Model |
Date Acquired |
Purchase Price |
Notes |
|
Printer |
HP |
LaserJet 4200dtn |
10/08/2002 |
1950.95 |
B/W Printer |
|
Computer |
IBM |
NetVista M42 |
10/08/2002 |
1035.00 |
|
|
Laptop |
Gateway |
200XL |
12/05/2002 |
2095.95 |
Business Notebook |
|
Printer |
Xerox |
Phaser 8200 |
10/22/2002 |
1250.55 |
Color Printer |
|
Digital Camera |
Olympus |
C-50 |
11/06/2002 |
450.75 |
|
|
Computer |
IBM |
ThinkCentre S50 |
10/08/2002 |
1055.55 |
|
|
Computer |
Ctrl + ' |
Ctrl + ' |
10/20/2002 |
1120.55 |
|
|
Ctrl + ' |
Ctrl + ' |
Ctrl + ' |
Ctrl + ' |
Ctrl + ' |
|
- After using the query, close it
- To create a query of selected information of employees, on the main menu, click Insert -> Query
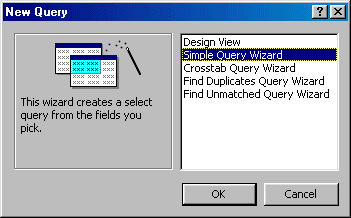
- In the New Query dialog box, click Simple Query Wizard and click OK
- In the first page of the wizard, in the Tables/Queries combo box, select Tables: Employees
- In the list of Available Fields, double-click FirstName, LastName,
Title, and BillingRate
- Click Next twice
- Change the Title of the Query to Employees Pay Information and click Finish
- After viewing the result of the query, close it
|
|
Like tables, queries provide you with a fast means of printing data. Once again, this should be done when you need a printed but not a professional-oriented product. Data printing on a query is done with the exact same approaches and techniques as for a table. |
 |
 Practical Learning: Printing a Query
|
- On the Database Window, while still in the Queries section, double-click the AssetsInventory query
- To print the query, on the main menu, click File -> Print…
- Make sure a printer is selected in the Name combo box and click the Properties button
- Select the Portrait orientation and click OK
- Click OK on the Print dialog box
- To print only a few records, click the gray box on the left side of Laptop
- Press and hold Shift. Then click the gray box on the left side of Digital Camera and click release Shift
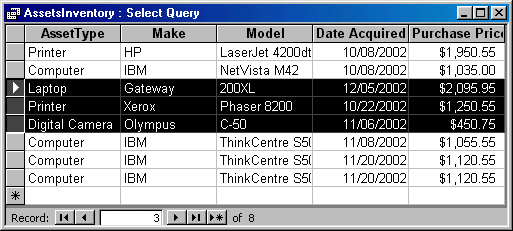
- On the main menu, click File -> Print… and, on the Print dialog box, click Selected Record(s)
- Click OK to print
- After using the query, close it.
MOUS Topics
| S6 |
Print database objects (tables and queries) |
| S7 |
Navigate through records in a table, query, ... |
| S8 |
Create a database (by using a wizard ...) |
| S9 |
Create tables by using the Table Wizard |
| S23 |
Enter records using a datasheet |
Exercises
Tenley Associates
- Start a new database using the Database Wizard and based on the
Expenses sample database
- Name it Tenley Associates
- For the Information About Employees, add Department Name,
Email Name, Home Phone, and Date Hired
- For the Expense Report Information, include the Business Purpose
- Set the Screen Style to Stone
- Set the Printed Reports Style to Corporate
- Set the Database Title to Tenley Associates
- Set the Startup form to None
- From the Tables section of the Database window, open the Expense
Categories table and enter the following expenses:
| Expenses Category ID |
Expenses Category |
Expense Account# |
| 1 |
Office Equipment |
102 |
| 2 |
Car Rental |
104 |
| 3 |
Transportation |
105 |
| 4 |
Customer Entertainment |
108 |
| 5 |
Other |
112 |
- Print all records on the table and close it
- Open the Employees table and fill it up with the following values,
ignoring those not mentioned:
| First Name |
Last Name |
Title |
Home Phone |
| James |
Bidds |
Accountant |
(301) 725-4570 |
| Alexandra |
Roberts |
Sales Manager |
(410) 727-0982 |
| Walter |
Hoaks |
Sales Representative |
(410) 521-2850 |
| Bertine |
Baugh |
Manager |
(301) 912-2129 |
- Close the table
- Using the Simple Query Wizard, create a query based on the Employees
table and include the following fields: FirstName, LastName,
Title, and HomePhone. Save the query as Employees Contact
Information
- Close the query and print all of its records without opening it
- Using the Employees Contact Information query, print only the second
and third records of
employees
- Use the Table Wizard to create a table that includes the following
fields: DepartmentID (from the Assets sample table), DepartmentName
(from the Employees sample table), and Notes (from the Recipes sample
table of the Personal category). Save the table as Departments and
fill it up with the following values
| Department ID |
Department Name |
Notes |
| 1 |
Administration |
Including all personnel from Management |
| 2 |
Sales |
Including all sales representatives and managers |
| 3 |
Accounting |
|
|


![]() Practical Learning: Creating a Query Using The Wizard
Practical Learning: Creating a Query Using The Wizard


![]() Practical Learning: Performing Data Entry on a Query
Practical Learning: Performing Data Entry on a Query
![]() Practical Learning: Printing a Query
Practical Learning: Printing a Query